24
9
8
10
A
3
4
5
7
6
2.
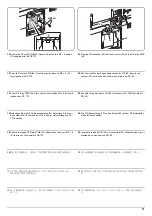
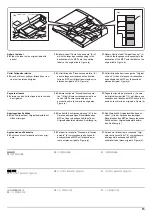
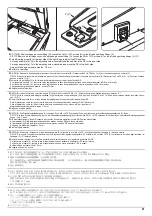
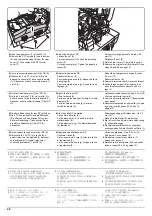
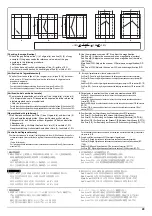
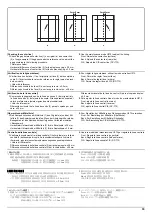
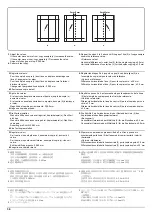
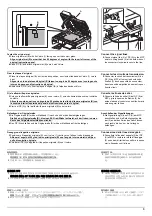
Open the upper cover (3) of the DP (A).
3.
Remove the 3 TP screws (4) and the screw
(5), and remove the strap (6) from the rear
cover (7). Then remove the DP (A) rear
cover (7).
4.
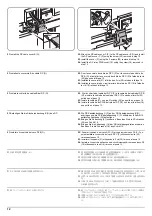
Adjust the height of DP.
Loosen the nut (8).
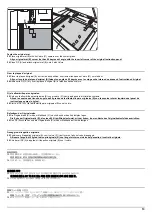
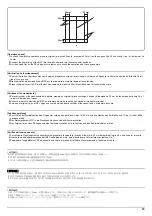
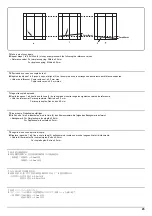
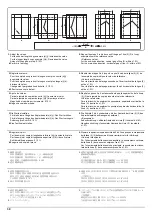
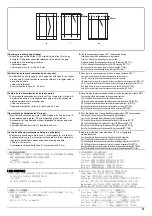
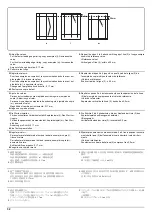
For copy example (f): Loosen the adjusting
screw (9).
For copy example (g): Tighten the adjusting
screw (9).
Amount of change per scale: Approx. 0.5
mm (10)
Retighten the nut (8).
5.
Refit the rear cover (7) removed in step 3.
6.
Remove the original mat (B) and refit it (see
steps 25 and 26 on page 13).
2.
Ouvrir le couvercle supérieur (3) du DP (A)
3.
Déposer les 3 vis TP (4) et la vis (5) puis
déposer la courroie (6) du couvercle arrière
(7). Déposer ensuite le couvercle arrière (7)
du DP (A).
4.
Réglez la hauteur du DP.
Desserrez l’écrou (8).
Pour l’exemple de copie (f): Desserrez la vis
de réglage (9).
Pour l’exemple de copie (g): Serrez la vis de
réglage (9).
Quantité de changement par pas: Environ
0,5 mm (10)
Resserrez l’écrou (8).
5.
Reposer le couvercle arrière (7) déposé à l'étape 3.
6.
Retirez le tapis d’original (B) et remettez-le en
place. (Reportez-vous aux étapes25 et 26 à la
page 13.)
2.
Abra la cubierta superior (3) del DP (A).
3.
Quite los 3 tornillos TP (4) y el tornillo (5) y
quite la correa (6) de la cubierta trasera (7).
Después, quite la cubierta trasera (7) del DP
(A).
4.
Ajuste la altura del DP.
Afloje la tuerca (8).
Para la copia de muestra (f): Afloje el tornillo
de ajuste (9).
Para la copia de muestra (g): Apriete el
tornillo de ajuste (9).
Cantidad de cambio de escala: Aprox. 0,5 mm (10)
Vuelva a apretar la tuerca (8).
5.
Vuelva a colocar la cubierta (7) desmontada
en el paso 3.
6.
Desmonte la plancha de original (B) y vuelva
a colocar (vea los pasos 25 y 26 en la
página 13).
2.
Die obere Abdeckung (3) des DP (A) öffnen.
3.
Die 3 TP-Schrauben (4) und die Schraube
(5) entfernen und den Riemen (6) von der
hinteren Abdeckung (7) abnehmen. Dann
die hintere Abdeckung (7) des DP (A)
abnehmen.
4.
Die Höhe des DP einstellen.
Lösen Sie die Mutter (8).
Für Kopienmuster (f): Lösen Sie die Ein-
stellschraube (9).
Für Kopienmuster (g): Die Einstellschraube
(9) festziehen.
Änderungsbetrag pro Skalenstrich: Ca. 0,5
mm (10)
Ziehen Sie die Mutter (8) wieder fest.
5.
Die in Schritt 3 entfernte hintere Abdeckung
(7) wieder anbringen.
6.
Die Originalmatte (B) abnehmen und wieder
anbringen (siehe Schritte 25und 26 auf Seite 13).
2.
Aprire il pannello superiore (3) del DP (A).
3.
Rimuovere le 3 viti TP (4) e la vite (5), e
quindi rimuovere la cinghietta (6) dal coper-
chio posteriore (7). Quindi rimuovere il
coperchio posteriore (7) del DP (A).
4.
Regolazione dell’altezza del DP
Allentare il dado (8).
Per un esempio di copia (f): Allentare la vite
di regolazione (9).
Per un esempio di copia (g): Stringere la vite
di regolazione (9).
Variazione graduale: Circa 0,5 mm (10)
Stringere di nuovo il dado (8).
5.
Reinserire il coperchio posteriore (7)
rimosso nel passo 3.
6.
Rimuovere il coprioriginale (B) e reinserirlo
(vedere i passi 25 e 26 a pagina 13).
2.
DP(A) の DP 上カバー(3) を開く。
3.
TP ビス (4)3 本とビス (5)1 本を外し、スト
ラップ (6) を後カバー(7) から外して、
DP(A) の後カバー(7) を取り外す。
4.
DP の高さを調整する。
ナット (8) をゆるめる。
コピーサンプル (f) の場合:調整ビス (9) を
ゆるめる。
コピーサンプル (g) の場合:調整ビス (9) を
締める。
1 目盛り当たりの変化量:約 0.5mm(10)
ナット (8) を元通り締める。
5.
手順 3 で取り外した後カバー(7) を元通り
取り付ける。
6.
原稿マット (B) を取り外し、13 ページの手
順 25、26 を参考に再度取り付ける。
2.
打开 DP(A)的上盖板(3)。
3.
拆除 3 颗 TP 螺丝 (4) 和 1 颗螺丝 (5),将塑
料片 (6) 从后盖板 (7) 上拆除,拆下 DP 主机
(A) 的后盖板 (7)。
4.
调整 DP 的高度。
松驰螺母(8)。
复印样张(f)时 :松弛调整螺丝(9)。
复印样张(g)时 :紧固调整螺丝(9)。
每 1 格的移动量 :约 0.5mm(10)
将螺母(8)按原样紧固好。
5.
重新安装在步骤 3 中拆下的后盖板(7)。
6.
拆下原稿垫(B),参照第 13 页的步骤 25 和
26 再次装上。
2.
DP(A) 의 DP 윗 커버 (3) 를 엽니다 .
3.
TP 나사 (4) 3 개와 나사 (5) 1 개를 제거하고
스트랩 (6) 을 뒷면 커버 (7) 에서 제거해
DP(A) 의후면 커버 (7) 를 제거합니다 .
4.
DP 의 높이를 조정합니다 .
너트 (8) 를 느슨하게 합니다 .
샘플 카피 (f) 의 경우:조정나사 (9) 를 느슨
하게 합니다 .
샘플 카피 (g) 의 경우:조정나사 (9) 를 조입
니다 .
1 개 변화량:약 0.5mm(10)
너트 (8) 를 원래대로 조입니다 .
5.
순서 3 에서 제거한 뒷 커버 (7) 를 원래대로
장착합니다 .
6.
원고매트 (B) 를 제거하고 13 페이지 순서
25, 26 을 참고로 다시 부착합니다 .
Summary of Contents for TASKalfa 3010i
Page 10: ...This page is intentionally left blank ...
Page 100: ...2NL 2P8 1 2 76 This page is intentionally left blank ...
Page 286: ...2NL 2P8 1 3 186 This page is intentionally left blank ...
Page 443: ...2NL 2P8 1 5 59 This page is intentionally left blank ...
Page 471: ...2NL 2P8 2 2 8 This page is intentionally left blank ...
Page 532: ...Installation Guide DP 770 B Document processor DP 772 Document processor Installation Guide ...
Page 568: ...DP 773 Document processor Installation Guide ...
Page 594: ...PF 791 500 x 2 Paper feeder Installation Guide ...
Page 602: ...PF 810 3000 sheet deck Installation Guide ...
Page 615: ...DF 791 3000 sheet finisher Installation Guide ...
Page 630: ...DF 770 D 1000 sheet finisher Installation Guide ...
Page 648: ...AK 740 Bridge unit Installation Guide ...
Page 650: ...MT 730 B Mailbox Installation Guide ...
Page 665: ...PH 7A C D Punch unit Installation Guide ...
Page 686: ...DT 730 B Document tray Installation Guide ...
Page 731: ...5 2013 5 302LC56750 01 H F G D D 6 4 3 7 E C D D M4 8 M4 8 M4 8 M4 8 ...
Page 732: ...FAX System W B Installation Guide ...


