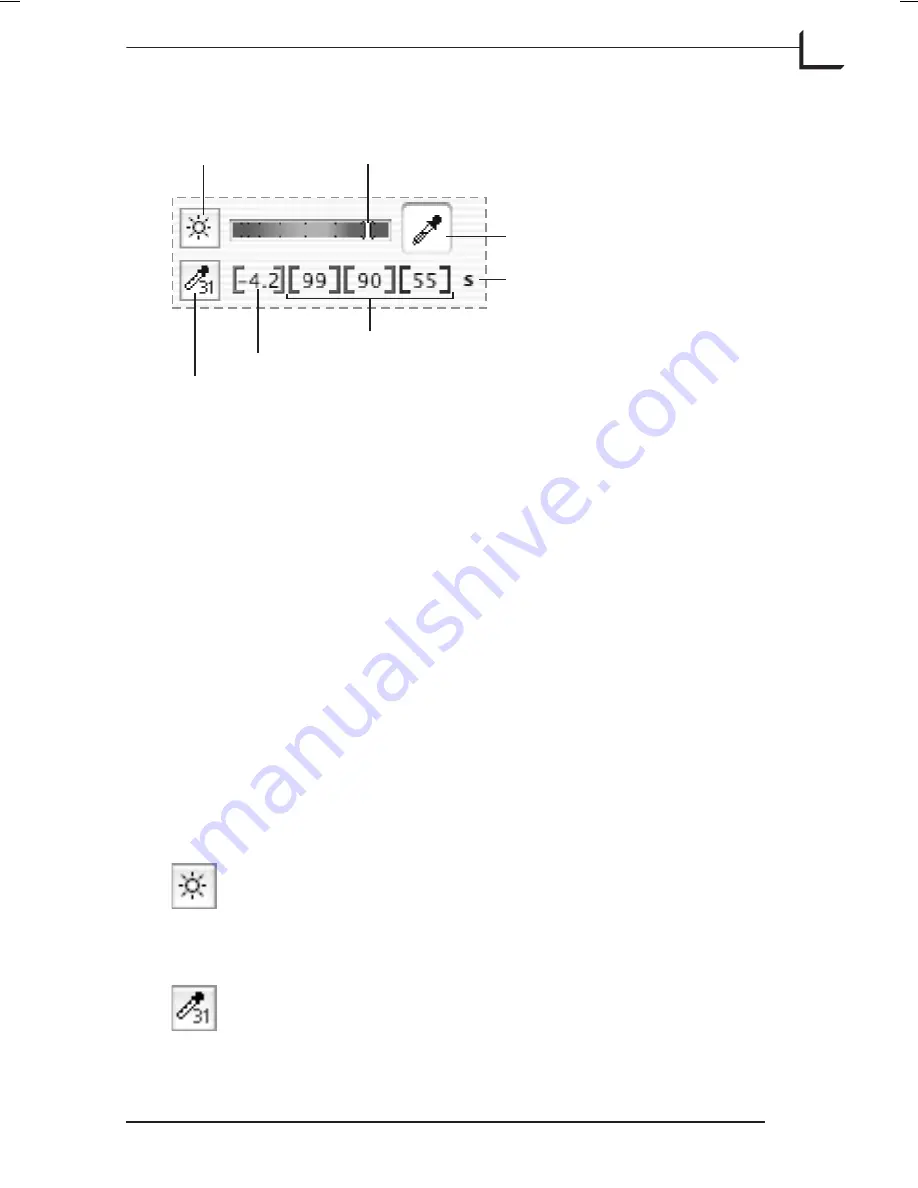
Color and Exposure Analysis Tools
Use the exposure-level indicator to get a rough idea of how bright your
picture is. Ideally, it should be near the top of the green area, but without
entering into the red area, which indicates an overexposure. The indicator
turns yellow to indicate a probably bad exposure and turns white to
indicate a good exposure. Only the part of the image that is inside of your
crop area is measured by this tool, which means that the measurement
will change when you modify the crop area.
The various pixel value displays give you the f-stop and/or color values
for the pixel currently under the mouse pointer in the preview. Use this
tool to evaluate the exposure in particular areas of the captured image.
When you are shooting in RGB mode, then you can read values for each of
the three colors and the f-stop brightness, as shown above. However, if
you are shooting to CMYK, then CMYK pixel values are shown, and no
f-stop value appears. Use the
Color Info
window to read CMYK and
f-stop values simultaneously (see below).
The Neutralize color picker helps you to obtain a neutral color balance in
your image (see “Neutralizing Colors" on page 98 for details).
Next to the information displays are two buttons, which will open
windows that give you even more information and control. These are:
Exposure Button
: Click this button to open the
Exposure
window, which enables you to assess your exposure, set
camera aperture, exposure time and ISO sensitivity, and
make a black calibration. See "The Exposure Window" on
page 79 for more information.
Color Info Button
: Click this button to read pixel values
from several points in the preview image. See "The Color
Info Window" on page 65 for more information.
Software Reference - FlexColor 4.0 for Camera Backs
The Main FlexColor Window
23
Color and Exposure Analysis Tools
Exposure button
Color Info button
Exposure-level indicator
Neutralize color picker
Soft Proof enabled
Red, green and blue pixel values
f-stop pixel value
Summary of Contents for CF DIGITAL CAMERA BACK RANGE
Page 1: ...User Manual Hasselblad CF Digital Camera Back Range ...
Page 32: ...32 Menu structure Items on the main menu ...
Page 68: ...Addendum V2 to User Manuals 2007 H1 H1D H2 H2D H3D 503CWD CFV CF 2007 09 20 V2 ...
Page 74: ...Software Reference FlexColor 4 0 for Camera Backs by Hasselblad Imacon ...
Page 85: ...Software Reference FlexColor 4 0 for Camera Backs Introduction 12 ...
Page 93: ...Software Reference FlexColor 4 0 for Camera Backs FlexColor Menus 20 ...
Page 127: ...Software Reference FlexColor 4 0 for Camera Backs The Preferences Window 54 ...
Page 133: ...Software Reference FlexColor 4 0 for Camera Backs FlexColor ICC Profiles 60 ...
Page 143: ...Software Reference FlexColor 4 0 for Camera Backs The Thumbnails Window 70 ...
Page 155: ...Software Reference FlexColor 4 0 for Camera Backs The Exposure Window 82 ...
Page 159: ...Software Reference FlexColor 4 0 for Camera Backs Active and Reload Buttons 86 ...
Page 165: ...Software Reference FlexColor 4 0 for Camera Backs The Gradations Window 92 ...
Page 177: ...Software Reference FlexColor 4 0 for Camera Backs The Texture Window 104 ...
Page 183: ...Software Reference FlexColor 4 0 for Camera Backs The Live Video Window 110 ...
Page 185: ...Software Reference FlexColor 4 0 for Camera Backs The Tasks Window 112 ...
Page 189: ...Software Reference FlexColor 4 0 for Camera Backs Appendix 116 Keyboard Shortcuts ...


