background image

63    

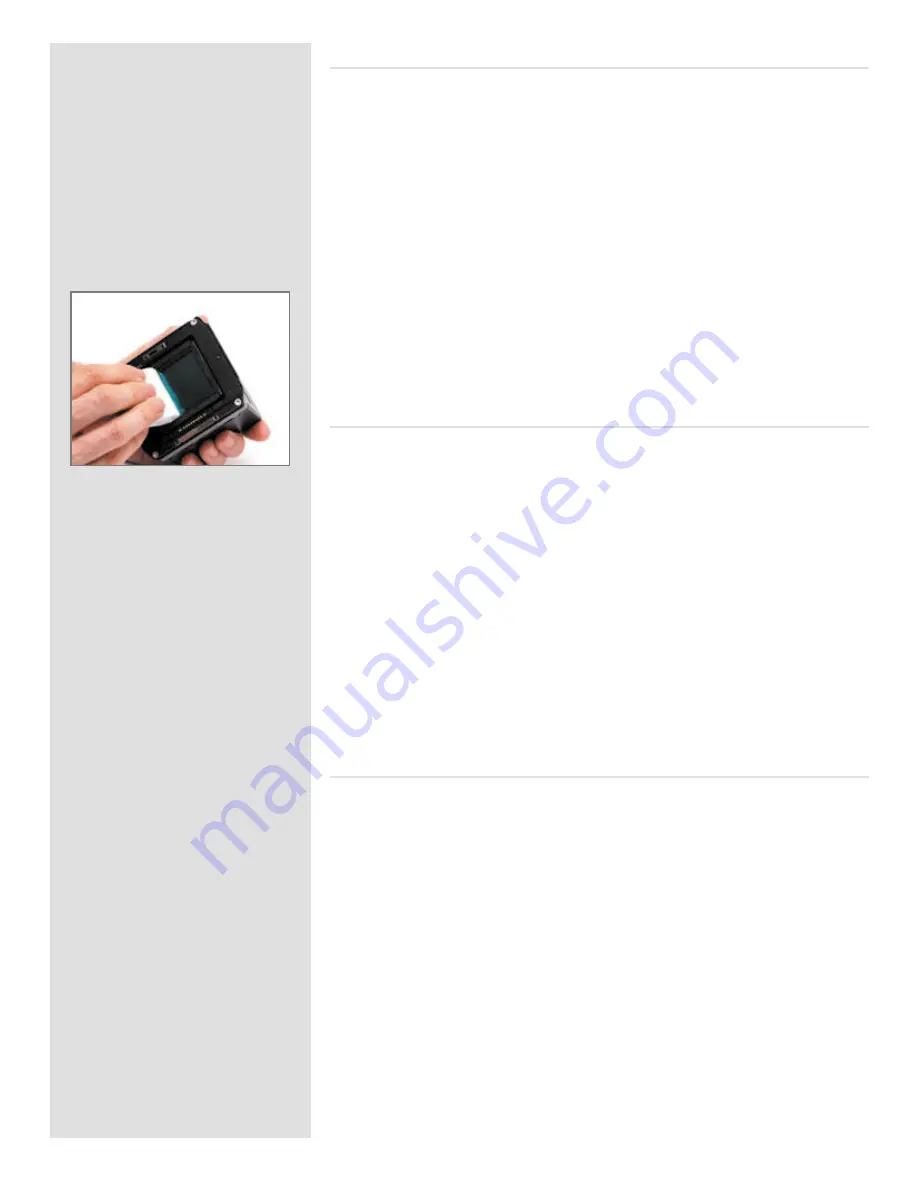
Cleaning using the HAMA Cleaning Fluid and tissues

Note! Hasselblad recommends HAMA Optic Cleaning Fluid 5902. 

1.  Carefully spray the fluid onto the IR filter at a distance of 10-15 cm (4-5 inches), so 

that the fluid is applied onto the filter as a thin, even haze. 1-2 sprays are enough. If 
you apply too little, the fluid will start to dry up before you start wiping the filter. As 
an alternative you can spray the fluid onto the tissue first, and then apply it to the 
filter as you wipe it.

2.  Fold the tissue several times to match the width of the IR filter—you might use two 

or three tissues at a time if necessary (to give you a better grip). Be sure to fold the 
paper so that the coated glossy side faces outwards—do not use the other side, as it 
can do more harm than good! 3. Gently place the folded tissue onto the edge of the 
filter using two or three fingers. Be sure to wipe the entire surface evenly. Sweep the 
filter only once. Do not wipe the same area twice with the same tissue as you might 
reapply dirt removed in the first sweep.

4.  Finally check if the IR filter has been properly cleaned either by visual inspection or 

by mounting the digital back to the camera and making a shot. If further cleaning is 
needed, repeat cleaning procedure.

Cleaning with an E-Wipe

E-wipes are individually packed wet tissues. 

1.  Tear at the notch to break seal.
2.  Remove the e-wipe from its packaging and continue without delay.
3.  Fold the tissue to match the width of the IR filter.
4.  Apply firm pressure using two or three fingers at the edge of the wipe to ensure an 

even, firm contact with filter surface. Wipe the surface in one unbroken motion.

 

Note! Do not use same side of the e-wipe twice as you will be likely to reapply any 
particles removed in the first sweep.

5.  Finally check if the IR filter has been properly cleaned either by visual inspection or 

by mounting the digital back to the camera and making a shot. If further cleaning is 
needed, repeat cleaning procedure.

Cleaning the housings

If the back becomes dirty do not use any other solvents. Clean it with a soft, clean 

cloth lightly moistened with water only. Do not allow water to enter any sockets or  

openings.

Summary of Contents for CF DIGITAL CAMERA BACK RANGE

Page 1: ...User Manual Hasselblad CF Digital Camera Back Range ...

Page 2: ...view of viewing deleting and copying images 24 Basic image browsing 24 Choosing the current batch 24 Browsing by approval status 24 Zooming in and out 24 Zooming in for more detail 25 Thumbnail views 25 Preview modes 26 Histogram 27 Underexposure 27 Even exposure 27 Overexposure 27 Full details 27 Battery saver mode 28 Full screen mode 28 Overexposure indicator 28 Deleting images 29 Transferring i...

Page 3: ...ineenablesyoutoincreasethecolorresolutionofyourcapturesbymeansof a unique multiple exposure technique controlled by the optional Multi Shot Module patent pending The resultisunsurpassedcolorresolutionandabsolutelymoiréfreeimages TheHasselbladCFcanbeupgraded withthe4 Resmoduleatanytime TheHasselbladCFMScomeswiththeMulti ShotModulealreadybuiltin Today s photographers demand higher resolution less no...

Page 4: ...chitecture IAA an enhanced set of feedback tools designed to liberate the photographer to focus on the shoot rather than the selection process IAA triggers audible and visual signals for each image captured notifying the photographer immediately of its classification status The information is recorded both in the file and in the file name providing a quick and easy way to classify andselectimages ...

Page 5: ...complete system requirements In addition to the digital back itself a CF User Manual CD the FlexColor sofware CD and a FlexColor user manual CD the items illustrated below arealsoincluded IfanythingismissingorseemsfaultyinanywaythenyoushouldcontactyourHasselbladdealerimmediately Warnings and restrictions If you want to power the back from a PC laptop as opposed to a Macintosh laptop you must ensur...

Page 6: ...o power down mode 3 If you intend to work with a CF card you must ensure you either have enough capacity on the card for the job in hand or have access to a card reader separate hard disk computer to off load the images 4 Thesensitivity ISO filmspeed ofthesensorcanbealteredaccordingtocircum stances just as you would choose a fast or slow film thereby providing a range of speeds Just as with film t...

Page 7: ...sensor that has 22 or 39 million light sensitive areas on its surface each of which creates a pixel Each pixel in the sensor is filtered to create the three separate red green and blue files Software then processes these electronic files as a package to produce the vari ous formats RAW TIFF JPEG etc Thethreecomponentsoftheimagefilearelaterrecombinedonthecomputerscreen to produce the familiar full ...

Page 8: ...sor area The sensor itself is covered and therefore protected by the glass IR filter but take great care when handling If you need to clean the filter see later section for specific details When storing separated from the camera always ensure you have replaced the protective cover Ifyouscratchormarkthefilterinanyway itwillshowuponeveryshot Replacements are expensive so treat the glass surface with...

Page 9: ...changes according to the current context e g the bottom right button sets the approval rating when browsing images but confirms settings when using the menus Ventilator 1 Ensures the sensor is kept cool OLED preview screen 2 Displays preview images and the menu system even in bright light and from acute angles MENU EXIT button 3 Opens and closes the menu system Also used for vari ous other tasks E...

Page 10: ... a new capture and is not available for new commands Glows steady green when the back is ready Navigation button 7 A four way rocker button enabling you to step through preview images and navigate the menu system To use it press the side of the button that corresponds to what you wish to do e g move up left right or down Zoom out button SELECTION button 8 Zoom out button to make the view smaller f...

Page 11: ...ly have a fully charged reserve battery with you at all times when not tethered to a computer A CF digital back requires power either from the battery 7 2V Sony InfoLithium L type NP F550 for example or from a computer via a FireWire cable To attach a battery 1 Firstly ensure the battery is fully charged see user appropriate manual for battery and charger 2 Remove the protective plate by sliding i...

Page 12: ...smodeistheextraequipmentandcablageneeded that might restrict mobility in some cases 3 Tethered Studio mode This mode enables you to connect your CF digital back directly to a computer and to operate the system using Hasselblad FlexColor software and store images on a computer hard disk Themainadvantageswiththismodearethealmostlimitlessstoragecapacityand being able to work on the images with Hassel...

Page 13: ...ly press the card into the slot If you encounter resistance it might be because you are hold ing the card backwards or upside down When the card is completely inserted swing the cover shut again Removing a card 1 With the CF card cover open press gently on the card removal button 1a and then release it It will now extend out from its original position as in the illustration 1b 2 Press firmly on th...

Page 14: ...rules apply see Connectivity Diagram and related issues for full information about sync cables etc The destination medium and location are controlled from FlexColor The screen and menu system on a CF digital back are disabled A CF digital back will take power from the FireWire cable if it is available please note that not all computers supply power this way notably PC laptops When initiating a sho...

Page 15: ...SBHF DBQBDJUZ 4IPUT UBLFO TIPUT SFNBJOJOH QQSPWBM TUBUVT BOE CSPXTF mMUFS TFUUJOH 2 General Using the menu on a CF digital back is very similar to using a menu on a cell phone or similar When you enter the menu by pressing the MENU button you will be see an initial list ISO White Bal Media Browse Storage Settings It is advisable to initially quickly skim through this section of the manual to build...

Page 16: ...ck to the original factory settings ABOUT Displays serial number and firmware version CAMERA Sets which type of camera body is being used with the digital back DELETE For single or multiple dele tion of images FORMAT Used to format compact flash cards and ImageBank IIs for optimum use BATCH Used to create new storage folders batches and name them DEFAULT APP LEVEL Assigns a default approval status...

Page 17: ...the navigation button or on the EXIT MENU button again When you reach the final destination of your choice this might take several moves PLUS and MINUS symbols ap pear to the right in the frame round the item You then press the Zoom in Zoom out SELECTION but tons to access a loop list of choices In the example on the left 50 is the ISO value shown By pressing either button the alternatives appear ...

Page 18: ...u can easily keep an eye on them as you work Don t forget to regularly attach a battery or make a FireWire connectiontoretainDate Timesettings Seeunder Working digitally for details The description below is a general illustration of how settings are changed See later section in this manual for details regarding ISO and White Balance Language If you have not already done so you may wish to change t...

Page 19: ... images you are able to restrict your delete command so that it affects just a single batch When browsing images you will only see images from the current batch You can change between batches by using the navigation controls of the sensor unit front panel The batch name also shows the date on which it was created using the Year Month Day convention Please note that each new image will be saved in ...

Page 20: ...ted The blue frame around the CF card symbol tells you that captured images will be saved to the CF card and not the FireWire disk This is the CurrentMedium The BATCH list The blue frame around a folder tells you that it is the CurrentBatch You work your way deeper into the menu branching off the selected item framed in blue each time you press the button to view media batch thumbnail view etc Con...

Page 21: ... you see a card that shows 18 5 3 then that card contains a total of 26 images 18 green APPROVED 5 yellow UNCLASSIFIED and 3 red DELETE If more than one medium is listed then use and to highlight the medium you wish to use 3 The currently selected medium shows a blue border 4 Press the zoom in button to zoom in on the currently highlighted medium 5 A list of batches on this medium now appears Each...

Page 22: ... shots YELLOW AMBER for images that need closer inspection RED for images that should probably not be used Please note when the current storage medium is full red status images will be de leted one at a time to make room for new shots You can continue shooting until no red status images remain if you then try to take additional new shots you will get a medium full message Please note the two diffe...

Page 23: ...u still need more images and then finally check the red shots as a last resort Note that the system is very flexible so you can use it in any way that you like For exam ple you can set the camera to assign all new images a yellow or green status regardless of the exposure warning Be careful when assigning red status because red images may be deleted if the current storage medium becomes full Readi...

Page 24: ...heBrowse Filter for a detailed procedure Deleting by approval status There are many ways to delete images including one at a time and multiple delete by batch media and or approval status When deleting several images you first pick the medium or batch from which you want to delete and then use the MAIN MENU STORAGE Delete item to specify the status of the images to delete You can choose to delete ...

Page 25: ...images from the current batch on the current medium To view another batch you must navigate to it by zoom ing out to the batch or media level and then zooming in on the appropriate folder See Navigating Media and Batches for complete details about how to select the current medium and or batch Browsing by approval status It is possible to set the camera to browse only images of one or more specific...

Page 26: ...utton to return to brows ing at the standard zoom level Thumbnail views Preview thumbnails are small versions of each preview sized to fit either four or nine images on the screen at once Use them to get an overview of your work so far and to help find specific shots To see the thumbnails start with the standard preview display and press the zoom out button once to see four thumbnails or twice to ...

Page 27: ... screen preview shows the preview only with no frame or settings information To cycle through the various modes press the view mode button on the front panel The order is circular as listed above Each mode is described in detail in the sub sections below Regardless of the current mode if you zoom in on the image or zoom out to the thumbnails the display reverts to showing the standard preview fram...

Page 28: ...eft or right part of the scale respectively Look at the histogram examples and the explanations below Underexposure A A histogram display that is concentrated on the left with few pixels elsewhere indicates a likely underexposure Many details will be lost in the shadows Even exposure B A histogram display that is spread across the full range indicates a likely good exposure There may still be a fe...

Page 29: ...NU SETTINGS USER INTERFACE DISPLAY Timeout to set a display time out See also Items of the USER INTERFACE Menu and Making Display Settings for details about these settings Full Screen Mode 1 In full screen mode you can browse your images at standard preview resolution without any distracting data surrounding them Because the current approval setting is not shown in full screen mode the approval bu...

Page 30: ...es from the current medium Another way of working is to simply assign unwanted images as Red In this way you retain the option for a while of changing your mind later while allowing the system to automatically delete the unwanted images as the storage medium fills up You will always be asked to confirm each delete operation For complete details about how to use the menu system to delete single or ...

Page 31: ... through the menu items and use the and buttons to change the selected setting See also The Control Panel for button diagrams and descriptions Any given menu may include both items and or sub menus Items are settings that are available at the current menu level they show their currentsettingsnexttotheitemname Tomakeanitemsetting usethenavigator button to select the item and then use the zoom and b...

Page 32: ...32 Menu structure Items on the main menu ...

Page 33: ... session They are therefore placed at the top level of the menu for quick and easy access They are also shown on screen in most preview modes so you can easily keep an eye on them as your work ISO The digital back can be set to use a light sensitivity rating equivalent to ISO 50 100 200 or 400 film Note however that the natural sensitivity of the CCD is ISO 50 so you will get best results with thi...

Page 34: ... 1a Press the MENU button on the digital back 2a Use and to select the White Bal sub menu 3a Use the or button to step through the available choices until the one you want is shown 4a Either move on to another setting by using the navigator but ton or press the MENU button to exit the menu system and keep your setting To make a manual white balance setting 1 Select the MAIN MENU White Bal Manual i...

Page 35: ...s method also enables you to select a batch as you zoom in from media to batch to thumbnails to preview See Navigating Media and Batches for complete details about this method Browse The browse filter complements the instant approval system by enabling you to browse through images according to their approval status You have the following choices All browses all of the images in the current batch r...

Page 36: ...e filter using the menus 1 Select the MAIN MENU Browse item The current setting is displayed here 2 Use the or button to step through the filter options described above until you have selected the filter you wish to use 3 Either move on to another setting by using the navigator but ton or press the menu button to exit the menu system and keep your setting The appearance of the Empty Browse Filter ...

Page 37: ...37 MENU Storage This section describes file storage file transference storage organization file classification and related subjects 6 Navigating the STORAGE settings ...

Page 38: ... Delete all images of a specified approval status e g red from a batch or medium DELETE In this example one image is to be deleted from a batch contain ing nine images To delete a single image 1 From a preview image which is being kept use the button to go to the nine thumbnail in this case view 2 Use the navigator button to select the image you wish to delete When you are viewing thumbnails the s...

Page 39: ...how to find this setting 2 Use to enter the Delete submenu 3 Use the or button to select This image deletes the current image only All Red in batch deletes all red images in the current batch All yellow red in batch deletes all yellow and red images in the current batch All in batch deletes all images in the current batch 4 Press OK to confirm the delete To exit without delete press EXIT Menus for...

Page 40: ... be deleting from all batches stored on that item Notethatbotheachlistedmediumshowsasetofthreecoloured numbers in parentheses to the right of the medium name These indicate the total number of images of each approval status green yellow and red that exist on the medium For example if you see a medium that shows 18 5 3 then the medium contains a total of 26 images 18 green approved 5 yellow unclass...

Page 41: ... Yellow or All 6 Then press to open the delete dialog for your selected status You are now asked to confirm the delete 7 To confirm press the button to change the status to Yes and then press the approve button to execute the delete To cancel press the menu button to exit or press the button to set the status to No and then press the approval button to cancel You now return to the main menu Either...

Page 42: ...erased To format media 1 If you have more than one type of medium connected e g a compact flash card and ImageBank II then start by select ing the medium you wish to format using the Storage item of the main menu see also Selecting the Current Storage Medium 2 Select MAIN MENU STORAGE Format See also Navigating the Menu System for details about how to find this setting 3 Press the to open the Form...

Page 43: ...atch 1 Press the MENU button 2 Press to navigate down and select the Storage dialog Press and then to navigate down and select Batch 3 Press to open the Batch dialog The new batch name will always begin with a three digit number which automatically increments by one with each new batch Following this is five letters which you can assign yourself to help make the batch easier to identify To set the...

Page 44: ...analysis results A typical strategy could be to as sign all shots to yellow and then review all of the shots later and promote only the best ones to green status At the same time you might demote the most doubtful shots to red status See also Using Instant Approval Architecture for complete details about working with the approval system To change the default status assigned to each new image 1 Pre...

Page 45: ...45 Menu Settings There are a number of settings grouped under the general Settings heading which are User Interface Camera About Default 7 Navigating the USER INTERFACE settings ...

Page 46: ...g Instant Approval Architecture This menu item has Volume choose between High Low and Off Key Click choose between On and Off and Exposure Warning choose between On and Off Date Time A CF digital back has an internal clock that keeps track of the date and time This information is used to mark each shot with the date and time at which it was taken It is also used to label batches with the date on w...

Page 47: ...r final choice Proceed as follows 1 Press the menu MENU button to open the menu 2 Use and to select the SETTINGS sub menu 3 Press to open the SETTINGS menu 4 Press to open the USER INTERFACE sub menu 5 Use and to select the required item 6 Press either the or button to make the new settings in the case of Language Power Down and Mark Overex or Press again to access Sound Date Time and Display 7 Pr...

Page 48: ...sec Times of up to 32 seconds can be set If you prefer you can connect the Flash sync input cable between the lens PC socket and a CF digital back which allows you to retain the default setting of 1 8 second while still being able to use exposure times longer than 1 8 second This method also allows the use of the B setting Model setting variations Look in the list below for the camera model you ar...

Page 49: ...h sync input cable should be used All exposures times including the B setting function correctly without having to alter the Exposure Time setting Do not use a winder at rapid sequence setting 500 For use with 500C CM 501C CM and 503 CX CXi CW models Make a 500 setting H Make an H series setting SWC For use with the 903 SWC and 905 SWC models Make an SWC setting PLEASE NOTE Due to the mechanical d...

Page 50: ...ails Initial delay Controls the amount of time required to elapse before the first exposure Delay Controls the amount of time required between each ex posure Count Controls the total number of exposures required Setting CAMERA model and options Proceed as follows 1 Press the menu MENU button to open the menu 2 Use and to select the SETTINGS sub menu 3 Press to open the SETTINGS menu 4 Use and to s...

Page 51: ... 500 EL ELM 500 553 ELX 555 ELD Flash sync input cable 500 C CM 501 C CM 503 CX CXi CW Exposure cable ELX Exposure cable 503 CW H1 H2 Single shot mode only Hasselblad H adapter Hasselblad ELD adapter Hasselblad EL ELM ELX adapter Hasselblad 503 CW adapter Hasselblad ELD adapter Hasselblad CF Hasselblad CF MS Hasselblad camera connectivity diagram ...

Page 52: ...amiya 645 AFD adapter Mamiya 645 Pro adapter Mamiya RZ67 adapter Mamiya RB67 adapter Rollei AF adapter Rollei adapter Contax 645 AF adapter Flash sync input cable Horseman DigiFlex II Fuji GX680 Mamiya 645 AF Mamiya 645 Pro Mamiya RZ67 Mamiya RB67 Rollei 6000 series AF camera Contax 645 AF 3PMMFJ FYQPTVSF DBCMF 3PMMFJ FYQPTVSF DBCMF Hasselblad CF Hasselblad CF MS ...

Page 53: ... shutter with X sync Hasselblad ELD adapter Rollei electronic shutter with lens control Horseman ISS electronic shut ter with lens control Exposure cable ELX Sliding adapter Fixed mount Focusing using ground glass Options for stitching from Linhof Rollei Horseman and Kapture Group Focusing using Hasselblad Flexcolor live video Any view camera accepting Hasselblad mount Any view camera accepting Ha...

Page 54: ...POSURE TIME and CAPTURE SEQUENCE Proceed as follows 1 Press the menu MENU button to open the menu 2 Use and to select the SETTINGS sub menu 3 Press to open the SETTINGS menu 4 Use and to select CAMERA 5 Press to open the CAMERA menu 6 Press either the or button to select PINHOLE 7 Press or to select EXPOSURE TIME 8 Press either or to make an exposure time setting 9 Press to select CAPTURE SEQUENCE...

Page 55: ...each exposure in the sequence 14 Press to select COUNT 15 Press either or to make a COUNT setting This setting controls the number of exposures in the sequence 16 Press OK to confirm all the settings 17 The CF digital back is now ready for sequence start Note that the MENU EXIT button now diplays START instead 18 Press START to set the sequence running 19 Note that the MENU EXIT button now display...

Page 56: ...NU SETTINGS ABOUT See also Navigating the Menu System or details about how to find this setting 2 Press to open the About dialog which shows the serial number and firmware version When you are done reading the information press the menu EXIT button to return to the SETTINGS menu Either move on to another setting by using the navigator button or press the menu EXIT button again to exit the menu sys...

Page 57: ...indicator To set the browse filter To delete images Francis Hills Fashion created using liveBooks www live books com copyright Francis Hills Memorize these quick actions to save time and effort later To help you work faster the digital back provides shortcuts to some of the most commonly used menu commands that do not otherwise have a dedicated button on the front panel These are accessible by pre...

Page 58: ...nt later in production Micro step In this this mode the movements of the sensor can be controlled accurately down to 1 2 pixel movement increments It quadruples the resolution of the image making a total of 16 captures This creates high resolution images of up to 528 MB Micro step images will stand up to even greater enlargement than multi shot images General In both cases it is essential to ensur...

Page 59: ... to protect the electronics in the digital back please ensure you do this correctly a Connect the flash input sync cable from the sync contact PC connector on the lens to the flash sync IN terminal on the back b Connect the flash output sync cable from the flash sync OUT terminal on the back to a regular flash strobe sync cable that is connected to the unit TTL function 503CW only The reflective c...

Page 60: ...00 series cameras depends on whether they are modified or not contact your local Hasselblad Service Center about modification TTL is also possible if the flash strobe unit allows See the appropriate camera manual for further details Please note the difference below unmodified cameras can only use C lenses C CF CFi etc at the C mode setting whereas modified cameras can use C and F type lenses Unmod...

Page 61: ...FC FCM 2003 FCW 201 F 203 FE 205 TCC FCC with C type lenses C mode setting FlexBody ArcBody Any view camera with Hasselblad V system adapter Standardflash strobesynccable Modified and unmodified 2000 FC FCM 2003 FCW 201 F 203 FE 205 TCC FCC with C type lenses C mode setting FlexBody ArcBody Any view camera with Hasselblad V system adapter Flashoutputsynccable Flashinput synccable PORTABLE FLASH te...

Page 62: ...asselblad dealer for assistance Basic cleaning procedure 1 Discharge any static electricity that may have built up on your body by touching the digital back housing 2 Unlock the digital back from the camera according to camera model 3 The top of the digital back will be released while it rests on the magazine retaining hooks and it can be swung away from the camera body 4 Clean the outside surface...

Page 63: ...ssue as you might reapply dirt removed in the first sweep 4 Finally check if the IR filter has been properly cleaned either by visual inspection or by mounting the digital back to the camera and making a shot If further cleaning is needed repeat cleaning procedure Cleaning with an E Wipe E wipes are individually packed wet tissues 1 Tear at the notch to break seal 2 Remove the e wipe from its pack...

Page 64: ...ry before attempting to operate again Never cover the ventilation openings on a CF digital back when in use Never try to remove the glass IR filter from the front of the sensor this will probably ruin the sensor If dust manages to get between the sensor and IR filter please contact your Hasselblad dealer for assistance Avoid frequent and severe temperature changes and be particularly careful in hu...

Page 65: ...thered to Mac or PC Over 1700 22 Mpix on an 80 GByte disk Powered from the camera battery Li Ion 250 captures in 4 hours Included with yes yes yes At least 30 captures per minute Colour display OLED 2 2 16 bit Hasselblad HB RGB full dynamics reproduction dynamics Yes Lossless compressed Hasselblad 3F RAW Mounted on CCD sensor FlexColor supplied Mac OSX PC NT 2000 XP FireWire 800 IEEE1394b 0 45 C 3...

Page 66: ...o took them All text in this manual Victor Hasselblad AB Hasselblad A S All images in this manual Jens Karlsson Hasselblad and David Jeffery Francis Hills www figjamstudios com Victor Hasselblad AB Hasselblad A S assumes no responsibility or liability for any errors or inaccuracies that may appear in this manual Victor Hasselblad AB Hasselblad A S assumes no responsibility or liability for loss or...

Page 67: ...67 Hasselblad A S Hejrevej 30 DK 2400 Copenhagen Denmark Victor Hasselblad AB Box 220 SE 401 23 Göteborg Sweden CF English v 3 item no 80500483 ...

Page 68: ...Addendum V2 to User Manuals 2007 H1 H1D H2 H2D H3D 503CWD CFV CF 2007 09 20 V2 ...

Page 69: ...utton Function list Custom Options All H system cameras Delete last image implemented H digital cameras only Three additions including Customizable Options System Info H3D only In additon new warranty conditions were issued with effect from 1st July 2006 onwards which affects all new products from that date onwards This affects the following user manuals H1 H1D user manual all versions H2 H2D user...

Page 70: ...nfirm press the OK button To cancel press the EXIT button Confirmation will make a copy of all batches and files and store them on the ImageBank II in a newly created folder called CARD0001 for example If you connect the camera to the ImageBank ll again a new folder is automatically created with the name CARD0002 for example and so on 4s The copying dialogue now appears to inform you of progress P...

Page 71: ...vertently pressed in a camera bag for example Extra mirror delay is acti vated either by loading the Standard profile or making a manual change in Custom Option 31 The factory default settings list now includes a 50 ms extra mirror delay Extra mirror delay Camera shake is common with longer hand held exposures leading to a loss of sharpness The normal remedy of using a tripod or support and manual...

Page 72: ... the ISO White Balance setting screen by re assigning the FLASH AF or DRIVE buttons One press of the chosen button will then take you straight to the ISO and White Balance setting screen for immediate last second changes Custom option 32 ADDENDUM to H1 H1D H2 H2D H3D 503CWD CFV CF USER manualS Camera The Camera choice on the menu is now greyed out as it is irrelevant in this configuration System I...

Page 73: ... Warranty claims must be made through the dealer and or company where the product was originally purchased The factory warranty is NOT international and warranty claims cannot be made through other channels This is also valid for equipment purchased outside the country of residence Please note that physical damage to the CCD sensor scratches chipping unauthorized polishing is not covered by factor...

Page 74: ...Software Reference FlexColor 4 0 for Camera Backs by Hasselblad Imacon ...

Page 75: ...or liability for any errors or inaccuracies that may appear in this manual Hasselblad A S assumes no responsibility or liability for loss or damage incurred during or as a result of using Hasselblad software or products Hasselblad Imacon FlexColor Flextight FlexFrame and Ixpress are trademarks of Hasselblad A S Adobe and Adobe Photoshop are trademarks of Adobe Systems Inc Macintosh Mac OS ColorSyn...

Page 76: ... The File Menu 14 The Edit Menu 16 The Modify Menu 17 The View Menu 18 The Maintenance Menu 18 The Window Menu 19 The Main FlexColor Window 21 Introduction 21 Capture and Save Tools 21 Color and Exposure Analysis Tools 23 Corrections Controls 24 Size Controls 24 Zoom Controls 26 Orientation Controls 26 Other Controls 27 Overlay 28 The Preview 28 The Setup Window 29 Introduction 29 The FlexColor Se...

Page 77: ...eneral FlexColor Settings 52 FlexColor ICC Profiles 55 Generic ICC Output Profiles 55 Editing ColorSync Color Profiles 56 The Thumbnails Window 61 Introduction 61 Opening the Thumbnails Window 61 Selecting a Thumbnails Folder 62 Files and Formats 62 Saving Crop and Imaging Settings 62 Using the Thumbnails Window 63 Printing the Thumbnails 69 Ixpress Contents Window 71 Introduction 71 Using the Ixp...

Page 78: ...on 85 The Gradations Window 87 Introduction 87 Using the Sliders 88 Using the Gradations Color Picker 89 Using the Curve 89 Setting the Threshold for Lineart Captures 91 The Histogram Window 93 Introduction 93 The Histogram Display 94 The Histogram Color Pickers 96 Neutralizing Colors 98 Selective Color Correction 99 Introduction 99 Opening the Color Correction Window 99 Using the Color Correction...

Page 79: ...erence FlexColor 4 0 for Camera Backs Table of Contents 6 The Live Video Window 107 Introduction 107 Live Video Window Tools 108 The Tasks Window 111 Background save from 3f 111 Appendix 113 Keyboard Shortcuts 113 ...

Page 80: ...ettings with the Histogram window including color neutralization and control Advanced color control with the Color Correction window Sharpening images with the Texture window Software compatibility The FlexColor software works with the entire range of Ixpress and FlexFrame digital camera backs and all Flextight scanners except for the Flextight 4800 FlexColor under Mac OS and Windows The CD that c...

Page 81: ...ep captures we recommend at least 1 5 GB Ixpress 528C will not function with less than 2 GB Screen resolution of 800 x 600 pixels with true colors 24 bits Mouse or other pointing device FireWire interface or SCSI Interface Minimum available hard disk space of 10 GB Macintosh Minimum Power PC processor Mac OS X ver 10 2 1 or later System RAM 512 MB or more recommended when performing micro step cap...

Page 82: ...d as a FireWire device that is the bus number in the device window will be 9 To be recognized by OS X devices connected to a standard SCSI adapter must be present when booting the Mac A SCSI device connected via a SCSI to FireWire adapter will be recognized when the adapter is plugged in The SCSI device itself must be turned on before connecting the adapter to FireWire or rebooting Software Refere...

Page 83: ...ws in a number of applications and always be able to re create the quality you need all this from the same 3f file Image Archiving Availability Because a 3f file preserves all of the details captured by your scanner or camera it is perfect for archiving Then for each new job you will work with the 3f image in FlexColor and export it to create a new TIFF file in which your settings are applied the ...

Page 84: ... press industry for exchanging meta information in news content including images The standard associates an object with its description within the same file You can embed all kinds of information in your images such as a caption the place you took it the date and even keywords and categories etc In FlexColor you are able to apply a number of IPTC tags to your 3f files See The Info Window on page 6...

Page 85: ...Software Reference FlexColor 4 0 for Camera Backs Introduction 12 ...

Page 86: ...nu Except for the Preferences entry the FlexColor menu functions are standard for all applications Preferences Opens the Preferences window which enables you to make general flash and shutter settings for your current camera model select an application for viewing final images and typing some default information for the 3f files See The Preferences Window on page 47 for more information Software R...

Page 87: ...until the rendering is finished though you can make other types of settings All setting are previewed using the full 16 bit color depth to display results Save Saves the image currently shown in the FlexColor window as a standard TIFF file All current crop mode color and image enhancement settings will be applied to the saved image Close Closes the currently selected window if possible Setup Opens...

Page 88: ... the right of the scanner or camera icon in the list ex 0 5 refers to the Bus no 0 and the SCSI address 5 Get Info Opens an Info window which contains various information about the currently selected image See The Info Window on page 65 for a detailed description Page Setup Print Enables you to print the contents of the Thumbnails window Make sure you have selected the view by clicking on an image...

Page 89: ... a text field then this command removes the text and saves it on a system wide virtual clipboard Copy Saves the selected text on the clipboard without removing it Paste Places a copy of the text on the clipboard at the insertion point Clear Removes all text from the clipboard Select All Selects all of the text contained in the field in which the insertion point is standing In the Thumbnails window...

Page 90: ... place in the background Processing tasks will not be interrupted by new image captures Batch Modify When using the Batch Modify function to add settings from current settings the cropping will be maintained in the added settings If the images in question have different sizes the cropping will be scaled accordingly Neutralization presets You have the ability to save and reuse named neutralization ...

Page 91: ... on your screen Enable this only when you are sure about the specific output device you are using If you are making a general purpose RGB capture then keep this feature unselected A small s to the right of the Color Info area in the main FlexColor window indicates that Soft Proof is enabled The Hide Tools item lets you hide all tool windows The Maintenance Menu The Maintenance menu is not availabl...

Page 92: ...manual Gradations window see page 87 Histogram window see page 93 Color Correction window see page 99 Texture window see page 101 Detail window see page 105 Exposure window see page 79 Thumbnails window see page 61 Color Info window see page 83 Live Video window see page 107 Tasks window see page 111 NOTE The Batch Scan entry is not available when you use FlexColor with a digital camera back Softw...

Page 93: ...Software Reference FlexColor 4 0 for Camera Backs FlexColor Menus 20 ...

Page 94: ...ctions available with FlexColor Capture and Save Tools Capture Captures an image using your current settings A preview of the image will be displayed in the main FlexColor window right away All settings are previewed using the full 16 bit color depth to display results Software Reference FlexColor 4 0 for Camera Backs The Main FlexColor Window 21 Introduction ...

Page 95: ... Window on page 61 for more information Setup Use this pop up menu to choose between any of the currently available setups A small will appear to the right of the menu to indicate when you have made custom changes that affect the setup but have not been saved Type Use this pop up menu to choose the type of capture you want to make preview single shot multi shot or micro step This setting mirrors t...

Page 96: ...g to CMYK then CMYK pixel values are shown and no f stop value appears Use the Color Info window to read CMYK and f stop values simultaneously see below The Neutralize color picker helps you to obtain a neutral color balance in your image see Neutralizing Colors on page 98 for details Next to the information displays are two buttons which will open windows that give you even more information and c...

Page 97: ...s saved with the current setup Size Controls Width The measured width of the output image The units used are set on the General tab of the Setup window See General Tab on page 32 for more information Height The measured height of the output image The units used are set on the General tab of the Setup window See General Tab on page 32 for more information Zoom The level of magnification applied whe...

Page 98: ...u work with the digital camera you will typically know the target output dimensions and resolution If so first enter the dimensions in the Height and Width fields and choose the output resolution from the PPI pop up menu Then click on the lock icon so that it is closed this will lock your height and width settings You are now able to click and drag the crop area to define the composition of your i...

Page 99: ...n page 113 for related keyboard shortcuts Orientation Controls Rotate Buttons If you choose to shoot with the camera back in portrait mode then your subjects will be rotated so that they appears sideways in relation to the FlexColor preview window If this annoys you the use the rotate buttons to rotate the image in 90 steps in either direction Both the preview and the final image will be rotated M...

Page 100: ...er occurs below the overlay button while the overlay is active The slider gives you full control of the overlay image transparency Grid Button Adds a grid over the preview and live video window The grid can be useful for aligning objects in your setup Holding down the option key while clicking the button opens the Grid options window Here you are able to define the number and color of the lines in...

Page 101: ...age 27 will turn the overlay on off The Preview FlexColor has been designed with the philosophy that when creating digital images it is best to judge image quality with your eyes not based on point measurements and color lookup tables This is why we have drawn so much attention to the screen calibration procedure in the tutorial and why we have integrated ICC color profiles to maintain the color a...

Page 102: ...type cmd U or select Setup from the File menu Many of the settings such as sharpness gradation and color correction are available individually through tool buttons in the main FlexColor window All settings you make using the individual tools are also applied to the Setup window and vice versa The Setup window is divided into several tab sheets to help you find the setting you want to make Software...

Page 103: ...d in each setup file Each time you make a capture select the closest setup from the Setup menu define the crop click on the Auto button and you are 98 to 100 of the way to a perfect image capture provided that you have neutralized the colors of your image see Neutralizing Colors on page 98 for details FlexColor is delivered with several generic setups to get you started quickly Use the Setup pop u...

Page 104: ... setup thereby removing it from the Setup pop up menus click on Delete NOTE The generic setups that ship with FlexColor are locked so that you can not accidentally modify rename or delete them If you want to modify a generic setup then select the setup from the Setup pop up menu make modifications then click on New to save your new setup with a new name Software Reference FlexColor 4 0 for Camera ...

Page 105: ... applications cannot read Grayscale creates grayscale images such as black and white photographs Grayscale files are smaller than color files so use this mode if your originals or final publications are in black and white To obtain a grayscale result FlexColor combines information from all three RGB color channels ICC profiles have no effect when you capture images using this mode Grayscale 16 bit...

Page 106: ... capture and applies full processing If you are capturing images of people animals flowing water or other moving objects or if you are capturing from a hand held camera then you must use single shot mode Single shot images are fully rendered and processed so they take slightly longer than previews but the results are of production quality Multi Shot makes four captures one for each color but with ...

Page 107: ...f ISO 50 or 100 If you are using an Ixpress camera back you will be able to select between ISO 200 and 400 as well This setting will also be reflected in the Exposure Window see page 79 Mirror If your original is a mirror image or if you want to create a mirrored image from the original then place a check in this box To keep the image as captured make sure this box is not checked Enhanced shadow d...

Page 108: ...indow available from the Window menu Changes made here in the Setup window will also change the settings in that window and vice versa See The Gradations Window on page 87 for more information about these settings Software Reference FlexColor 4 0 for Camera Backs The Setup Window 35 Contrast Tab ...

Page 109: ...h color channel Normally you should leave them set to 100 each which applies sharpening equally to all channels In some cases you may be able to reduce the effect of noise by applying less sharpening to one channel typically the blue channel You can also use these settings to create special effects Apply Mark this check box to apply the unsharp mask filter to all images Remove the check to disable...

Page 110: ...er overview of all of the color correction settings for the current setup To activate the color correction mark the Apply check box To disable the color correction settings remove the mark from this box Click on the box to toggle the mark To modify the amount of any one color component in the image click on the button next to the target color along the top of the matrix Then use the up and down bu...

Page 111: ...lors Y 0 0 0 0 0 0 Neutral yellow A full explanation on all of the applications of this tool would be complex and beyond the scope of this manual If you would like to know more about color mapping please speak with your printer or consult the electronic prepress section of your local library or book store Software Reference FlexColor 4 0 for Camera Backs The Setup Window 38 CC Color Correction Tab...

Page 112: ...hlight or shadow values to be tighter than the auto function normally chooses then use a positive setting here Positive settings will result in a relative increase in the contrast You are able to set negative values for the Auto settings This will make the automatic controls use less extreme settings for highlight and shadow than normal For example if the Auto for Highlight were set to 2 and you u...

Page 113: ...ak to your printer for advice about how to set these values The values in the three RGB columns control the maximum for highlight or minimum for shadow For RGB color 8 bit values 0 to 255 are shown for each color The Endpoints pop up menu determines how the values for the color columns will be assigned when the input values exceed the defined limits They work as follows Software Reference FlexColo...

Page 114: ... FlexColor is called ColorSyncTM Under Windows ICC technology is referred to as ICM which stands for Image Color Management and the tab for selecting ICC profiles in FlexColor is called ICM The Ixpress digital camera backs and most monitors and output devices include ICC profiles which will help to make sure that the colors in your original are maintained and that colors you see on your screen wil...

Page 115: ...ine help for your operating system For information about Apples ColorSyncTM technology check Apple s web site at http www colorsync apple com and or http www apple com Software Reference FlexColor 4 0 for Camera Backs The Setup Window 42 ColorSync or ICM Tab ...

Page 116: ... default profile simply click the Change button located to the right of the input profile menu This will lead you to the ColorSync Utility application Here you simply select the Devices view which gives you a list of registered devices After selecting your camera or scanner in the list you can either assign a new default profile or switch back to factory default The standard settings installed all...

Page 117: ...represents the color space in which you work If you are using Adobe Photoshop you can choose the space used by Photoshop To see which space is used by Photoshop start Photoshop and choose Edit Color Settings The Color Settings window appears see the Getting Started manual for more information about using this window In this example the RGB working space is the ICC profile Adobe RGB 1998 If you cho...

Page 118: ...ing images in grayscale To do so simply check the required Embed and Convert options and if you have checked Convert you also need to select a grayscale output profile from the menu Please note that you do not need to select a different input profile when in grayscale mode as a suitable grayscale input profile is automatically generated based on the currently selected RGB input profile When select...

Page 119: ... an on screen representation of the colors expected from your output device It combines the output profile with the monitor profile selected for your system to create a simulation of the output colors See the Getting Started manual for instructions on how to set up a monitor profile for you system and for advice about using the Softproof feature Software Reference FlexColor 4 0 for Camera Backs Th...

Page 120: ... not saved with the other settings in the setup files To open the window select Preferences from the FlexColor menu Scanner Tab For scanners only Camera Tab The Camera tab holds the following settings for your current device Model FlexColor must know which kind of camera body you are using so that it can control the camera correctly Choose your camera body from the Software Reference FlexColor 4 0...

Page 121: ...nt for each camera back model The delay is set automatically when you choose a camera body from the Model pop up menu However you must set this manually when you choose the Generic setting NOTE Even when working with a specific camera body you are able to adjust the shutter delay time manually if necessary The value is resettable by clicking the Default button Under normal circumstances you simply...

Page 122: ...be ready to flash again then enter the required minimum charge time in seconds in the Flash delay field Process and store full image when saving Check this if you want to avoid updating the 3f files with the processed info when saving from these In this case processing will only be done for the actual cropped area and your unprocessed 3f file will stay small and unprocessed Software Reference Flex...

Page 123: ...Color with a scanner device Default Info Prior to taking a number of captures where you want to add the same name and copyright information to all of the shots you can type this information in the Byline and Copyright fields Later when opening the Info window for one or more of the captures this information will show up in the corresponding fields here See The Info Window on page 65 for references...

Page 124: ...tead of specifying a specific output profile The standard settings will specify the default output profiles for all color spaces Therefore it s possible to change the specific output profile used by all standard settings simply by selecting another profile in the Output Profiles tab Software Reference FlexColor 4 0 for Camera Backs The Preferences Window 51 Output Profiles Tab ...

Page 125: ...to after new crop checkbox provides an optional shortcut for using the auto function When this checkbox is marked each time you make a new crop FlexColor will immediately analyze the image contained in the crop area and set highlight and shadow values just as if you had clicked on the Auto button You can also control this function by holding down the option key as you define a new crop If the Auto...

Page 126: ...nd Auto Tab on page 39 For more information about cropping see The Main FlexColor Window on page 21 Show units in cm Check this box if you want the Height and Width values in the main FlexColor window to be displayed in cm If this box is not checked the values will be displayed in inches Software Reference FlexColor 4 0 for Camera Backs The Preferences Window 53 General FlexColor Settings ...

Page 127: ...Software Reference FlexColor 4 0 for Camera Backs The Preferences Window 54 ...

Page 128: ...ust have before any black is added at all If you are not sure which profile to use ask your printer if there is a limit on the maximum ink percentage and be sure to choose a profile that limits the percentage appropriately In the majority of cases the Imacon 330 Skel K 75 30 profile will provide the best results Software Reference FlexColor 4 0 for Camera Backs FlexColor ICC Profiles 55 Generic IC...

Page 129: ... of generic output profiles each of which is designed to create good results under a different set of conditions These generic profiles will deliver adequate to excellent results If after testing an output profile and speaking with your service bureau you find that you would like to fine tune an output profile then follow the procedure below The settings available for editing the output profiles a...

Page 130: ...e not able to create a completely different profile using the editor The menu lists all of the profiles currently installed in the ColorSyncTM Profiles folder in the Preferences folder of your System Folder 4 Click on the Edit button The Output Profile window appears 5 We recommend that you save your edited profile using a new name so click on the Save as button Software Reference FlexColor 4 0 fo...

Page 131: ...tput For example if your prints look too yellow in the highlights then you could turn down the Y value for 0 and or 5 values In many cases this is all the level of detail you will need 7 The Dot Gain Compensation setting compensates for the default dot gain setting of the existing profile The setting is relative and can be positive or negative Generally this value varies from printer to printer Fi...

Page 132: ...ore gray levels These settings include the same four levels that you were able to adjust using the standard part of the Output Profile window 10 When you are done making settings in the window click on the Save button to apply the settings to your new profile Software Reference FlexColor 4 0 for Camera Backs FlexColor ICC Profiles 59 Editing ColorSync Color Profiles ...

Page 133: ...Software Reference FlexColor 4 0 for Camera Backs FlexColor ICC Profiles 60 ...

Page 134: ...he Thumbnails window to review your work load images into the main FlexColor window and to save images as standard TIFF files Opening the Thumbnails Window To open the Thumbnails window type cmd 8 or click on the Thumbnails button in the main FlexColor window or select Thumbnails from the Window menu Software Reference FlexColor 4 0 for Camera Backs The Thumbnails Window 61 Introduction ...

Page 135: ...ge enhancement settings in effect when capturing an image will be saved with the 3f file in the current folder If you make new settings with the various tools of FlexColor while a capture is loaded into the main FlexColor window your new settings will not be saved unless you click on Save in the main FlexColor window When you do this FlexColor will create a TIFF file of the current image in which ...

Page 136: ...f you wish to reverse the sorting order click the Descending Ascending button to the right of the pop up Also it is possible to sort the captures by their approval status by checking the and approval checkbox Size Use this pop up menu to choose how large you would like the icons to appear in the Thumbnails window Crop mask button Masks off the area outside the current cropping if any for each imag...

Page 137: ...ollowing values 1 for single shot and the preview shot 4 for multi shot 16 for micro step Software Reference FlexColor 4 0 for Camera Backs The Thumbnails Window 64 Using the Thumbnails Window Progress bar Capture type Image currently previewed Approval mark Image name Crop mask Selected thumbnail highlighted ...

Page 138: ...ious or next image respectively Working with Selected Images The Thumbnails window includes the following controls which operate on the images you have highlighted Please note that if you ctrl click on a thumbnail you will get a contextual menu containing most of the functions described below Get Info Opens the Info window that holds various information about the image such as size resolution expo...

Page 139: ...utton the Batch Save window appears asking if you would like to save using the Individual settings cropping saved with each file or to apply the Current settings cropping as seen in the current preview of the main FlexColor window to all captures Choose either of the settings and then use the Mode pop up menu to select one of the following save options Normal to save the selected images as TIFF fi...

Page 140: ...se a specific saved setup Rename To rename the selected images type a name and the number from which the images should be renumbered Change IPTC info The Byline and Copyright information is only updated if you actually enter new data in these fields For Keywords you have the option of either adding to existing keywords or to replace them with a new list Neutralize captures using Select from your s...

Page 141: ...ify dialog can also be used to modify the currently loaded image With the preview window in front select Batch Modify from the Modify menu This gives you a modify dialog that acts on the shown image only The primary benefit here is that it gives you a very easy way to update the current default setup of an image after making adjustments Approve A capture is approved by selecting it and clicking th...

Page 142: ...iew mode Preview shots are never saved and are not visible in the Thumbnails window Preview shot images are intended only as a fast way of checking your exposure composition and color cast on screen before making a final single shot multi shot or micro step exposure for use in production Printing the Thumbnails You can print the contents of the Thumbnails window Make sure you have selected the vie...

Page 143: ...Software Reference FlexColor 4 0 for Camera Backs The Thumbnails Window 70 ...

Page 144: ...e images in FlexColor they will have to be transferred to your current thumbnails folder Using the Ixpress Contents Window After shooting simply switch on and connect the Image Bank to a computer with a running FlexColor application see the Ixpress User s Guide for details Within a few seconds the Ixpress Contents Window is available with thumbnails ready to load Software Reference FlexColor 4 0 f...

Page 145: ...nails folder will start Double clicking or typing Return will have the same effect Load Transfers the selected shot s to the currently selected Thumbnails folder and saves them as 3F files see Load Images on page 74 for details Update Updates the Ixpress Contents window with new pictures from the Image Bank Approve Approves the selected shot s When a shot is approved a checkmark is applied to the ...

Page 146: ...Searching Using the Search field enables you to filter the Ixpress Contents window contents Simply enter the text you want to search for and type Return and only images containing this text will be shown To return to an unfiltered display simply delete the text from the Search field and type Return Show Transferred Images By default the Ixpress Contents window will only show images that has not be...

Page 147: ...ore control of the image transfer Select the images you want to transfer and click Load A Load Images dialog box appears From the Transfer pop up menu choose whether you want to load All Selection Only or Approved Check the Delete after transfer checkbox if you want the images to be deleted from the Image Bank s harddisk after having loaded them to the computer Check the Change name checkbox if yo...

Page 148: ...and keywords to support an image database Using the Info Window Opening the Info Window From the main FlexColor window when an image is loaded choose Get Info from the File menu or type cmd I The Info window will be displayed From the Thumbnails window you can select one or more thumbnails and use the Get Info button to display an Info window for each of the selected files Software Reference FlexC...

Page 149: ...time used when exposing the image Aperture Aperture setting used when exposing the image This field will only show a value if you are using a camera that allows you to adjust the aperture from your computer otherwise the field will be empty Device Device used to capture the image Use the following fields to enter your own file information Byline Name of photographer The contents if any from the By...

Page 150: ...n menu The history list includes an entry with name date time and file size for each time new settings have been applied to the image and for each TIFF file that has been created from it The buttons below the list have the following functions Show Select an entry and click the button or double click the entry to load the image into the FlexColor preview window The image will be loaded with the exa...

Page 151: ...elected as default The settings of the entry selected as default are also applied to the thumbnails displayed in the Info window and in the Thumbnails window Add Current Adds an entry to the list with the settings of the image currently displayed in the FlexColor preview Software Reference FlexColor 4 0 for Camera Backs The Info Window 78 Using the Info Window ...

Page 152: ...ransmit its readings before the shutter closes To open the Exposure window type cmd 7 or click on the Exposure button in the main FlexColor window or select Exposure from the Window menu Using the Exposure window Judging the exposure The Exposure window provides two tools for judging the exposure of the current capture The Meter in the center of the window indicates the overall brightness of the i...

Page 153: ... then place a checkmark in the Enable camera control check box The camera body that you select in the Preferences window affects the availability and functionality of the Shutter time and Aperture settings here in the Exposure window You must identify your camera body in order for the Exposure window to work correctly See The Preferences Window on page 47 for details about how to set your camera b...

Page 154: ... enables you to select between sensitivities of ISO 50 or 100 If you are using an Ixpress camera back you will be able to select between ISO 200 and 400 as well This setting will also be reflected on the General tab in the Setup window see General Tab on page 32 Custom White Calibration The Custom White calibration can be used to compensate for cast effects introduced by wide angle lenses or tilt ...

Page 155: ...Software Reference FlexColor 4 0 for Camera Backs The Exposure Window 82 ...

Page 156: ...window indicate the pixel brightness at the selected position in the image Note the following When showing RGB the values indicate pixel brightness values 0 255 with white 255 255 255 When showing CMYK the output values indicate ink percentage values 0 100 with white 0 0 0 0 However input values are still shown in RGB as described above The f value indicates the f stop brightness of the pixel incl...

Page 157: ...e to place the point A numbered diamond will then appear on the preview image at the point you select You can work with the sample points as follows To move an existing sample point activate the sample point picker by clicking on the Sample Point button to make it grey then click and drag on the target point To delete an existing sample point activate the sample point picker click once on the targ...

Page 158: ...d setup The button has a small triangle on it indicating that if you click and hold down on the button a menu will popup This menu enables you to save and load presets for the tool that the button is associated with The tool reload menus have at least one factory preset named Default You can use this to obtain neutral settings for each tool simply option click the Reload button to load the default...

Page 159: ...Software Reference FlexColor 4 0 for Camera Backs Active and Reload Buttons 86 ...

Page 160: ...using the settings and inspect them closely Take notes on the kind of settings you use and make a comparative proof print To open the Gradations window type cmd 1 or click on the Gradation button in the Correction area of the main FlexColor window or select Gradations from the Window menu The Gradations window includes sliders for Contrast Brightness Gamma and Shadow depth It also includes a grada...

Page 161: ...rol is easy to use but is less precise than using the curve Gamma The gamma setting applies a predefined gradation curve However unlike the standard gradation curve the gamma setting is strictly controlled so it enables you to use a color management program that is calibrated to the camera back at a given gamma setting The default is 2 2 If you raise the gamma setting then the image will become li...

Page 162: ...er each color channel You can hide or show the curve by clicking on the small triangle beneath the Shadow depth slider To adjust the curve click and drag on the graph Each time you click on a new point you will create a gravity point which will pull the curve toward itself This system makes sure that the curve is always smooth The preview image will update to reflect your changes Here are some gui...

Page 163: ...ation curve to RGB All of the settings made to the gradation curve are saved with the setup just as all of the settings shown in the Setup window See Managing Setups on page 30 for instructions about how to select load and save setups To neutralize all settings in all color channels of the gradation curve and sliders click on the Reset button None of your other FlexColor settings will be affected ...

Page 164: ...rtical line You can move this line left or right to adjust the input level at which the threshold is applied Click and drag on the line to adjust the threshold level to the right which will cause more pixels to go to black or the left which will cause more pixels to go to white Software Reference FlexColor 4 0 for Camera Backs The Gradations Window 91 Setting the Threshold for Lineart Captures Mor...

Page 165: ...Software Reference FlexColor 4 0 for Camera Backs The Gradations Window 92 ...

Page 166: ...he Dot tab sheet of the Setup window see Dot Tab on page 40 for details You must take care when using these settings as they can have a powerful effect on your images Take some time to experiment with them Look at the preview to see how these settings will effect the image Save some images after using these controls and inspect them closely Take notes on the kind of settings you use and make a com...

Page 167: ...t pixels with a value of 255 white are shown on the right Color Pickers These enable you to click on pixels in your image to set highlight shadow and neutral points See The Histogram Color Pickers on page 96 for more information about using them Software Reference FlexColor 4 0 for Camera Backs The Histogram Window 94 The Histogram Display Shadow color picker Show Output Histogram button Neutraliz...

Page 168: ...n the RGB histogram you will get an illustration of the areas in the image that are cut off by the current slider setting Buttons Show Output Histogram Button Click this button enabled when grey to display the histogram as it appears after the highlight and shadow values are applied Disable it to work while viewing the histogram of the image before these settings are applied Auto Button Click on t...

Page 169: ...istogram Color Pickers The histogram color pickers enable you to point at any pixel in your preview image and assign the highlight neutralize or shadow point based on the value of that pixel Both the highlight and shadow color pickers will affect the brightness and contrast in your image by choosing the tonal range Software Reference FlexColor 4 0 for Camera Backs The Histogram Window 96 The Histo...

Page 170: ...r click on the Detail button in the Zoom area of the main FlexColor window To use the magnifier function of the Detail window push the Magnifier button Note that the pixel selector is out lined at the center of the window 4 Place the tip of the eyedropper over an appropriate pixel in the preview image When selecting a highlight point select an object in the image that you would like to have print ...

Page 171: ...eas to be sure you have not hidden any details in these areas You can undo your settings by selecting Edit Undo or pressing cmd z on your keyboard Neutralizing Colors Working with digital photography is somewhat different from using conventional film To obtain a neutral color balance in your image you will have to perform a neutralization of the image To achieve the correct neutralization it is ad...

Page 172: ...tive Color Correction 1 Open the Color Correction window by selecting Color Correction from the Window menu or clicking on the Color Correction button in the main FlexColor window 2 Click on the upper square area to the right in the Color Correction window to activate the color correction color picker 3 Click on the color in the preview image that you would like to change The color will immediatel...

Page 173: ...will have on the color you selected in the preview Continue to adjust the settings until you are satisfied with the color shown in this box The functionalities of the Active and Reload buttons are described in details on page 85 You can also view and edit settings made in the Color Correction window by looking at the CC tab in the Setup window The color correction settings are saved and loaded tog...

Page 174: ...rst in the dark areas of the image FlexTouch Filter For scanner use only Preview Preview your settings using the Detail window When using the Unsharp Mask filter it is recommended to use at least two detail previews so that you can compare the sharpening effect in two different areas of your image use one to check for enough sharpness in the bright or midtone areas and another to check for noise r...

Page 175: ...hen the Active button is enabled the filter will not only be applied to your preview image and final image but also to any detail images in the Detail window Amount Controls the strength of the sharpening effect The higher the value the stronger the sharp lines will become Depending on your image a value between 80 and 200 is recommended Dark limit Sets the brightness level below which the filter ...

Page 176: ...e the sharpening effect will be The setting you choose will depend on the contents of your image and the resolution you are using Generally use a large radius with high resolution images Use a smaller radius for lower resolutions images Reset button Returns the filter to its default settings Amount 0 Dark limit 10 Grain limit 0 and Radius 1 None of your other FlexColor setting will be affected It ...

Page 177: ...Software Reference FlexColor 4 0 for Camera Backs The Texture Window 104 ...

Page 178: ...rrection tools in different areas of your preview image The detail views also enables inspection of the final image quality immediately after capture even though the image has not yet been processed The view to the left can be used either as a detail view or as a magnification view enabling you to read color values for a specific pixel in your image Software Reference FlexColor 4 0 for Camera Back...

Page 179: ...from where you want the detail click it once and the detail image will be created in your currently selected detail view To make comparison between different settings you can lock individual views by clicking the Detail View Lock icon which will prevent the view from being updated when settings are changed To use the left view as a magnification view click the Magnification button below the view T...

Page 180: ...This allows for focusing solutions for view cameras and other cameras without a ground glass To open the Live Video window type cmd L or select Live Video from the Window menu NOTE On certain cameras you must set the shutter in B position before using the Live Video mode Software Reference FlexColor 4 0 for Camera Backs The Live Video Window 107 Introduction ...

Page 181: ...window to select the spot where focus is measured Neutralize Picker Enables you to neutralize the image see Neutralizing Colors on page 98 for details Click on the Neutralize Picker button which will turn grey when it is activated Select an object in the overview image that should be a neutral gray color Please note that you can undo a neutralization setting by selecting Edit Undo or pressing cmd ...

Page 182: ...rlay is active The slider gives you full control of the overlay image transparency Grid button Makes a grid over the overview The grid can be useful for aligning objects in your setup Audio Feedback Turn on audio feedback corresponding to the focus meter Aperture Some camera bodies allow you to adjust the aperture from your computer If you are using one of these bodies then the Aperture setting co...

Page 183: ...Software Reference FlexColor 4 0 for Camera Backs The Live Video Window 110 ...

Page 184: ...t by selecting them and clicking the Remove button Likewise active tasks can be cancelled by selecting them and clicking the Stop button If you re saving from an unprocessed camera image the necessary processing will also take place in the background Please note the option in the camera preferences that allows you to avoid updating the 3f files with the processed info when saving from these In thi...

Page 185: ...Software Reference FlexColor 4 0 for Camera Backs The Tasks Window 112 ...

Page 186: ...ts all of the icons in the window Cmd click Selects several images Shift click Selects a consecutive row of images Cmd I Opens an Info window for the currently selected image s a Toggles the approval status of the selected image s on off Approved pictures are marked by a checkmark in the lower left corner del Deletes the currently selected image s from your hard disk You will be asked to confirm t...

Page 187: ...tions for example a crop area modification or a change in the Setup window You are able to step back through a long series of actions Cmd R Reapplies the last action that you cancelled using the Cmd Z command Cmd X If you have selected some text in a text field then this command removes the text and saves it on a system wide virtual clipboard Cmd C Saves the selected text on the clipboard without ...

Page 188: ...tion window Cmd 4 Opens closes the Texture window Cmd 5 Opens closes the Detail window Cmd 7 Opens closes the Exposure window Cmd 8 Opens closes the Thumbnails window Cmd 9 Opens closes the Color Info window Cmd L Opens closes the Live Video window Software Reference FlexColor 4 0 for Camera Backs Appendix 115 Keyboard Shortcuts ...

Page 189: ...Software Reference FlexColor 4 0 for Camera Backs Appendix 116 Keyboard Shortcuts ...

Page 190: ...FlexColor 4 5 Documentation Addendum ...

Page 191: ...Changes Applied 15 Modifying the Current Preview 16 Midtone Slider in the Gradation Window 16 Using the Midtone Slider 16 Effects on Older 3F images 17 Keyboard Shortcuts 17 Part 2 FlexColor for Cameras 18 Most Important Changes for Camera Users 18 Processed Images Are No Longer Saved in Camera 3F Files 18 3F File Compatibility Issues for Camera Shots 19 New Color Handling for Camera Captures 19 N...

Page 192: ...File Size Options 32 Using a Batch Feeder 32 Reading the 3F Scan Log 33 Preventive Maintenance for Scanners 33 FlexColor 4 5 Documentation Addendum 3 ...

Page 193: ...ture this means that users that switch between scanning and digital photography only need to learn one program However because many users stick to one type of capture scan or camera this addendum is divided into three main parts Part 1 For All FlexColor Users Describes the new features that affect both camera and scanner users Part 2 FlexColor for Cameras Describes the new features that affect cam...

Page 194: ...camera users that are already familiar with FlexColor 4 0 New Support for Instant Approval Architecture FlexColor 4 5 now provides full support for the Instant Approval Architecture IAA system introduced with the latest Hasselblad digital cameras and Ixpress digital camera backs Using this system you are able to assign one of three approval levels green yellow or red to each image Consequently Fle...

Page 195: ...d other changes in the color handling system for camera images you need to make some extra adjustments when you open camera 3F files made with older versions of FlexColor see also New Color Handling for Camera Captures on page 19 scanner images however are not affected unless you change the color profile from an old setup to use the new profile The Gamma setting from the Contrast tab of the Setup ...

Page 196: ...t older Ixpress camera backs do not provide this feature 4 Approval levels are clearly shown for each image in the FlexColor Thumbnails window where they can also be used for filtering and or sorting When you are reviewing your images consider the approval level of each and adjust it as necessary In the future the approval levels will help guide you and others to the best images 5 When you begin w...

Page 197: ...ction when you are working away from your camera See your camera back manual for details Approval Settings in the Thumbnails Window Each of the thumbnails displays each image as though it were mounted as a slide In the virtual mounting area you can read various types of information about each image including the image name and approval The approval setting is shown in the upper left corner for eac...

Page 198: ...ers Figure 2 Examples of reading and reading the approval filter in the thumbnails window Use the Sort by pop up menu to sort the thumbnails either by date or by name You can further sort the images by approval rating by marking the and approval check box When sorting by approval all green images are shown on top then yellow and finally red within a given approval rating the images are sorted acco...

Page 199: ...n several ways since FlexColor 4 0 See Importing Camera Images on page 22 for details including how to apply settings by approval rating Import by Approval Rating The Import function enables you to load images from your digital camera or from a folder after you have been shooting while not connected to your computer When you do this you can filter the import by approval rating for example you migh...

Page 200: ... the letter d Click on the Detail button in the Zoom area of the main FlexColor window Select Detail from the Window menu When you first open the Detail window it contains a single pane which is shown with a black border to indicate that that pane is active While the pane is active try to move your mouse cursor over the preview window the cursor is now replaced with a box that indicates the area o...

Page 201: ...nges to show the color picker type when you hold down the alt option key Note also that you cannot use color pickers in locked panes after you change image settings this is because the image in the locked pane is no longer current To lock a pane in the Detail window click on the lock icon below the pane you wish to lock so that it shows a closed lock icon While the pane is locked you cannot activa...

Page 202: ... 5 Working with multiple panes in the Detail window Note the before after affect you can get by loading identical images into two panes using alt click then locking one pane before making settings When several panes are present you have a few more options The pane showing a black border is currently active This is the pane that will update if you click on the preview Click on a pane to make it act...

Page 203: ... even locked panes will update to match the current level if you change it Modifying Images in the Thumbnail Window The FlexColor 4 0 user manual described how to use the Modify command of the Thumbnail window to apply setup and other changes to several images without opening them in the preview This functionality remains essentially unchanged in FlexColor 4 5 but has been expanded to enable you t...

Page 204: ...ages to apply your modifications to all of the images that were shown in the Thumbnails window when you opened the Modify window Note that the number of images that will be affected as a result of your scope settings in both the Thumbnails and Modify window is shown to the right of the scope pop up menu Check this to make sure that you will get the scope you are expecting Setting the Scope of Chan...

Page 205: ...B graph of the Histogram window When you move the slider you are adjusting the gamma curve for the image which lightens or darkens the midtones without affecting the highlight or shadow points The effect is similar to using the curve on the Gradation window except that the shape of the gamma curve is strictly defined at each value making it practical to use together with color management The defau...

Page 206: ...our old color profiles will work fine so you do not need to do anything special when opening an old file However for camera images you must use the new profiles which expect a midtone setting of 1 0 rather than the previous default equivalent of 1 2 You must therefore either update the 3F file to use one of the setups included with FlexColor 4 5 or change your existing setup to use the new camera ...

Page 207: ... and enabled FlexColor to provide 1 1 pixel zoom in the preview window However this came at the cost of larger 3F files and added complexity in the 3F workflow We have therefore decided to stop storing processed images with the 3F files You should ignore all references to this feature in the FlexColor 4 0 User s Guide When you open an older camera generated 3F file that includes a processed image ...

Page 208: ...atically be updated to the new format However if you then switch back to FlexColor 4 0 the preview will look too dark you can fix this by using the neutralization picker in FlexColor 4 0 to re neutralize the preview If you then move the same image back to FlexColor 4 5 again you will see the opposite effect the preview will be too bright In this case update the preview by holding down the alt and ...

Page 209: ...alance for camera captures is now established as a set of parameters in the setup rather than being defined globally in the 3F file as they were previously where they were also device dependent When using a camera or opening a 3F file created by a camera the FlexColor window now includes a set of presets and a set sliders for fine tuning the presets A new exposure correction slider is also provide...

Page 210: ...oaded the control bar on the left side of the preview window shows four controls for working with the white balance and exposure correction values Your settings will be saved with the file when opening camera images the values shown are those set when the image was taken regardless of whether you shot them tethered or untethered from your computer but you can change them at any time and save them ...

Page 211: ... and tint based on an analysis of the current photo The resulting values will be slightly different for each picture This function works best with photos that contain a full range of tints without a heavy intentional cast Factory presets below the Auto entry is a set of several presets named to match typical lighting situations These match the selections offered by Ixpress camera backs when shooti...

Page 212: ...you prefer e g using a CF card reader rather than connecting the camera You must then use the Import window in FlexColor to convert the images to 3F Using the Import Window To import your raw camera shots regardless of which raw format they use do the following 1 Do one of the following Connect your camera or Image Bank to your computer Often the Import window will open automatically depending on ...

Page 213: ...Thumbnails window The following buttons and controls are provided Location this pop up menu located at the top of the window enables you to select the folder from which you will import The menu lists your most recently used folders and enables you to add or remove favorite locations that you use often Select Choose Location to open a browse window with which to navigate to and select a new folder ...

Page 214: ...ages that include the text you enter will be shown Hidden images will not be imported Sort controls Use the Sort by pop up menu to chose to sort by either date or name Use the button next to the window to control whether the images should sort by ascending or descending values Mark the and approval check box to further sort by approval level with the other sort settings acting as secondary criteri...

Page 215: ... settings not already set by your camera Change name to change the file name during import mark this check box and enter the name you wish to use in the field provided All of the imported images will use this name plus a unique number taken either from the number assigned by the camera or starting with the number you enter in the Renumber from field Renumber from to change the numbering from that ...

Page 216: ...ontrast and the sensitivity drops by about one third of an f stop Therefore if you want to use reproduction mode we advise that you capture with it already turned on rather than capturing in normal mode and then switching during postproduction It is possible to switch later but you will have less control over highlight exposure and might risk a loss of detail in these areas Note that when you use ...

Page 217: ...Part 2 FlexColor for Cameras Using Reproduction Mode Figure 7 Effects of reproduction mode when shooting flat artwork Note the shift in the histogram FlexColor 4 5 Documentation Addendum 28 ...

Page 218: ...canning images to 3F files is approximately the same in FlexColor 4 5 as it was in FlexColor 4 0 However the feature has been revised and expanded somewhat See the FlexColor 4 0 User s Guide for a general discussion about using 3F but refer to the sub sections below for details about the various settings available in the new Scan 3F window Opening the Scan 3F Window To scan to 3F you must use the ...

Page 219: ... Each scan will then produce both a 3F file for your archive plus a TIFF file in which the default setup plus optional auto crop and or auto level settings have been permanently applied The TIFF files will be saved in a sub folder automatically created below the destination or job folder established above To enable this auto export feature mark the Save final TIFF s check box Choosing Setups Use t...

Page 220: ...rop the image accordingly If you would like to crop slightly inside or outside of this then use the Bleed field to control how far to modify the crop in mm on the original surface Use a negative bleed to make the crop smaller positive values make it bigger This results in a full sized 3F file in which a crop is already defined for export o Current Crop uses the crop size and position currently set...

Page 221: ...ve to the controls above you can instead set your scans to fit to a specific output size To use this option mark this check box and then specify your output size using the height and width fields provided next to the check box Output PPI Set this to the output resolution you would like to define for the file Depending on your other settings this may or may not affect the size of your 3F file For e...

Page 222: ...n Log from the FlexColor menu bar Figure 8 Features of the 3F Scan Log window Preventive Maintenance for Scanners To ensure that Flextight scanners continue to provide maximum quality scans their mechanical components must be adjusted every year every 25 000 standard scans or every 15 000 batch fed scans which ever comes first To help remind you of when it is time to return your scanner for preven...

Page 223: ...r only when your time is running out When the indicator is in the yellow area a notice is shown When it is in the red area a warning is shown Last service date this is the date on which the scanner was last serviced Scans without feeder this is the number of standard scans that you have taken since the last service Scans with feeder this is the number of scans that you have taken using the Batch F...

Reviews: