


8062A
Instruction Manual
2-4
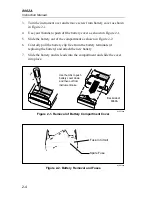
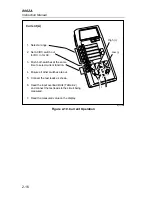
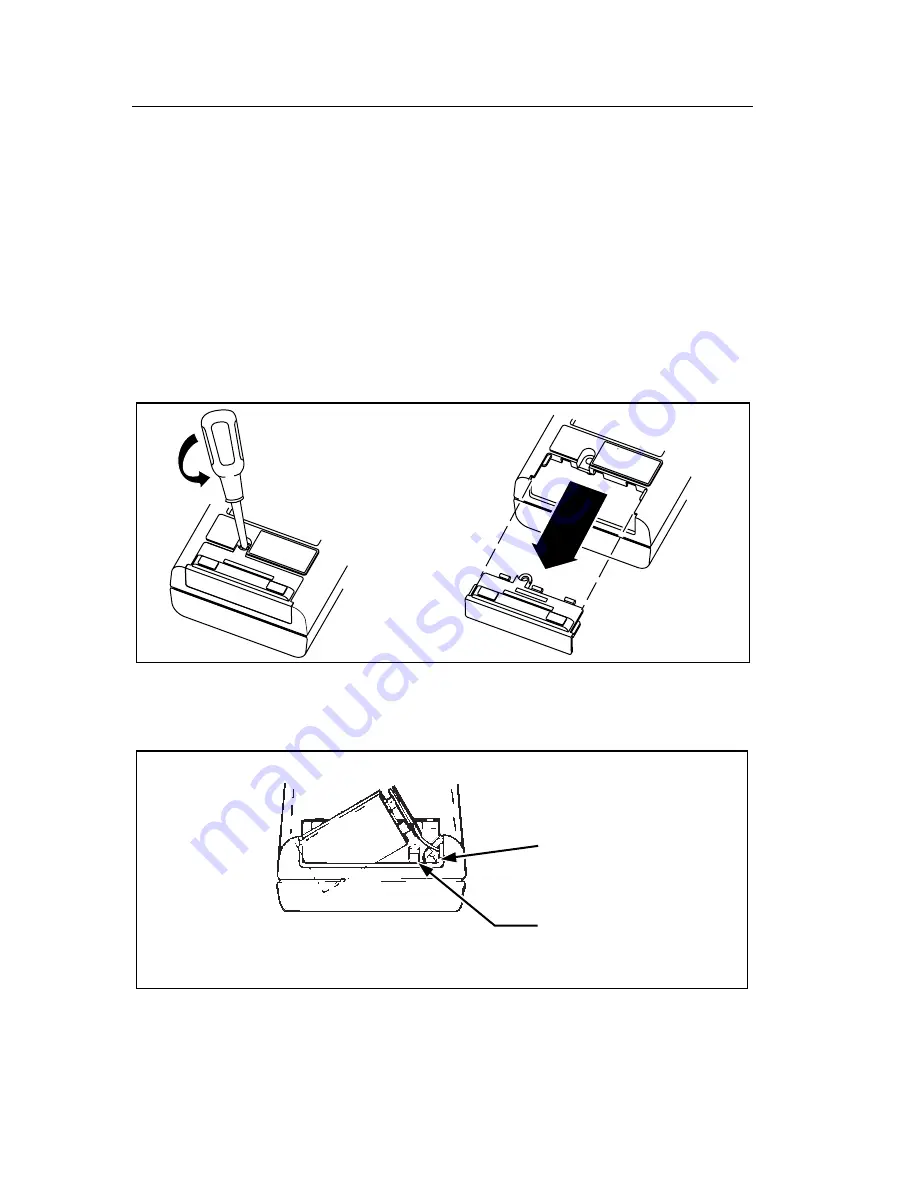
3.
Turn the instrument over and remove screw from battery cover as shown
in Figure 2-1.
4.
Use your thumbs to push off the battery cover as shown in Figure 2-1.
5.
Slide the battery out of the compartment as shown in Figure 2-2.
6.
Carefully pull the battery clip free from the battery terminals (if
replacing the battery) and attach the new battery.
7.
Slide the battery and its leads into the compartment and slide the cover
into place.
WARNING
TO AVOID SHOCK REMOVE
INPUTS BEFORE OPENING
CLOSE COVER BEFORE USE
WARNING
TO AVOID SHOCK REMOVE
INPUTS BEFORE OPENING
CLOSE COVER BEFORE USE
Backside of
8060A
Use thumbs to push
battery cover down
and then out from
instrument case.
dy03f.eps
Figure 2-1. Removal of Battery Compartment Cover
Fuse in Circuit
Spare Fuse
dy04f.eps
Figure 2-2. Battery Removal and Fuses
Summary of Contents for 8062A
Page 4: ......
Page 8: ...8062A Instruction Manual iv...
Page 10: ...8062A Instruction Manual vi...
Page 14: ...8062A Instruction Manual 1 2...
Page 24: ...8062A Instruction Manual 2 2...
Page 50: ...8062A Instruction Manual 2 28...
Page 52: ...8062A Instruction Manual 3 2...
Page 62: ...8062A Instruction Manual 3 12...
Page 64: ...8062A Instruction Manual 4 2...
Page 90: ...8062A Instruction Manual 4 28...
Page 92: ...8062A Instruction Manual 5 2...
Page 102: ...8062A Instruction Manual 5 12 8062A 4031 iv39c eps Figure 5 2 A1 Main PCB Assembly...
Page 106: ...8062A Instruction Manual 6 2...
Page 108: ...8062A Instruction Manual 6 4 dy55c eps Figure 6 1 Accessories...
Page 118: ...8062A Instruction Manual 7 2...
Page 122: ...8062A Instruction Manual 7 6...
Page 123: ...8062A Instruction Manual 7 7 8062A 1201 iu46c eps Figure 7 5 A1 Main PCB Schmatic Diagram...
Page 124: ...8062A Instruction Manual 7 8 8060A 1003 iu61f eps Figure 7 6 A3 RMS PCB Schmatic Diagram...


