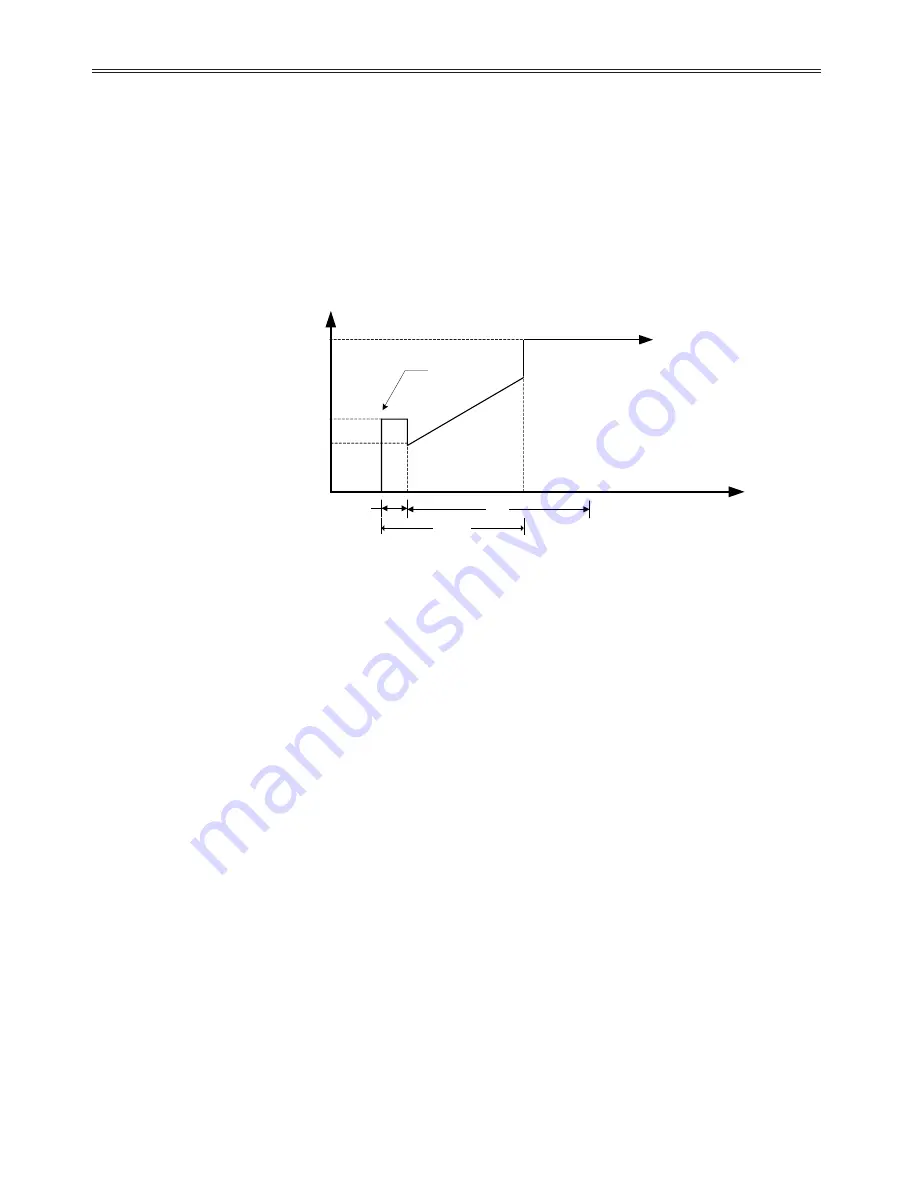
UTS Timer
When the start mode is set to open-loop voltage ramp acceleration, the UTS Timer acts as an acceleration
kick. When the UTS timer expires, full voltage is applied to the motor. This feature can be used to reduce
motor surging that may occur near the end of an open loop voltage ramp start. If a surge occurs near the end
of the ramp, set the UTS timer to expire at this time and restart the motor. If the surge still occurs, set the UTS
time to a lower time until the surging subsides. If motor surging continues to be a problem, it is recommended
that one of the other standard MX
3
closed-loop starting profiles be used.
7.3.6
Dual Acceleration Ramp Control
General
Two independent current ramps and kick currents may be programmed. The use of two different starting
profiles can be very useful with applications that have varying starting loads such as conveyors that can start
either loaded or unloaded.
The Current Ramp 1 profile is programmed using the parameters Initial Current 1, Maximum Current 1, and
Ramp Time 1. The Current Ramp 2 is programmed using the parameters Initial Current 2, Maximum Current
2, and Ramp Time 2. Kick Current 1 profile is programmed using the parameters Kick Level 1 and Kick Time
1. Kick Current 2 profile is programmed using the parameters Kick Level 2 and Kick Time 2.
7.3.7
Tachometer Ramp Selection
Description
The Tachometer control ramp profile provides a method to linearly ramp the speed of the system. When this
control mode is selected, the starter uses a tachometer to provide speed feedback to the starter. This mode is
commonly used on conveyor belt applications where a smooth controlled start is necessary under various load
conditions to prevent belt breakage, lifting, or excessive stretching. The Tachometer controller consists of an
inner PID current loop and an outer PI speed control loop.
z
NOTE:
The maximum current limit will override the speed control loop if necessary. If the Maximum
Current level is not set high enough or the load is too great, the MX
3
starter will limit the motor current to this
maximum level. When current limiting occurs, the speed profile will no longer be linear and the motor(s) will
take longer to accelerate to full speed. Therefore, if current limiting is undesirable, this parameter must be set
higher than the peak starting current during a linear speed ramp start.
Tachometer Requirements
In addition to the basic motor and starter setup variables, the following needs to done to use the tachometer
feedback control ramp:
1.
Connect a tachometer with appropriate DC output voltage and correct polarity to the MX
3
power card
input (TB5-2 (+ positive) & TB5-3 (- negative)).
2.
The tachometer feedback Start Mode (CFN 01) is selectable as “Tach Ramp” from the Starter Modes
menu.
3.
Program the appropriate variables in the Tachometer Setup menu.
FUN 13- Tachometer Full Speed Voltage on page 106.
FUN 14- Tachometer Loss Time on page 106.
FUN 15- Tachometer Loss Action on page 106.
4.
Set the Initial Current (QST 06/CFN 03) level to the desired starting current on page 64.
5.
Set the Maximum Current (QST 07/CFN 04) level to the desired maximum current limit on page 65.
128
7 - THEORY OF OPERATION
Voltage
Time
Kick Time
Ramp
Time
Initial Voltage
Optional Kick
Current
Full Voltage
Start
command
UTS Time
Figure 36: Effect of UTS Timer on Voltage Ramp
Summary of Contents for RediStart EXEXMVRMX3 Series
Page 2: ......
Page 10: ......
Page 11: ...1 Introduction 1...
Page 17: ...2 Technical Specifications 7...
Page 27: ...3 Installation 17...
Page 48: ......
Page 49: ...4 Keypad Operation 39...
Page 59: ...5 Parameter Groups 49...
Page 67: ...6 Parameter Description 57...
Page 122: ...NOTES 112 6 PARAMETER DESCRIPTION...
Page 123: ...7 Theory of Operation 113...
Page 155: ...NOTES 145 7 THEORY OF OPERATION...
Page 156: ...146 7 THEORY OF OPERATION...
Page 157: ...8 Troubleshooting Maintenance 147...
Page 185: ...NOTES 175 8 TROUBLESHOOTING MAINTENANCE...
Page 186: ......
Page 187: ...Appendices 177...
Page 213: ...203 APPENDIX H 3 YEAR WARRANTY...
Page 221: ...Publication History Revision Date ECO 00 12 15 06 Initial Release...


