


9365200990 Rev F
BE1-CDS240 Testing and Maintenance
13-89
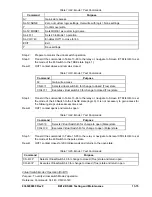
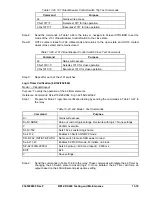
Current Value
Sensing
Type
Below Switch
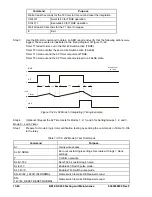
Timing
Threshold
But Above Next
Group Switch
Threshold
Time Comments
10.78 A
5.61 A
> 1 min SG3 (110% SG0 51P).
4.9 A
4.4 A
> 1 min Switch to SG2 (100% SG0 51P).
4.16 A
3.57 A
> 1 min Switch to SG1 (85% S0 51P pickup).
5 A
3.43 A
2.55 A
> 1 min Switch to SG0 (70% S0 51P pickup).
Step 10: Remove the current from A-phase, Input 1.
Step 11: Using the RS-LGC command to retrieve logic variable data from the SER, verify that the
following actions were logged:
Verify that all setting group changes were logged.
Verify that VO1 went TRUE and closed relay output OUT1 when SG1 became the
active setting group.
Verify that VO2 went TRUE and closed relay output OUT2 when SG2 became the
active setting group and that relay output OUT1 opened.
Verify that VO3 went TRUE and closed relay output OUT3 when SG3 became the
active setting group and that relay output OUT2 opened.
Verify that when the Virtual Switch 143 went TRUE (as a discrete input to the SG1
input of the setting group logic block) that the active setting group remained SG3.
Verify the events that occurred in reverse order when the current was being stepped
down.
Manual Change Mode 1
Manual Change Mode 1 test procedures are a continuation of the automatic test procedures. Do not
change the logic or settings except for those in Step 1 and subsequent.
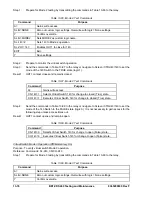
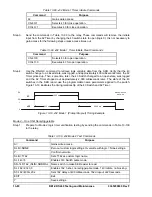
Step 1: Transmit to the relay the commands in Table 13-114.
Table 13-114. Manual Group Control Selection
Command Purpose
A= Gain
access.
CS-443=0
Selects 443 for FALSE operation to enable logic control (manual mode).
CO-443=0
Executes 443 for FALSE operation to enable logic control (manual mode).
E Exit.
Step 2:
Verify that VO1 went TRUE and closed relay output OUT1 when SG1 became the active
setting group (remember in Step 6, Switch 143 was made TRUE).
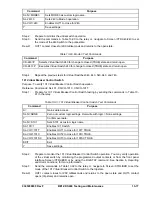
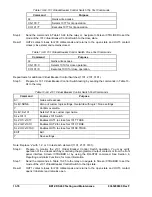
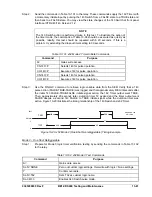
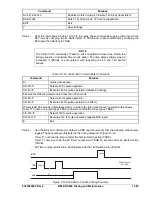
Step 3:
Send to the relay the commands in Table 13-115. Monitor the output contacts to verify the
setting group changes. After all commands have been sent, verify that SG3 is the active
setting group by sending the command RG-GRPACTIVE to the relay. It should echo back that
the SG3 is the active group. Using the HMI, you may also verify the active setting group at the
front panel interface Screen \STAT\OPER\ACTIVEG, 1.4.4.
Table 13-115. Manual Group Control Selection
Command Purpose
A= Gain
access.
CS-143=0
Deselects Setting Group 1 for operation.
CO-143=0
Executes Deselecting Setting Group 1 for operation.
Summary of Contents for BE1-CDS240
Page 2: ......
Page 8: ...vi BE1 CDS240 Introduction 9365200990 Rev F This page intentionally left blank ...
Page 38: ...1 28 BE1 CDS240 General Information 9365200990 Rev F This page intentionally left blank ...
Page 40: ...ii BE1 CDS240 Quick Start 9365200990 Rev F This page intentionally left blank ...
Page 152: ...ii BE1 CDS240 Metering 9365200990 Rev F This page intentionally left blank ...
Page 226: ...iv BE1 CDS240 Application 9365200990 Rev F This page intentionally left blank ...
Page 286: ...ii BE1 CDS240 Security 9365200990 Rev F This page intentionally left blank ...
Page 290: ...9 4 BE1 CDS240 Security 9365200990 Rev F This page intentionally left blank ...
Page 292: ...ii BE1 CDS240 Human Machine Interface 9365200990 Rev F This page intentionally left blank ...
Page 306: ...10 14 BE1 CDS240 Human Machine Interface 9365200990 Rev F This page intentionally left blank ...
Page 308: ...ii BE1 CDS240 ASCII Command Interface 9365200990 Rev F This page intentionally left blank ...
Page 342: ...11 34 BE1 CDS240 ASCII Command Interface 9365200990 Rev F This page intentionally left blank ...
Page 349: ...Figure 12 5 Horizontal Rack Mount Front View 9365200990 Rev F BE1 CDS240 Installation 12 5 ...
Page 361: ...Figure 12 17 Typical DC Connection Diagrams 9365200990 Rev F BE1 CDS240 Installation 12 17 ...
Page 372: ...12 28 BE1 CDS240 Installation 9365200990 Rev F This page intentionally left blank ...
Page 468: ...13 92 BE1 CDS240 Testing and Maintenance 9365200990 Rev F This page intentionally left blank ...
Page 512: ...14 42 BE1 CDS240 BESTCOMS Software 9365200990 Rev F This page intentionally left blank ...
Page 544: ...ii BE1 CDS240 Terminal Communication 9365200990 Rev F This page intentionally left blank ...
Page 550: ...ii BE1 CDS240 Settings Calculations 9365200990 Rev F This page intentionally left blank ...
Page 578: ...D 28 BE1 CDS240 Settings Calculations 9365200990 Rev F This page intentionally left blank ...
Page 579: ......


