


13-24
BE1-CDS240 Testing and Maintenance
9365200990 Rev F
Step 5:
Obtain write access to the relay by using the ACCESS= command. For each virtual selector
switch enabled in your logic scheme, change the switch position by entering CS-x43=1
(TRUE), 0 (FALSE) or P (Pulse) followed by CO-x43=1,0 or P. The syntax of the CS-x43 and
CO-x43 commands must match or the CO-x43 command won’t be executed.
Step 6:
Verify each switch position change by using the CO-x43 command or through HMI Screens
\CTRL\43\43 through \CTRL\43\743.
Step 7:
Leave each Virtual 43 Switch in the desired position for placing the protection and control
system in service.
Step 8:
Verify the 43 Switch activity by viewing the sequence of events reports with the RS-###
command.
Virtual 101 Switches
Purpose:
To verify the operation and logic setting for the 101 switches, 101, 1101, 2101, 3101.
Reference Commands:
SB-LOGIC, SL-x101, RG-x101STAT, RG-STAT, CS/CO-x101
Step 1:
Verify the breaker label and breaker-closed logic expression with the SB-LOGIC command.
Step 2:
Use the SL-x101 command to read the logic mode of the each 101 Switch. The switch is either
enabled (1) or disabled (0).
Step 3:
Verify the virtual control switch status by using the RG-x101STAT, RG-STAT or CO-x101
commands or HMI Screens 2.2, \CTRL\BKR.
Step 4:
Transmit the command ACCESS= to obtain write access to the relay. Change the switch
position by entering CS-x101=T (Trip) or C (Close) followed by CO-x101=T (Trip) or C (Close).
The syntax of the CS-x101 and CO-x101 commands must match or the CO-x101 command
won’t be executed.
Step 5:
Verify the switch position change as you did in Step 3.
Step 6:
Repeat Step 4 to return the x101 Switch to the desired position for your application.
Step 7:
Verify the x101 switch activity by viewing the sequence of events reports with the RS-###
command.
Reporting and Alarm Functions
Just prior to placing the relay in service, the following reporting and alarm functions should be reset and
verified. For information on how to use the ASCII command interface or the front panel HMI to enter or
edit relay settings, refer to Section 10,
Human-Machine Interface
, and Section 11,
ASCII Command
Interface
.
Clock Display
Set the real-time clock to the current date and time. If an IRIG input is used, day and time are
automatically synced to the IRIG source. Remember that the IRIG time code signal does not contain the
current year information.
Purpose:
To verify that the reporting and alarm functions are set/reset as required for the system
installation.
Reference Commands:
RG-TIME, RG-DATE
For clock setting details, refer to Section 6,
Reporting and Alarm Functions, Clock, Setting the Clock
. To
use the front panel HMI, go to Screen 1.4.6.
Demand Functions
If the relay Demand Functions feature is enabled, reset the peak current demand registers to zero or an
existing value.
Purpose:
To set the demand registers as required for the system installation.
Reference Commands:
RD-PI, RD-PI<p>
Refer to Section 6,
Reporting and Alarm Functions, Demand Functions,
for setting details. To use the
front panel HMI, go to Screen 4.4.3.
Transformer Monitoring
If the relay Transformer Through-Fault and Duty Monitoring features are enabled, reset the counter and
duty registers to zero or an existing value.
Summary of Contents for BE1-CDS240
Page 2: ......
Page 8: ...vi BE1 CDS240 Introduction 9365200990 Rev F This page intentionally left blank ...
Page 38: ...1 28 BE1 CDS240 General Information 9365200990 Rev F This page intentionally left blank ...
Page 40: ...ii BE1 CDS240 Quick Start 9365200990 Rev F This page intentionally left blank ...
Page 152: ...ii BE1 CDS240 Metering 9365200990 Rev F This page intentionally left blank ...
Page 226: ...iv BE1 CDS240 Application 9365200990 Rev F This page intentionally left blank ...
Page 286: ...ii BE1 CDS240 Security 9365200990 Rev F This page intentionally left blank ...
Page 290: ...9 4 BE1 CDS240 Security 9365200990 Rev F This page intentionally left blank ...
Page 292: ...ii BE1 CDS240 Human Machine Interface 9365200990 Rev F This page intentionally left blank ...
Page 306: ...10 14 BE1 CDS240 Human Machine Interface 9365200990 Rev F This page intentionally left blank ...
Page 308: ...ii BE1 CDS240 ASCII Command Interface 9365200990 Rev F This page intentionally left blank ...
Page 342: ...11 34 BE1 CDS240 ASCII Command Interface 9365200990 Rev F This page intentionally left blank ...
Page 349: ...Figure 12 5 Horizontal Rack Mount Front View 9365200990 Rev F BE1 CDS240 Installation 12 5 ...
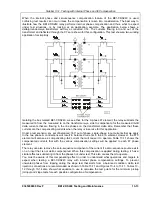
Page 361: ...Figure 12 17 Typical DC Connection Diagrams 9365200990 Rev F BE1 CDS240 Installation 12 17 ...
Page 372: ...12 28 BE1 CDS240 Installation 9365200990 Rev F This page intentionally left blank ...
Page 468: ...13 92 BE1 CDS240 Testing and Maintenance 9365200990 Rev F This page intentionally left blank ...
Page 512: ...14 42 BE1 CDS240 BESTCOMS Software 9365200990 Rev F This page intentionally left blank ...
Page 544: ...ii BE1 CDS240 Terminal Communication 9365200990 Rev F This page intentionally left blank ...
Page 550: ...ii BE1 CDS240 Settings Calculations 9365200990 Rev F This page intentionally left blank ...
Page 578: ...D 28 BE1 CDS240 Settings Calculations 9365200990 Rev F This page intentionally left blank ...
Page 579: ......


