


2*44 Engine, clutch and transmission
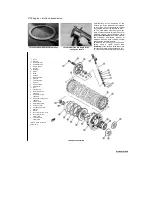
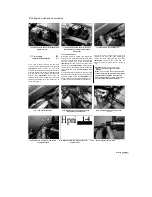
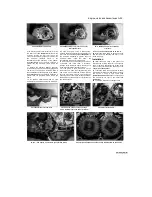
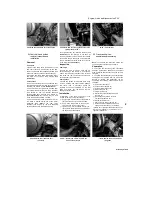
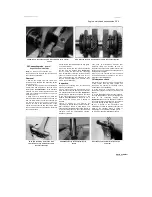
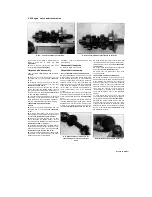
23.13a Fit a new O-ring into the narrow
groove
1
'
■ft Ts*
1
'
23.13b Align the punch mark on the gear (A)
with the mark on the crankcase (B)
23.13c Fit the holder onto the dowels
(see illustration).
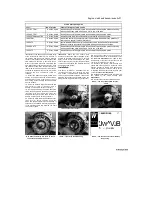
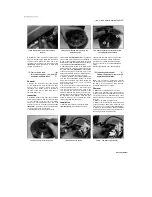
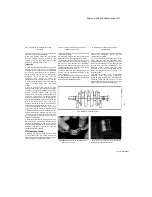
Apply clean engine oil to the
shaft. Position the rear balancer weight in the
engine, aligning the punch mark on the larger
gear with the mark on the crankcase, then slide
the shaft in from the left-hand side until it is fully
home
(see illustration and 23.7b).
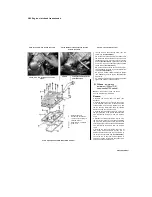
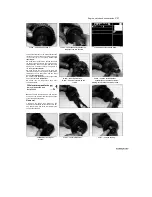
Check that
the marks on both the crankshaft and the
balancer shaft are still correctly aligned. If
removed, fit the balancer holder dowels, then
install the holder and tighten its bolts to the
torque setting specified at the beginning of the
Chapter
(see illustration). 14
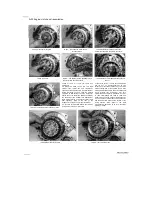
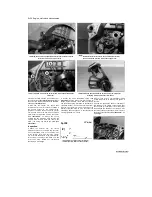
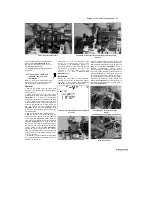
Fit the shaft
retainer plates with the
counter-sink for the screw heads on the outside,
then apply a suitable non-permanent thread
locking compound to the Torx screw threads and
tighten them to the specified torque setting
(see
illustration).
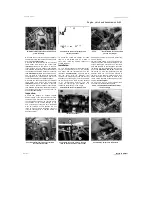
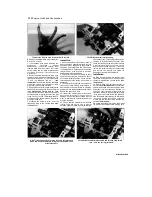
15
Fit a new O-ring around the oil passage
collar
(see illustration 23.5b),
then fit the oil
strainer holder
(see illustration).
Apply a
suitable
non-permanent
thread
locking
compound to the holder bolts and tighten them to
the specified torque setting.
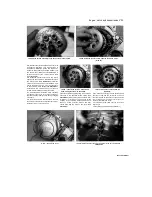
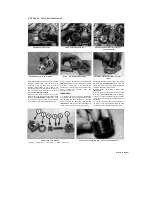
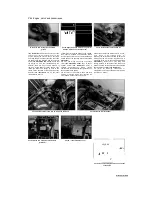
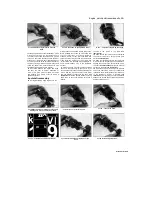
16
On 1991 to 1995 TDM models and XTZ
models, if removed, install the crankcase top
cover dowels. Fit the cover using a new
gasket, then tighten the bolts evenly in a criss-
cross pattern to the specified torque, not
forgetting the earth cable and cable guide(s) and
making sure the bolt with the copper washer is
positioned at the rear on the right-hand side
(see
illustrations).
Install the oil pipe using new
sealing washers on each side of the unions and
tighten the banjo bolts and the bracket bolt to
the
specified torque settings
(see illustration).
17
Install
all
remaining
components
or
assemblies in a reverse of the removal procedure
(see Steps 3, 2 and 1).
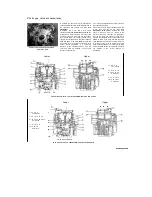
23.14 Fit each retainer plate into its slot in the shaft end
23.15 Install the strainer holder
23.16a Fit the new gasket onto the dowels
23.16b ... then install the cover
(arrowed)...
ti^ff^M
•BIB" >-.'
.
A
#1 1
,
'..-*"
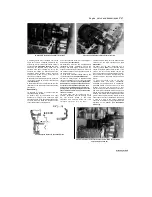
23.16c Use new sealing washers on each side
of the union
Staned by Stalker
Содержание XTZ750
Страница 174: ...UNREGISTERED VI ScanedbyStalker UNREGISTERED VI ...
Страница 207: ...Wiring diagrams 9 29 _____Scaned by Stalker 5 l 6o Cxj fi I JICM ...
Страница 208: ...UNREGISTERED VI 9 30 Wiring diagrams UNREGISTERED VERSION 01 ONREGISTEREDVI Scaned by Stalker ONREGISTERED VERSION 0 ...
Страница 209: ...I UNREGISTERED VI Wiring diagrams 9 31 ____ Scaned by Stalker UNREGISTERED VERSION OF PICTURE DESK ...
Страница 210: ...9 32 Wiring diagrams Scaned by Stalker ...
Страница 211: ...XTZ750 gauge Starter circuit Neutral Starter cut off relay switch rnotor ...


