


UNREGISTERED VERSION OF PI
UNREGISTERED VERSION OF PICTURED
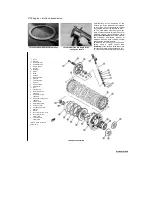
Engine, clutch and transmission 2»43
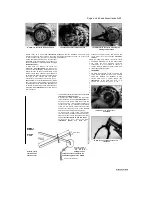
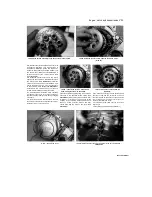
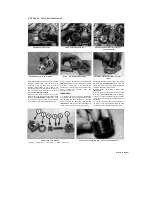
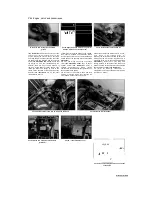
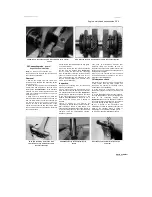
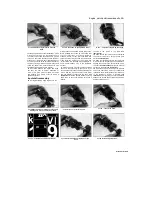
23.6 Each retainer plate is secured by a Torx
screw (arrowed)
i
Ml
v
if
^
^S^
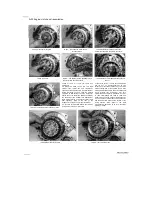
—m
O"^"
23.7a Unscrew the bolts (arrowed) and
remove the holder...
23.7b
... then withdraw the shaft and lift
out the rear weight
6
Unscrew the Torx bolt securing each balancer
shaft retainer plate and remove the plates, noting
how they fit
(see illustration).
7
Unscrew the bolts securing the rear balancer
shaft holder and remove the holder
(see
illustration).
Remove the dowels if they are
loose. Support the rear balancer shaft weight,
then withdraw the shaft from the left-hand side of
the crankcase and lift the weight out of the top
(see illustration).
Discard the shaft O-ring as a
new one must be used. Keep the weight and
shaft together as a matched pair, and do not
confuse them with the front weight and shaft.
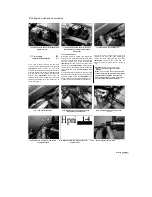
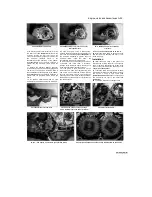
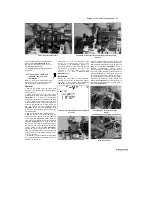
8 Unscrew the bolts securing the front balancer
shaft holder and remove the holder
(see
illustration).
Remove the dowels if they are
loose. Support the front balancer shaft weight,
then withdraw the shaft from the left-hand side of
the crankcase and remove the weight from the
bottom
(see illustration).
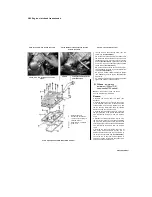
Inspection
9
Check the weights for cracked, chipped
and worn teeth on the driven gears and renew
the weight if any are found. The drive gears on
the crankshaft should also be checked. Check
the condition of the needle bearings in the
bore of the weight. If they are worn, the weight
must be renewed as the bearings are not
listed as being available separately, though it
is worth checking with a Yamaha dealer or
bearing specialist.
10 Check the shafts are straight by rolling
them on a flat surface such as a piece of
glass. Also check the bearing surfaces for
scuffing and wear.
Installation
11
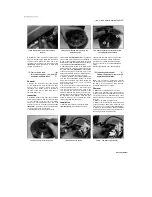
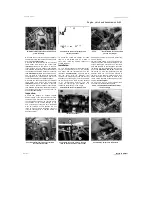
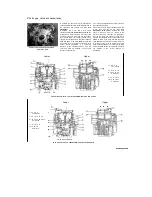
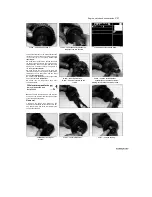
Turn the crankshaft until the Woodruff key
slot (for the alternator rotor) on the left-hand
end aligns with the triangular mark on the
crankcase
(see illustration).
The best way to
turn the engine with the alternator rotor
removed is to engage a gear and use the front
sprocket nut. If the engine is still in the frame,
the rear wheel can be used. Turn the sprocket
in
an
anti-clockwise
direction
only
and
remove the spark plugs (see Chapter 1) to
release the compression in the engine,
23.8a Unscrew the bolts (arrowed) and
remove the holder...
making it much easier to turn and to prevent the
nut from undoing.
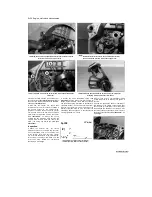
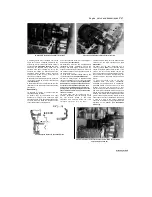
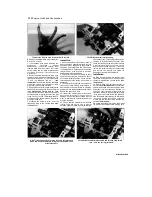
12
Apply clean engine oil to the front balancer
shaft. Position the front balancer weight in the
engine, aligning the punch mark on the larger
gear with the mark on the crankcase, then slide
the shaft in from the left-hand side until it is fully
home
(see illustration and 23.8b).
Check that
the marks on both the crankshaft and the
balancer shaft are still correctly aligned. If
removed, fit the balancer holder dowels, then
install the holder and tighten its bolts to the
torque setting specified at the beginning of the
Chapter
(see illustration).
13
Fit a new O-ring onto the rear balancer shaft
and smear it with lithium-based grease
23.8b ... then withdraw the shaft and lift out
the front weight
23.11 Align the Woodruff key slot (A) with
the triangular mark (B)
23.12a Align the punch mark on the gear
(A) with the mark on the crankcase (B)
23.12b Fit the holder onto the dowels
UNREGISTERED VI
Staned by Stalker
UNREGISTERED VI
Содержание XTZ750
Страница 174: ...UNREGISTERED VI ScanedbyStalker UNREGISTERED VI ...
Страница 207: ...Wiring diagrams 9 29 _____Scaned by Stalker 5 l 6o Cxj fi I JICM ...
Страница 208: ...UNREGISTERED VI 9 30 Wiring diagrams UNREGISTERED VERSION 01 ONREGISTEREDVI Scaned by Stalker ONREGISTERED VERSION 0 ...
Страница 209: ...I UNREGISTERED VI Wiring diagrams 9 31 ____ Scaned by Stalker UNREGISTERED VERSION OF PICTURE DESK ...
Страница 210: ...9 32 Wiring diagrams Scaned by Stalker ...
Страница 211: ...XTZ750 gauge Starter circuit Neutral Starter cut off relay switch rnotor ...


