background image

Chapter 6 - Additional Configuration Options

Configure Networking Services

C

ONFIGURE

N

ETWORKING

S

ERVICES

Use the following instructions to configure networking services on the BlackPearl system.

For instructions on configuring NAS services, see

Configure NAS Services on page 233

.

Configure the Spectra S3 Service

1.

From the menu bar, select

Configuration > Services

to display the Services screen.

Figure 94

The Services screen.

2.

Double-click the S3 service, or select the S3 service and select

Action > Show Details

. The

S3 details screen displays.

3.

On the S3 service details screen, select

Action > Edit

. The Edit S3 Service dialog box

displays.

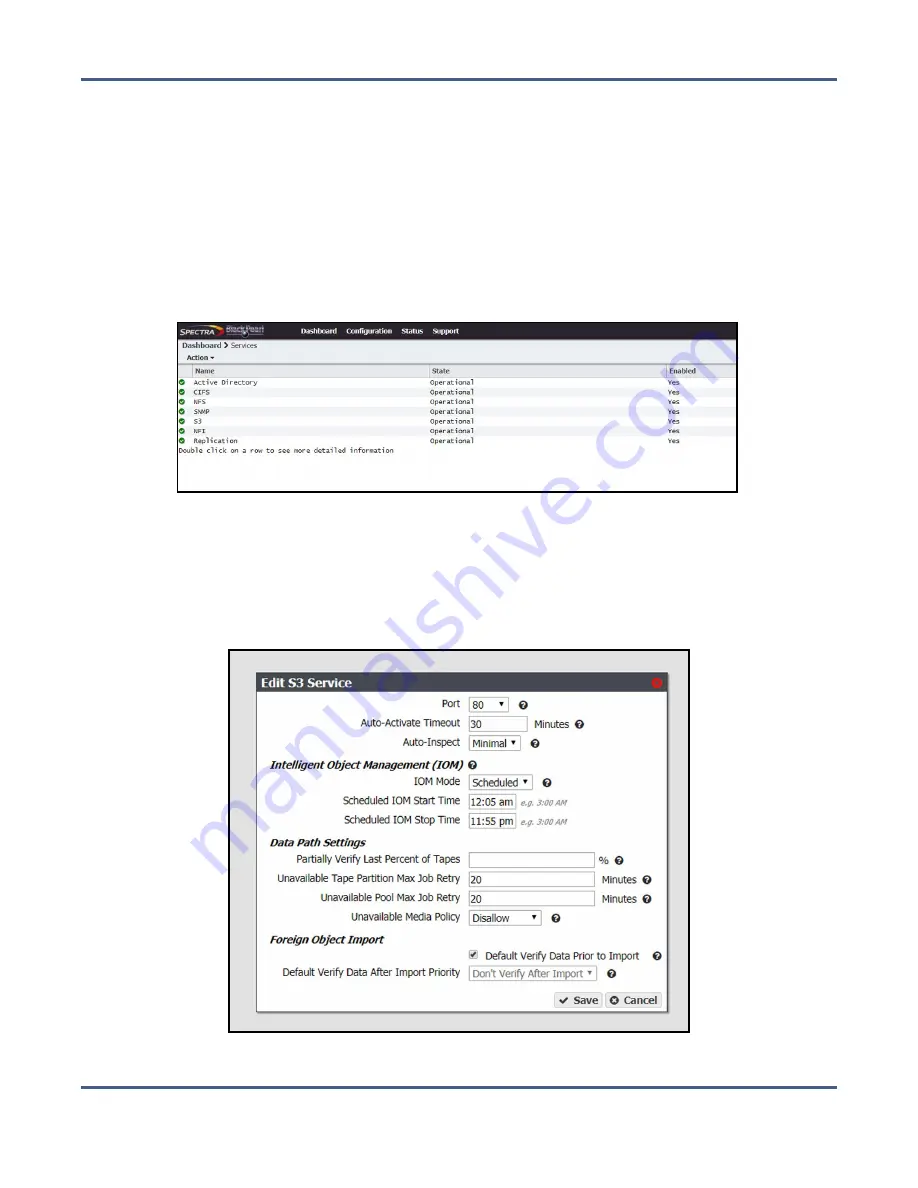
Figure 95

The Edit S3 Service dialog box.

November 2020

User Guide-BlackPearl Converged Storage System

- 183 -

Содержание BlackPearl

Страница 1: ...Spectra Logic BlackPearl Converged Storage System User Guide SpectraLogic com...

Страница 2: ...of any kind even if Spectra Logic has been advised of the possibility of such damages arising from any defect or error Information furnished in this manual is believed to be accurate and reliable Howe...

Страница 3: ...release Revisions O P were never released R July 2018 Updated for the BlackPearl 5 0 release S May 2019 Updated for the BlackPearl 5 1 release T February 2020 Updated for the BlackPearl 5 1 4 release...

Страница 4: ...g or use of this product do not acquire any ownership rights to the Software Product 3 GENERAL The Software Product is licensed not sold to you by Spectra for use only under the terms of this EULA The...

Страница 5: ...a retains all right title and interest in and to the Software Product and any rights not granted to you herein are reserved by Spectra You hereby expressly agree not to extract information reverse eng...

Страница 6: ...xported or re exported a into or to a nation or resident of any U S embargoed countries or b to anyone on the U S Treasury Department s list of Specially Designated Nationals or the U S Department of...

Страница 7: ...ODUCT PROVIDED HOWEVER IF YOU HAVE ENTERED INTO A MASTER SUPPORT AGREEMENT SPECTRA S ENTIRE LIABILITY REGARDING SUPPORT SERVICES SHALL BE GOVERNED BY THE TERMS OF THAT AGREEMENT BECAUSE SOME STATES AN...

Страница 8: ...support spectralogic com United States and Canada Phone Toll free US and Canada 1 800 227 4637 International 1 303 449 0160 Europe Middle East Africa Phone 44 0 870 112 2185 Deutsch Sprechende Kunden...

Страница 9: ...pter 1 Product Overview 28 Overview 29 Features 29 Components 32 Front View 32 Rear View 34 Rear Panel 36 Front View of the 96 Bay Expansion Node 38 Rear View of the 96 Bay Expansion Node 39 Front Vie...

Страница 10: ...l NAS Drives 54 Configure the Data Connection 55 Configure an Aggregate Port Data Connection 55 Configure a Single Port Data Connection 58 Configure a Static Route 59 Create a User 61 Description of U...

Страница 11: ...Disk and Dual Copy on Tape 94 Chapter 4 Configuring Advanced Bucket Management 100 Create a Storage Pool 101 Create a Nearline Disk Pool 101 Create an Online Disk Pool 105 Create a Disk Partition 107...

Страница 12: ...Exclude a Storage Domain Member 143 Cancel Storage Domain Member Exclusion 144 Delete a Storage Domain Member 144 Edit a Storage Domain 145 Delete a Storage Domain 146 Manage Data Replication Rules 14...

Страница 13: ...163 Manage Online and Nearline Disk Pools 163 Import a Nearline or Online Disk Pool 163 Delete a Nearline or Online Disk Pool 166 Manage Buckets 166 Show Bucket Physical Placement 166 Edit a Bucket A...

Страница 14: ...PSID Erase an Encryption Drive 199 Configure Users and S3 Groups 201 Description of User Types 201 Create a User 201 Edit a User 201 Change S3 Secret Key 204 Create an S3 Group 206 Remove an S3 Group...

Страница 15: ...5 Configure the NFS Service 236 Configure the NAS Replication Service 237 Create an Hourly Schedule 241 Create a Daily Schedule 241 Create a Weekly Schedule 242 Chapter 8 Managing Network Attached Sto...

Страница 16: ...2 Restoring Files from a NAS Replication Target 263 Disable NAS Replication for a Volume 263 Edit the NAS Replication Service 264 Delete the NAS Replication Service Configuration 265 Managing NFI Repl...

Страница 17: ...ventory 283 Mark Tape as Ejected 283 Delete Lost or Ejected Tape 284 Tape Library and Tape Drive Options 284 Activate a Tape Library Partition 284 Put a Tape Library Partition into Standby 285 Edit a...

Страница 18: ...ents 306 View the Status of Services 308 View the Status of the System Pools 309 View Bucket Contents 312 View Spectra S3 Jobs Information 313 View Tape Media Information 315 View Performance Metrics...

Страница 19: ...re a Log Set Schedule 341 Manually Generate Log Sets 342 Email a Log Set 343 Download a Log Set 344 Delete Log Sets 344 Chapter 12 Maintaining the BlackPearl System 345 Data Integrity Verification Dis...

Страница 20: ...lackPearl system 363 How does the user know which tapes must be taken off site and brought back 363 What happens if the user ejects the wrong tape 364 How does a user use cleaning media in a T50e or T...

Страница 21: ...84 Determine System Serial Number 385 Opening a Support Ticket 385 Remote Support 388 Enabling Remote Support 388 Disabling Remote Support 390 Appendix A IPMI Configuration 392 Appendix B Specificatio...

Страница 22: ...1 0 Chassis Overview Specifications 415 Components 415 Front View 415 Rear View 417 Rear Panel 418 Specifications 419 System Specification 420 Interface Specifications 420 Appendix E Regulatory Safet...

Страница 23: ...em 428 Conflict Minerals Policy 428 Appendix F Open Source Code Acknowledgements Package List 430 Apache 430 FreeBSD 430 Java 431 Samba 438 Nginx 439 Ruby 439 Ruby on Rails 441 ZFS 441 Included Packag...

Страница 24: ...he information in this guide assumes a familiarity with computing terminology and with network connectivity protocols such as SAS Fibre Channel and Ethernet You also need to be familiar with installin...

Страница 25: ...Note for additional information or suggestions about the current topic Related Publications For additional information about the Spectra BlackPearl Converged Storage System and the Spectra S3 interfac...

Страница 26: ...Spectra 12 36 45 Drive Chassis Drive Replacement Guide provides instructions for replacing a failed data drive after the system is installed The Spectra 12 36 45 Drive Chassis Fan Replacement Guide p...

Страница 27: ...Tape Libraries User Guides for compatible IBM tape libraries are posted on the IBM Knowledge Center website at ibm com support knowledgecenter products ONLINE FORUM Need help with Spectra Logic s S3...

Страница 28: ...s page 32 Front View page 32 Rear View page 34 Rear Panel page 36 Front View of the 96 Bay Expansion Node page 38 Rear View of the 96 Bay Expansion Node page 39 Front View of the 107 Bay Expansion Nod...

Страница 29: ...up to 96 disk drives with an active or passive bezel Up to nine 96 bay expansion nodes can be connected to a BlackPearl 4U system which allows the system to use the 96 bay expansion nodes as storage d...

Страница 30: ...er IOM also allows multiple object versioning and data pre staging from tape to disk and improves tape library performance by reducing the number of cartridge mounts LTFS Format The BlackPearl system...

Страница 31: ...st cost media option 10GBase T Ethernet Connectivity Two onboard 10 gigabit copper ports 10GBase T provide Ethernet connectivity for the system with one dedicated port used to access the BlackPearl us...

Страница 32: ...rear panel components Front View Figure 1 and Figure 2 show the components on the front of the BlackPearl systems with the front bezel removed Figure 1 The front view of the BlackPearl 4U system fron...

Страница 33: ...ation Data drives The base BlackPearl 4U system includes one high performance solid state drive and five spinning disk drives mounted on individual drive sleds in the front of the chassis Additional d...

Страница 34: ...the BlackPearl system For a description of the components on the BlackPearl 1 0 chassis see BlackPearl 1 0 Chassis Overview Specifications on page 415 on page page 415 Figure 3 The rear view of the Bl...

Страница 35: ...ppable which allows for uninterrupted operation during replacement Data drives BlackPearl 4U system only The base BlackPearl 4U system includes one high performance solid state drive and five spinning...

Страница 36: ...o 10GBase T ports One of the 10GBase T ports can be used for network connectivity on a 10GBase T network The left port of the two 10GBase T ports is dedicated as the BlackPearl management port and can...

Страница 37: ...peed data connection between hosts and the BlackPearl system An optional four port SAS or Fibre Channel card provides connectivity between the BlackPearl system and tape drives in a Spectra Logic tape...

Страница 38: ...maximum performance Front View of the 96 Bay Expansion Node Figure 6 shows the major components on the front of the 96 bay expansion node Figure 6 The front view of the 96 bay expansion node Visual S...

Страница 39: ...ay expansion node Power supplies The 96 bay expansion node includes two power supplies to provide N 1 redundancy and fail over protection Each power supply has its own AC power connector Each power su...

Страница 40: ...atus information for the expansion node See Front Bezel Visual Status Beacon on page 302 for more information Data drive activity LEDs not shown Numbered LEDs indicate drive activity for each drive in...

Страница 41: ...clude one Ethernet port and four SAS ports used to connect a 107 bay expansion node to a BlackPearl system Fans Eight hot swappable fans in banks of two provide the cooling for the 107 bay expansion n...

Страница 42: ...e BlackPearl system The following sections describe the common features that appear in all screens in the user interface Menus The menu bar appears along the top edge of each screen Use the menu bar d...

Страница 43: ...s Buckets Displays information about the currently configured buckets and lets you add edit or delete buckets You can also view information about the objects contained in a bucket and the physical tap...

Страница 44: ...ls for generating reports about the configuration and status of the system Reports can be generated in XML or JSON JavaScript Object Notation formats Support The Support menu provides access for maint...

Страница 45: ...functioning correctly Information An informational message about a system component is available Check messages to determine the component Warning A system component requires attention Check messages...

Страница 46: ...System with 96 Bay or 107 Bay Expansion Nodes page 49 Configure the BlackPearl Management Port page 50 Automatically Import Activation Keys page 51 Log Into the BlackPearl User Interface page 52 Conf...

Страница 47: ...BLACKPEARL NAS SYSTEMS If you BlackPearl system includes NAS drives it is important that the drives that are to be used for NAS are not installed in any chassis in the system when the system is powere...

Страница 48: ...power on all chassis together The power LED illuminates indicating that power is on See System Status LEDs on page 304 for more information Figure 11 Press the power button Wait while the BlackPearl...

Страница 49: ...aster node To power on a 107 bay expansion node remove the front bezel and reach into the left side as viewed from the front and press the power button Wait approximately five minutes while the 107 ba...

Страница 50: ...ckPearl User Interface on page 52 IMPORTANT You must connect Ethernet cables as described in Connect Ethernet Cables on page 47 before either proceeding with the steps below or skipping this section a...

Страница 51: ...play you may need to manually refresh the console screen by pressing CTRL R 5 Connect a cable from your network to the BlackPearl management port on the BlackPearl system You are now able to connect t...

Страница 52: ...message that it is safe to remove the USB device Note The first time that you log in after importing activation keys an informational message displays indicating that you can now safely remove the USB...

Страница 53: ...no longer need to pass the security check when accessing these ports See Configure Certificates on page 210 3 Enter the primary administrator username and password The default username is Administrat...

Страница 54: ...NAS based storage you must install the drives used for NAS storage before continuing If your system does not include NAS storage continue with Configure the Data Connection below Use the instructions...

Страница 55: ...in the same BlackPearl system only one type port can be used in each link aggregation configuration You can only use the BlackPearl management port to access the BlackPearl user interface You cannot...

Страница 56: ...screen displays with information about the network connections of the system Figure 16 The Network screen 2 From the menu bar select Action New Aggregate Interface The New Aggregate Interface dialog b...

Страница 57: ...ned to the data port Use the button to configure additional IP and Netmask addresses You can configure a maximum of 16 aliases 6 If applicable enter the IPv4 Default Gateway Notes If you selected DHCP...

Страница 58: ...em Figure 18 The Network screen 2 Double click the Data row in the Network Interfaces pane for the port you want to configure or select the Data row and select Action Edit from the menu bar The Edit D...

Страница 59: ...be configured when the BlackPearl system is connected to a SLACC network 7 Change the MTU Maximum Transmission Unit value if desired If you set the MTU value to something other than 1500 ensure that y...

Страница 60: ...request is sent to the default gateway If the default gateway is not connected to the IP address for isolation reasons the request fails Use the instructions in this section to configure a static rou...

Страница 61: ...ns Note Spectra Logic recommends changing the password for the primary administrator See Edit a User on page 201 Monitor User The monitor user account is created by default This account can access the...

Страница 62: ...lect Action New from the menu bar The New User dialog box displays Figure 22 The New User dialog box 3 Enter the desired Username for the user The Username cannot contain capital letters or spaces and...

Страница 63: ...eing created to perform the action described in the table below for all buckets present on the system as well as any buckets created at a future date Name Description List The user can see the bucket...

Страница 64: ...e S3 Credentials dialog box displays Figure 23 The S3 Credentials dialog box 3 Use the S3 Access ID and S3 Secret Key to access the BlackPearl system using a Spectra S3 client Spectra S3 API or Vail s...

Страница 65: ...em If your system includes 96 bay expansion nodes you can optionally change the configuration of nearline disk pools See Manage Buckets on page 166 See Additional Configuration Options on page 170 for...

Страница 66: ...epts in this chapter and have thoughtfully planned your data policies before you start using the BlackPearl system to store data Topic Goals of Advanced Bucket Management page 67 Spectra S3 Overview p...

Страница 67: ...of large amounts of bulk data It enables users to deploy tape nearline disk and online disk storage that is cost effective easy to manage and scalable to exabytes of data Spectra S3 utilizes the stan...

Страница 68: ...ata out of order Spectra S3 plans and queues a large amount of data to be efficiently written to tape it logically groups data on tape in a way that reflects how the client is likely to read it back B...

Страница 69: ...tape is allocated out of the member data partitions to fulfill the capacity requirement DATA POLICIES A data policy defines data integrity policies checksum type and end to end CRC requirements defaul...

Страница 70: ...d multiple times using different persistence rules in the same data policy The same storage domain can be referred to across different data policies Data persistence rules must specify the level of ph...

Страница 71: ...Ejecting a copy for off site disaster recovery The BlackPearl system allows a user to make multiple copies of data automatically A typical use case is to create a tape first copy that is intended to...

Страница 72: ...opy For more information on storage domains see Storage Domains on page 69 Notes Cleaning partitions are not added to the BlackPearl user interface Tape drive cleaning is typically handled by the Spec...

Страница 73: ...detects a sufficient number of disks for a new storage pool and there is a capacity key installed on the system to license the additional storage space Online storage pools are manually created using...

Страница 74: ...chnically not allowed in LTFS file names however the BlackPearl software can accommodate a slash in the object name and translates it as a directory in the LTFS file system for example directory1 dire...

Страница 75: ...configured data policies on the BlackPearl system which include data persistence rules and storage domain targets Note For information on additional data policy settings that are not available through...

Страница 76: ...system detects a tape partition Figure 25 The Single Copy on Tape workflow The single copy on tape data policy is configured with the following attributes Parameter Value Description Storage Domain Ta...

Страница 77: ...before a partition with Low or Never Select write preference Auto Compaction Threshold 20 The percentage of a tape with deleted objects at which auto compaction is triggered The default is 95 The mini...

Страница 78: ...n the Create Verify Job command See the Spectra BlackPearl Spectra S3 API Reference for more information Default Verify After Write cleared Data is not verified after a write Rebuild Priority Low If d...

Страница 79: ...is deleted from a bucket it is removed from tape media but individual tape media cartridges are not reclaimed for use until all data is deleted from a tape cartridge Bucket Isolation Level Standard D...

Страница 80: ...nd tape partitions created on the tape library Figure 26 The Dual Copy on Tape workflow The dual copy on tape data policy is configured with the following attributes Parameter Value Description Storag...

Страница 81: ...the partition after partitions with High write preference and before a partition with Low or Never Select write preference Storage Domain Tape Second Copy A second copy of the data is written to a tap...

Страница 82: ...s an object to be broken into multiple blobs Minimize Spanning cleared Jobs larger than 1 TB are allowed to span across multiple tapes or pools as needed to maximize capacity utilization and performan...

Страница 83: ...from tape media the data is rebuilt using low priority which is the lowest setting Checksum Type MD5 Data using this storage domain is CRC checked using the MD5 checksum type Data is CRC checked when...

Страница 84: ...nd Copy Type Permanent Data is moved to tape and maintained on tape media until data is deleted from a bucket Note When data is deleted from a bucket it is removed from tape media but individual tape...

Страница 85: ...m detects a nearline disk partition Figure 27 The Single Copy on Nearline Disk workflow The single copy on nearline disk data policy is configured with the following attributes Parameter Value Descrip...

Страница 86: ...e disk partition created Write Preference Normal The system uses the partition after partitions with High write preference and before a partition with Low or Never Select write preference Data Policy...

Страница 87: ...different priority in the Create Verify Job command See the Spectra BlackPearl Spectra S3 API Reference for more information Default Verify After Write cleared Data is not verified after a write Rebui...

Страница 88: ...fferent buckets can be mixed on to the same piece of media Data Persistence Rule for Pool First Copy Type Permanent Data is moved to disk and maintained on disk media until data is deleted from a buck...

Страница 89: ...atically created when the system detects a disk partition and a tape partition Figure 28 The Single Copy on Nearline Disk and Tape workflow The single copy on nearline disk and tape data policy is con...

Страница 90: ...leted objects at which auto compaction is triggered The default is 95 The minimum is 10 Write Preference Normal The system uses the partition after partitions with High write preference and before a p...

Страница 91: ...Allows an object to be broken into multiple blobs Minimize Spanning cleared Jobs larger than 1 TB are allowed to span across multiple tapes or pools as needed to maximize capacity utilization and perf...

Страница 92: ...from tape media the data is rebuilt using low priority which is the lowest setting Checksum Type MD5 Data using this storage domain is CRC checked using the MD5 checksum type Data is CRC checked when...

Страница 93: ...om different buckets can be mixed on to the same piece of media Data Persistence Rule for Pool First Copy Type Permanent Data is moved to disk and maintained on disk media until data is deleted from a...

Страница 94: ...utomatically created when the system detects a disk partition and two tape partitions Figure 29 The Single Copy on Nearline Disk and Dual Copy on Tape workflow The single copy on nearline disk and dua...

Страница 95: ...ition after partitions with High write preference and before a partition with Low or Never Select write preference Storage Domain Tape Second Copy A second copy of the data is written to a tape storag...

Страница 96: ...uses the partition after partitions with High write preference and before a partition with Low or Never Select write preference Storage Domain Pool First Copy Data is written to the primary nearline...

Страница 97: ...ols as needed to maximize capacity utilization and performance Default GET Job Priority High When the storage domain receives a GET job it is processed with high priority which is before low and norma...

Страница 98: ...CRC checked when it is written to cache with a PUT job or read back from media with a GET job End to end CRC No This data policy does not use end to end CRC checking Versioning None In order to uploa...

Страница 99: ...idual tape media cartridges are not reclaimed for use until all data is deleted from a tape cartridge Bucket Isolation Level Standard Data from different buckets can be mixed on to the same piece of m...

Страница 100: ...e Pool page 101 Create a Nearline Disk Pool page 101 Create an Online Disk Pool page 105 Create a Disk Partition page 107 Create a Tape Partition page 108 Create a Replication Target page 109 Create a...

Страница 101: ...ercentage On systems running BlackPearl 5 2 or later this percentage is 95 On systems running BlackPearl 5 1 x or older the capacity limit percentage is 87 Depending on the drives installed the 107 ba...

Страница 102: ...ge Pool 1 From the menu bar select Configuration Advanced Bucket Management Storage Policy Management to display the Advanced Bucket Management screen Figure 30 The Advanced Bucket Management screen N...

Страница 103: ...ine Disk Pool The New Nearline Disk pool dialog box displays Note The Storage Pool Preview pane does not display until you have selected the disks you want to use in the storage pool Figure 31 The New...

Страница 104: ...level for the pool Only one option can be selected Use the Storage Pool Preview information to compare the fault tolerance and required overhead for each configuration None The pool is not configured...

Страница 105: ...new online disk pool If your BlackPearl system does not include a 44 bay expansion node or a 107 bay expansion node with SAS drives continue with Create a Disk Partition on page 107 Use the instructio...

Страница 106: ...line Disk Pool The New Online Disk pool dialog box displays Note The Storage Pool Preview pane does not display until you have selected the disks you want to use in the storage pool Figure 32 The New...

Страница 107: ...nce for small random reads and writes Single parity Data is striped across multiple single parity arrays which can tolerate one drive failure without data loss This type of RAID has faster performance...

Страница 108: ...e click Add A new row appears in the pane b Use the Name drop down menu to select a storage pool from the list of previously configured storage pools The Capacity Type and Health of the storage pool d...

Страница 109: ...118 Note The instructions below describe configuring a target system that is later associated with a data policy For instructions on creating NAS replication see Configure the NAS Replication Service...

Страница 110: ...34 The Replication Targets screen 2 Select Action New BlackPearl Target The New BlackPearl Target dialog box displays Figure 35 The New BlackPearl Target dialog box 3 Enter a name for the BlackPearl...

Страница 111: ...ata is read back from the target system if needed Name Description Last Resort The source system only reads data from the target system if the source system cannot read from any of its own data partit...

Страница 112: ...m uses the specified proxy to connect to the target system 12 Click Create The new BlackPearl target appears on the Advanced Bucket Management screen Create an Amazon S3 Target Configuring an Amazon S...

Страница 113: ...n see Figure 34 on page 110 2 Select Action New Amazon S3 Target The New Amazon S3 Target dialog box displays Figure 36 The New Amazon S3 Target dialog box 3 Select the type of S3 File Naming to use f...

Страница 114: ...inistrator privileges for the Amazon S3 account in the Access Key field Note Administrator credentials are used to configure and maintain the source target relationship They are not used for user driv...

Страница 115: ...read from the source system whenever possible This setting determines when data is read back from the Amazon S3 target if needed Note Spectra Logic recommends that Default Read Preference be kept at...

Страница 116: ...e proxy server port through which the system connects Proxy Username The username used when connecting through the proxy server Proxy Password The password used when connecting through the proxy serve...

Страница 117: ...6 In the Account Key field enter the account key associated with the account entered in Step 5 7 Optionally enter a Cloud Bucket Prefix and or Cloud Bucket Suffix Bucket names on the BlackPearl syste...

Страница 118: ...pool After Non Ejectable Tape The source system only reads data from the target if the source system cannot read from a non ejectable tape Never Data is never read from the target 9 Click Create The n...

Страница 119: ...ed automatically Notes By default all data on the tape is verified You can customize the amount of data to be verified in Configure the Spectra S3 Service on page 183 When this verification completes...

Страница 120: ...r the storage domain This setting specifies whether job chunks are written as quickly as possible or across as few pieces of media as possible For example when Performance mode is set for a tape parti...

Страница 121: ...n BlackPearl object names The slash character is also technically not allowed in LTFS file names however the BlackPearl software can accommodate a slash in the object name and translates it as a direc...

Страница 122: ...threshold in the text box to the left of the unit size drop down menu b Using the Auto Eject Verify Task Priority drop down menu select a task priority for tapes to be verified when they are automati...

Страница 123: ...for Every week on This determines the day s of each week the system ejects tapes 9 Click Create The new storage domain displays on the Advanced Bucket Management screen Add a Storage Domain Member to...

Страница 124: ...omain details screen 3 Select Action New Storage Domain Member The New Storage Domain Member dialog box displays Figure 40 The New Storage Domain Member dialog box 4 Use the Partition Name drop down m...

Страница 125: ...his member of the storage domain This setting determines the preferred usage of the partition when additional capacity is needed The system uses a partition with High write preference before a partiti...

Страница 126: ...ctly one blob Blobbing must be enabled to handle objects larger than 1 TB to use multi part upload or to break up an object into multiple blobs Note Disabling blobbing guarantees that an object will n...

Страница 127: ...mpletes the tape remains in the drive during data verification Only the data just written by the PUT job is verified This verification does not update the Last Verified field on the tape details scree...

Страница 128: ...page 118 for more information The Keep Latest setting requires that the PUT job for the earlier version of the object complete before the PUT of the latest version of the object with the same name in...

Страница 129: ...n see Figure 30 on page 102 2 Select the row for the data policy for which you want to create a new ACL for a group then select Action Show Details The Data Policy details screen displays 3 From the m...

Страница 130: ...data policy ACL 5 Click Create Add Data Persistence Rules and Replication Rules to a Data Policy Once a data policy is created you must add persistence rules A persistence rule is either permanent me...

Страница 131: ...Data Policy details screen displays Figure 44 The Data Policy details screen 3 Select Action New Data Persistence Rule The New Data Persistence Rule dialog box displays Figure 45 The New Data Persist...

Страница 132: ...policies configured to use tape storage Notes The Standard isolation level provides the best capacity utilization and overall performance Bucket Isolated allocates an entire tape or pool to a bucket...

Страница 133: ...em to use when creating the bucket for replicated data Alternatively you can leave the field blank Notes The data policy name is case sensitive If the field is left blank and the BlackPearl target was...

Страница 134: ...e to use for the for the replication target is Permanent or Retired Note You cannot create a replication rule as Retired You can only modify a rule from permanent to retired after creating the replica...

Страница 135: ...e Data Replication Rule to a Data Policy 1 If necessary select Configuration Advanced Bucket Management Storage Data Policy Management to display the Advanced Bucket Management screen see Figure 30 on...

Страница 136: ...s 1 GB Note To prevent data transfer failures it is important that this value not exceed the maximum blob size that the target is able to accept 8 Click Create The new Microsoft Azure replication rule...

Страница 137: ...ded If you are using bucket names that only differ by case the buckets are combined on the cloud target causing possible data collision and bucket ownership permission problems For BlackPearl software...

Страница 138: ...the bucket for which you want to create an ACL and select Action Show Details The bucket details screen displays Figure 51 The bucket details screen 3 Select Action New Bucket ACL For Group The New B...

Страница 139: ...ect the bucket for which you want to create an ACL and select Action Show Details The bucket details screen displays Figure 53 The bucket details screen 3 Select Action New Bucket ACL For User The New...

Страница 140: ...ion consult the Spectra StorCycle User Guide To transfer data using a Spectra S3 client consult the Spectra BlackPearl Spectra S3 API Reference and documentation specific to each Spectra S3 client IMP...

Страница 141: ...Storage Domain Member page 144 Edit a Storage Domain page 145 Delete a Storage Domain page 146 Manage Data Replication Rules page 147 Edit a BlackPearl Data Replication Rule page 147 Edit an Amazon S...

Страница 142: ...ement page 166 Edit a Bucket ACL page 167 Delete a Bucket ACL page 168 Edit a Bucket page 168 Delete a Bucket page 169 MANAGE A STORAGE DOMAIN Use the instructions in this section to edit or delete a...

Страница 143: ...ompaction occurs when the percentage of deleted objects on a tape cartridge exceeds this value 5 If desired using the drop down menu edit the Write Preference field as necessary See Add a Storage Doma...

Страница 144: ...0 on page 102 2 Double click the row for the storage domain with the storage domain member that is currently being excluded or select the storage domain row and then select Action Show Details The Sto...

Страница 145: ...ow or the Partition details screen will open A confirmation dialog box displays Figure 56 The delete storage domain member confirmation dialog box 4 Type DELETE into the entry field and then click Del...

Страница 146: ...scription of each field 4 Click Save The edited storage domain displays on the Advanced Bucket Management screen Delete a Storage Domain Use the instructions in this section to delete a storage domain...

Страница 147: ...replicate deletes for a BlackPearl data replication rule Note Some edits are restricted based on whether a bucket is currently using the data policy If an edit is not allowed an error message displays...

Страница 148: ...edited BlackPearl data replication rule displays on the Data Policy details screen Edit an Amazon S3 Data Replication Rule Use the instructions in this section to change the type Initial Data Placeme...

Страница 149: ...the Replication Targets screen will open The Edit Amazon S3 Data Replication Rule dialog box displays Figure 60 The Edit Amazon S3 Data Replication Rule dialog box 4 The Amazon S3 target name is unava...

Страница 150: ...the data policy and then select Action Show Details The Data Policy details screen displays see Figure 44 on page 131 3 Double click the row of the Microsoft Azure data replication rule that you want...

Страница 151: ...he data policy with the replication rule that you want to delete or select the data policy and then select Action Show Details The Data Policy details screen displays see Figure 44 on page 131 3 Selec...

Страница 152: ...om the menu bar select Configuration Advanced Bucket Management Storage Data Policy Management to display the Advanced Bucket Management screen see Figure 30 on page 102 2 Select the row for the data...

Страница 153: ...Delete A confirmation dialog box displays Figure 64 The delete data policy confirmation dialog box 3 Type DELETE into the entry field and then click Delete Delete a Data Policy ACL Use the instructio...

Страница 154: ...data policy and then select Action Show Details The Data Policy details screen displays see Figure 44 on page 131 3 Double click the row of the persistence rule that you want to edit or select the ro...

Страница 155: ...uration Advanced Bucket Management Storage Data Policy Management to display the Advanced Bucket Management screen see Figure 30 on page 102 2 Double click the data policy with the persistence rule th...

Страница 156: ...agement Replication Targets to display the Replication Targets screen see Figure 34 on page 110 2 Double click the BlackPearl replication target that you want to edit or select the replication target...

Страница 157: ...ation Targets screen see Figure 34 on page 110 2 Double click the Amazon replication target that you want to edit or select the replication target and then select Action Edit The Edit Amazon S3 Target...

Страница 158: ...dit The Edit Microsoft Azure Target dialog box displays Figure 69 The Edit Microsoft Azure Target dialog box 3 Edit the fields as necessary See Create a Microsoft Azure Target on page 116 for a descri...

Страница 159: ...ete 4 Click Verify The system confirms connectivity to the target and optionally verifies the replicated data Put a Replication Target in Standby State If you need to perform service on a replication...

Страница 160: ...this section to activate a replication target currently in standby Once activated data transfers are allowed to the replication target 1 From the menu bar select Configuration Advanced Bucket Manageme...

Страница 161: ...replication target from a data policy 1 From the menu bar select Configuration Advanced Bucket Management Replication Targets to display the Replication Targets screen see Figure 34 on page 110 2 Sele...

Страница 162: ...ct Configuration Advanced Bucket Management Storage Data Policy Management to display the Advanced Bucket Management screen see Figure 30 on page 102 2 Select the disk partition row and then select Ac...

Страница 163: ...n Delete A confirmation dialog box displays Figure 75 The Delete Disk Partition confirmation dialog box 3 Type DELETE into the entry field and then click Delete MANAGE ONLINE AND NEARLINE DISK POOLS U...

Страница 164: ...tion 3 From the menu bar select Configuration Advanced Bucket Management Storage Policy Management to display the Advanced Bucket Management screen see Figure 30 on page 102 4 Disk pools eligible for...

Страница 165: ...n existing bucket Value Description Use system default The system uses the behavior displayed in the System Default Conflict Resolution Mode row of the Import dialog box Cancel Abort the import proces...

Страница 166: ...splays Figure 77 The Delete Nearline Disk Pool confirmation dialog box Figure 78 The Delete Online Disk Pool confirmation dialog box 3 Enter DELETE POOL into the entry field and click Delete The disk...

Страница 167: ...Buckets The Buckets screen displays see Figure 49 on page 136 2 Select the bucket for which you want to edit an ACL and select Action Show Details The bucket details screen displays see Figure 51 on...

Страница 168: ...instructions in this section to change the owner of a bucket or to change the data policy used by the bucket 1 From the menu bar select Configuration Buckets The Buckets screen displays see Figure 49...

Страница 169: ...erations immediately Any bucket data that was written to tape media is retained until the tape is loaded into a drive and new data is written 1 From the menu bar select Configuration Buckets The Bucke...

Страница 170: ...Configure the Spectra S3 Service page 183 Configure the Active Directory Service page 187 Configure the SNMP Service page 191 Configure the Vail Service page 193 Configure and Use Encryption page 195...

Страница 171: ...o edit the system name configure Ethernet ports and DNS settings and to enter SMTP and NTP information Figure 83 The Network screen Configure Ethernet Ports This section describes using the BlackPearl...

Страница 172: ...earl system only one type port can be used in each link aggregation configuration You can only use the BlackPearl management port to access the BlackPearl user interface You cannot use this port for d...

Страница 173: ...click the Network pane from the Dashboard screen The Network screen displays 2 In the Network Interfaces pane double click the Management row or select the Management row and then select Action Edit T...

Страница 174: ...e default gateway for the BlackPearl system The IPv6 Gateway does not need to be configured when the BlackPearl system is connected to a SLACC network 7 Change the MTU value if desired If you set the...

Страница 175: ...oes not apply to IPv6 5 To configure a static address click the button and enter the following information IP Address Enter a valid IPv4 or IPv6 address Note You cannot enter an IPv4 address if you se...

Страница 176: ...ration Network or click the Network pane from the Dashboard screen The Network screen displays see Figure 83 on page 171 2 Select the row of the data connection you want to edit and select Action Edit...

Страница 177: ...ork 7 Change the MTU Maximum Transmission Unit value if desired If you set the MTU value to something other than 1500 ensure that your switch configuration supports larger MTU settings as well as all...

Страница 178: ...1 2 Select the row of the configuration you want to clear and select Action Clear from the menu bar A confirmation window displays 3 Click Delete to clear the Ethernet configuration Configure DNS Sett...

Страница 179: ...Pearl management port is configured with a static IP address or if you selected Manual enter the following information a Enter the IP address of one or more name servers in the Name Servers field b En...

Страница 180: ...by your mail server 5 If your SMTP server uses TLS Transport Layer Security authentication select the Enable TLS Authentication check box and enter the required Username and Password information 6 En...

Страница 181: ...etwork or select the Network pane from the Dashboard screen The Network screen displays Figure 91 The Date and Time pane of the Network screen 2 Double click the System Time to edit the date and time...

Страница 182: ...etters numbers and the hyphen character in the system name Notes The first section of the system name up to a delimiter for example a period cannot be longer than 15 characters Valid BlackPearl domain...

Страница 183: ...age 233 Configure the Spectra S3 Service 1 From the menu bar select Configuration Services to display the Services screen Figure 94 The Services screen 2 Double click the S3 service or select the S3 s...

Страница 184: ...s To manually start the data path backend see Reboot or Shut Down a BlackPearl System on page 331 If the Auto Activate Timeout is set to 0 the data path backend will never auto activate 6 Using the dr...

Страница 185: ...information Data migration is initiated manually See Data Migration on page 292 for more information If this option is currently enabled when the setting is disabled any in progress IOM operations are...

Страница 186: ...r Unavailable Media Policy This setting configures how the system behaves where there is unavailable tape or disk partitions when creating new jobs or retrying to process job data Value Description Al...

Страница 187: ...he Services screen displays see Figure 94 on page 183 2 Double click the Active Directory row or select the Active Directory row and select Action Show Details The Active Directory details screen disp...

Страница 188: ...Trusted Domains if the Active Directory domain you want to join is a trusted domain 9 Click Join Domain Edit Domain If desired you can edit your Active Directory configuration to enable or disable sup...

Страница 189: ...meters should not be configured without a full understanding of the consequences 1 From the menu bar select Configuration Services The Services screen displays see Figure 94 on page 183 2 Double click...

Страница 190: ...n Show Details The Active Directory details screen displays 3 Select the advanced parameter which you want to edit then select Action Edit Advanced Parameter The Edit Advanced Parameter dialog box dis...

Страница 191: ...Service 1 From the menu bar select Configuration Services to display the Services screen see Figure 94 on page 183 2 Double click the SNMP service or select the SNMP service and select Action Show De...

Страница 192: ...y string is set for each client The clients monitor SNMP notifications for any that use the string specified here f Repeat Step a through Step e as needed to add additional clients 8 Click Save Downlo...

Страница 193: ...on page 191 Configure the Vail Service The Vail service configures a BlackPearl system for use with a Spectra Vail sphere The Vail service only displays in the Services menu after an activation key is...

Страница 194: ...ogic recommends setting this value to the pair of ports your S3 service is not currently using If necessary see the S3 service details screen to determine the ports currently in use by the S3 service...

Страница 195: ...te a password to unlock the drives following a system power cycle You can select to store the password on the system so that the drives are unlocked automatically or to save the password to a USB key...

Страница 196: ...must manually enter the password each time the BlackPearl system initializes This setting is also allows you to create a USB device with the encryption password You can use the USB device when the sy...

Страница 197: ...ser interface Unlock the Self Encrypting Drives If the encryption service is configured to not store the password on the BlackPearl system use the instructions below to manually unlock the self encryp...

Страница 198: ...l system use the instructions below to create a USB key to store the encryption password that unlocks the self encrypting drives after the system initializes Insert the USB key when the system initial...

Страница 199: ...l user interface The PSID string is printed on the label physically attached to the drive It is not available from any other source Before you can perform a PSID erase you must remove the drive from t...

Страница 200: ...ar select Status Hardware or click the Hardware pane on the Dashboard or click the Hardware link on the status bar The Hardware screen displays see Figure 210 on page 307 11 Click Data Drives The hard...

Страница 201: ...ch user type Create a User To create a user see Create a User on page 61 Edit a User There are two methods you can use to edit a user through the User screen or the User Profile screen Note If you use...

Страница 202: ...desired edit the value for the Session Timeout in minutes This value cannot exceed 999 minutes 7 Select or clear one or more User Access permissions See Description of User Types on page 61 for infor...

Страница 203: ...ete The user can delete objects but cannot delete the bucket Job The user can modify or cancel jobs created by other users The user can also see the details of jobs created by other users Note All use...

Страница 204: ...rface on page 333 5 If desired edit the value for the Session Timeout in minutes This value cannot exceed 999 minutes 6 Click Save Change S3 Secret Key If an S3 secret key is compromised or you otherw...

Страница 205: ...in the entry box 5 Click Change to change the S3 secret key for the user Using the User Profile Screen 1 From the right side of the menu bar select Current User User Profile The User Profile screen di...

Страница 206: ...up you specify the global bucket and data policy access control lists Use the instructions in this section to create a new S3 group 1 From the menu bar select Configuration Users The Users screen disp...

Страница 207: ...T jobs Delete The S3 group can delete objects but cannot delete the bucket Job The S3 group can modify or cancel jobs created by other users The S3 group can also see the details of jobs created by ot...

Страница 208: ...From the menu bar select Configuration Users The Users screen displays see Figure 115 on page 206 2 Double click the S3 group to which you want to add an individual user as a member or select the grou...

Страница 209: ...From the menu bar select Configuration Users The Users screen displays see Figure 115 on page 206 2 Select the S3 group which you want to edit and from the menu bar select Action Edit The Edit S3 Grou...

Страница 210: ...management port to view the BlackPearl user interface or when you attempt to transfer data using the data port If desired you can install signed trusted SSL certificates for your data and management p...

Страница 211: ...into the Private Key entry box Note The private key must be in PEM format 6 Click Save MANUALLY ENTER ACTIVATION KEYS If this is an initial installation and your BlackPearl documentation kit included...

Страница 212: ...he specified number of SATA drives present in a 96 bay or 107 bay expansion node if the 107 bay expansion node contains SATA drives EM_S3_SSD_COUNT Enables the specified number of SSD drives present i...

Страница 213: ...Select Action New The Enter Activation Key dialog box displays Figure 123 The Enter Activation Key dialog box 4 Enter the key exactly as provided in the Activation Key field and click Create to save...

Страница 214: ...Pools page 215 Volumes and Shares page 215 Naming Considerations page 215 Create a NAS Storage Pool page 215 Create a Volume page 220 Create a Share page 227 Create a CIFS Share page 227 Create an NFS...

Страница 215: ...d volume name The combined name must be less than 78 ASCII characters or the volume fails to mount Additionally storage pool names are limited to 48 characters and volume names are limited to 62 chara...

Страница 216: ...Use the following steps to create a new storage pool 1 From the menu bar select Configuration NAS Pools or click the Pools pane on the Dashboard The NAS Pools screen displays Figure 124 The NAS Pools...

Страница 217: ...ialog box opens to show the default configuration options for the new pool Note The Storage Pool Preview pane does not display until you have selected the disks you want to use in the storage pool Fig...

Страница 218: ...ntage an alert is generated Enter 0 if you do not want to set an alert level Power Saving Mode Using the drop down menu select the desired Power Saving Mode Enabling the power saving mode sets the sta...

Страница 219: ...the best balance between data protection performance and storage capacity Triple parity Data is striped across multiple triple parity arrays which can tolerate three drive failures without data loss...

Страница 220: ...use the NFI service Network File Interface to automatically transfer files from the NAS storage to the local system s storage domains or to a remote BlackPearl system configure the NFI service before...

Страница 221: ...he combined storage pool and volume name must be 78 characters or fewer NFS does not allow spaces in share names As a result any spaces in the volume name are replaced by underscores in the correspond...

Страница 222: ...nimum Size and Maximum Size blank to create the volume with access to all available space on the storage pool Case Insensitive CIFS If desired select this option to configure the volume to treat all n...

Страница 223: ...he data on the BlackPearl system If the bucket does not exist it is automatically created Notes The bucket name cannot contain a colon forward slash or space The bucket name cannot exceed 255 characte...

Страница 224: ...an Hourly Schedule below Transfer data every selected number of hours Create a Daily Schedule on page 241 Transfer data every selected number of days Create a Weekly Schedule on page 242 Transfer data...

Страница 225: ...alog box select Daily as the interval for the policy schedule The dialog box changes to display options for the daily interval setting Figure 129 The New Volume dialog box showing the daily interval o...

Страница 226: ...ng Figure 130 The New Volume dialog box showing the weekly interval options b Enter a time value for Start Time and include AM or PM after the value This field is not case sensitive c Select one or mo...

Страница 227: ...n the Verde arrays However if your Windows operating system environment does not use Active Directory you can enable local administrator status on the system to allow a specified user to access the CI...

Страница 228: ...a new user with local administrator status See Create a User on page 61 1 From the menu bar select Configuration Users The Users screen displays Figure 131 The Users screen 2 Double click the row for...

Страница 229: ...IFS Share 1 From the menu bar select Configuration NAS Shares CIFS The CIFS Shares screen displays Figure 133 The CIFS Shares screen 2 Select Action New The New CIFS Share dialog box displays to show...

Страница 230: ...CIFS share only has access to the user directory even if the home volume contains other directories Note If you use a path that starts with two slashes for example path you are unable to edit permiss...

Страница 231: ...select Properties The General tab of the Properties window displays Note You cannot use the Computer Management panel to set permissions on CIFS shares Figure 135 The Properties window 3 Click Securit...

Страница 232: ...creen displays Figure 137 The NFS Shares screen 2 Select Action New The New NFS Share dialog box displays Figure 138 The New NFS Share dialog box 3 Use the drop down menu to select the Volume you want...

Страница 233: ...t access Standard access allows write permission to the share but does not allow the user to delete modify or rename files for which they do not have write permission ro Read Only The host can access...

Страница 234: ...configuring advanced parameters can expose security vulnerabilities and other serious issues Advanced parameters should not be configured without a full understanding of the consequences 1 From the me...

Страница 235: ...Services screen 2 Double click the NFI service or select the service and then select Action Show Details The details screen for the NFI service displays Figure 141 The NFI service details screen 3 Sel...

Страница 236: ...e BlackPearl 3 3 0 or later c Enter a value for the S3 Username The S3 Username helps you identify the user credentials provided for the BlackPearl system d Enter the S3 security credentials of a user...

Страница 237: ...configurations 6 Click Save Configure the NAS Replication Service If the BlackPearl system is on a network with Verde arrays or other BlackPearl systems with NAS enabled you can select to replicate d...

Страница 238: ...ports on the system with the volumes to replicate and the targets before you can configure replication see Configure Ethernet Ports on page 171 Your firewall must allow the source system and all targ...

Страница 239: ...er with administrator privileges configured on the target in the Username field 7 Enter the user password in the Password field if one is set Otherwise leave the field blank 8 Select the Enable Secure...

Страница 240: ...n the Destination Pool Name This field is case sensitive 7 Enter the name of a volume that resides on the target storage pool you selected in Step 6 in the Destination Volume Name field or enter the n...

Страница 241: ...on page 240 2 Enter a number for Every _ hours on the hour This value specifies the interval in hours between replicating data For example if this value is set to 4 the system replicates data every fo...

Страница 242: ...dialog box showing the weekly interval options 2 Enter a time value for Start Time and include AM or PM after the value This field is not case sensitive 3 Select one or more days for Every week on Th...

Страница 243: ...e 246 Managing Volumes page 247 Move a Volume page 247 Cancel a Volume Move page 247 Edit a Volume page 248 Delete a Volume page 250 Volume Snapshots page 250 Create a Snapshot page 251 Create a Snaps...

Страница 244: ...LS After creating one or more storage pools use the instructions in this section to edit expand or delete a pool Edit a Storage Pool You can edit an existing storage pool to change the value of the hi...

Страница 245: ...rives drop down menu to select the number of write performance drives to allocate to the storage pool 6 Click Save Expand a Storage Pool You can resize an existing storage pool to include more physica...

Страница 246: ...existing storage pool to make drives available for the new storage pool CAUTION When you delete a storage pool all data on it is lost If you want to keep the data migrate it to another location befor...

Страница 247: ...o a different storage pool 1 From the menu bar select Configuration NAS Volumes or click the Volumes pane on the Dashboard The Volumes screen displays see Figure 126 on page 220 2 Select the volume yo...

Страница 248: ...change the volume configuration Use the following steps to edit a volume 1 From the menu bar select Configuration NAS Volumes or click the Volumes pane on the Dashboard The Volumes screen displays se...

Страница 249: ...orage pool If there is insufficient space available saving the modified volume fails Maximum Size Select the desired unit size from the drop down menu and enter a numerical value for the maximum size...

Страница 250: ...onfiguration and data makeup as they were when the snapshot was generated Restoring to a previously created snapshot allows you to go back in time and restore the volume to the state it was in when th...

Страница 251: ...then 100 GB of capacity is made available for new data Create a Snapshot Use the following steps to create a snapshot 1 From the menu bar select Configuration NAS Volumes or click the Volumes pane on...

Страница 252: ...Decide which interval to use for the schedule and follow the appropriate instructions Create an Hourly Schedule below Create snapshots every selected number of hours Create a Daily Schedule on page 25...

Страница 253: ...our This value specifies the interval in hours between generating snapshots For example if this value is set to 4 the system creates a snapshot every four hours The maximum setting for this field is 4...

Страница 254: ...napshot Schedule The New Snapshot Schedule dialog box displays 2 Select Weekly as the interval for the snapshot schedule The dialog box changes to display options for the weekly interval setting Figur...

Страница 255: ...Use the instructions in this section to delete a snapshot schedule 1 From the menu bar select Configuration NAS Volumes or click the Volumes pane on the Dashboard The Volumes screen displays see Figur...

Страница 256: ...delete snapshots see Delete Snapshots below Delete Snapshots Use the following steps to delete a one or more snapshots 1 From the menu bar select Configuration NAS Volumes or click the Volumes pane o...

Страница 257: ...napshot deletion Delete Snapshot window shown 4 Type the indicated text in the entry field and click Delete to delete the selected snapshot or all snapshots Restore to a Snapshot Use the following ins...

Страница 258: ...t you want to use to restore the volume and then select Action Rollback CAUTION Rollback deletes all data changes made after the snapshot was created and deletes any snapshots that were saved after th...

Страница 259: ...dows explorer you must enter the full path of the snapshot from which you want to retrieve a file in the Windows explorer address bar Snapshots are organized as follows Z zfs snapshot snapshot name 3...

Страница 260: ...ake the desired changes see Create a Share on page 227 for more information and click Save Delete a Share If you do not want to continue sharing a volume that is you do not want users accessing the NA...

Страница 261: ...tart NAS Replication If desired you can initiate volume replication manually regardless of the automatic replication schedule configured for the volume Starting a manual NAS replication begins the rep...

Страница 262: ...plication Use the steps in this section to cancel a NAS replication 1 In the BlackPearl user interface select Configuration NAS Volumes The Volumes screen displays 2 Double click the volume name for w...

Страница 263: ...reate a Share on page 227 for instructions 3 If desired write protect the replicated volume before you copy files from the volume Note Spectra Logic highly recommends that you write protect the volume...

Страница 264: ...d check box The other options on the dialog box grey out and become un editable 5 Click Configure The volume no longer replicates to the target Edit the NAS Replication Service 1 On the source system...

Страница 265: ...Do not use http or https to precede the IP address or hostname 6 If desired modify the username of a user configured on the target in the Username field 7 Enter the user password in the Password field...

Страница 266: ...ata to the target 5 Repeat Step 3 and Step 4 to delete additional NAS replication targets if desired MANAGING NFI REPLICATION Edit the NFI Service If desired you can change the configuration of the pr...

Страница 267: ...et system 1 From the menu bar select Configuration NAS Volumes or click the Volumes pane on the Dashboard The Volumes screen displays see Figure 126 on page 220 2 Double click the volume for which you...

Страница 268: ...nd then select Action Show Details The details screen for that volume displays 3 Select Action Reinitialize NFI Transfer A confirmation window displays Figure 177 The Reinitialize NFI Transfer confirm...

Страница 269: ...nstructions for installing configuring and using the Deep Storage Browser use the documentation provided to you when you installed the program Note To retrieve a file you must use the S3 credentials f...

Страница 270: ...tiple Partitions page 278 Import Tapes page 279 Import Foreign Tapes page 279 Imported Tape Object Name Restrictions for Amazon S3 Replication page 280 Import BlackPearl Foreign Tape s page 281 Import...

Страница 271: ...Libraries and Media Topic Online a Tape Drive page 290 Remove a Tape Drive from a Tape Partition page 291 Delete a Tape Partition page 292 Data Migration page 292 November 2020 User Guide BlackPearl C...

Страница 272: ...ng the format operation Tapes are not eligible for formatting if they have a state of EJECTED LOST EJECT_ PENDING or OFFLINE In addition the Force parameter must be used to format a tape that contains...

Страница 273: ...rce a format on a cleaning tape If you do so the cleaning tape is set to expired and no longer usable for cleaning drives 4 Enter FORMAT in the entry field and click Format Tape or Format All Unmanage...

Страница 274: ...sociated with a BlackPearl system the tape may transition to the Pending Inspection state see State on page 308 and become unusable by the system To return the cartridge to a usable state manually req...

Страница 275: ...tandard eject mode in order for the BlackPearl system to automatically eject tapes If your library has only one partition it is already in Standard eject mode If there is more than one partition inclu...

Страница 276: ...pe 1 Select Status Tape Management to display the Tape Management screen see Figure 178 on page 272 2 Select the tape you want to eject and then select Action Edit The Edit Tape dialog box displays Fi...

Страница 277: ...rmation in the Eject Label and Eject Location fields This information is stored on the BlackPearl database and is visible when re importing the tape into a BlackPearl system You are not required to en...

Страница 278: ...ll tape ejections select Action Cancel All Ejects To cancel a single tape ejection select the tape for which you want to cancel the ejection and then select Action Cancel Tape Eject Eject Tapes from a...

Страница 279: ...the Tape Management screen If you imported new media the tape cartridges need to be formatted as described in Format Tapes on page 272 If you imported media previously exported from the BlackPearl sys...

Страница 280: ...lowing characters are not compatible with Amazon S3 targets Any object using one of these characters prevents the object from migrating to the Amazon S3 target Backslash Left curly bracket Right curly...

Страница 281: ...lackPearl Tapes or select the individual BlackPearl foreign tape that you want to import and select Action Import Foreign Tape The Import Foreign BlackPearl Tape or Import All Foreign BlackPearl Tapes...

Страница 282: ...k Save The foreign tape is imported into the BlackPearl system 9 Repeat Step 2 through Step 8 to import additional BlackPearl foreign tapes Import LTFS Foreign Tape s Use the instructions in this sect...

Страница 283: ...ociated with the bucket the system does not make additional copies of the objects on the tape 5 Using the Task Priority drop down list select the priority for the import process The priority determine...

Страница 284: ...Delete Lost or Ejected Tape A confirmation window displays 3 In the confirmation window click Delete The system deletes the tape from the database and it no longer displays on the Tape Management scr...

Страница 285: ...ckPearl system may attempt to use the tape library while it is in service Putting the tape library into standby allows you to service the tape library without disconnecting the interface cables betwee...

Страница 286: ...fic drive in the library see Reserve or Make Available a Specified Tape Drive on page 287 Use the instructions in this section to edit a partition 1 From the menu bar select Configuration Advanced Buc...

Страница 287: ...on on configuring IOM 7 Click Save Reserve or Make Available a Specified Tape Drive If desired you can reserve a specified tape drive in an exiting library partition to dedicate the drive to either re...

Страница 288: ...Type drop down menu select the type of operation for which you want to reserve the tape drive Select Read to reserve the drive for read operations Select Write to reserve the drive for write operation...

Страница 289: ...ent screen see Figure 30 on page 102 2 Select the tape partition that contains the drive you want to offline in the Tape Partitions pane and select Action Show Details The Tape Partition details scree...

Страница 290: ...vent further use by the BlackPearl system Offline drives with a Quiesced value of No indicate that the BlackPearl system cannot communicate with the drive Examine your tape library to determine the ca...

Страница 291: ...emoving a drive makes the drive inaccessible to the BlackPearl system It has no effect on the tape library configuration 1 From the menu bar select Configuration Advanced Bucket Management Storage Pol...

Страница 292: ...that you want to delete and select Action Delete A confirmation window displays 3 Enter DELETE in the entry box 4 Click Delete DATA MIGRATION If desired you can migrate data from one technology to ano...

Страница 293: ...age domain select the source tape storage domain member from which you want to migrate data and select Action Exclude The source tape storage domain member now displays exclusion in progress 5 Select...

Страница 294: ...Monitor the BlackPearl System page 301 Front Bezel Visual Status Beacon page 302 Configuring the Visual Status Beacon Color page 303 System Status LEDs page 304 Check System Messages page 305 View the...

Страница 295: ...lackPearl system can be downloaded using the BlackPearl user interface a Spectra S3 client or the Spectra Eon Browser For information on using the Spectra Eon Browser see the BlackPearl Eon Browser Us...

Страница 296: ...select Action Download The object begins downloading through your web server Cancel Spectra S3 Jobs You can use the BlackPearl user interface to cancel an in progress Spectra S3 job or to cancel all...

Страница 297: ...associated with a current in progress PUT job that are already uploaded to the system c Click Yes to cancel all S3 jobs or the individual selected S3 job Edit an S3 Job If desired you can edit the na...

Страница 298: ...anceled or Completed Jobs If desired you can clear completed or canceled jobs from the BlackPearl user interface 1 From the menu bar select Status S3 Jobs to display the S3 Jobs screen Figure 202 The...

Страница 299: ...or select the S3 service and select Action Show Details The S3 details screen displays 3 On the S3 service details screen select Action Activate Data Path Backend The Activate Data Path Backend confi...

Страница 300: ...he instructions in this section to configure the system to allow new jobs 1 From the menu bar select Configuration Services to display the Services screen see Figure 94 on page 183 2 Double click the...

Страница 301: ...ents on page 306 for more information Clicking the text next to each icon displays detailed status information for the components in the group You can also use the BlackPearl user interface to do the...

Страница 302: ...er interface to determine the cause of the warning Red Scroll The system is experiencing an Error condition Log in to the BlackPearl user interface to determine the cause of the error Orange Scroll Th...

Страница 303: ...2 Click Bezel The Bezel pane of the Hardware screen displays 3 Click the colored box next to Select Bezel Color The color picker window displays Figure 206 Use the color picker to set the color of th...

Страница 304: ...BlackPearl management port Network 2 Indicates network activity on data interface 1 This LED also shows network activity if data interface 1 is configured in link aggregation mode Fan Failure Overheat...

Страница 305: ...Alert Notifies the user that a failure as part of normal operation occurred which requires some sort of user interaction and until this occurs adverse impact to the BlackPearl system may occur Warnin...

Страница 306: ...he most recent messages The system holds 10 000 messages 2 If desired use the Page Length drop down menu to limit the Messages screen to the specified number of messages 3 To mark a single message as...

Страница 307: ...l Color of the Visual Status Beacon that is displayed during normal operation See Front Bezel Visual Status Beacon on page 302 for more information about the colors displayed by the Visual Status Beac...

Страница 308: ...led on the BlackPearl system From the menu bar select Configuration Services to display the Services screen Figure 211 The Services screen The Services screen displays the following information This c...

Страница 309: ...out the database and cache pools configured on the BlackPearl system as well as status information for each system pool 1 From the menu bar select Configuration Advanced Bucket Management Storage Poli...

Страница 310: ...perating normally Degraded One or more drives in the cache is missing or failed Raw Size The total amount of storage space assigned to each system pool Available The amount of unused storage space in...

Страница 311: ...the pool reaches this percentage an alert is generated No alert is generated when the percentage is set to zero Power Saving Mode Indicates if power saving mode is enabled or disabled Data Configurati...

Страница 312: ...BlackPearl system 1 From the menu bar select Configuration Buckets The Buckets screen displays see Figure 49 on page 136 2 Double click the name of the bucket for which you want to view the contents T...

Страница 313: ...s desired The S3 Jobs screen displays the following information This column Shows Name The name of the job request which is generated automatically using the job request type and IP address of the sou...

Страница 314: ...ally or loaded into cache from tape For VERIFY jobs this is the amount of data loaded into cache from the permanent data store Amount Archived Received The amount of data that is completely processed...

Страница 315: ...o view the status of the tapes associated with a bucket a From the menu bar select Configuration Buckets The Buckets screen displays b Select the bucket for which you want to view the tape media infor...

Страница 316: ...o a checkpoint DATA CHECKPOINT FAILURE DUE TO READ ONLY The tape should have data on it that is recognizable to the BlackPearl system but the system could not verify that the data on the tape is at th...

Страница 317: ...yet been inspected RAW IMPORT IN PROGRESS The data on an LTFS formatted tape not associated with a BlackPearl system is being imported into the BlackPearl system RAW IMPORT PENDING An LTFS formatted...

Страница 318: ...for the selected tape displays Figure 218 The details screen for a selected tape The details screen for a selected tape cartridge displays the following This row Shows Barcode The barcode label on th...

Страница 319: ...cartridge by either a manual verification or when the number of days specified in the storage domain that owns the tape passed Eject Label A user defined label entered when the tape is ejected Eject...

Страница 320: ...ape Drive or Interface drop down menu to select a specific pool disk drive tape drive or network connection to monitor 3 Select the time interval using the Resolution drop down menu The data can be di...

Страница 321: ...over the section of the detail graph that you want to magnify The highlighted section of data is shown on the main graph The range indicator graph continues to display the original range of data with...

Страница 322: ...igure 221 The Reports screen 2 Select check boxes next to the report s you want to generate Note Use the All or None buttons at the bottom of each report group to select or clear that group of reports...

Страница 323: ...p policy must be manually created If desired you can modify the settings of the preconfigured data policy or create a new data policy for database backups see Create a Data Policy on page 125 If you c...

Страница 324: ...Daily Schedule on page 325 Create backups every selected number of days Create a Weekly Schedule on page 325 Create backups on certain days of the week Create an Hourly Schedule 1 From the menu bar s...

Страница 325: ...number for the Minimum backups to keep on tape When the system generates a backup it determines the number of fully persisted backups and automatically deletes the oldest backups exceeding this number...

Страница 326: ...e system generates a backup it determines the number of fully persisted backups and automatically deletes the oldest backups exceeding this number Note Although the minimum number of backups is always...

Страница 327: ...isplays Figure 226 The Start Immediate Backup confirmation window 3 Click Backup Restore from a Database Backup Restoring a database backup returns the system to the state it was in when the backup wa...

Страница 328: ...hen the system completes initialization you must re import the pool on the 96 bay expansion node containing the backup file used to restore the database Restore Using a Database Backup Use the followi...

Страница 329: ...Backup screen displays see Figure 227 on page 328 2 Select Action Restore from Arbitrary File A confirmation window displays Figure 229 The Restore from Arbitrary File confirmation dialog box 3 Enter...

Страница 330: ...tion Database Backup The Database Backup screen displays 2 From the menu bar select Action Edit Data Policy The Edit Data Policy screen displays Figure 230 The Edit Data Policy screen 3 Use the Data P...

Страница 331: ...en refreshes to show you the storage pool or tape media the backup currently occupies Figure 231 The Database Backup Physical Placement screen REBOOT OR SHUT DOWN A BLACKPEARL SYSTEM This section disc...

Страница 332: ...e lower right hand corner of any screen in the BlackPearl user interface The Power screen displays Figure 232 The Power icon 2 Click either Reboot or Shutdown 3 A confirmation screen appears Confirm t...

Страница 333: ...n again to turn the system back on CAUTION Do not use the power button to turn off a BlackPearl system unless you are specifically instructed to do so by Spectra Logic Technical Support EXIT THE BLACK...

Страница 334: ...Enter Contact Information page 335 Configure Mail Recipients page 336 Create a New Mail Recipient page 336 Edit a Mail Recipient page 337 Send a Test Email page 338 Delete a Mail Recipient page 339 L...

Страница 335: ...l recipients receive ASL sets ENTER CONTACT INFORMATION Contact information helps Spectra Logic in contacting the administrator of the BlackPearl system during troubleshooting Entering the contact inf...

Страница 336: ...ou cannot send log sets or messages directly to an email address Use the Mail Recipient screen to add edit or delete mail recipient accounts Figure 234 The Mail Recipients screen Create a New Mail Rec...

Страница 337: ...og set Choose the message severities you want to receive Select from the listed message types which severities of message this mail recipient should receive The BlackPearl Converged Storage System sys...

Страница 338: ...337 for a description of each setting Send a Test Email Use the following steps to send a test email to a mail recipient 1 From the menu bar select Configuration Mail Recipients The Mail Recipients s...

Страница 339: ...figuration Mail Recipients to display the Mail Recipients screen with any already configured mail recipients listed see Figure 234 on page 336 2 From the list of mail recipients select the name of the...

Страница 340: ...erformance data about the system and are used by Spectra Logic Technical Support for in depth troubleshooting Statistic log sets are too large to be mailed directly from the system and must be downloa...

Страница 341: ...e New Log Set Schedule dialog box displays Figure 240 The New Log Set Schedule dialog box 3 Enter a time value for Start Time and include AM or PM after the value This field is not case sensitive 4 Se...

Страница 342: ...in general troubleshooting Continue with Email a Log Set on page 343 or Download a Log Set on page 344 OR Select Action New Statistic Log Set to generate a log set used for in depth troubleshooting Th...

Страница 343: ...log set Note You must configure the SMTP settings on the system before you can send emails See Configure SMTP Settings on page 179 to configure the SMTP settings 1 From the menu bar select Support Lo...

Страница 344: ...n displays see Figure 239 on page 340 2 Select the log set you want to delete and then select Action Delete A confirmation window displays asking you to confirm the action 3 Click Delete to remove the...

Страница 345: ...Software Version page 354 Download and Stage the Updated Software page 355 Install the Update page 356 Replacing a Failed Component page 357 Identify the Failed Component page 357 DATA INTEGRITY VERI...

Страница 346: ...hey are listed in the Suspect Objects pane If possible retrieve the object from another storage domain delete the object from the system and then PUT the object again delete and then reimport the obje...

Страница 347: ...f the tape cartridge If you specify a percentage the system starts the scan the specified percentage of the tape capacity before the EOD End of Data marker and ends the scan at the EOD marker This is...

Страница 348: ...r location they are lost Cancel Tape Media Verification If desired you can cancel queued data integrity verification Only tapes currently queued for data integrity verification are canceled Any tapes...

Страница 349: ...rices does not require you to create an account You must create a user account and log in to access Release Notes or repair documents to download the latest version of BlackPearl software or to open a...

Страница 350: ...lackPearl System Accessing the Technical Support Portal 2 On the home page click create an account Figure 245 The Spectra Logic Technical Support portal home page November 2020 User Guide BlackPearl C...

Страница 351: ...on If you do not have an invitation enter the requested information to create your account When you are finished click Sign Up When the account is approved you receive an email with a link to setup yo...

Страница 352: ...t Support Software The Software screen displays 2 Select Action Edit Automated Software Upload The Automated Software Upload dialog box displays Figure 247 The Automated Software Upload dialog box 3 S...

Страница 353: ...ystem also downloads the updated software The method used to update the system depends on if the Automated Software Upload feature is enabled or not and if enabled whether it is configured to download...

Страница 354: ...349 for information about creating an account and accessing the Technical Support portal 2 Select Downloads Product Software 3 On the Product Software page locate the BlackPearl system in the Spectra...

Страница 355: ...pectralogic com 2 Select Downloads Product Software The Product Software Screen displays Figure 250 The Product Software screen 3 Locate the BlackPearl system in the Spectra Product column The current...

Страница 356: ...tware Update screen with an available software package listed Install the Update 1 Discontinue all file storage operations on the BlackPearl system The system automatically reboots as part of the upda...

Страница 357: ...rations REPLACING A FAILED COMPONENT If a component in a BlackPearl system is not functioning properly the system generates a message and the hardware icon on the status bar of the BlackPearl user int...

Страница 358: ...om The Spectra 12 36 Drive Chassis Boot Drive Replacement Guide provides instructions for replacing a failed boot drive in the system The Spectra 12 36 45 Drive Chassis Drive Replacement Guide provide...

Страница 359: ...Guide provides instructions for replacing a failed power supply in the 96 bay expansion node The Spectra 96 Drive Chassis I O Module Replacement Guide provides instructions for replacing a failed I O...

Страница 360: ...t Port IP Address Conflict page 377 Using the Console page 377 Using a Separate Computer page 377 Network Setup Tips page 379 Configuration page 380 Connectivity to the Network page 380 Troubleshootin...

Страница 361: ...366 Can data be overwritten on existing tapes on page 366 How does a user cancel a write from the BlackPearl cache to tape cancel an in progress job on page 367 How does a user know if a component of...

Страница 362: ...on How does a user create a Bucket Isolated data policy for the database backup tapes Creating a bucket isolated data policy for your database backup tapes ensures that only the database backup bucket...

Страница 363: ...policies and options available to customize data policies see Understanding Spectra Advanced Bucket Management Concepts on page 66 For additional information about ejecting and importing tapes see Eje...

Страница 364: ...ectra Logic tape library For instructions on exporting a tape from an IBM TS4500 tape library see the see the TS4500 User Guide What happens if the user ejects the wrong tape Eject has multiple defini...

Страница 365: ...order for drives to be automatically cleaned you must store cleaning media in the single data partition on your T50e or T120 library When the BlackPearl system detects cleaning media in the data part...

Страница 366: ...or all cleaning tapes in the selected location and the number of cleanings remaining for each tape How does a user know if the tape media is running out of space The available capacity should be monit...

Страница 367: ...system has an error During installation of the BlackPearl system users are configured to receive emails if the BlackPearl system or the tape library issues a warning or error message See Configure Mai...

Страница 368: ...on page 292 for more information Can WORM media be used with the BlackPearl system If the BlackPearl system is configured to transfer data to tape make sure the partitions configured for use by the Bl...

Страница 369: ...lueScale interface as described in your Tape Library User Guide 2 T50e Select MENU General Media Lifecycle Management All other libraries Select General Media Lifecycle Management The MLM Report scree...

Страница 370: ...of each tape drive If a drive shows any status besides a good status green check mark in a circle click Details for that drive and take any action described in the details screen 3 Once the tape driv...

Страница 371: ...formation in the Eject Label and Eject Location fields This information is stored on the BlackPearl database and is visible when reimporting the tape into a BlackPearl system 8 Click Eject The tape is...

Страница 372: ...guring a partition to use the Standard mode for the Entry Exit port An email is sent from the BlackPearl system indicating that the tape backend is deactivated This issue can occur if the attached tap...

Страница 373: ...able components in the BlackPearl system may wear down and fail Use the instructions in this section to determine the failed component 1 In the BlackPearl user interface select Status Hardware The Har...

Страница 374: ...nt screen displays 2 Under Tape Partitions make sure all tape partitions listed show a State of Online and a Standby status of No If any tape partitions are in standby state select the tape partition...

Страница 375: ...ary 3 The BlackPearl system automatically inspects and uses the tapes as needed The BlackPearl Tape Management screen shows media in the attached tape library as Inspect Failed The BlackPearl system u...

Страница 376: ...twork issue use the steps below to collect logs and open a ticket with Spectra Logic Technical Support 1 In the client software collect a set of logs if available 2 Download the Archive Provider logs...

Страница 377: ...ecommended way to change the BlackPearl management port IP address For instructions on using the console to configure the management port IP address see Configure the BlackPearl Management Port on pag...

Страница 378: ...bar select Configuration Network or click the Network pane from the Dashboard screen The Network screen displays 8 In the Network Interfaces pane double click the Management row or select the Manageme...

Страница 379: ...dress of the BlackPearl management port you lose your connection to the user interface when you save your changes To re establish the connection enter the new IP address in your browser and log in aga...

Страница 380: ...ta path Recommended For the 10 GigE optical card Single 10 GigE logical connection using one of the 10 GigE physical ports OR Single 20 GigE logical connection using two 10 GigE physical ports link ag...

Страница 381: ...ents only one MAC address but can have up to 16 IP addresses aliased to the MAC address It is up to the switch to rotate data transfers among the physical ports on the BlackPearl system in order to ac...

Страница 382: ...ss for the BlackPearl management port or data port If this is not successful use the following troubleshooting tips to ascertain if the problem is a network setup issue Troubleshooting Port Link LED D...

Страница 383: ...ork node The ping command is based on ICMP Internet Control Message Protocol The request is an ICMP Echo request packet and the reply is an ICMP Echo Reply Like a regular IP packet an ICMP packet is f...

Страница 384: ...oute 192 168 2 10 shows a numbered list indicating the number of hops encountered when tracing the packet from the switch to the BlackPearl system SPECTRA LOGIC TECHNICAL SUPPORT Spectra Logic Technic...

Страница 385: ...hnical Support portal or telephone 1 Make notes about the problem including what happened just before the problem occurred 2 Gather the following information Company name contact name phone number and...

Страница 386: ...idents page you are given an opportunity to search for existing support content that may help you solve your problem immediately If the search does not provide an answer click Open a New Incident Note...

Страница 387: ...ing as much detail as possible When you are finished click Create Incident Figure 264 The Create Incident page If it is within the hours of coverage provided by your support contract contact Spectra L...

Страница 388: ...kPearl 4 x or later the primary administrator account is named Administrator If you have upgraded from BlackPearl 3 x to BlackPearl 4 0 or later the settings and permissions of the primary administrat...

Страница 389: ...port activation key See Configure Network Connections and Settings on page 171 for more information 5 Click Save IMPORTANT After Spectra Logic Technical Support informs you that they no longer require...

Страница 390: ...rl 3 x to BlackPearl 4 0 or later the settings and permissions of the primary administrator account are migrated from the Spectra user to the Administrator user The Spectra user is maintained on the B...

Страница 391: ...r 13 Troubleshooting and Support Remote Support Figure 266 The Edit User dialog box 3 Clear the Enable Remote Support check box 4 Click Save November 2020 User Guide BlackPearl Converged Storage Syste...

Страница 392: ...onnect a monitor and USB keyboard to the rear of the BlackPearl system See Rear Panel on page 36 to locate the monitor and USB connectors 3 Power on the system as described in Power On the System on p...

Страница 393: ...Dedicated Always uses the dedicated IPMI port for IPMI traffic Shared Always uses the LAN1 port for IPMI traffic Failover On system startup detect if the dedicated IPMI port is connected If not the sy...

Страница 394: ...ds display Figure 269 Enter Static IP information 11 Configure the Station IP address Subnet mask and Router IP address with the desired address values Note Only IPv4 addresses are valid 12 Press F4 t...

Страница 395: ...tion Data Storage Specifications page 395 Drive Specifications page 396 Capacity page 397 System Specification page 398 Size and Weight page 400 Environmental Specifications page 402 Power Requirement...

Страница 396: ...400 or 800 GB Solid State SAS a Object Cache 4 8 12 or 16 TB Spinning Disk SAS b 12 or 16 TB Spinning Disk SATA b 12 TB Spinning Disk Self Encrypting Drives b 44 Bay Expansion Node Drive Purpose Spec...

Страница 397: ...TB drives 160 TB 20 12 TB drives 240 TB 20 16 TB drives 320 TB BlackPearl 4U System object cache capacity using SSDs 10 960 GB drives 9 6 TB 10 1600 GB drives 16 TB 10 1920 GB drives 19 2 TB 20 960 GB...

Страница 398: ...es 972 TB c 77 16 TB drives 1232 TB d 107 bay expansion node 107 4 TB drives 428 TB 107 8 TB drives 856 TB 107 12 TB drives 1284 TB 107 16 TB drives 1712 TB SYSTEM SPECIFICATION The following table pr...

Страница 399: ...o integrated 10GBase T Ethernet ports a One dual port 10 Gigabit Ethernet NIC Optional One dual port 40 Gigabit Ethernet NIC Optional One dual port 10GBase T Ethernet NIC Optional four port SAS card b...

Страница 400: ...SSDs 9 HDDs 2 SSDs 37 2 lb 17 2 kg 46 7 lb 21 2 kg 55 7 lb 25 3 kg N A 67 7 lb 30 7 kg 76 7 lb 34 8 kg BlackPearl 4U System and 44 Bay Expansion Node Parameter BlackPearl 4U System and 44 Bay Expansio...

Страница 401: ...g 21 lb 9 5 kg 107 Bay Expansion Node Parameter 107 bay Expansion Node Shipping Container Dimensions Height 4U Width Depth 7 in 17 8 cm 17 in 43 2 cm 41 in 104 1 cm a 18 4 in 46 7 cm 24 3 in 61 7 cm 5...

Страница 402: ...ameter Operating Environment a Storing and Shipping Non Operating Environment b Humidity 20 to 80 non condensing 10 to 90 non condensing Temperature 41 F to 95 F 5 C to 35 C 40 F to 140 F 40 C to 60 C...

Страница 403: ...e BlackPearl 2U master node 3138 BTUs hour BlackPearl 4U master node 3410 4365 BTUs hour 44 bay expansion node 3751 4775 BTUs hour 96 bay expansion node 3751 BTUs hour 107 bay expansion node 6820 BTUs...

Страница 404: ...uirements for each system or expansion node BlackPearl 2U System Parameter Requirements Input Voltage 100 240 VAC 11 4 5 A 920 watts maximum Input Frequency 50 60 Hz BlackPearl 4U System Parameter Req...

Страница 405: ...Spectra Logic are between 6 ft 1 8m to 6 5 ft 2m in length If you need to use a longer cord make sure it conforms to the specifications listed below Power cords must comply with local electrical code...

Страница 406: ...meter Specification Power cordage SJT type three conductor 14 AWG minimum Power input connectors BlackPearl 2U and 4U Master Node Male Connector must be of the proper type rating and safety approval F...

Страница 407: ...lackPearl 2U and 4U Master Node Male Connector must be of the proper type rating and safety approval Female IEC 60320 C13 44 Bay Expansion Node Male Connector must be of the proper type rating and saf...

Страница 408: ...S 6 Gbps Four SFF 8644 sockets per optional 6 Gbps SAS card provide connections to two 44 bay expansion nodes using two ports for each expansion node Four SFF 8644 sockets per optional 6 Gbps SAS card...

Страница 409: ...in the 107 bay expansion node Maximum of two expanders SAS Tape Drive T50e library Two SFF 8088 ports per tape drive Only a single port is required to connect the tape drive to a BlackPearl system Ei...

Страница 410: ...provided by the customer SAS 44 bay expansion node 6 Gbps 4 lane cable with SFF 8644 and SFF 8088 connectors Two SAS cables are required for each 44 bay expansion node Note Two SAS cables are include...

Страница 411: ...or the following USB mass storage devices for example flash drives Keyboards pointer devices for example a computer mouse CD or DVD drives with USB interface Spectra Logic does not support using the U...

Страница 412: ...brary in a rack T120 and T50e only Remove the shipping lock or shipping screw T120 and T50e only Install the tape drives T120 and T50e only Connect the cables AutoInstall the option activation keys an...

Страница 413: ...gure the BlackPearl Management Port on page 50 Automatically Import Activation Keys on page 51 Log Into the BlackPearl User Interface on page 52 Configure the Data Connection on page 55 Configure SMTP...

Страница 414: ...Check if tapes are ready for use See View Tape Media Information on page 315 Tapes should have a status of Managed Managed Format in Progress Managed Format Pending or Pending Inspection Manually Gen...

Страница 415: ...19 System Specification page 420 Interface Specifications page 420 COMPONENTS The following sections show the locations of and briefly describe the BlackPearl 1 0 chassis major front and rear panel co...

Страница 416: ...304 for more information Data drives The base BlackPearl Converged Storage System 4U system includes one high performance solid state drive and five spinning disk drives mounted on individual drive sl...

Страница 417: ...Rear Panel on page 418 for a detailed description Boot drives The boot drives provide storage for the operating system and BlackPearl user interface The boot drives for the BlackPearl 2U system are h...

Страница 418: ...the BlackPearl Converged Storage System 4U and 2U systems Figure 274 The BlackPearl rear panel components Component Description IPMI management port Not currently supported Gigabit Ethernet ports Gig...

Страница 419: ...rives in a Spectra Logic tape library Expansion slots The expansion slots accommodate optional interface cards to provide additional connectivity An installed 10 Gigabit Ethernet network interface car...

Страница 420: ...it Ethernet NIC Optional four port SAS card Optional two port Fibre Channel card BlackPearl 4U System Parameter Specifications CPU Two multi core processors System disk drives Two 250 GB SATA disk dri...

Страница 421: ...er optional Fibre Channel card Network Interface Cables The type of cables required to connect the BlackPearl system to the network depend on the type of interface being used Interface Type Cable Requ...

Страница 422: ...safety requirements and is in conformity with the EU Directives listed below using the relevant section of the EU standards and other normative documents listed in the following table Nicole Gallego S...

Страница 423: ...y EN 61000 4 8 1994 A1 2001 Power Frequency H field Immunity EN 61000 4 11 1994 A1 2001 Voltage Dips and Interrupts EN 61000 3 2 2000 Power Line Harmonics EN 61000 3 3 1995 Power Line Flicker EC Low V...

Страница 424: ...Appendix E Regulatory Safety Standards EU Declaration of Conformity November 2020 User Guide BlackPearl Converged Storage System 424...

Страница 425: ...Appendix E Regulatory Safety Standards EU Declaration of Conformity November 2020 User Guide BlackPearl Converged Storage System 425...

Страница 426: ...ion The safety issues of this information technology equipment type have been evaluated by a government accredited European third party organization such as Nemko CE MARKING The CE marking is affixed...

Страница 427: ...ed in accordance with the instruction guide may cause harmful interference to radio communications Operation of this equipment in a residential area is likely to cause harmful interference in which ca...

Страница 428: ...duct European Union users should contact their local waste administration for WEEE collection instructions for this product Restriction of Hazardous Substances in Electrical and Electronic Equipment R...

Страница 429: ...from conflict free smelters Each affected supplier to Spectra Logic will be required to provide completed EICC GeSI declarations evidencing such supplier s commitment to becoming conflict free and do...

Страница 430: ...copy of the License at http www apache org licenses LICENSE 2 0 Unless required by applicable law or agreed to in writing software distributed under the License is distributed on an AS IS BASIS WITHOU...

Страница 431: ...terpreted as representing official policies either expressed or implied of the FreeBSD Project JAVA ORACLE AMERICA INC ORACLE FOR AND ON BEHALF OF ITSELF AND ITS SUBSIDIARIES AND AFFILIATES UNDER COMM...

Страница 432: ...orage management systems and other related systems are excluded from this definition and not licensed under this Agreement Programs means a Java technology applets and applications intended to run on...

Страница 433: ...LAIMER OF WARRANTY THE SOFTWARE IS PROVIDED AS IS WITHOUT WARRANTY OF ANY KIND ORACLE FURTHER DISCLAIMS ALL WARRANTIES EXPRESS AND IMPLIED INCLUDING WITHOUT LIMITATION ANY IMPLIED WARRANTIES OF MERCHA...

Страница 434: ...y a U S Government prime contractor or subcontractor at any tier then the Government s rights in Software and accompanying documentation shall be only those set forth in this Agreement 10 GOVERNING LA...

Страница 435: ...d testing your Programs C LICENSE TO DISTRIBUTE SOFTWARE Subject to the terms and conditions of this Agreement and restrictions and exceptions set forth in the README File including but not limited to...

Страница 436: ...nded to supersede any component s of the Redistributables unless otherwise specified in the applicable README File iv you do not remove or alter any proprietary legends or notices contained in or on t...

Страница 437: ...ar information can typically be found in the Software s About box or screen This information must be placed on the Media label in such a manner as to only apply to the JDK vi You must clearly identify...

Страница 438: ...ME file accessible at http www oracle com technetwork java javase documentation index html In addition to any terms and conditions of any third party opensource freeware license identified in the THIR...

Страница 439: ...mentation and or other materials provided with the distribution THIS SOFTWARE IS PROVIDED BY THE AUTHOR AND CONTRIBUTORS AS IS AND ANY EXPRESS OR IMPLIED WARRANTIES INCLUDING BUT NOT LIMITED TO THE IM...

Страница 440: ...and library files of the software together with instructions in the manual page or equivalent on where to get the original distribution b accompany the distribution with the machine readable source of...

Страница 441: ...CLUDING BUT NOT LIMITED TO THE WARRANTIES OF MERCHANTABILITY FITNESS FOR A PARTICULAR PURPOSE AND NONINFRINGEMENT IN NO EVENT SHALL THE AUTHORS OR COPYRIGHT HOLDERS BE LIABLE FOR ANY CLAIM DAMAGES OR...

Страница 442: ...61 1 cyrus sasl 2 1 26_12 dbus 1 10 16_1 dbus glib 0 108 dejavu 2 37 dmidecode 3 1_1 ds3 3 2 0 1701306 e2fsprogs libuuid 1 43 4 expat 2 2 1 fieldmod 1 0 0 1366684 fio 2 21 fontconfig 2 12 1 1 freetyp...

Страница 443: ...mon 1 0 15 jansson 2 12 java zoneinfo 2017 b javavmwrapper 2 5_2 ksh93 20120801_2 kyua 0 13_4 3 libarchive 3 3 3 1 libassuan 2 4 3 libdaemon 0 14_1 libedit 3 1 20170329_2 1 libevent 2 1 8 libffi 3 2 1...

Страница 444: ...e 3 9 2 lua52 5 2 4 lutok 0 4_6 lzo2 2 10_1 mbuffer 2016 06 13 mhash 0 9 9 9_4 mkfontdir 1 0 7 mkfontscale 1 1 2 monit 5 23 0_4 mtx 1 3 12_1 ncurses 6 0_3 net snmp 5 7 3_17 netperf 2 7 0 nettle 3 4 1_...

Страница 445: ...5 readline 7 0 3 redis 3 2 9 rrdtool 1 6 0_2 ruby 2 4 5 1 ruby24 gems 2 6 14 rubygem actioncable5 5 1 2 rubygem actionmailer5 5 1 2 rubygem actionpack5 5 1 2 rubygem actionview5 5 1 2 rubygem activejo...

Страница 446: ...5 1 rubygem byebug 9 0 6 rubygem capybara 2 14 4 rubygem childprocess 0 7 1 rubygem coffee rails rails5 4 2 2 rubygem coffee script 2 4 1 rubygem coffee script source 1 12 2 rubygem colorize 0 8 1 rub...

Страница 447: ...0 7 rubygem ffi 1 9 18 rubygem ffi locale 1 0 1_2 rubygem ffi ncurses 0 4 0_3 rubygem fio_rb 1 1 0 1141562 rubygem freebsd_cam 1 0 6 1687748 rubygem freebsd_mps 1 1 1 1325934 rubygem freebsd_ses 1 3 2...

Страница 448: ...etaclass 0 0 4 rubygem method_source 0 8 2 rubygem mime types 3 1 rubygem mime types data 3 2016 0521 rubygem minitest 5 10 2 rubygem mocha 1 2 1 rubygem multi_json 1 12 1 rubygem multi_test 0 1 2_1 r...

Страница 449: ...html sanitizer 1 0 4 rubygem rails5 5 1 2 rubygem railties5 5 1 2 rubygem rake 12 0 0_1 rubygem rb kqueue 0 2 5 rubygem rbcurse 1 5 3 rubygem rbcurse core 0 0 14_1 rubygem rbcurse extras 0 0 0 rubygem...

Страница 450: ...ctra_support 5 0 0 1644282 rubygem spectra_view 2 3 0 1719690_7 rubygem spectra_workers 5 0 0 1718457 rubygem spring rails5 2 0 2 rubygem sprockets rails rails5 3 2 0 rubygem sprockets3 3 7 1_1 rubyge...

Страница 451: ...1642179 samba48 4 8 11_2 sedutil 1 0 1643852 sg3_utils 1 42 smartmontools 7 0 smp_utils 0 98_1 spectra_ltfs 2 4 1 0 1698234_2 sqlite3 3 22 0_1 staf 3 4 23_3 t5seeprom 0 0 1366684_1 talloc 2 1 14 tdb 1...

Страница 452: ...ckPearl data replication rule about 132 add to data policy 132 delete 151 edit 147 BlackPearl software current available version 354 BlackPearl target about 109 create 109 BlackPearl user interface ab...

Страница 453: ...cation disk pools 345 tape media 347 data persistence rule about 130 add to data policy 130 delete 155 edit 154 data policy about 125 create 125 delete 153 edit 152 disk partition about 101 107 create...

Страница 454: ...ble 263 edit configuration 264 manual 261 NAS volumes 237 restore files from a replication target 263 NAS storage pools about 215 create new 215 delete 246 expand 245 options 104 107 218 protection le...

Страница 455: ...so technical support 387 power power off 331 power on 47 reboot 331 requirements 404 R rear panel 36 418 rear view 34 417 recycling 428 regulatory CE Marking 426 Conflict Mineral Policy 428 EU Declara...

Страница 456: ...rds 405 size and weight 400 system 398 420 Spectra Logic contacting 8 Spectra S3 clients 69 online forum 27 status lights 304 storage domain about 118 create 118 delete 146 edit 145 storage domain mem...

Страница 457: ...ure 201 delete 204 edit 201 types 201 V Visual Status Beacon lights 302 volumes see NAS volumes 215 W warning icon 45 website Spectra Logic 8 WEEE Directive 428 WORM tape media not supported 72 109 27...

Отзывы: