


1.
Select the ME, MiniME
™
, Aux, MultiScreen, or
keyer that you want to select a source on.
Tip:
The user select buttons can be assigned to select any
bus on the switcher. If you change what the button is
assigned to you should make sure to change the text on
the button cap.
•
ME
— press the user button assigned to the ME,
or press and hold a user button assigned to an
ME/MiniME
™
and press
ME1
or
ME2
on the
key bus.
•
MiniME
™
— press the user button assigned to
the MiniME
™
, or press and hold a user button
assigned to an ME/MiniME
™
and press
MinME1-4
on the key bus.
•
Aux
— press the user button assigned to the Aux,
or press and hold a user button assigned to an
Aux and press
AUX 1-8
on the key bus.
•
MultiScreen
— press the user button assigned
to the MultiScreen, or press and hold a user
button assigned to an ME/MiniME
™
and press
MultS1
or
MultS2
on the key bus.
Tip:
You can also press AUX X and press the knob for the
Aux Bus you want to select.
2.
Select the bus you want to select a source on.
Note:
Ensure that the source selected on the bus you want
to enter onto the ME, MiniME
™
, Aux, chroma key, or keyer
is valid for that destination. If the source is not valid, you
will not be able to select the bus on the ME, MiniME
™
, Aux,
chroma key, or keyer.
•
Background Bus
— use the BACKGROUND
bus.click
Background
.
•
Preset Bus
— use the PRESET bus.click
Preset
.
•
Key Bus
— press
KEY X SEL
to assign the
KEY/AUX/CUSTOM CONTROL bus to that
keyer.
•
Aux Bus
— use the KEY/AUX/CUSTOM
CONTROL bus.
3.
Select the source you want to use on the bus. Use
the
Shift
button to access additional sources. Select
the type of source you want to assign to the bus and
then select the source.
Tip:
Double-press the SHIFT button to lock the button row
to the shifted bus. Press the SHIFT button again to return
to the non-shifted bus. The Shift-Lock is reset when the ME
is reset, but not when a factory default or switcher set is
recalled.
•
Physical
— the sources on the physical input
BNCs.
•
Internal
— internally generated sources,
including re-entries.
•
Aux Follows
— use the source that is active
on selected aux bus.
•
ME Follows
— use the source that is active on
selected ME bus.
•
MiniME Follows
— use the source that is active
on selected MiniME
™
bus.
•
MultiScreen Follows
— use the source that
is active on selected MultiScreen bus.
Tip:
You can assign special sources to an Aux Bus by pressing
and holding the AUX X button and pressing the AUX PGM
(Program), AUX PV (Preview), or AUX CLN (Clean Feed) source
button on the Preset bus. These are the first three buttons on
the row.
For information on assigning video inputs to source
buttons, refer to the Setup Guide that came with your
switcher.
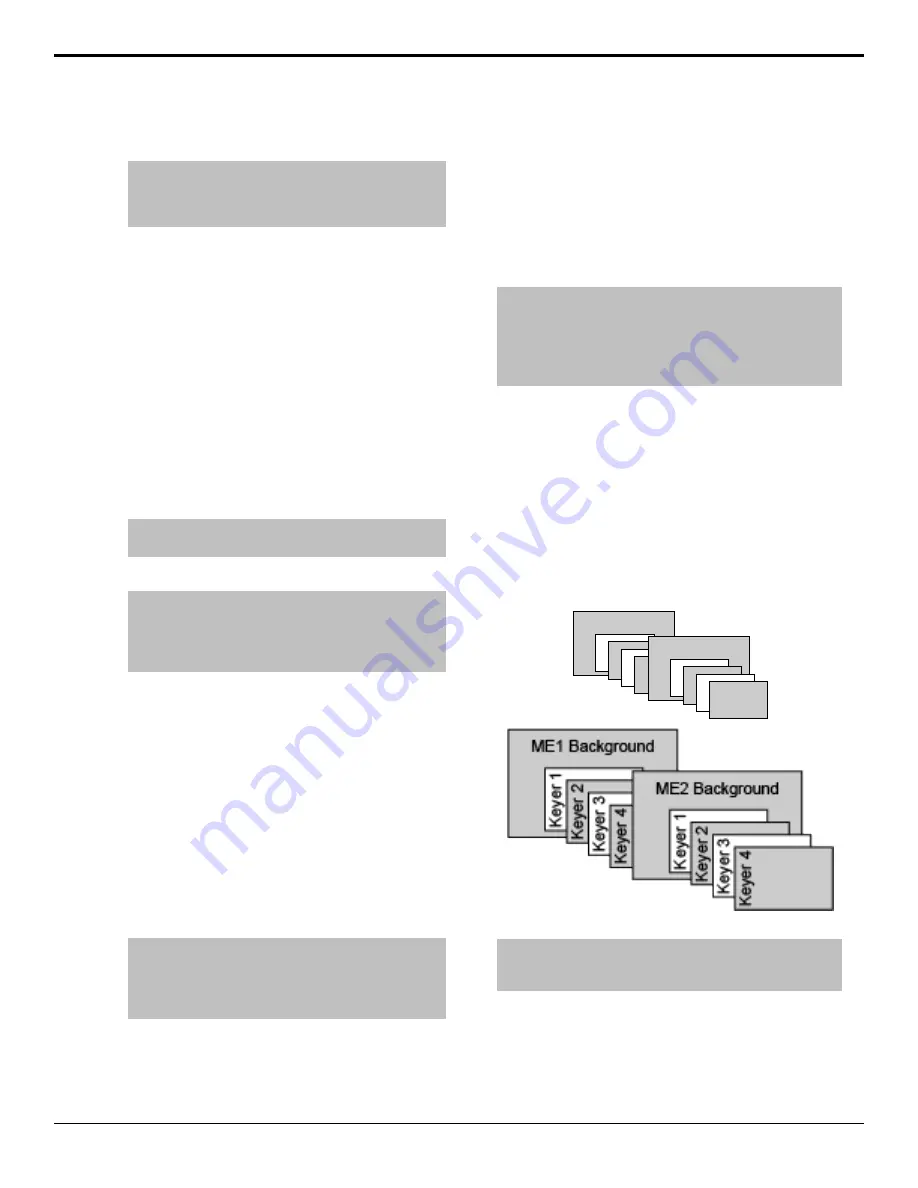
Video Layering
How video is layered in the output of the switcher
depends on how an ME is re-entered onto the other, and
what keyers are on-air for the ME. If we assume that
each ME has all keyers on-air, and that ME 1 is re-entered
into the ME 2, the layering will start with ME 1
Background and progress to the highest ME and keyer.
ME1 Background
K
e
y
er
1
K
e
y
er
2
K
e
y
er
3
K
e
y
er
4
ME2 Background
K
e
y
er
1
K
e
y
er
2
K
e
y
er
3
K
e
y
er
4
Figure 8: Video Layering
Tip:
You can select a MiniME
™
on an ME or different MiniME
™
to re-enter it. Up to two MiniME
™
re-entries, including an ME is
allowed.
ME Re-Entry
Re-entry is the term used to describe the process of
selecting another ME on an ME. For example, if you
select ME 1 on ME 2, ME 1 is said to be re-entered onto
ME 2. Re-entry takes the output of an ME and uses it as
Carbonite Operation Manual (v13.0) — Switcher Basics •
19