User Manual
18
i Series / iX Series
3.6 Connectors - Rear Panel
A number of connectors are located along the top rear covers. These connectors are in a
recessed area to protect them from shipment damage.
3.6.1 System Interface, Clock and Lock Connectors
WARNING: The system interface connector and Clock and Lock connectors may be at
hazardous voltages. These connections may not be used in table top applications. In
table top applications the safety cover must be in place. These connections may only
be used when the equipment is enclosed in a rack, only within one rack, only with
California Instruments supplied cables, and only between California Instruments
equipment.
J21 and J20 are the Clock and Lock connectors and are used to synchronize and control the
phase shift between the three outputs when 3 units are operating as a three-phase system with
the 15003iX - LK option.
The System Interface connector, J22, is used to connect the slave power sources to the Master
power source (the one with the controller) in multiple box systems. The connector is also used
for the external sync input, external modulation input and trigger output.
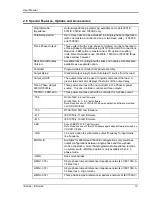
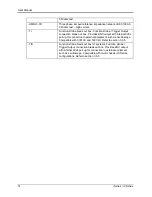
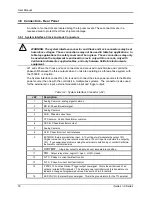
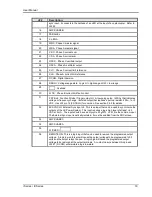
Table 3-2: System Interface Connector (J22)
J22
Description
1
Analog Common: analog signal common
2
MR B: Phase B master signal
3
Analog Common
4
CS B: Phase B current sum
5
CT Common: Current transformer common
6
OSC B: Phase B oscillator output
7
Analog Common
8
CL B: Phase B current limit reference
9
EXT MOD: External modulation input. A 10 volt input will modulate the output 10%.
Original versions of iX power sources required a 100 volt input to modulate the output by
10%. If you experience problems using the external modulation input, contact California
Instruments customer service.
10
OVR TEMP
¯¯¯¯¯¯¯¯¯¯ : A logic low output to indicate an over temperature condition.
11
CNF
¯¯¯ : Output relay state: Logic HI = open, LOW = closed.
12
FLT C: Phase C current limit fault control
13
FLT A: Phase A current limit fault control
14
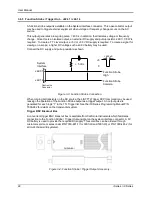
F STB LO: Function Strobe / Trigger output Low signal. This is the emitter lead of an
optically isolated NPN transistor. The internal power controller turns this transistor on to
indicate a change of programmed values. See section 3.6.5 for details.
15
EX SYNC LO: External Sync Low signal. This is the ground return for the TTL external
Содержание 10001i
Страница 2: ......
Страница 3: ......
Страница 6: ...ii This page intentionally left blank...
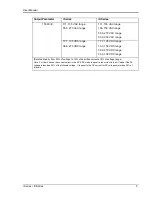
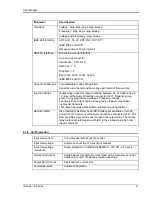
Страница 25: ...User Manual i Series iX Series 11 Parameter Specification Shock Designed to meet NSTA 1A transportation levels...
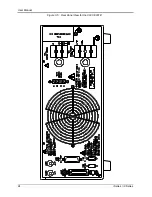
Страница 38: ...User Manual 24 i Series iX Series Figure 3 5 Rear Panel View for the 3001i 3001iX...
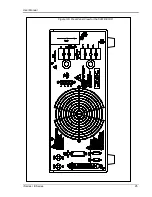
Страница 39: ...User Manual i Series iX Series 25 Figure 3 6 Rear Panel View for the 5001i 5001iX...
Страница 42: ...User Manual 28 i Series iX Series Figure 3 7 Connection For Single Power Source 5001iX i 3001iX i...
Страница 43: ...User Manual i Series iX Series 29 Figure 3 8 Functional Test Setup...
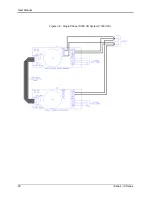
Страница 44: ...User Manual 30 i Series iX Series Figure 3 9 Single Phase 10000 VA System 10001iX i...
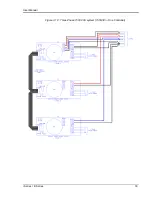
Страница 45: ...User Manual i Series iX Series 31 Figure 3 10 Three Phase 15000 VA System 15003iX i LK Three Controllers...
Страница 46: ...User Manual 32 i Series iX Series Figure 3 11 Single Phase 15000 VA System 15001iX i...
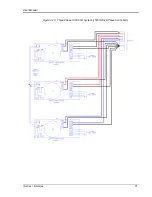
Страница 47: ...User Manual i Series iX Series 33 Figure 3 12 Three Phase 15000 VA system 15003iX i One Controller...
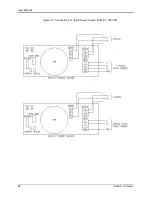
Страница 48: ...User Manual 34 i Series iX Series Figure 3 13 Connection With MODE Option...
Страница 49: ...User Manual i Series iX Series 35 Figure 3 14 Two Phase 10000 VA System 10002i LK Two Controllers...
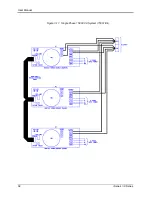
Страница 50: ...User Manual 36 i Series iX Series Figure 3 15 Three Phase 9000 VA System 9003iX i One Controller...
Страница 118: ...User Manual 104 i Series iX Series Figure 5 2 Power Source Module Block Diagram...
Страница 121: ...User Manual i Series iX Series 107 Figure 5 3 5001i Internal Layout...
Страница 122: ...User Manual 108 i Series iX Series Figure 5 4 Logic Board LED s...
Страница 124: ...User Manual 110 i Series iX Series Figure 5 5 AC Power Stage Layout...
Страница 125: ...User Manual i Series iX Series 111 Figure 5 6 AC Control Logic Block Diagram...
Страница 132: ...User Manual 118 i Series iX Series Figure 6 2 Test Equipment Hook up for Measurement Calibration...
Страница 138: ...User Manual 124 i Series iX Series Figure 6 3 Adjustment Location...
Страница 152: ...User Manual 138 i Series iX Series Figure 9 4 Voltage Modulation...
Страница 219: ...User Manual i Series iX Series 205 Figure 9 36 Example Connection With 5001iX and EOS 1...
Страница 220: ...User Manual 206 i Series iX Series Figure 9 37 Example Connection With Compliance Test System and EOS 1...
Страница 221: ...User Manual i Series iX Series 207 Figure 9 38 15003iX CTS EOS3 LR3...
Страница 222: ...User Manual 208 i Series iX Series Figure 9 39 15003iX 3 EOS3...
Страница 226: ...User Manual 212 i Series iX Series Figure 9 40 EOS3 Location of 70 80 Taps for each phase Lug 3 70 Lug 5 80...
Страница 233: ...User Manual i Series iX Series 219 Figure 9 41 Example Connection With MODE iX...
Страница 240: ...User Manual 226 i Series iX Series Figure 9 42 Example Connections With OMNI 1 18i...
Страница 241: ...User Manual i Series iX Series 227 Figure 9 43 Example Connections With OMNI 3 18i...
Страница 242: ...User Manual 228 i Series iX Series Figure 9 44 Schematic Showing OMNI 1 37i and1 37iJ Connected to 5001iX System...
Страница 243: ...User Manual i Series iX Series 229 Figure 9 45 Schematic Showing OMNI 3 37i Connected to 30003iX System...
Страница 249: ...User Manual i Series iX Series 235 9 7 4 Mechanical Dimensions Figure 9 49 XLS Module Dimensions...


