


Chapter 3:
User Interface
OsmoPRO MAX Automated Osmometer User Guide
38
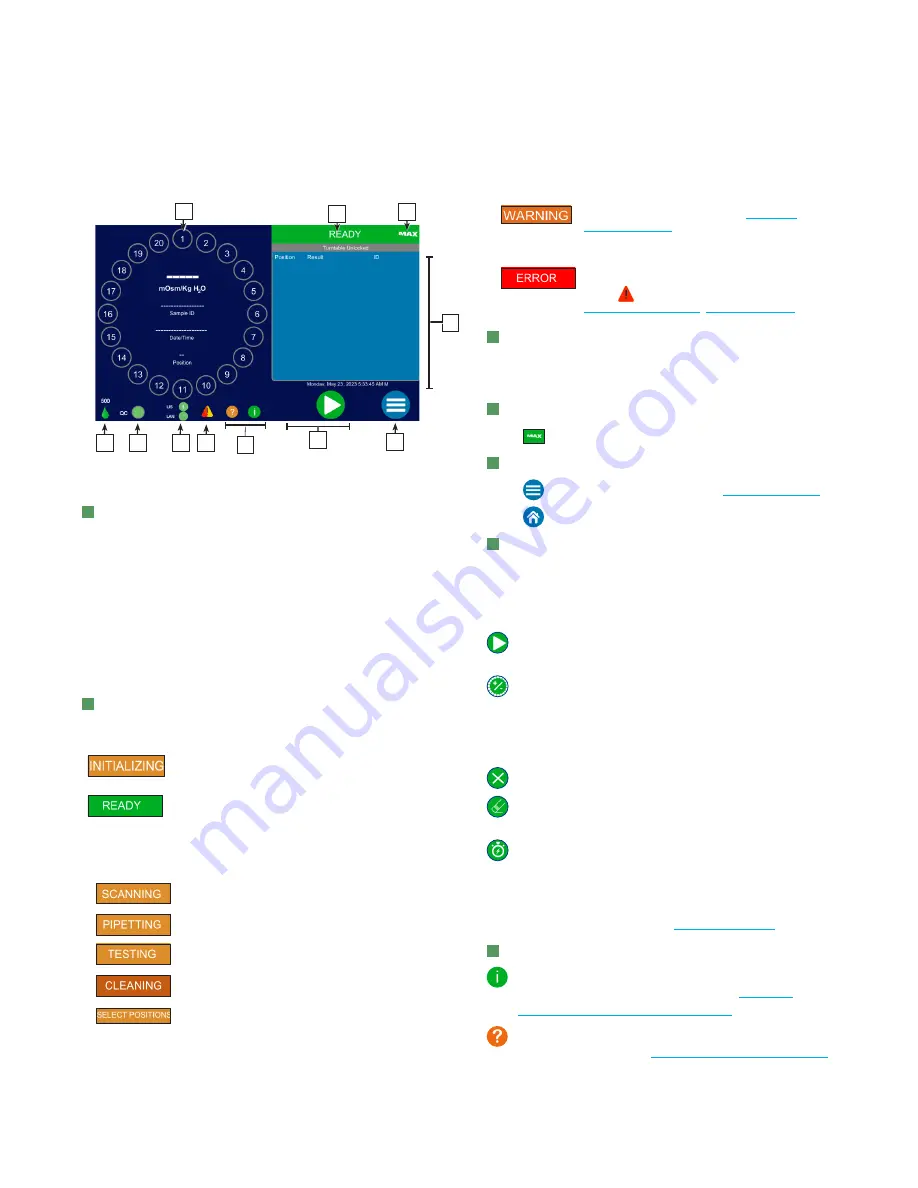
OsmoPRO MAX Home screen
A
Turntable Display and Test Information Area
The turntable display represents all twenty tube
positions and is used to select sample positions for
testing. The test information area inside the turntable
display shows the following test information during
testing:
•
Test result (mOsm/Kg H
2
O)
•
Tube position number
•
Sample ID
•
Date and time when the
sample test was completed
B
Instrument status
Displays one of these instrument statuses.
The system is initializing for operation.
Usually seen after rebooting instrument.
The turnable is unlocked and the instrument
is ready to place samples for testing,
calibration, or another operation.
During sample testing and calibration, the instrument cycles
through these statuses for each sample test. The testing status
header also indicates the progress bar of the current operation.
The instrument is scanning barcodes on
sample adapters/tubes.
The instrument is pipetting the sample.
The instrument is testing the sample.
The instrument is cleaning the pipette and
system fluidics.
The user requested either:
•
To add a sample during an automated test
•
To perform a STAT test during an
automated test
Indicates the OsmoPRO MAX Maintenance
Kit needs to be replaced (see
).
An error occurred and the system generated
an alarm. Testing and calibration cannot be
performed until the issue is resolved.
Press
to display the alarm(s) (see
).
C
Test Results
Lists each test result when the test completes. Also
displays the system date and time.
D
Screen Capture
Press
to capture the current screen to a USB drive.
E
Main Menu Button
Press
to open the Main menu (see
Press
to return to the Home screen.
F
Testing Buttons
Press these buttons to start loading sample tubes, start a
continuous or STAT test, and other testing functions.
These buttons change during different phases of testing.
Press to begin automated testing of samples that
are present on the turntable.
Press to load more samples onto the turntable:
–
While testing is in progress
–
After a test ends if the turntable sample positions
have not been cleared
Press to cancel sample testing in progress.
Press to clear the current sample position or all
sample positions.
Press to initiate a STAT test while an automated
test is in progress. The instrument completes the
current sample test and then pauses the automated
test for the STAT test to proceed.
For more information, refer to
G
Legend and Instrument Assistance and Icons
Press to display manufacturer, distributor, and
instrument system information (see
Instrument Assistance Information
).
Press to open the Legend screen which explains
each status icon (see


