Diagnostic information
2-80
Marketing Name
Go Back
Previous
Next
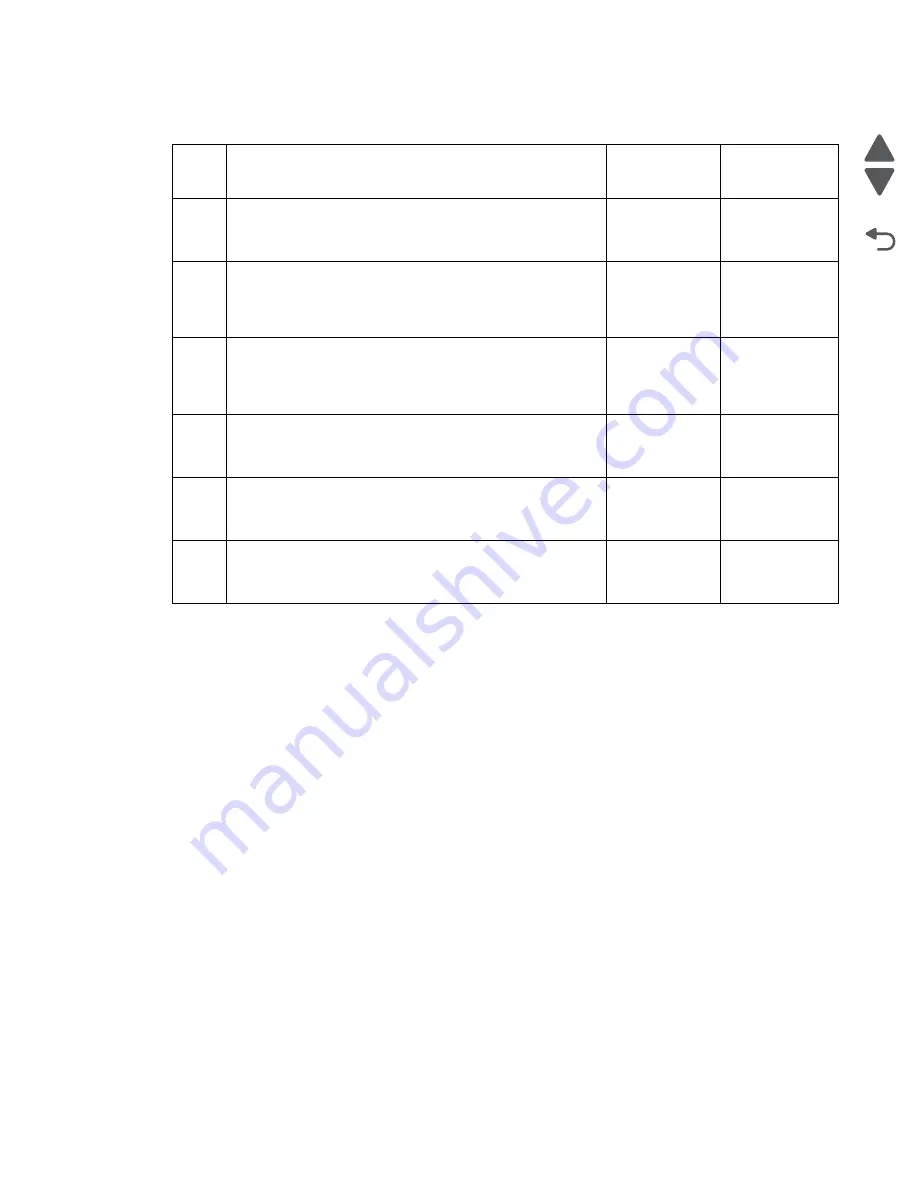
Paper exit tray full
Step
Check
Yes
No
1
Remove paper from the exit tray. Make sure the exit tray
sensor is free from any obstruction. Clear any obstruction.
Does the problem remain?
Go to step 2.
Problem
resolved
2
Turn off the printer by unplugging the power cord. Wait for
10 seconds, and turn on the printer. Run the print/scan/copy
job again.
Does the problem remain?
Go to step 3.
Problem
resolved
3
Check the J71 and J72 cables on the system board for
proper connection and damage. Reseat the cables.
Are the cables properly connected and free from
damage?
Go to step 4.
Replace the
printer.
4
Check the exit tray sensor if it is dislodged. Reseat the
sensor.
Does the problem remain?
Go to step 5.
Problem
resolved
5
Replace the system board
.
See
Does the problem remain?
Go to step 6.
Problem
resolved
6
Replace the print engine assembly. See
assembly removal” on page 4-84
.
Does the problem remain?
Replace the
printer.
Problem
resolved
Summary of Contents for Pro5500 Series
Page 11: ...Safety information xi 4447 20x Go Back Previous Next 012 3456789...
Page 254: ...4 85 Service Manual 4447 20x Go Back Previous Next Disassembly Flow chart...
Page 260: ...5 6 Service Manual 4447 20x Go Back Previous Next Wireless card Card reader JP3...
Page 261: ...Connector locations 5 7 4447 20x Go Back Previous Next Carrier card J1 J2 J3...
Page 262: ...5 8 Service Manual 4447 20x Go Back Previous Next...
Page 268: ...7 4 Service Manual 4447 20x Go Back Previous Next Assembly 2 Engine 1 2 3 5 4...
Page 270: ...7 6 Service Manual 4447 20x Go Back Previous Next Assembly 3 Fluid system assembly 1 3 2 5 4...
Page 274: ...7 10 Service Manual 4447 20x Go Back Previous Next...
Page 277: ...I 3 Service Manual 4447 20x Go Back Previous Next...


