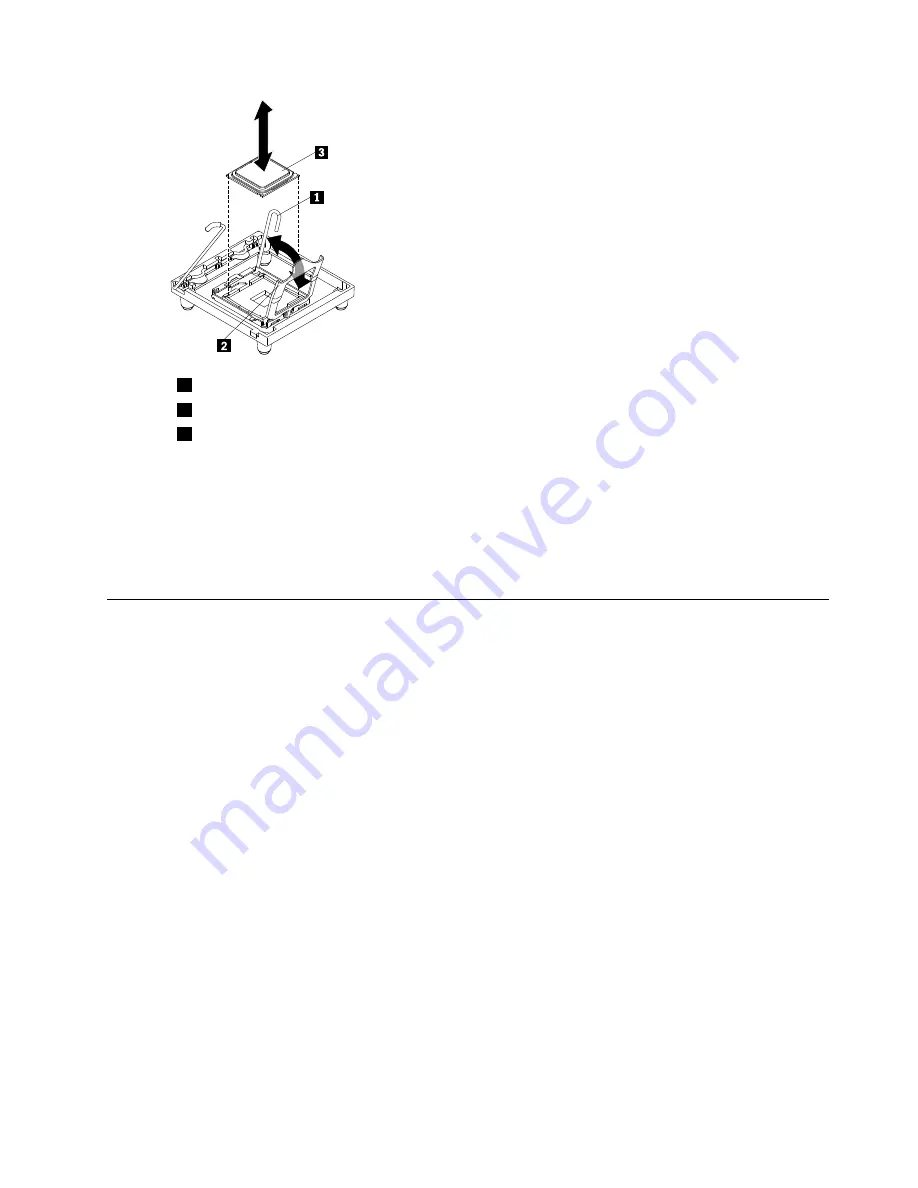
1
Microprocessor
2
Heatsink release latch
3
Microprocessor bracket frame
Step 12. Open the microprocessor bracket frame by lifting up the tab on the top edge. Keep the bracket
frame in the open position.
Step 13. Carefully lift the microprocessor straight up and out of the socket, and place it on a static-protective
surface.
Step 14. If you are instructed to return the microprocessor and heat sink, follow all packaging instructions,
and use any packaging materials for shipping that are supplied to you.
Installing a microprocessor and heat sink
The following notes describe the type of microprocessor that the server supports and other information that
you must consider when installing a microprocessor:
Important:
Some cluster solutions require specific code levels or coordinated code updates. If the device
is part of a cluster solution, verify that the latest level of code is supported for the cluster solution before
you update the code.
• Read the documentation that comes with the microprocessor to determine whether you have to update
the server firmware. To download the most current level of server firmware, complete the following steps:
1. Go to: http://www.lenovo.com/support.
2. Enter your product number (machine type and model number) or select
Servers and Storage
from
the
Select your product
list.
3. Select
Servers and Storage
from the
Brand
list.
4. From
Family
list, select
ThinkServer TD200
, and click
Continue
.
5. Click
System TD200
to display the matrix of downloadable files for the server.
• The server comes with one microprocessor installed, but supports up to two microprocessors.
Note:
A microprocessor must be installed and removed only by a trained service technician.
• The first microprocessor must always be installed in microprocessor socket 1.
• When one microprocessor is installed, a heat sink filler is not required for microprocessor socket 2,
however, the air baffle must be installed to provide proper system cooling.
• Do not remove the first microprocessor from the system board when you install the second
microprocessor.
Chapter 7
.
Installing and replacing FRUs
189
Summary of Contents for ThinkServer TD200
Page 2: ......
Page 8: ...viii ThinkServer TD200 Hardware Maintenance Manual ...
Page 28: ...20 ThinkServer TD200 Hardware Maintenance Manual ...
Page 138: ...130 ThinkServer TD200 Hardware Maintenance Manual ...
Page 264: ...256 ThinkServer TD200 Hardware Maintenance Manual ...
Page 300: ...292 ThinkServer TD200 Hardware Maintenance Manual ...
Page 327: ...Lenovo product service Appendix A Getting help and technical assistance 319 ...
Page 328: ...320 ThinkServer TD200 Hardware Maintenance Manual ...
Page 338: ...330 ThinkServer TD200 Hardware Maintenance Manual ...
Page 344: ...336 ThinkServer TD200 Hardware Maintenance Manual ...
Page 345: ......
Page 346: ...Part Number Printed in USA 1P P N ...


