R5909934 /00
E2 Lite and EC-40
84
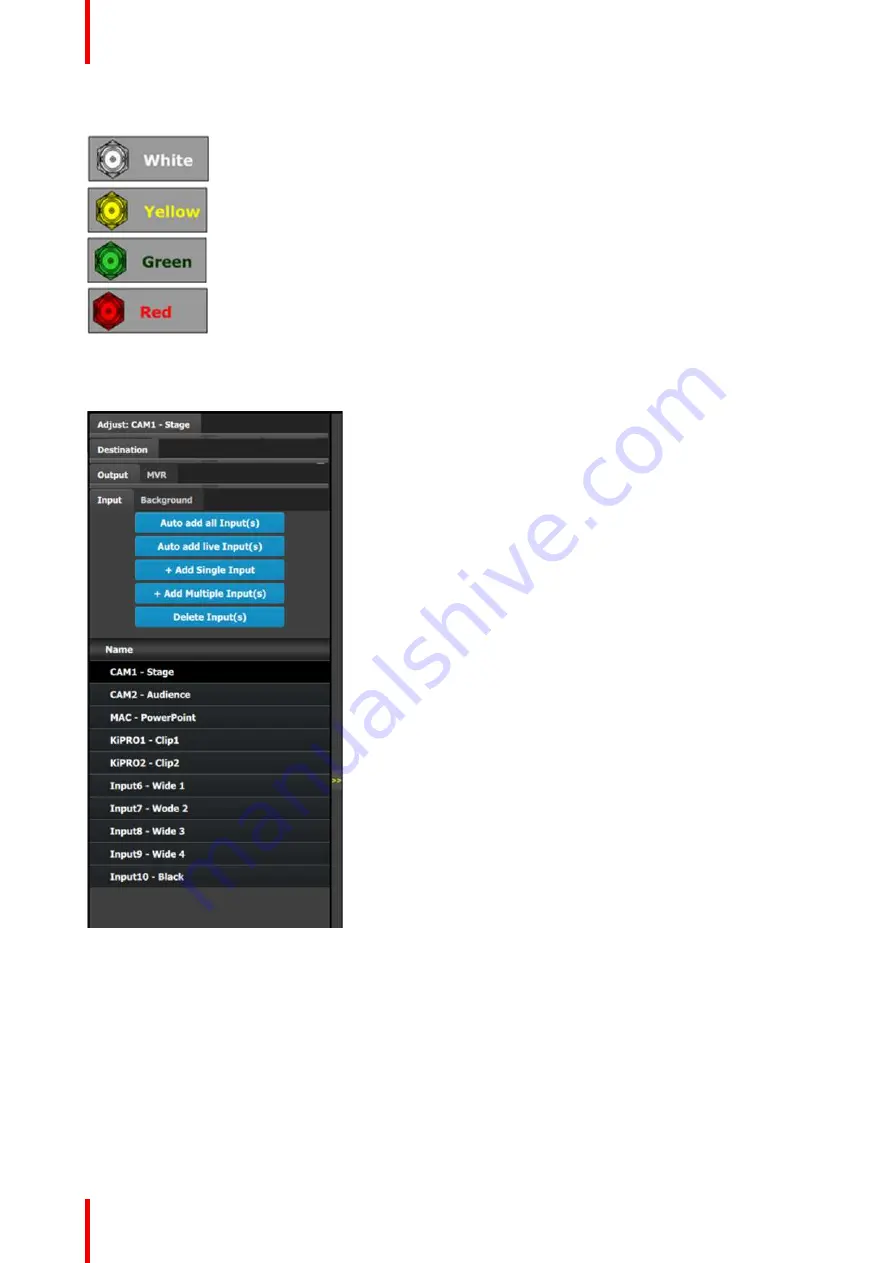
Input connector colors
Not assigned and no input signal is detected
Not assigned to any Source or an input, but a signal has been detected
Assigned to a source or an input and an input signal is detected
Assigned to a source or an input, but an input signal is not detected
Input configuration menu description
Input configuration menu is accessed by clicking on the Input tab.
This menu provides:
•
Auto Add all Input(s):
A button to
automatically allocate all unassigned input
connectors to an input.
•
Auto add live Input(s):
A button to
automatically allocate all LIVE input
connectors (GREEN) to an input.
•
+ Add Single Input:
A button to manually
allocate connectors to an Input configuration.
•
+ Add Multiple Input(s):
A button to manually
allocate more than one connector to an Input
configuration.
•
Delete Inputs:
A button to delete unused or
obsolete inputs.
•
A list of all the Inputs already created on the
system (e.g. Cam 1, Input2).
How to Auto add all Inputs
The
“
Auto add all Inputs
”
button automatically allocates all unassigned input connectors to an input. At this
moment the incoming signal is acquired and a source file is saved. Input connectors that are already assigned
to an input will not be affected. If the button is pressed, 28 input configurations will be automatically assigned.
The software by default names inputs as
“
Input 1, 2, 3
…
.
”
. Input configuration names can be renamed by
double-clicking on the name and turning the box blue.
How to Auto add live Inputs
The
“
Auto add live Inputs
”
button automatically allocates all live input connectors to an input. Input connectors
that are already assigned to an input will not be affected. If the button is pressed in the beginning, before any
sources has been connected, no inputs will be automatically assigned. The software by default names inputs
Summary of Contents for Event Master E2 Lite
Page 1: ...ENABLING BRIGHT OUTCOMES User s Guide E2 Lite and EC 40...
Page 10: ...R5909934 00 E2 Lite and EC 40 10...
Page 14: ...R5909934 00 E2 Lite and EC 40 14 Introduction...
Page 18: ...R5909934 00 E2 Lite and EC 40 18 Safety...
Page 32: ...R5909934 00 E2 Lite and EC 40 32 General...
Page 46: ...R5909934 00 E2 Lite and EC 40 46 Hardware orientation...
Page 168: ...R5909934 00 E2 Lite and EC 40 168 EM GUI orientation...
Page 208: ...R5909934 00 E2 Lite and EC 40 208 Controller Orientation...
Page 214: ...R5909934 00 E2 Lite and EC 40 214 Controller Configuration...
Page 220: ...R5909934 00 E2 Lite and EC 40 220 Controller Operation...
Page 284: ...R5909934 00 E2 Lite and EC 40 284 E2 Lite Maintenance...
Page 289: ...289 R5909934 00 E2 Lite and EC 40 Environmental Information 15...
Page 300: ...R5909934 00 E2 Lite and EC 40 300 Specifications...
Page 316: ...R5909934 00 E2 Lite and EC 40 316 Remote Control Protocol...
Page 317: ...317 R5909934 00 E2 Lite and EC 40 Troubleshooting C...
Page 320: ...R5909934 00 E2 Lite and EC 40 320 Troubleshooting...


