background image

  For  Service  Engineer 

Service Information 

SI1705004E-00=SIGMA-G5SII  Service  Manual 

165/273 

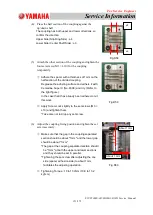
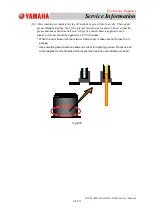
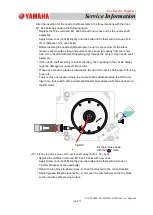
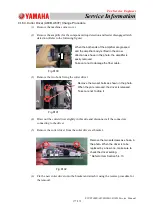
(13)  Assemble the parts after cleaning and greasing has been completed. 

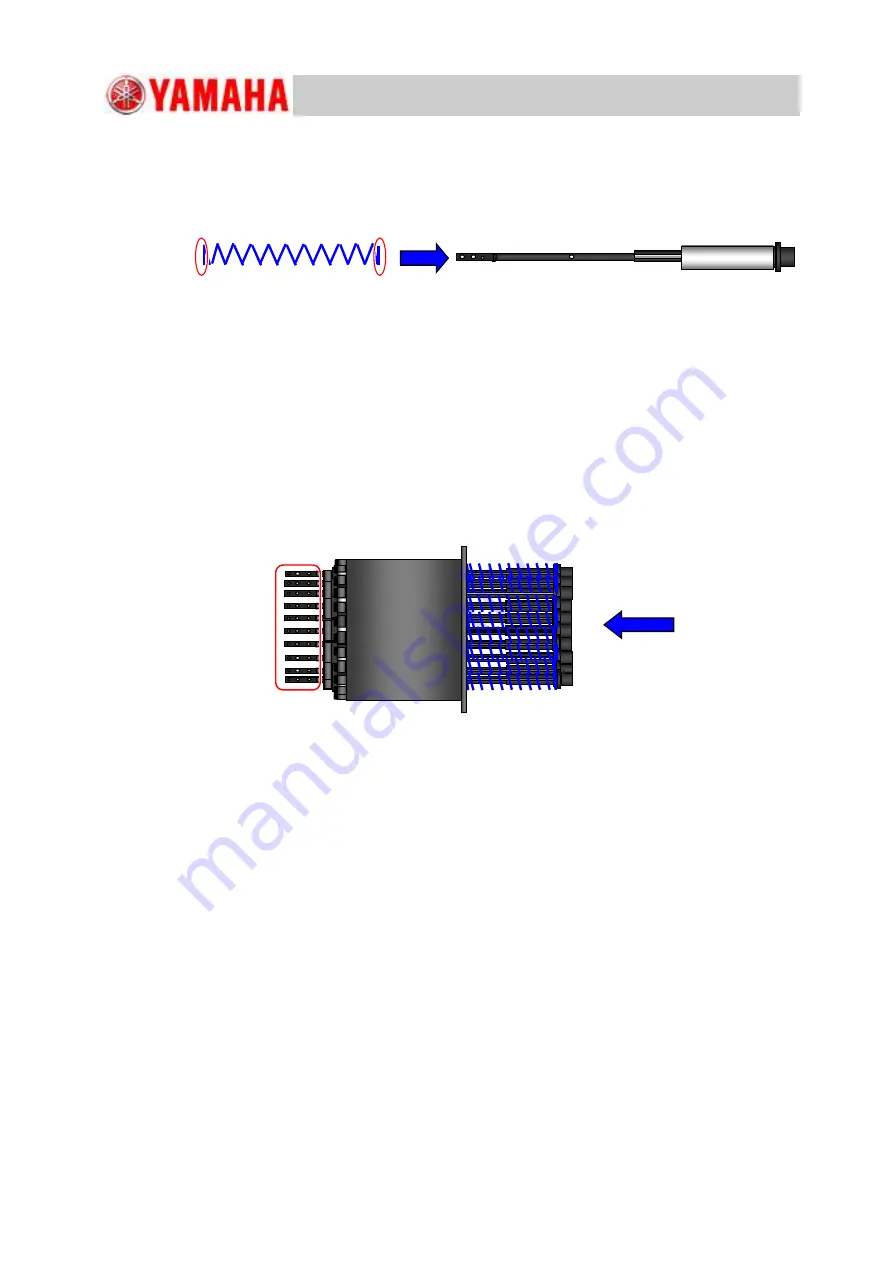
First, the spring is attached onto the nozzle shaft. Before it, apply grease (Daphne 

Eponex No. 1) on the two locations on the both side as shown in the figure, after the 

cleaning. 


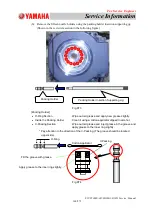
(14)  Insert the nozzle shaft into the outer casing, taking care of the correct direction of the 

nozzle shaft. 

*  Make sure that the outer casing has the same serial No. as that of the nozzle shaft. 

*  Do not insert the nozzle shaft forcibly. 

(This is to avoid damage that might result in the damage to the V-packing or the V-

packing coming off). 

*  After the nozzle shaft insertion, if any excessive grease is attached to the nozzle 

shaft (in the location framed in red in the following figure), wipe it out using a cloth, 

etc. 


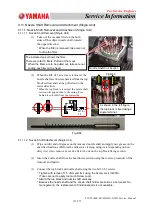
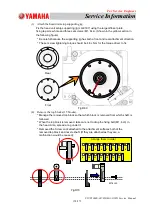
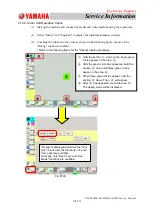
(15)  Then, assemble the nozzle shaft assembly using the reverse procedure of the 

disassembling. 

Attach the "Head Attachment Supporting Jig" to the nozzle shaft assembly using the 

Large Diffusing Plate set tapped hole, as shown in the following figure. 

*  Unless the "Head Attachment Supporting Jig" is held securely, the M1. 6L4 bolt 

might be tightened on the slant and thread might be damaged. Be careful. 

*  Before the attachment, confirm the No. 1 nozzle position. 


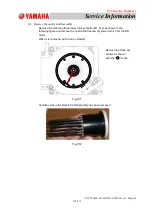
(16)  Clean the packing holder insertion section in the DD motor unit using a cotton 

applicator, etc., dipped in alcohol. 


(17)  Insert the 15 packing holders into the DD motor using the "Packing Holder Insertion   

Supporting Jig". 

*  Pay attention to the insertion direction of the packing holder. 


(18)  Insert the nozzle shaft assembly gently into the DD motor unit straight from the lower 

side, so that no load is given to the nozzle shaft. 

Apply grease onto both ends of the spring.


Fig.D79 

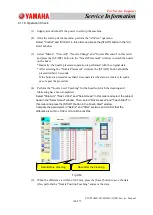
Fig.D80 

Содержание SIGMA-G5SII

Страница 1: ...when handling it All rights reserved About the safety Strictly follow the safety precautions in the Safety section in the Operation Manual Disclaimers This document contains the preliminary information subject to change in the future The information contained in this document represents the current view of YAMAHA on the issues discussed as of the date of issuance As YAMAHA must respond to changing...

Страница 2: ...Adj Window 25 1 4 5 1 NL Axis Origin Offset Master Nozzle Level 27 1 4 5 2 Placement Level Offset Head Up Down Offset 29 1 4 5 3 Chute Level Perform the teaching selecting Teach Start Shipment 30 1 4 5 4 Stocker Master 32 1 4 5 5 Pick up Level Offset Value L for the Feeder Offset A 32 1 4 5 6 PEC Recognition Camera Beam Offset 33 1 4 5 7 Component Recognition Camera Position 35 1 4 5 8 Head Rotati...

Страница 3: ...e High 89 3 1 4 6 Multi None None Multi 90 3 1 5 Various Settings 91 3 1 5 1 High Speed Nozzle Stocker 91 3 1 5 2 Multi Functional Nozzle Shutter 92 3 1 5 3 Nozzle Up Status Detection Sensor Amplifier Adjustment 93 3 2 X Axis Ball Screw Change Procedure 96 3 2 1 X Axis Ball Screw Removal Procedure 96 3 2 2 X axis Linear Guide Attachment Procedure 98 3 2 3 Treatment if any value is out of the stand...

Страница 4: ... 4 10 Slip Ring Change Procedure 149 4 10 1 Slip Ring Removal 149 4 10 2 Ring Attachment 150 4 11 Nozzle Shaft Removal and Attachment Single Unit 153 4 11 1 Nozzle Shaft Removal and Attachment Single Unit 153 4 11 1 1 Nozzle Shaft Removal Single Unit 153 4 11 1 2 Nozzle Shaft Attachment Single Unit 153 4 11 2 Nozzle Shaft Total Disassembling Cleaning and Assembling 154 4 11 2 1 Purpose 154 4 11 2 ...

Страница 5: ...tric System Block Drawing SIGMA G5SII 202 5 3 Each Block Electric System Layout 203 5 3 1 Main Machine Corner Front Side and Plate Entire Section in the lower frame section 203 5 3 2 Main Machine Corner Front Side and Plate Entire Section in the lower frame section 204 5 3 3 Multi axis board Lighting Control I O Intensive Board Side View Camera Board 205 5 3 4 Power UNIT layout 206 5 3 5 Layout fo...

Страница 6: ...n 243 7 1 3 1 LISA System Stop and Service Registration Cancellation 243 7 1 3 2 ACV Server System Stop and Service Registration Cancellation 244 7 1 4 Installation Version Up 245 7 1 5 Software License Setting 246 7 1 5 1 License Server Setting 246 7 1 5 2 License Client Setting 246 7 1 6 Security Partly Cancellation Batch Processing 247 7 1 6 1 LISA System Batch Processing 247 7 1 6 2 ACV Server...

Страница 7: ...ng the Bank Feeder Change Carts and the tape feeders Air Consumption L min 30L min During automatic operation 100L min When one feeder base moves up and down 200L min When two feeder base moves up and down Power Supply Three phase AC200V 10V 50 60Hz Allowable Power Fluctuation AC200V 10 Apparent Power RATED 8 0 kVA MAX 12 1 kVA Power Consumption 1 9 kWh Fig A1 Note The dimensions are those for des...

Страница 8: ...For Service Engineer Service Information SI1705004E 00 SIGMA G5SII Service Manual 8 273 Feeder Cart 792mm 975 8mm 962mm Fig A2 1 Fig A2 2 Fig A2 3 ...

Страница 9: ...robot cable to the left side in order to level the beam load G5S right side routing G5SII left side routing 2 XY axis driver placement position Along with changing the routing of the robot cable the XY axis driver position changed back and forth G5S G5SII Front Rear Front Rear Block 1 XY driver position Block 1 XY driver position Block 2 XY driver position Block 2 XY driver position ...

Страница 10: ...h brake G5S Multifunction head 2 axis G5SII Multifunction head 3axis For multifunctional headed machine the multi axis board changed to three G5S Twe boards used G5SII Three boards used 5 Footrests Change from separation type to integral type Wrench size is also 46 mm G5S footrests G5SII footrests 6 Production capacity Increased production capacity compared to G5S CPH 75K to 90K Production capacit...

Страница 11: ... Step 1 Remove the six truss head screws fixing the cover Note Remove carefully the two truss head screws on the upper section so that any of them does not drop in the linear section Step 2 Set the breaker dial to OFF and turn it further to the left to remove the cover Caution Fig A3 1 Primary Power Breaker Location Fig A3 2 Fig A4 1 Fig A4 2 Fig A4 3 OFF Attachment Detachment ...

Страница 12: ...l the terminal cover to this side to remove Step 5 After the power cable is crimped in the round terminals connect the cable to the breaker primary side If the cable is connected directly to the terminals without crimping the breaker section might catch fire The earth cable is connected to the plate PE section through the round terminal PE AC 200V Fig A5 1 Fig A5 2 Fig A5 3 Fig A5 4 Fig A5 5 Fig A...

Страница 13: ...tion is loosened some years later Perform the checks after the primary power is turned off Precautions in connection Examples 1 When the power cable is to be connected to the terminal insert the solid wire cable or strand wire cable straight and tighten it In this case the use of the crimp style terminal is also available 2 In the case of strand wire cable divide the wires and insert them separate...

Страница 14: ...ne shipping To be connected after the machine delivery Note The user should provide the socket before the machine installation In the case that the user does not know the model No and need a check the user should access the following web page to find the socket model No appropriate for the air hose in the user s facility http www smcworld com products en global do kw kk130 Fig A7 1 Fig A7 2 Fig A8...

Страница 15: ...Preparation for the Installation 1 4 1 1 Removal of the Fixtures X Axis Beam 1 Remove the X axis beam unit metal fittings BEAM1 BEAM2 1 4 1 2 Removal of the Fixtures Y Axis 1 Remove the Y axis beam metal fittings BEAM1 BEAM2 Be careful not to drop any setscrew Be careful not to drop any setscrew Fig A9 1 Fig A9 2 Fig A9 3 ...

Страница 16: ...e Manual 16 273 1 4 1 3 Attachment of the Tower Light Fig A10 1 4 1 4 Removal of the cover and cutter guide cover in the power breaker section Remove the cover in the power breaker section Remove the cutter guide cover at the front and rear of the machine Fig A11 1 Fig A11 2 ...

Страница 17: ...105 mm 2 JG 0191 PLATE Placement Height Confirmation Supporting Jig 160 80 mm 3 JG 0188 QFP Glass Jig 4 JG 0293 Height Confirmation Nozzle Master Nozzle For High Speed Head 5 HV19C Jig Nozzle 6 FF01 Jig Nozzle For multi functional head camera teaching 7 FA04 Jig Nozzle For multi functional head height automatic teaching 8 JG 0233 Traverse Teaching Jig 9 JG 0258 Table Offset Teaching Glass PCB Jig ...

Страница 18: ...0342 jig Height 105mm for G5S G5SII is different from that for JG 294 Height 104mm for SIGMA G5 b For the nozzles for high speed head only the nozzles dedicated to the SIGMA series machines can be used The nozzles for GXH 1 or 3 cannot be attached because their flange shape is not appropriate for it c The jigs other than teaching jig No 1 are commonly used with those for Sigma G5 d In addition to ...

Страница 19: ...hine installation position confirm it with the client before doing the installation work 2 Move the machine to the installation position using the plumb bob and align it with the correct position 3 When the machine alignment is completed install the machine temporarily with the four height adjusters leg type Machine Temporary Installation 1 1 The standard for the machine temporary installation hei...

Страница 20: ...ment When the machine is to be moved according to these conditions pay particular attention to the level vial not to drop it 5 Level the machine 5 1 Leveling Refer to Fig A16 Direction Y The leveling is performed using the level vials A and C Standard Value one scale mark within 2 100 mm Direction X The leveling is performed using the level vial B Standard Value one scale mark within 2 100 mm Lock...

Страница 21: ...t under the component trash box is required Note Normally the level vial for the X axis should be set between the nozzle stocker unit and the component recognition camera unit However the optional V bend detection unit coplanarity check unit might be installed in this section When this unit is to be installed the leveling instrument is installed in either of the following two sections in front of ...

Страница 22: ... Then set the following pattern on the Pattern sub tab sheet on the Test Mode tab sheet Select the pattern set in the TEST PATTERN box and save the setting using the Apply button In the case of the following figure because Pattern 2 has been set in the selection box Pattern 2 has selected for the Test Pattern 4 Using the START button perform the test run 5 Make sure that there is not any rise in a...

Страница 23: ...ew driving type Therefore when the X axis is moved manually it feels slightly heavier When the X Y axis is moved in the Manual Operation window displayed from Control Window it can be moved quickly and efficient operation is available 2 5 The standard value of the master nozzle offset is 0 2 to 0 7 mm 3 Placement Accuracy Adjustment 3 1 For the high speed nozzle use the nozzles for SIGMA series 04...

Страница 24: ...ny nozzles are not attached in the running in operation Dummy nozzles are registered Set the nozzles required for the pattern program on the data in the nozzle arrangement selection window The attachment of the actual nozzles is not required 1 2 When any multi functional head is to be used the nozzles appropriate for the pattern program should be setup in the nozzle stocker Note Save the backup da...

Страница 25: ...ter Nozzle For high speed head JG 0293 3 Chute Level For shipping Jig to be used Master Nozzle For high speed head JG 0293 4 Stocker Master For shipping Jig to be used Master Nozzle For high speed head JG 0293 Automatic Height Teaching Jig For high speed middle size odd shaped stocker JG 0297 Automatic Height Teaching Jig For multi functional stocker JG 0298 5 Pick up Level Jig to be used Master N...

Страница 26: ...ASSY JG 0253 1 pcs 4 Jig Chip _0603R CC731HTCF 2 pcs 5 Double Sided Tape 35mm 50M No7692 12 1 pcs Delivery Adjustment Teaching Flow Chart 2 1 2 There are no components with 0603 size or smaller 1 NL Axis Origin Offset Master Nozzle Level Jig to be used Master Nozzle For high speed head JG 0293 3 Chute Level For Replacement Jig to be used Master Nozzle For high speed head JG 0293 5 Pick up Level Ji...

Страница 27: ...in Offset In the NL axis origin adjustment operation the offset is measured for the controlled cam follower alternative operation by means of detecting the nozzle flange Master Nozzle Offset The lower side level reference position is measured for the height check nozzle master nozzle for high speed head JG 0293 Required Jig and Tool Nozzle One unit Height Confirmation nozzle the master nozzle For ...

Страница 28: ...he steps 3 through 6 1 Set the mode to Debug Mode Refer to 2 9 Change Procedure to Debug Mode in Chapter 2 for the change procedure to the debug mod Fig A22 No 1 Nozzle The position where the projected bolt is set is regarded as that for the No 1 nozzle Diffusion Plate Fixing Position Rotor Assembly Fixing Position NL Axis Origin Offset Confirm that there is only a small change 0 01 mm or less etc...

Страница 29: ...onveyor button in the Conveyor window 4 Set Target Value to 80 mm and Clearance to 0 5 mm Then press the Target Position Move button and press the START button PLATE Placement Height Confirmation Supporting Jig JG 0191 Attachment 1 Place the PLATE Placement Height Confirmation Support Jig on the entrance of the conveyor 2 Move the PLATE to around the center of the backup table LR Set so that the c...

Страница 30: ...the PCB stopper is not activated NOTICE Take the greatest care so that the PC board does not touch and scratch the light projector or the side view camera Teach Start 1 Return to the Placement Height Teaching window and after the head is selected Select Teach Start Shipment and press the START button 2 Attach the master nozzle onto the No 1 nozzle position in the other head and preform the chute l...

Страница 31: ...ffset is also entered to use for the calculation when the feeder A offset input value calculation However in the SIGMA Series machines the head up down offset value is not taken in the feeder A L offset parameters In the GXH 1 or 3 for the height control in component pick up operation the feeder A L is used but in SIGMA G5 G5S G5SII machine the head up down offset and feeder A L are used in the pi...

Страница 32: ...rt 6 Save the results 1 4 5 5 Pick up Level Offset Value L for the Feeder Offset A Pick up Height Measurement Jig to be used Master Nozzle For high speed head JG 0293 Automatic Height Teaching Jig JG 0342 1 Position the feeder cart in the working block 2 Select the Head 1 or Head 2 3 Attach the master nozzle JG 0293 to the No 1 nozzle position in the designated head 4 Set the automatic height teac...

Страница 33: ...he head has been changed The PEC recognition camera is to be changed The X axis or Y axis linear scale and scale head are to be changed Purposes This data corrects the deviation from the designed distance from the machine reference coordinate origin or head origin position to the PEC recognition camera center Teaching Operation Procedure At time of Delivery 1 Press the Maint button in the operatio...

Страница 34: ...ached on the backup table Note Unless the support jig and the support pins are not removed the glass jig PCB might be broken 2 Change the conveyor width Enter the value of 430 in the Tgt Wd text box and 0 3 in the Clearance text box on the CONVEYOR tab sheet 3 Set the Z clamp pressure to 0 1Mpa so as not to break the glass jig PCB 4 Place the PCB recognition calibration jig at the center position ...

Страница 35: ... when the machine is delivered The head has been changed The PEC recognition camera is to be changed The component recognition camera is to be changed X axis or Y axis linear scale and scale head are to be changed Purpose The deviation from the designed distance from the machine reference coordinate origin to the component recognition camera center is adjusted Required Jig and Tool QFP Glass Jig J...

Страница 36: ...d manually enter HA09C or HA19C in the nozzle arrangement position for the subject head using the debug operation If it is not entered the QFP glass jig can not be picked up 4 Press the Maint button in the operation window and press the Ship Adj button Then select the camera and head to be taught in the Cmp Recog Pos window 5 Press the Noz button and designate No 1 nozzle on the head 6 Press the T...

Страница 37: ...s to be performed when the machine is delivered The head has been changed The PEC recognition camera is to be changed The component recognition camera is to be changed X axis or Y axis linear scale and scale head are to be changed Required Jig and Tool QFP Glass Jig JG 0188 1 unit Vacuum Nozzle HA19C 1 unit Purpose Head Rotation Center Offset The deviation from the designed value for the distance ...

Страница 38: ... the nozzle change operation Unit Adj NOTICE Basically nozzles are not attached manually When it is unavoidable take care so that the unit such as PEC recognition camera after the head change etc does not touch and scratch the side view camera or light projector When the nozzle is attached manually enter HA09C or HA19C in the nozzle arrangement position for the subject head using the debug operati...

Страница 39: ...cognition Lighting Unit section Note Clean the jig storage space vacuum nozzle component recognition camera upper surface and QFP glass jig using a soft and clean rag dipped in alcohol Clean the vacuum nozzle with alcohol applied to the tip 3 Set the HA19C nozzle in the nozzle stocker and enter HA09C or HA19C in the nozzle arrangement position for the subject stocker Set it onto the nozzle No 1 po...

Страница 40: ...ton to save the data Description of Base Mark Reference Head 1 and 2 Mark Left Center Right X Horizontal Y Vertical mm The Mark Center is the base mark position taken using the PEC recognition camera when the head rotation center is moved onto the component recognition camera A Mark Right or Left is the reference mark position when the subject nozzle is moved to the component recognition camera ce...

Страница 41: ...nter and the head pick up nozzle in the fly recognition operation for each speed from the designed values Fig A35 Teaching Procedure 1 Perform the All Zero operation in the Control window 2 Place the QFP glass jig with the printed side turned down on the jig storage space Component Recognition Lighting Unit section Note Clean the jig storage space vacuum nozzle component recognition camera upper s...

Страница 42: ...e performed The offset teaching is to be performed when the machine is delivered The head has been changed The PEC recognition camera is to be changed The component recognition camera is to be changed X axis or Y axis linear scale and scale head are to be changed Required Jig and Tool QFP Glass Jig JG 0188 1 unit Vacuum Nozzle HA19C 1 unit Purpose Nozzle Inclination Offset The deviation of the set...

Страница 43: ...head and nozzle 5 Press the Teach Start button and START button 6 When the teaching operation is completed normally make a note of the values in the Before and After sections 7 Press the Save button to save the data 1 4 5 11 Table Offset Teaching Under each of the following conditions this teaching is required It affects the placement accuracy directly The in house adjustment is to be performed Th...

Страница 44: ...e Maint button in the operation window and press the Unit Adj button Then zero each of the L Conveyor Conveyor and R Conveyor in the Conveyor tab sheet Refer to Change Procedure to Debug Mode for the procedure to transfer to the debug mode 4 Perform the setting so that 619 1 is added to the SW data and 597 1 is deleted 5 Change the conveyor width Enter the value of 430 in the Tgt Wd text box and 0...

Страница 45: ... 1 or 2 button or All button in the Select Beam selection box in the PCB Recog Beam window 10 Select Use in the Glass Jig selection box 11 Select the Teach Start button and press the START button 12 Place the PEC recognition calibration jig onto the upstream side stopper position manually Fig A39 13 As the same as on the upstream side fix the PCB onto the PEC recognition calibration jig and select...

Страница 46: ...n the CPK measuring machine but shows the relative measurement results This offset is available when the component with the 0603 size or smaller is placed Note If there is a request by the user for CPK measurement results not using the standard machine or for speed reduction condition or placement with change of placement pattern the external CPK measurement machine is used as usual For the measur...

Страница 47: ...ation Applicable Head High Speed head Multi functional head 2 Head Offset Preparation Only for High Speed Head Head offset A Head offset B For each head offset angle For each head offset NL speed reduction Offset automatic correction function 3 CPK Placement Result Display Screen Display Placement Result Save Function 4 Machine Configuration PP Automatic Switching 5 PP Preparation List for Each Se...

Страница 48: ...sults are reported Procedure Completed CPK Measurement Adjustment with BARON CPK Measurement with BARON are the measurement results within the range of company specified values for the placement Are the measurement results of self calibration within the range of company specified values Manual Offset Tuning Check and Placement with Self Calibration Self Calibration Start Placement Accuracy Head Of...

Страница 49: ...Make sure that nothing is attached on the backup table Note Unless the support jig and support pins are not removed the glass jig PCB might be broken 2 Set the mirror jig on the back up table Insert the leg sections of MIRROR_PLATE into the pin insertion holes of the back up base to install Fig A39 2 Fig A39 1 ...

Страница 50: ...rvice Manual 50 273 3 Set the following operation conditions Select Machine Menu OPERATION Opr Mode in this order and the set the Mode data to No Designate Fig A40 Select Machine Menu OPERATION Test Mode in this order and the set the TEST PATTERN data to Disable Fig A41 ...

Страница 51: ...tart Select Machine Menu Maint Ship Adj Self Calibration in this order Fig A42 5 Preparation before Placement Change the pattern program to one for placement accuracy measurement Because the head offset is initialized make a backup of the data as necessary The restoration of the last data is available Fig A43 ...

Страница 52: ...rred For the placement preparation select the setup window Fig A44 7 Change the conveyor width to 71 0 mm The default clearance value is acceptable It is changed in the Automatic Operation Specified Target Position Move window Operation Sequence Select Setup Conveyor Setup Automatic Operation Specified Target Position Move in this order Fig A45 ...

Страница 53: ...A G5SII Service Manual 53 273 Fig A46 8 Attach the nozzle HG33C to the high speed type head Attach it manually or edit the stocker data where the nozzle is housed in the window as shown in the following window to perform the nozzle attachment operation Fig A47 ...

Страница 54: ...ormation SI1705004E 00 SIGMA G5SII Service Manual 54 273 Fig A48 9 In the case that the stocker where HG33C nozzles are housed is arranged in the second line when the head 2 is adjusted select the box enclosed by a broken line Fig A49 ...

Страница 55: ...For Service Engineer Service Information SI1705004E 00 SIGMA G5SII Service Manual 55 273 10 Perform the Fdr P u Tch operation Fig A50 Fig A51 The teaching of two sections F117 F217 is started ...

Страница 56: ...button on the window The automatic adjustment will be started Note Before putting the double sided tape clean the surface of BARON PCB using soft cloth After the cleaning check that there is no dirt on the PEC recognition mark If there is any debris dust or dirt a measurement error might be caused When the double sided tape is to be put put it so that any bubble is not left between the board and t...

Страница 57: ...When the PCB where components have been actually placed is set on the CPK measuring instrument CPK measurement is available using the procedure as usual Perform it as necessary Fig A55 Note It has been designed that the results of the CPK measurement of a board in the machine cannot be output to NT 100 When the measurement result data is required the measurement using BARON is needed ...

Страница 58: ...0 JG 0195 24 1p 50m for 1 roll Common to all Cpk measuring instrument models 2 Jig chip component for CPK Measurement one reel KYF M8614 00 1p CHIP0603 1 2 Maintenance Part List Table H2 No Name of product Part No Model No Unit Remarks 1 Glass Jig PCB KYF M860M 00 JG 0195 01 1p Common to all Cpk measuring instrument models except for those for manual operation 2 Mirror jig KYB M882N 00 JG 0357 1p ...

Страница 59: ...dth 80mm Clearlance 0 8mm Set the JIG Plate onto middle of a conveyor Then clamp the JIG by Z clamp MENU Maint DVC Check OutP Chk XFR CNVR Slect D1 D3 Ascent Clamp Then Press ON Multi Function Head Slect D0 D2 Decent Clamp Then Press ON Apply the master nozzle onto the head nozzle position No1 Nozzle position is 12 00 direction when DD axis is original position Perform Head UP DN Offset MENU Ship ...

Страница 60: ...for Feeder base 2 by same procedure of Feeder Base 1 8 PEC Recog Beam Offse Slect MENU Ship Adj PEC Recog Beam Select Beam ALL If need you can select Head 1 or 2 Grass jig Not use 9 Compornent Recog Camera Position Offset Slect MENU Ship Adj Cmp Recog Camr Pos Select Head ALL or Head 1 or Head 2 Set the Glass QFP Jig on the machine X Set the Nozzle HA09C on the head Y Z X Y Z 10 Head center Mark P...

Страница 61: ...ss Teach Start Note attach of the screenshot for the offset data result 13 Traverse Axis Draw offset Slect MENU Unit Chg Traverse Axis Draw Select Tray Unit button Press Teach Start Set the Traverse Jig JG 0233 on the machine 14 Accuracy measurement result HIGH SPEED HEAD High speed head 0 025mm CPK 1 0 or more 75K 0 03 CPK 1 0 or more Multi function head 0 015mm CPK 1 0 or more Multi Function Hea...

Страница 62: ...ach section is completed and only the section is to be returned 2 2 Home Return Operation Procedure 2 2 1 All Zero Select Control key located in the lower section of the operation window then select Zero and press the START button on the operation panel Whole system performs zeroing operation with all units returned to their home positions at the same time During the operation the START button ill...

Страница 63: ...inates in green and when the operation is completed the button s illumination is turned OFF 2 2 2 2 Selected Axis Home Return Described here is that the NL motor for the Head No 1 is changed with another one and the single axis home return is performed Select DVC Check MOTOR and Operation in this order Select Block 1 NL and Sel axis in this order and press the START button on the operation panel D...

Страница 64: ...t based on the pattern program or All Nozzle Housing 2 Select Maint Unit Adj and NOZ CHG in this order and perform the nozzle change in the NOZ CHG window For Individual Nozzle Attachment or Housing selected and decided by the operator Each way is described in details as follows 2 3 1 Nozzle Change Procedure in the Setup window 1 Housing the Nozzle in the Stocker In the Setup window select Change ...

Страница 65: ...le is to be changed in the Unit Adj window make sure to perform the nozzle level teaching and nozzle position teaching after any nozzle change Example Housing the nozzle No 1 on the Head No 1 to the Position No 1 in the Stocker No 1 in the H1 Stocker Section Select Maint Unit Adj and CHNG 15 H1 Stocker Section Stocker 4 Stocker 3 Stocker 2 Stocker 1 H2 Stocker Section Stocker 1 Stocker 2 Stocker 3...

Страница 66: ...d the operation same as in the case of selecting Conveyor is performed 2 When the value in the Tgt Wd box is clicked the Ten key window opens 3 When 80 is entered in the box and the Set key is clicked the target value is changed to 80mm 4 As above input 0 8 in the Clearance text box 5 Select Desig Width button and then press the START button on the operation panel The conveyor width is changed to ...

Страница 67: ...1 Place a PCB on input conveyor 2 Open the PCB Transfer window Click the conveyor figure directly in the Product window or select PCB XFER in the Setup window 3 In the PCB XFER window select the transfer location 1 to 3 to be designated Pressing the START button on the operation panel within 5 seconds after the location selection transfers the PCB to the designated position ...

Страница 68: ... to the operator s desired location is described as follows 1 Place a PCB on the input conveyor 2 Open the PCB Transfer window 3 Select MNL XFER 4 Select one of the XFER Start arrows Then within 5 seconds pressing the START button transfers the PCB Each pressing moves the PCB a certain distance in the designated direction ...

Страница 69: ...GMA G5SII Service Manual 69 273 5 For the individual operation of PCB Positioning or Stopper select each operation on the designated L or R side L R and within 5 seconds press the START button on the operation panel The designated operation will be performed ...

Страница 70: ...n only is to be used due to a system trouble etc forcible continuous PCB transfer operation for discharge is available 1 Click Maint Unit Adj and Cnvr button in this order to select Select Hi Speed or Low Speed for the conveyor speed and click Pass Opn START Then within 5 seconds press the START button on the operation panel ...

Страница 71: ...reasons only the person who completed the training course should use this mode Refer to the Debug Mode separately for the Debug mode display procedure 2 6 1 NOZ CHNG Window in Debug Mode In this operation window individual nozzle is attached or removed Note The items in the red frame are displayed only in the Debug mode Only the trained person can operate the items in the red frame because such op...

Страница 72: ... are operated under the condition where there is no PCB on the conveyor When an error occurs that a PCB is always detected in the display sensor detection error while there is no PCB in the machine the PCB Positioning Detection Sensor Teaching operation is performed This error occurs when the conveyor width is changed manually during the power OFF condition in the machine delivery 2 6 3 PCB Stpr T...

Страница 73: ... 6 4 Driver Mng Tab Sheet in the CONVEYOR Window Note This menu is used to check the version for the conveyor driver 2 6 5 X Axis grease up Window Note This menu is used for the X axis ball screw greasing up operation The steps 1 to 10 in the window should be performed in the numerical order ...

Страница 74: ...the manual operation the operation in debug mode is partly required Refer to 2 9 Change Procedure to Debug Mode for the transferring procedure to debug mode The manual operation and manual axis operation are divided into the following two items 1 Unit Adjustment This operation used for the unit operation includes the nozzle change linear measure detection test cutter operation conveyor width chang...

Страница 75: ...nd then press START button on the operation panel Confirm that there is no value outside the range for the judgment level 2 7 1 2 Cutter Operation Select Unit Adj and Cutter in this order and check the cutter unit operation in the Cutter window Connect the feeder cart connecting connector to the main machine and perform the Zero for maintenance operation in the window Then select a mode in the win...

Страница 76: ... OFF in the Ctrl Sw selection box and check the operation 2 7 3 Manual Axis Operation 1 The manual axis operation converts the front and rear right and left up and down and rotation operation of a single unit in each section of the machine into values and operates such unit This operation is performed in the tab sheet under the Maint menu item 2 The operation procedure related to the manual axis o...

Страница 77: ...n the box and click Set The Incr mm deg value will be changed to 0 02 Click in the Single operation box and press the START button on the operation panel The HL axis is move down by 0 02mm 2 8 System Data Editing Procedure 1 Refer to the following procedure for the parameter change on the Machine System data In the Sys Setting window Operation Sequence Select Maint Supervisor and Sys Setting in th...

Страница 78: ...04E 00 SIGMA G5SII Service Manual 78 273 1 Select Ope Palam Auto Ope Set up and Set up2 in this order 2 When the setting section white background for the Mode item of Cut Operation Set up group in Block 1 column is selected the pull down menu appears ...

Страница 79: ...ibed taking an example of Vacuum Timing Head 1 Pick up Holding Time change operation 1 Select Offset Head and Vacuum Timing in this order 2 When the data box for the Adspt Stop Time sec for Head No 1 is clicked the Ten key pad is displayed When the changed value is entered and the Set button is pressed the parameter is changed 3 The Ten key window will disappear When Save is clicked the data is ch...

Страница 80: ...ntenance training Also the work where this operation is required should be limited to those qualified as specified in this service manual and this operation should be performed carefully according to the specific procedure 1 The following procedure is applied when the mode is transferred to the Debug Mode 2 Performing the following operation in the initial window of Maint enables the transfer to t...

Страница 81: ...ge Mode is started in the indication area is changed to When the section shown as in the lower left is pressed for 3 seconds or more after the indication is changed to the indication is changed to 4 When the section shown as in the lower right is selected with 5 seconds after the indication is changed to the indication is changed to When the section shown as in the lower right is pressed for 3 sec...

Страница 82: ...period an incorrect operation is performed or the window is transferred to another one in the Maintenance Mode Change Mode the Maintenance Mode Change Mode is stopped and the procedure from Step 2 should be repeated 2 9 1 Main Additional Items in the Debug Mode Unit Adjustment Linear measure correction value feeder base cutter conveyor driver management Tray manual operation nozzle change manual o...

Страница 83: ...osen the two set bolts M6L25 and remove the nozzle stocker unit Refer to Fig C1 3 1 2 Attachment of the Nozzle Stocker Unit 1 Set the nozzle stocker based on the pilot pin Refer to Fig C2 Press the nozzle stocker to the end in the machine inside direction transfer side and fix it using the two set bolts M6L25 2 Connect the air piping connector and power cable connector 3 Start supplying air and po...

Страница 84: ...lue Black White Brown When 1 has been selected for the stocker arrangement No the connector for the stocker with the arrangement No 1 is used Nozzle Stocker Unit Lower Limit Detection Nozzle Stocker Shutter Close Check Nozzle Stocker Clamp Check Connector XUP 1 Wiring 4 pins NST 1 Connector XSFL Wiring 4 pins XUP 1 Fig C3 Fig C4 Solenoid Valve Connection Diagram Fig C5 Solenoid Valve Shutter Open ...

Страница 85: ...zle are added to the high speed nozzle stocker unit Note 1 Because the nozzle stocker for high speed nozzle does not have the nozzle stocker up status detection function the connector XSFL XNST 1 SFL is not used 2 Because the print mark for the connectors for the nozzle stocker addition valves is only XUP mark 2 to 4 additionally to each connector using a magic pen etc as shown in the following fi...

Страница 86: ...ker unit for high speed nozzle Note 1 Because Nozzle Stocker Up Status Detection B1611 is added connect the connector XSFL as shown in the following figure Set the detection sensor output to AND 2 Because the print mark for the connectors for the nozzle stocker addition valves is only XUP mark 2 to 4 additionally to each connector using a magic pen etc as shown in the following figure Fig C7 ...

Страница 87: ...etection Sensor for the Nozzle Stocker Unit for Multi Functional Nozzle to AND 2 Because the print mark for the connectors for the nozzle stocker addition shutter valve is only XUP mark 2 additionally on the connector using a magic pen etc as shown in the following figure 3 The shutter valve for addition for the nozzle stocker for high speed nozzle has been attached as standard configration Howeve...

Страница 88: ...ing figure Set the Up Status Detection Sensor for the Nozzle Stocker Unit for Multi Functional Nozzle to AND 2 Because the print mark for the connectors for the nozzle stocker addition valves is only XUP mark 3 and 4 additionally on the connectors using a magic pen etc as shown in the following figure 3 The shutter valve for addition for the nozzle stocker for high speed nozzle functions for the s...

Страница 89: ...llowing figure Set the Up Status Detection Sensor for the Nozzle Stocker Unit for Multi Functional Nozzle to AND 2 Because the print mark for the connectors for the nozzle stocker addition valves is only XUP mark 2 to 4 additionally to each connector using a magic pen etc as shown in the following figure 3 The shutter valve for addition for the nozzle stocker for high speed nozzle functions for th...

Страница 90: ... Set the Up Status Detection Sensor for the Nozzle Stocker Unit for Multi Functional Nozzle to AND 2 Because the print mark for the connectors for the nozzle stocker addition valves is only XUP mark 2 to 4 additionally to each connector using a magic pen etc as shown in the following figure 3 For the shutter open close for the added nozzle stocker for multi functional nozzle the shutter open close...

Страница 91: ...osed position 2 Nozzle Stocker Open Stroke Adjustment Fix the cylinder stroke adjusting nut at the position where the shutter is returned 0 15 to 0 25mm from the full open position Fig C13 yellow arrow section right figure Apply Screw Lock 1401B 3 Shutter Open Close Speed Adjustment Open the needle of the Speed Controller SPICON 225 degrees standard from the completely closed position Make sure th...

Страница 92: ...Status Detection Sensor Sensor Optical Axis Adjustment Set the nozzles in the stockers No 1 and No 9 and adjust the sensor optical axis up and down on the light emitting side and right left up and down on the light receiving side Fix the sensor where its indication value becomes maximum peaked Any indication values should be 125 or more Light Receiving Level Check Set the nozzles in the stockers N...

Страница 93: ...ent 1 Amplifier Cable Wiring Arrangement a Standard The nozzle stocker for multi functional nozzle is setup in the first line b Standard The nozzle stocker for multi functional nozzle is setup in the Fouth line c Standard The nozzle stockers for multi functional nozzle are setup in first and the fourth lines 2 Sensor Amplifier Teaching Set the nozzle up status detection fiber amplifier using the f...

Страница 94: ...OWN key to show the following indication 4 Press the MODE key once to go to the Timer Function Setting Change the indication using the UP DOWN key to show the following AND indication 5 Press the MODE key once to go to the Timer Function Setting Change the indication using the UP DOWN key to show the following PTUN Power Tuning Start indication Press the MODE key once to go to the Power Tuning Tar...

Страница 95: ...ss the MODE key for three seconds to perform the power tuning operation Additional Key Lock Setting Set the SET RUN key to RUN mode Press the UP key for three seconds or more with the MODE key pressed The sub digital indicator will flash twice and the key input operation is disabled In order to cancel it using the same procedure for key locking operation press the UP key for 3 seconds or more with...

Страница 96: ...use they are to be used for positioning Fig C17 2 Move the head to the motor side in the direction Take out the cover from opposite side of the motor in the direction 3 Remove the seven truss head screws M4L6 on the cover over the ball screw Slide the head to the motor side Turn the upper cover and remove it on the opposite side of the motor Remove the 7 bolt screws on the locations specified with...

Страница 97: ...t using a spanner to remove Fig C21 6 Loosen the setscrew for the lock nut using the hexagon wrench 2 Note Take care not to lose the ball axis scratch preventive spacer 7 Insert the hexagon wrench 4 into the gap at the end of the ball screw and stop the ball screw turning Then loosen the lock nut using a spanner to remove 8 Turn the ball screw using the hexagon wrench with the spanner placed to re...

Страница 98: ...e the ball screw unit and insert it carefully into the bearing holder on the opposite side of the motor Then insert it into the support unit on the motor side Take the greatest care not to bump the ball screw axis 2 Put the collar and lock nut and insert the ball screw axis into the coupling Put the bearing sets which have been removed in Step 10 of X axis ball screw removal procedures in the ball...

Страница 99: ...er and press the marked section using the push pull gauge until the value reaches 28N Turning it with the hexagon wrench is also available After applying Screw Lock 1401B tighten the lock nut with 147cN m 6 Fix the ball screw movable section onto the head plate temporarily Note Arrange it so that the ball screw movable section can move slightly 7 Slide the head to the motor side in the direction a...

Страница 100: ... M3 on the ball screw side 3 2 3 Treatment if any value is out of the standard range 3 2 3 1 Adjustment Procedure 1 Loosen the set bolt for the ball screw nut 2 Slide the head to the motor side and tighten the bolt Note The procedure in this Item cannot be performed together with the procedure in Item 17 3 2 3 2 Adjustment Procedure 1 Loosen the set bolt for the bearing holder on the ball screw si...

Страница 101: ... edge When the linear slider is to be removed take care not to lose the inside steel balls 3 Adjust the straightness so that it is within the standard range Standard Range Within 0 02mm 4 Adjust the parallelism of the linear guide Press the linear guide on the Y2 axis against the setup section and fasten it with the set bolt Wipe out anti rust oil in advance from the linear guide Tighten the linea...

Страница 102: ...nd Y2 axis and adjust the parallelism Standard Range Within 0 02mm Fig C36 5 After the attachment push the blind plugs into the holes of the linear guide set bolts in parallel each other Any blind plug or burr should not come out from the linear guide upper surface Y1 Axis Linear Guide Y1 Axis Linear Guide Parallelism Adjusting Jig Do not fix the bolts Check the entire movable section Dial Gauge 0...

Страница 103: ... After fixing make sure that the 0 01mm shim cannot be inserted to the end in the linear guide reference surface contact section Fig C37 2 Press the reference surface of the X axis beam lower linear guide on the reference side against the beam setup section section with red lines in the following figure and tighten the set bolt M4L14 In the lateral direction insert the bolt at the center of the cl...

Страница 104: ...ree locations Make sure to record the results Make sure that the difference between the maximum value and minimum value in the measurement results in these three locations should be within 0 03mm If not repeat the temporary fixing steps Measure the values at the center of the beam and the both ends of the beam three locations using the above procedure Press it against the section in red lines in t...

Страница 105: ... on the surface plate and measure the parallelism in the directions Z and Y Standard Range Within 0 04mm Refer to the following figure for the measurement procedure Standard Range 1000g or less From the surface plate to the DD center 84 5mm Surface Plate Straight Edge From the beam center position to the component placement level 200mm Direction Y Direction Z Fig C40 ...

Страница 106: ...Attach the linear scale based on the frame knock pin lower side 2 Tighten the five setscrews to temporarily fix the linear scale For the linear scale position adjustment the following conditions should be satisfied The 0 01mm shim cannot be inserted in the gap between the linear scale and knock pin The laterally adjusted position of the X axis linear scale should be the position with the center va...

Страница 107: ...porarily Put the scale head cable leading direction etc back to the original condition 5 Put the scale head adjusting jig t 0 4mm between the scale head and linear scale and loosen the temporarily tightened setscrews Then tighten the setscrews at the position where the jig can be pulled out with some difficulty Refer to Fig C45 Place the dial gauge on the linear scale side surface Refer to the lef...

Страница 108: ...ss through Scale Head Adjusting Jig t 0 5mm It cannot pass through Note Basically the position adjustment is performed only at one location It is because the final adjustment is performed using the software PC Note Finally check the following items and if there is no problem fix it Then adjust the parameters 1 The scale head jig with thickness 0 3mm can be entered without problem 2 The scale head ...

Страница 109: ...t from the bracket 7 Loosen the nine setscrews for the linear scale to remove 3 6 2 Y Axis Linear Scale Attachment 1 Attach the linear scale based on the frame knock pin lower side 2 Tighten the nine setscrews to temporarily fix the linear scale For the linear scale position adjustment the following conditions should be satisfied Remove the two bolts fixing the block Refer to Fig C47 Loosen the tw...

Страница 110: ...d block When it is attached fix it so that the scale head end surface is parallel with the block end surface If not it might affect the adjustment after that 4 Attach the assembled scale head block onto the main machine When it is attached fix it temporarily Put the scale head cable leading direction etc back to the original condition 5 Put the Y axis MITSUTOYO scale adjustment jig t 0 4mm between...

Страница 111: ...ss through Y axis MITSUTOYO scale head adjustment jig t 0 5mm It cannot pass through Note Basically the position adjustment is performed only at one location It is because the final adjustment is performed using the software PC Fig C53 Note Finally check the following items and if there is no problem fix it Then adjust the parameters 1 The scale head jig with thinkness 0 3mm can be entered without...

Страница 112: ...ct the PC s USB connector to the adjusting jig D SUB connector in the frame in Fig C54 1 3 There are two relay cables to connect to the adjusting jig Black and White cables Use the cable appropriate for the connector to be connected Refer to Fig C55 Note Take care so that no cables interfere with the machine because the beam is operated in the adjustment operation Also because there are two types ...

Страница 113: ...rt No Press the START button in the lower left to start up the adjusting program Note a If the communication is still a navailable after the above operation the USB port No might be incorrect In such a case change it and reconfirm b b In the case that a software error occurs re start up the software When the button on the upper left of the window is pressed the software is started up Disconnect th...

Страница 114: ...w In this case perform the gap adjustment between the scale head and the linear scale again Note When an error occurs confirm the highest position of the signal level on the signal monitor Because the adjustment in the 信号調整 Start is started from that position in the next item In the case of a re adjustment of the mechanism section turn OFF the power to the adjusting jig and close the PC software F...

Страница 115: ...lues are OK in the judgement area In the case of OK press the 終了 ESC button to return the initial window In the case of NG adjust it again because the signal might not be adjusted at the highest signal level position using the 信号調整 button or the gap between the linear scale and the scale need might be too large 10 Press the 信号 Monitor button and make sure that Magnitude Scale A B and C values are ...

Страница 116: ... 終了 ESC button to return to the initial window 13 Close the software for adjustment and turn OFF the power to the adjusting jig Then remove the jig from the head and return the head cable to the original position Note In the case that the cable ties etc have been released except for the cable connector return them to the original condition and move the beam by hand again to make sure that it does ...

Страница 117: ...the PC s USB connector to the adjusting jig D SUB connector in the frame in Fig C66 1 3 There are two relay cables to connect to the adjusting jig Black and White cables Use the cable appropriate for the connector to be connected Refer to Fig C67 Note Take care so that no cables interfere with the machine because the beam is operated in the adjustment operation Also because there are two types of ...

Страница 118: ...in the PC with the connected PC s USB port No Press the 起動 START button in the lower left to start up the adjusting program Refer to Fig C68 Note a If the communication is still unavailable after the above operations the USB port No might be incorrect In such a case change it and reconfirm b In the case that a software error occurs re start up the software When the button on the upper left of the ...

Страница 119: ...to return to the initial window 8 Close the software for adjustment and turn OFF the power to the adjusting jig unit Then remove the jig from the head and return the head cable to the original position Note In the case that the cable ties etc have been released has been released except for the cable connector return it to the original condition and move the beam by hand again to make sure that it ...

Страница 120: ... Frame Grabber 1 U92 BOARD FigD2 1 No3 D89 SSD FigD2 1 No7 4 1 1 Removal of CPU1 BOX In the case of the replacement the backup operation using the NT 100 is performed 1 Shut down the machine and turn OFF the breaker 2 Disconnect all the connectors on the CPU 1 section Fig D2 X9102 X9202 X8500 X8501 X8502 X85UP X85DN X85T X8109 X8104 X8202 X8201 X8102 U85 U82 U81 X8204 X9201 X8203 U92 U91 X9106 X91...

Страница 121: ...out the BOX 5 Incline the drawn out CPU BOX toward the right hand side and keep it as shown in the figure Remove the upper plate Setscrews in four locations Refer to the left figure Because SSD has been attached to the upper side of the cover open the cover with careful attention to the wiring for the SSD Setscrews Setscrews 1 Remove the board fixing block Loosening the two setscrews can remove th...

Страница 122: ...six setscrews for CPU1 and then remove the board Four Setscrews One Setscrew U92 Frame Grabber Use an antistatic sheet etc Six Setscrew When U91 is to be removed from the locations each shown by a red circle in the left figure press the connector section arranged in front of the board to slide as shown in the following figure Fig D6 2 Remove the set bracket Remove four setscrews shown in the left ...

Страница 123: ...X 2 Fix the six locations each in a red circle with a screw After fixing connect the connectors in the sections specified in the following figure Insert the U92 board into the U91 board slot 2 and connect the power cable Fig D8 3 Insert the U92 board into the U91 board slot 2 and connect the power cable After the wiring arrangement bind the power line cables with cable ties Because there is a conv...

Страница 124: ...in the section enclosed by a rod circle When it is to be removed press the locked section to unlock and pull it out Refer to Fig D13 First attach the set bracket Fix the sections enclosed by red circle using the four screws Refer to Fig D10 When the DURACON block is attached make sure to press it against the side surface of U92 and fix Refer to Fig D11 Four Setscrews Take care not to step on the c...

Страница 125: ...rk Then the change procedure closes Turn ON the power and make sure that the system is operated normally There is a plate on the front lower section of CPU1 BOX where the wiring destination is printed Connect the cables referring to the above plate Refer to Fig D15 Note There are three types of CPU Before wiring check the board type Refer to Chapter 5 Fig D15 CPU Section Front Layout ...

Страница 126: ..._I O CF KYB M410C 00 FigD2 2 No 105 D81 Compact Flash has been attached to the CPU2 board 4 2 2 Control Board Removal Fig D17 2 Unplug the connector of the PCB to be removed Take care not to deform the cables fiber optic cables for the connector X8201 and X8202 1 Shut down the machine and turn OFF the breaker When a message NO SIGNAL INPUT is displayed in the window the breaker turning OFF is avai...

Страница 127: ...8 4 2 3 Handling of Control Board 1 Do not touch the electronic components placed section directly Grab the levers and put the section on an antistatic sheet etc Wear an antistatic belt Fig D19 Note The basic settings for each board are described in Chapter 5 However the settings might be different depending on the design changes Therefore make a note of the settings as currently as possible Antis...

Страница 128: ...he slot When the lever is closed the correct insertion is not available Tighten the setscrews on the upper and lower sections of the PCB Plug the disconnected connectors Fig D21 The data required for the control has been written in this memory Therefore the commercial memory product without such control data can not be used The main board can be replaced in the machine with a different type or opt...

Страница 129: ...inafter called CF Fig D22 Push the bar on the side of the slot and carefully pull out of the memory Fig D23 Attach the memory onto the new PCB Attach the nut taking care not to scratch the memory or PCB with the tool The nut does not need to be fastened tightly Insert the PCB into the BOX using the same procedure in the case of U85 and U82 and connect the connectors Bottom surface of the PCB Hold ...

Страница 130: ...ighting Control Board Fig D26 Note For G5S only when coplanarity check function Option has been included the image distributor is added Normally such distributor is not required because the video signal is fed directly to the monitor from CPU1 NAME SYMBOL PART NAME PART CODE Fig No Key No Remarks Lighting Control Board U95 PCB_MOUNT FigD3 7 No 601 LED Lighting Control Board U95 FRONT U95 Lighting ...

Страница 131: ... earth wires in this side and disconnect all connectors connected to the board 3 Remove the setscrews for the board from the board mounting panel and remove the board Loosen the two bolts each in a circle in the left figure Disconnect all the connectors which have been plugged into the board Black connectors on the rear side Remove the lighting signal line according to the instructions Fig D27 Fig...

Страница 132: ...the left hand side and in the one location on the rear Then pull out the board Remove the seven board set bolts and remove U95 Fig D29 4 3 2 U95 Attachment 1 Confirm the DIP SW and Jumper Setting for the prepared U95 board These settings are for the initial type of the U95 board They might be changed so confirm the settings referring to the removed board Fig D30 SW1 All OFF JP All Open ...

Страница 133: ...n fix the two setscrews on the lower side After the panel has been fixed fix securely the four earth wires at the front If loosened unexpected movement might occur 4 Turn ON the machine and perform the component recognition and PEC recognition camera lighting teaching Refer to Item 1 4 5 Offset Teaching Ship Adj Chapter 1 Window Insert the connector to the end When it has been inserted close the l...

Страница 134: ...hange Procedure The section shown in the figure shows the multi axis board housing section The names of multi axis board are as follows NAME SYMBOL PART NAME PART CODE Fig No Key No Remarks Multi Axis Board A31F A31B UNIT_DRIVER FigD3 5 No 401 Front Rear Head Multi Functional Head FRONT Breaker Side REAR Fig D32 ...

Страница 135: ...med by screws When the cover is removed take care not to damage the fiber cable 3 Remove the cables connected to A31B and A31F For the wiring arrangement refer to the following figure Fig D33 4 Remove the screws fixing the nine locations on the upper surface of A31F and remove the board Fig D34 Screw fixing locations Locations each shown in a red circle in the left figure Remove the screws in the ...

Страница 136: ... to 1 For the rotary switch refer to the following figure Fig D35 6 The attachment order of A31F and A31B is alternated and fix the boards again 7 Connect the wires that have been disconnected first as before The connections of the fiber cables are as follows Fig D36 Fiber Cable Connection Order 1 Black and Red Arrows CPU A31B CN1A 2 Red Circle A31B CN2A A31F CN1A Make sure to connect the fiber ca...

Страница 137: ...tion camera to the set block Disconnect the cable connecting to the camera unit Remove the camera unit from the main body 1 Attach the PEC recognition camera onto the set block After attaching tighten the setscrew lightly Do not tighten it completely Position adjustment is required first Attach the camera carefully in the correct direction 2 Adjust the head base end surface and the camera angles s...

Страница 138: ...om the machine body 4 6 2 Attachment Procedure for the Component Recognition Camera Unit Remove the two bolts in the support section of the component recognition camera Refer to Fig D39 Remove all the following connectors 1 Lighting for the Reference Mark Base Mark 2 Front Lighting 3 Camera Cable 4 Main Body Lighting 1 Press the component recognition camera unit against the pilot pin 2 Fix the bot...

Страница 139: ...he coupling from the removed motor and degrease the shaft section of the new motor using alcohol Also degrease the shaft section where the coupling on the NL axis ball screw side is inserted 2 Temporarily fix the NL axis motor and coupling on the motor side Apply Screw Lock 1401B on the coupling fixing bolts Set the gap between the coupling and motor axis root so that it reaches about 2 5 mm Arran...

Страница 140: ...rder Select Maint DVC Check and Motor in this order and select the changed block in Motor window Then select NL and Axis Select in this order and press the START button in the Axis Select window The same procedure is applied to the HL NS and DD axis to zero 7 In the same window select NS and Servo Switch in this order and touch Servo OFF in the upper right of the Servo Switch window For safety pur...

Страница 141: ...e manual axis operation and confirm the cam delivery Standard Value Range Within 0 01 mm In the case that it is out of the range adjust it by loosening the coupling setscrew After the check remove the dial gauge from inside the machine During the check operation make sure not to move the XY beam absolutely Only NS axis can be moved 11 Check that the upper lower interlock positions on the NL axis a...

Страница 142: ...care not to lose it and the washer when removing them 4 Incline the motor to remove the timing belt from the pulley and separate the nozzle selection axis from the motor 4 8 1 Attachment of Nozzle Selection NS Axis Motor 1 Loosen the split block fastening bolt M2L8 on the removed motor and remove the block and pulley Then attach them to the new motor Degrease the shaft section of the new motor suf...

Страница 143: ...the pulley on the center shaft is the same as that of the pulley on the motor side Select Maint DVC Check Motor Select Changed Block NL and Selection Axis in this order and press the START button in the Selection Axis window The same procedure is applied to the HL NS and DD axis to zero 6 Fix the pulleys at the position where the nozzle No 1 cam follower center agrees with the roller rest center c...

Страница 144: ...not available this operation is not required 2 Loosen the coupling fixing bolt M2L8 on the ball screw side of the HL axis so that the motor can be removed One bolt each in the upper and lower sections When the coupling set bolt is to be loosened approach from the section framed in red lines in the following figure This is because the tool can be inserted only from the head side 3 Separate the HL a...

Страница 145: ...bend due to sliding Return to the original condition 4 Turn ON the power to the machine and start it up 5 Zero to view Phase C the head up down HL Axis motor manually at the position where there is no obstacle such as nozzle stocker under the head Shade the upper photo sensor X0711 Select Maint DVC Check and Motor in this order and select the changed block Then select HL and Selection Axis in this...

Страница 146: ... 1 position in the head in question Refer to 2 4 Conveyor Width Adjusting Procedure in Chapter 2 for the setup procedure for the placement height confirmation supporting jig Setup the jig only on the Z clamp In the case that the conveyor width clearance is not the same as the set value record the value before the change and return it after the work When the NL axis has not been zeroed arrange the ...

Страница 147: ...an be loosened easily loosen the coupling on the motor side and adjust the position Then repeat Step 10 12 Perform the head up down offset adjustment work in the center of the machine Find the difference between the values recorded before the replacement and the actual measured value If the difference in offset value before and after replacement is within 0 01 mm go to the next item The difference...

Страница 148: ...14 Make sure that the position of the head up down HL axis overrun sensor and mechanical stopper status are as follows Fig D53 Mechanical Stopper Overrun Soft Limit HL Axis Zero HL Axis Full Stroke Soft Limit Mechanical Stopper 1 0 0 5 1 0 1 2 1 25 0 Photo Sensor Unit mm X0711 2 0 75 27 0 35 ...

Страница 149: ...ng Be careful not to drop the fixing bolt For the fixing bolt in the rear side in left figure turn it to remove after removing the bolt on the front side 3 Disconnect the connectors of the slip ring When the connector is to be disconnected do not hold and pull the cable section It might cause a wire breakage 4 Remove the four slip ring set screws M3 L8 and release the slip ring freely Then spread ...

Страница 150: ...her 2 Temporarily fix the slip ring using the slip ring set screw M3 L8 with SW FW Take care not to drop any set screw 3 Tie up the cables so that they can be housed in the coupling Make the wires round and house them between the upper and lower shafts Bind wires and connectors so that they can be housed in the coupling inside the dot lines During repair operation use the wiring protection tube an...

Страница 151: ...r X No 8008 and dry Refer to the right figure In the case that it has already been adhered omit this work Apply Screw Lock slightly to the set screws M3 L10 and tighten them Take care not to drop any set screw 6 Adjust the coupling fixing position and tighten the set screws securely Make sure that the gap in the coupling separated section should be about 1mm and the lower gap should be about 1mm T...

Страница 152: ...tricity 0 1mm or less The staged section of the coupling is not measured In the case of an eccentricity of 0 1mm or more the slip ring attachment position wiring caught in the coupling or coupling fastening procedure is reviewed Tighten the slip ring set screw at the position where the eccentricity is within the specified range 8 Connect the slip ring and the connector Make sure that the connector...

Страница 153: ...removed nozzle shaft and apply new grease on the specified locations Perform the ultrasonic cleaning using water depending on how dirty it is Also remove excessive Screw Lock on the top block fixing section 2 Insert the nozzle shaft from the head lower section using the reverse procedure of the removal and hold it 3 Connect the top block and nozzle shaft using the two M1 6L3 screws Tighten with to...

Страница 154: ...chment Supporting Tool General Phillips Type Screwdriver Linear Measure Sensor Protection Tube or Protection Wrap Reference Tool Bamboo Skewer Used for greasing up the retainer section Ultrasonic Cleaner For cleaning the nozzle shaft Nozzle Shaft Cleaning Supporting Tool Lubricating Tool SS 10LZ Standard Accessory and Lubrication Nozzle Type No 19 2 Others Grease Daphne Eponex No 1 Screw Lock 1401...

Страница 155: ...ig D65 2 Select Maint Ship Adj Noz Lv Pos Select Head Noz Lv and Teach Start in this order and press the START button in the Teaching window When the teaching is completed select Save When a message Do you save it appears select Yes to save the teaching data Fig D66 3 Select Setup NOZ CHG Nozzle Reset Head Select and Operation in this order and press the START button in the Operation window When t...

Страница 156: ...ections instructed in the following figure The bolt to be removed has been fixed using Screw Lock 1401B Therefore take care not to damage the bolt If the diffuser plate is removed forcibly it might be chipped or damaged Therefore be careful Do not reuse the removed bolts Dispose of them and replace with new ones When the small diffuser plate is to be removed protect it with the protection tube or ...

Страница 157: ...ut the linear measure Because the bolt to be removed has been fixed using Screw Lock 1401B the greatest care is required Do not reuse any removed screw Fig D68 Separate the linear measure sensor from the pulled out linear measure sensor connector section When the linear measures are pulled out confirm the direction of each of the linear measures This is because they are returned in the direction s...

Страница 158: ... direction The set screw tightening torque should be 4 8 cN m for the torque driver to fix 4 Remove the top blocks 15 blocks Manage the removed top block so that which block is removed from which shaft is followed When the top block is removed take care not to drop the fixing bolt M1 6L3 in the head Also spread a rag under it Removed the Screw Lock attached to the attachment surfaces both of the r...

Страница 159: ... Remove the following three lower rotor set bolts M1 6L4 as shown in the following figure and remove the nozzle shaft assembly lower rotor from the DD motor When it is removed pull it down vertically Fig D71 Condition where the Nozzle Shaft Assembly has been removed Fig D72 Remove the three set screws as shown with the mark ...

Страница 160: ...and apply new grease slightly Inside the Packing Holder Clean it using a cotton applicator dipped in alcohol V Packing Section Wipe out old grease and inject grease in the groove and apply grease to the inner ring slightly Pay attention to the direction of the V Packing The groove should be located upper side Packing Holder Packing Holder Insertion Supporting Jig O Ring Cotton Applicator V Packing...

Страница 161: ...up supporting jig and outer casing with clips the work can be completed by a single individual Each nozzle shaft and outer casing has the same serial No Therefore when the nozzle shaft is assembled after cleaning return it to the location on the outer casing with the same serial No 8 Remove the V packing from the outer cylinder section in the following figure and wipe out old grease and dirt Apply...

Страница 162: ...ng using a rag etc dipped in alcohol Clean all 15 locations Material which does not leave any fiber residue should be used for the rag The width of the rag should be 6 to 7 mm A rag cut to the length of 130mm should be prepared Refer to the following figure Reference Cleaning Tools Fig D77 Rag Hexagon Wrench Long 1 5 mm Stretch both sides of the rag by hand ...

Страница 163: ...one location 2 lines so that the grease amount as much as half size 0 03g of a match head is applied to each location Grease should be applied to all 15 locations When the air is blown into the retainer inside to dry it take care not to lose the V packing Use something like a bamboo skewer as a tool for applying grease Do not use an cotton applicator or tooth pick which leaves fiber residue or sma...

Страница 164: ...way with air and further perform air blowing also inside the nozzle shaft Take care in particular not to leave any dirt or water inside the shaft cylinder After that apply grease Daphne Eponex No 1 on the specified locations Refer to the following figure on the nozzle shaft using a finger so that a thin film of grease is created Also apply grease into the grooves 2 lines where the retainer is move...

Страница 165: ...red in the following figure wipe it out using a cloth etc 15 Then assemble the nozzle shaft assembly using the reverse procedure of the disassembling Attach the Head Attachment Supporting Jig to the nozzle shaft assembly using the Large Diffusing Plate set tapped hole as shown in the following figure Unless the Head Attachment Supporting Jig is held securely the M1 6L4 bolt might be tightened on t...

Страница 166: ...e nozzle shaft assembly is inserted forcibly the V packing in the nozzle holder might be damaged or come off Be careful When any excessive grease is attached to the tip of the nozzle shaft wipe it off using a rag etc There is only one location where the nozzle shaft is attached inside the DD motor Insert it so that a notch of the nozzle shaft assembly is aligned with the knock pin on the DD motor ...

Страница 167: ... M1 6L4 bolts with new ones Dispose of the used bolts Apply Screw Lock 1401B slightly onto the M1 6L4 bolts and tighten them with a torque of 4 8 cN m Fix the linear measure sensor at the center of the long hole 22 Attach the large and small diffuser plates Apply Screw Lock 1401B slightly to the M1 6L4 bolts and tighten these plates with a torque of 4 8 cN m When the small diffuser plate is to be ...

Страница 168: ...window the START button should be pressed within 10 seconds If the button is pressed more than 10 seconds later the status is cleared In such a case repeat the procedure 4 Perform the Nozzle Level Teaching for the head for which the cleaning and lubricating have been completed Select Ship Adj Noz Lv Pos and Select Head in this order and select the subject head in the Select Head window Then select...

Страница 169: ...box to place the head 1 Loosen the fixing bolt four locations and hold the head frame and DD motor section Then pull out the head assembly to the upper direction Fig D85 Fixing Bolt Base Fig D84 Connector 2 pcs X0701 Power Source X0702 Encoder Air Hose 2 Unit 6 Air Blow 8 Air Vacuum Fig D86 Fixing Bolt Note After removing the wires and air hoses described in Item 4 12 1 1 loosen the set bolts The ...

Страница 170: ...not caught 1 Tighten the head fixing bolt four locations 2 Connect the wires and pipes as before 3 Make sure that the wiring or piping does not interfere with the robot cable or any other section when the head is moved throughout the entire movable range 4 Turn ON the power to the machine 4 13 1 SVC Offset Value Input SVC Side View Camera 1 SVC Magnification Offset Value Input Enter the X Y Z Magn...

Страница 171: ...ching is performed in the following order Fig D90 NL Origin Offset Master Nozzle Level Offset Chute Level For Replacement PEC Recognition Camera Beam Offset Component Recognition Camera Offset Head Rotation Axis Offset Head Rotation Center Base Mark Position Offset and Corn Recognition Offset Fry Recognition Offset Nozzle Inclination Offset Head Offset A B For each angle N1 For each speed reductio...

Страница 172: ...ne Lower the feeder base with the machine stopped Disconnect the machine connecting connectors and pull out the feeder cart 2 Remove the machine s area cover Undo the lock on the both sides and remove the cover 3 Loosen the two set bolts for the cutter unit to remove Remove the bolts on the right and left sides two locations Undo the lock on the right and left sides two locations Fig D91 Fig D92 F...

Страница 173: ...ss of the screw head Note When the cutter unit is to be removed because it is very heavy remove it taking care not to drop it on your foot The weight of the unit is about 20kg When it is removed take the greatest care 4 14 2 Cutter Unit Attachment to the Feeder Cart Attach the cutter unit onto the feeder cart using the reverse procedure of Item 4 14 1 After the cable connection take care not to ca...

Страница 174: ...14 1 for the removal procedure 2 Loosen the screw fixing the tape leading cover and side covers and remove them 3 Loosen the two set bolt M5 x L13 two locations for the clamp lever mounting stay on the both sides and remove the clamp lever When removing move the cutter blade assembly to around the center and remove the clamp lever When removing be careful of the cutter blade Fig D96 Fig D97 Clamp ...

Страница 175: ...a hexagon wrench For the replacement replace the urethane rubber and metal frame assembly 4 15 3 Clamp Lever Attachment 1 Attach the clamp lever using the reverse procedure described in Item 4 15 2 For the fixing of the clamp lever stay there are the two knock pins each on the right and left of the cutter unit base section which facilitates positioning Slide the cutter blade assembly by hand and c...

Страница 176: ...ar scale and the transfer belt base each using two knock pins the positioning during attachment or removal is easy In the right figure the frame etc has been removed for easy understanding about the positions of the setscrews When disassembling check that there is no malfunction backlash or looseness in the linear scale 4 Attach the cutter blade assembly Attach it using the reverse procedure of th...

Страница 177: ...ve the cutter driver from the cutter driver set bracket 6 Fix the new cutter driver onto the bracket and attach it using the reverse procedure for the removal When the both ends of the amplifier are grasped and the amplifier body is lifted in the arrow direction as shown in the photo the amplifier is easily removed Take care not to damage the fiber cable Remove the two set bolts as shown in the ph...

Страница 178: ...Debug window is enabled Refer to the following figure for the Debug display procedure Fig D103 Debug is displayed and when the Unit Adj is selected the functions in the red frame become available Normally only Noz Chng and Line Meas functions are available Hold the section down until a single green circle appears in the area After the green circle has appeared hold the section down until three gre...

Страница 179: ...rom the tape guide cover and select an appropriate operation mode Then press Manual Opn The cutter manual operation is started Repeat this procedure several times and confirm that the tape is being cut without any problem For a small piece of emboss tape prepare it so it can reach from the tape leading cover front end to the cutter section The manual operation can be started without positioning of...

Страница 180: ...ower BL2 24G2A 250V 6 3A U27 UC34 Relay PCB 1 F27 Feeder Power BL2 24G2B 250V 6 3A U27 UC34 Relay PCB 1 F200 Lightning Surge Protector AC200 Outside of the Side Panel Front 3 F1 48V Power CN1 250V 10A U95 UC19 Lighting Control Board 4 F2 48V Power CN1 250V 10A U95 UC19 Lighting Control Board 4 F3 24V Power CON9 125V 1A U95 UC19 Lighting Control Board 4 F4 48V Power CN1 250V 10A U95 UC19 Lighting C...

Страница 181: ...shutdown and breaker has been turned OFF 4 17 1 Relay PCB U27 Fuse Replacement 4 17 2 Replacement of Fuse located on the side panel rear Remove the case using a flathead screwdriver turn it counterclockwise and replace the glass tube fuse Pull out the fuse case and open the cover Remove the glass tube fuse using a flathead screwdriver and replace it by a new one Fig D106 Fig D107 ...

Страница 182: ... Replacement 4 17 4 Lighting Control Board U95 Fuse Replacement F200 Take out the glass tube fuse using a screwdriver etc and replace it Connector XP200 Three phase 200V Connector XF200ALM I O for Lightning Surge Alarm Remove the earth wire E0 and replace the lightning surge protector by a new one Fig D109 Fig D108 U95 PCB ...

Страница 183: ... U85 Remove the AE LINK I O host board U85 located in the left end in the CPU2 BOX Note Removal Procedure Loosen the setscrews on the upper and lower sides of the board and push down the up down lever at the same time press the red section on the lever Pull out the blade fuse and replace it by a new one Fig D110 CPU2BOX U85 PCB U85 PCB ...

Страница 184: ...ngth of 30cm or more 1 Shut down the machine and turn OFF the breaker 2 Component Arrangement Locations H2 XY Servo Amplifier Remove the cover under the machine rear H1 XY Servo Amplifier Remove the cover under the machine front 3 When the servo amplifier on the H1 side is to be changed remove the cover on the lower section of the machine front Remove the head section motor amplifier unit 4 Discon...

Страница 185: ... the servo amplifier pull the servo amplifier out to a point where it can easily be removed 4 18 2 Servo Amplifier Attachment Attach the subject servo amplifier Set the values for SW1 and SW2 for the subject amplifier based on the following table AMP SW1 address SW2 UVW CN1A CN1B CN2 CN2L CN3 A21F 0 Settng XM21PF X211AF X211BF X2102F X2102LF X2103F A22F 1 XM22PF X221AF X221BF X2202F X2202LF X2203F...

Страница 186: ... load power Then open the gullwing cover 4 Adjust the beam position manually based on the following figure Note Make sure to adjust the beam position to establish a position in relation to the figure If the position in relation is not correct and teaching is performed the beam might hit a component around it The home position of the XY axis is the same regardless of front or rear Move both beams t...

Страница 187: ...med make sure to perform it in the both beams If not the machine might not be operated correctly after the restart Fig D118 6 After the home position teaching re start the machine 7 Send overwrite the device system data saved before the operation to the machine Note If the teaching is performed without saving the device system data before the operation all the teaching operation items should be pe...

Страница 188: ...ifier shown on the right side in the following figure 3 Remove the amplifier connector B0520 4 19 2 Disengaged Latch Detection Sensor Attachment 1 Attach the disengaged latch detection sensor amplifier in the section shown on the right side in the following figure 2 Peel off about 5 cm of the fiber cover on the both end of the cable using the fiber cutter and take out the core 3 Attach the fiber c...

Страница 189: ...Type Press the output switch button and turn ON the L D indicator lamp L Percent Tuning Mode Setting Press the mode change button for 3 seconds or more and set the function Function Selection Press the button to set it to the following value and determine the value using the mode change button Detection Function Press the button to set it to the following value and determine the value using the mo...

Страница 190: ...lowing value and determine the value using the mode change button Percent Tuning Level Press the button to set the percent tuning level to 50 and determine the value using the mode change button Differentiation Function Press the button to set it to the following value and determine the value using the mode change button Digital Display Setting Press the button to set it to the following value and...

Страница 191: ...n the mode change button for 3 seconds or more to escape from the setting mode 3 When the above settings are completed press the sensitivity setting button without the object to be detected Now all the settings have been completed 4 Finally set up the feeder 8mm or 32mm and disengage the feeder hook Then check that the value is 1000 or less Check it in the three locations right end center and left...

Страница 192: ...is turned OFF when the fiber light is shielded 2 Set the timer setting to OFF DELAY using the following procedure and set the timer time to 5ms Set the SET RUN switch to SET and press the MODE key three times to display the timer setting window Change the indication to the following one using the UP DOWN key Then press the MODE key once to display the timer setting window and change the indication...

Страница 193: ...ng procedure Set the SET RUN switch to RUN and press the UP DOWN key to set the sub digital indication to 500 Three second later the normal display will be returned 7 For the pick up error detection set the sensor jig height to 107 5mm and check that the light level is 300 to 600 Perform it on the both sides and check that the difference in the light level is within 50 8 For the pick up error dete...

Страница 194: ...on Wrench 2 Phillips Head Screwdriver 3 Flat Head Screwdriver 4 Nipper Preparation before the Work After all zeroing operation remove the cart on the light receiver side from the machine and turn OFF the power to the machine Then turn OFF the breaker 4 21 1 1 Light Receiver Removal 1 Move the head to the location where the operation can be performed easily At that time take care to avoid any obsta...

Страница 195: ... the following Fig D122 and changing the light receiver perform the wiring treatment At that time fix the light receiver onto the head temporarily When the connectors are disconnected mark on the connectors Refer to Fig D123 for the cable routing and connector positions Before the connectors are disconnected remove the board This is for better workability when the wires are removed Fig D123 Fig D1...

Страница 196: ...as shown in Fig D124 and align the height of jig and that of the lower end of the light receiver Then tighten it using the two M2L10 bolts 3 Press the light receiver attachment adjusting jig and the light receiver against the head and keeping this condition tighten them using the two light receiver set bolts M2L8 FL 4 Remove the light receiver attachment adjusting jig M2L8 Bolt Washer 2 pcs Fig D1...

Страница 197: ...using each of HV82C and HA09C nozzles as described in Steps 4 and 5 4 Make sure that the obtained HV81C image satisfies the following i to iii conditions ⅰ The measured value is between 0 385 and 0 616 ⅱ The outline of the light projector is between the external two vertical lines ⅲ The right and left ends of nozzle are between the inner two vertical lines If any of the above conditions is not sat...

Страница 198: ... not satisfied adjust it as follows Attach the light receiver attachment adjusting jig using the procedure in Step 4 21 1 3 1 and adjust the attachment position of the light receiver Refer to the following figure for definite adjusting procedure Note Do not turn around the DD axis with the jig attached Doing so might damage the head When the nozzle tip end is located over the reference line adjust...

Страница 199: ...hed minimum value data in the light receiver The following two data parameters are entered 1 Camera Magnification X 0000 four digit numbers 2 Camera Magnification Y 0000 four digit numbers Do not change the values for X Y 1 Select Sys Setting Offset Device Offset P2 2 and Line Meas in this order 2 Change the values for Magnification X and Magnification Y for the head where the light receiver has b...

Страница 200: ...n Master Nozzle Level Offset Teaching 1 Attach the master nozzle to any nozzle No position on the head to be adjusted 2 Select Ship Adj and NL Axis Org Master Noz Lv in this order 3 Select the head to be adjusted in Select head section and designate the nozzle No position where the master nozzle has been attached in Noz 4 Press Teach Start and press the START button to start the teaching 5 Press S...

Страница 201: ...For Service Engineer Service Information SI1705004E 00 SIGMA G5SII Service Manual 201 273 5 Electric System 5 1 Home Return Operation Procedure Fig E1 ...

Страница 202: ...For Service Engineer Service Information SI1705004E 00 SIGMA G5SII Service Manual 202 273 5 2 Electric System Block Drawing SIGMA G5SII Fig E2 ...

Страница 203: ...on SI1705004E 00 SIGMA G5SII Service Manual 203 273 5 3 Each Block Electric System Layout 5 3 1 Main Machine Corner Front Side and Plate Entire Section in the lower frame section Lightning Surge Protector Terminal Unit Wiring Diagram FRONT ...

Страница 204: ..._MOUNT KYA M8625 00 Fig D2 2 No104 D81 UNIT_I O CF KYB M410C 00 Fig D2 2 No105 Note There are two or more patterns for the combination of the CPU2 board and CF If you order the components make sure to check the combination pattern Refer to ES E0350 Table 2 Combination List of CPU2 board and CF Combination A B C D CPU2 PART NAME PCB_MOUNT PCB_MOUNT PCB_MOUNT PCB_MOUNT PART No 4B111622 1005BA5X 1010...

Страница 205: ...OL PART NAME PART CODE Fig No Key No Remarks I O Intensive Board U01 PCB_MOUNT KYB M657N 00 Fig D3 6 No 502 UC18 Lighting Control Board U95 PCB_MOUNT KYB M657P 00 Fig D3 7 No 601 UC19 Multi axis board A31F A31B UNIT_DRIVER KYB M658U 00 Fig D3 5 No 401 Front Rear Head Multi functional Head SVC Side View Camera PCB U02 P_C_B_MOUNT KYB M6535 00 Fig D3 5 No 402 Using 5V Power Source A31B A31F Multi ax...

Страница 206: ...t Circuit 24A3 F5 250V 6 3A K25 Inside the U27 board IO PCB 24A6 F7 250V 6 3A F7 On the TB DC Second Stage G2 50 00 0 20V A31 Main power 48D3A F13 250V 6 3A Inside the U27 board 48D3B F14 250V 6 3A Inside the U27 board A63 Main power 48D3C F15 250V 6 3A Inside the U27 board 48D3D F16 250V 6 3A Inside the U27 board A51 53 Main power 48D3 U95 48D G3 24 75 0 10V Feeder Power Block1 24G1A F21 250V 6 3...

Страница 207: ...CCESSORY_WIRING SEMCONDU_DIODE KYB M65BJ 00 KYB M658K 00 KYB M6569 00 Fig D3 4 No 320 No 322 No 332 Electromagnetic Contactor K33A K34A EM CONTACTOR KYB M658S 00 Fig D3 4 No 324 Resistor R04F R04B FUSE SPECIAL KYB M657F 00 Fig D3 4 No 309 X1 axis Motor Regeneration Resistance Electromagnetic Contactor K10 K29 K28 EM CONTACTOR KYB M65BL 00 Fig D3 4 No 305 Vacuum Pump Power in CPU Power in G2 Power ...

Страница 208: ...1F A21B UNIT_DRIVER KYB M652Y 00 Fig D3 3 No 202 The model No of the amplifier used in the front surface is the same as that used in the rear side Y1 Front Axis Servo Motor Amplifier Y2 Front Axis Servo Motor Amplifier Y1 Rear Axis Servo Motor Amplifier Y2 Rear Axis Servo Motor Amplifier A22F A23F A22B A23B UNIT_DRIVER KYB M6565 00 Fig D3 3 No 203 The model No of the amplifier used in the front su...

Страница 209: ...in the following figure Refer to 5 4 6 Transfer I O Board Driver Setting Single for the transfer driver and board settings Table 7 Component Name and SYMBOL Chart NAME SYMBOL PART NAME PART CODE Fig No Key No Remarks Transfer Driver A10 TEPPER DRV BRD ASSY KYB M5806 02 Fig H1 12 No B42 16 16 I O Board UB95 U08 PCB_MOUNT KYB M91AK 00 Fig C1 3 No B41 Backup Driver A11 TEPPER DRV BRD ASSY KYB M5806 1...

Страница 210: ...ings dual for the transfer driver and board settings Table 8 Component Name and SYMBOL Chart Note In the case of dual transfer system the number of drivers is increased because the number of control axes is increased NAME SYMBOL PART NAME PART CODE Fig No Key No Remarks Transfer Driver D4920 A12 A13 A14 A15 UNIT_DRIVER KYB M913W 00 Fig H1 12 No B42 16 16 I O Board UB95 U08 U09 PCB_MOUNT KYB M91AK ...

Страница 211: ...der Cart Layout Table 9 Component Name and SYMBOL Chart Note For the U69 board make sure that there is no error in the SW setting NAME SYMBOL PART NAME PART CODE Fig No Key No Remarks Feeder I O Board U69 PCB_MOUNT KYB M371H 00 Fig C1 3 No 216 UC26 U68A U68B PCB_MOUNT KYB M371G 00 Fig C1 3 No 215 SW1 ...

Страница 212: ...5 ASSY_PCB1 KYC M1821 00 Fig N1 10 No 901 For Traverse UB95 General Purpose U151 UB95 ASSY_PCB2 KYB M918U 00 Fig N1 10 No 902 General Purpose K505 K505 RELAY KYB M65BJ 00 Fig N1 10 No 907 For EL Sensor Electromagnetic Contactor K101 K201 K301 EM CONTACTOR KYB M65BL 00 Fig N1 10 No 910 K101 For TV K201 For EL1 K301 For EL2 Circuit Protection Q101 CIRCUIT PROTECTOR KYC M1878 00 Fig N1 10 No 909 Rela...

Страница 213: ... figure Although the same UB95 is used in U150 through U155 the software where the data is written in is different each other NAME SYMBOL PART NAME PART CODE Fig No Key No Remarks UB95 U152 U152 ASSY_PCB1 KYC M171W 00 Fig N1 10 No 901 UB95 UB95 U153 U154 U155 U153 U154 U155 ASSY_PCB2 KYB M918U 00 Fig N1 10 No 902 UB95 Remove the cover in the specified location ...

Страница 214: ...For Service Engineer Service Information SI1705004E 00 SIGMA G5SII Service Manual 214 273 5 4 Electric Parts Settings 5 4 1 Breaker Current and Timer Setting ...

Страница 215: ...0 SIGMA G5SII Service Manual 215 273 5 4 2 CPU2 Board Setting X9102 X9202 X8500 X8501 X8502 X85UP X85DN X85T X8109 X8104 X8202 X8201 X8102 U85 U82 U81 X8204 X9201 X8203 U92 U91 X9106 X9105 X9109 X9104 X9103 X9108 X9107 U85 AE LINK HSIO U82 Motion Control ...

Страница 216: ...neer Service Information SI1705004E 00 SIGMA G5SII Service Manual 216 273 5 4 3 I O Board Setting SW1 Note Although the setting has been performed in the factory before shipping check it again when replacing the board ...

Страница 217: ...ation SI1705004E 00 SIGMA G5SII Service Manual 217 273 5 4 4 U95 UC19 Lighting Control Board Setting SW1 FRONT REAR Note SW1 Set all to 0 Table 10 List of Fuses to be used Note Refer to Fuse Change Procedure for the fuse change procedure ...

Страница 218: ... 5 Relay Board U27 UC34 Board Setting Fuse No Capacity F5 6 3A F13 6 3A F14 6 3A F15 6 3A F16 6 3A F21 6 3A F22 6 3A K2A Timer Delay Setting Table 11 List of Fuses to be used FRONT REAR U27 UC24 Board Layout Note Refer to the U27 Board Layout in the lower left figure for the arranged locations ...

Страница 219: ...ransfer Driver Settings U08 Board Settings A11 D4460 Back up Driver Settings Top Bottom Top bottom coupled SW1 setting A10 Bottom Address Function setting Driver address setting 1 to 3 SW1 setting A10 1 Top Address Function setting Driver address setting 1 to 3 Transfer Driver Backup Driver SW1 setting A11 Address Function setting Driver address setting 1 to 3 ...

Страница 220: ... 00 SIGMA G5SII Service Manual 220 273 5 4 7 Transfer I O Board Driver Settings Dual Table 12 Various Transfer Unit Driver Settings List A12 A13 A16 U08 A14 A15 A17 U09 A12 to A15 D4920 Transfer Driver A16 A17 D4460 Back up Driver U08 U09 Board Setting ...

Страница 221: ...4 CN2B X312BF X312BB 5 CN2C X312CF X312CB 6 CN2D X312DF X312DB 7 CN4A X314AF X314AB 8 CN4B X314BF X314BB 9 CN4C X314CF X314CB 10 CN4D X314DF X314DB 11 CN1A X311AF X311AB SSCNET Communication Cable A31F CN1B A31B CN1A 12 CN1B X311BF 13 CNP1 X31P1F X31P1B Relay Board U27 X13 X31P1F X12 X31P1B 14 CNP2A X312PAF X312PAB Robot Cable Relay X131P2F X131P2B 15 CNP2B X312PBF X312PBB 16 CNP2C X312PCF X312PCB...

Страница 222: ...B XM21PF L132 L232 L332 L110 L210 XM2102F XM2102LF XM211AF X211BF X2103F 3 A22B XM22PF L132 L232 L332 L120 L220 XM2202F XM2202LF XM221AF X221BF X2203F 6 A23B XM23PF L132 L232 L332 L120 L220 XM2302F XM2302LF XM231AF 7 A21F XM21PB L132 L232 L332 L110 L210 XM2102B XM2102LB XM211AB X211BB X2103B 0 A22F XM22PB L132 L232 L332 L120 L220 XM2202B XM2202LB XM221AB X221BB X2203B 1 A23F XM23PB L132 L232 L332 ...

Страница 223: ...tion Unit Setting SV NET Communication Driver A63F A63B SV NET Communication Driver Settings A63F A63B Note The setting is common to front and rear This setting has been performed in the factory before shipping However check it before the installation FRONT REAR Side View Camera Board Dip Switch Setting Turn ON the SW1 s 1 U02 UC39 G09 ...

Страница 224: ...neer Service Information SI1705004E 00 SIGMA G5SII Service Manual 224 273 5 4 11 U07 Head Distrbution Panel Setting The SW setting value varies depending on the head type When the head is replaced make sure to check it ...

Страница 225: ...GMA G5SII X7 6 1 2 Installation Procedure 6 1 2 1 OS Installation Device Connection The connections to the CPU1 BOX are shown in the following diagram 1 When the keyboard has not been connected connect it to USB port 1 in the CPU1 BOX PC 2 Connect the CD drive to the USB port 2 in the CPU1 BOX PC 3 The power is supplied to CD drive through the AC adaptor 4 Turn ON the power to the machine and inse...

Страница 226: ...3 Using the up down arrow or key on the keyboard to select the USB CD item and press the Enter key 4 The confirmation message will appear Press the Enter key again to execute the program 2 When the OS recovery operation is completed the following messages Command Prompt are displayed on the monitor screen Install Completed Press Any Key To Continue When the Enter key is pressed the program is rest...

Страница 227: ... started up the processing varies depending on the machine status Refer to the following Execution Flow Chart Refer to the items indicated in the Execution Flow Chart for the operation details FirstInst Start Is there the Drive D in HDD Do you select Drive D Formatting Execution What is the Drive D Format Type End End Dialog Display Drive D Generation Processing Drive D Formatting Processing Drive...

Страница 228: ...ne is re started and the file format change processing is performed After the re start the operation from Item 3 2 is executed 3 3 End Dialog When the initial setting operation is completed normally the execution completion confirmation dialog appears Select OK to delete the confirmation dialog Then select the Close button located in the lower section of the monitor screen to end the initial setti...

Страница 229: ...or Dialog If any error occurs during the initial setting execution the execution error dialog appears Select OK to delete the confirmation dialog Then select the Close button located in the lower section of the monitor screen to end the initial setting application The operation from Item 3 2 will be executed ...

Страница 230: ...eration Refer to the following flow chart Refer to the items described in the execution flow chart for the operation details Refer to Item 4 3 Refer to Item 4 1 Refer to Item 4 2 Refer to Item 4 4 Start Is Machine Software Initial Setup required CD ROM Connection Judgment Machine Software Setup Selection Copy the machine software installation data from CD ROM Is Machine Software Setup Started End ...

Страница 231: ...ROM drive is connected When the CD ROM drive has not been connected in the connection waiting status and that the Machine Software Installation CD ROM is inserted the window in Step 4 2 Machine Software Installation Data Copy Processing appears 4 2 Machine Software Installation Data Copy Processing When the CD ROM is connected the installation data copy processing is started When the copy is compl...

Страница 232: ...installation confirmation dialog window in Step 4 4 appears When the Drive D formatting is performed in the OS recovery operation the setup data before the OS recovery is deleted Therefore this window is not displayed 4 4 Machine Software Installation Confirmation Dialog When the copy processing is selected in Step 4 2 or the Recovery SETUP button is selected in Step 4 3 the following window appea...

Страница 233: ...dia Example In the case that the removable media uses Drive E E XM Folder This method is used as the first aid when there is no CD ROM media Normally the installation from the CD ROM is performed 6 2 2 Automatic Setting in Re Recovery Operation The following data items are automatically set in the re recovery operation Network Connection Local Area Connection IP Address Subnet Mask Network Connect...

Страница 234: ...e touch panel is changed 6 3 1 Touch Panel Removal Procedure 1 Disconnect the three cables connecting to the touch panel 2 Remove the hexagon socket head cap bolts on the bracket fixing the touch panel and remove the touch panel from the machine There is a fulcrum pin in the monitor fixing section When the monitor is to be removed after removing the bolts in all three locations remove the monitor ...

Страница 235: ...er to 6 3 1 Touch Panel Removel Procedue 6 3 3 Touch Panel Adjustment Procedure 1 Open the Debug Mode window Refer to 2 9 Change Procedure to Debug Mode in Chapter 2 for Debug Mode window display procedure 2 After displaying the Debug Mode window touch the location around the center of the lower section of the panel Refer to Fig F5 After tap three icons are displayed on the left hand side Select t...

Страница 236: ...s tool bar is displayed open the Intel Graphics HD displayed on the lower right Refer to Fig F6 4 Open the Graphic Properties window and perform the setting using the following procedure 1 Select Graphic Properties 3 Select Clone Displays 2 Select Multiple Displays 1 Open the Intel Graphics HD Fig F7 Fig F6 ...

Страница 237: ...identification of the operation panel using the following procedure 2 Select MANAG tab and press down the TP Device ReSetup button to perform the front rear identification Fig F8 1 Select Debug and FP CTRL in this order and press down the Show key in the PnlTool Control item The bar will appear in the lower left of the window Double click this bar ...

Страница 238: ...ow is displayed where touching again is urged If nothing happens in the window in Step 3 touch the key in this window 3 When the operation is to be performed from the front side on the breaker side press down Front Panel When the operation is to be performed from the rear side press down Rear Panel In the event that nothing happens even when the key is touched wait for about five seconds until the...

Страница 239: ...nual 239 273 Fig F10 5 After the work press down the Hide button in the PanlTool Control item and close the window The machine front will be switched to rear or vice versa Make sure that the Rear is disabled when the Front is enabled or Front is disabled when the Rear is enabled ...

Страница 240: ...sion up LISA Service Registration ACV Server Service Registration LISA PC Restart up LSA System Start up Check ACV Server Start up Check New Change Existing PC Existing PC New START END LISA System Start up Check ACV Server Start up Check New Existing PC Fixed IP Address Setting Power Option Check LISA System Stop ACV Server System Stop LISA Service deregistration ACV Server Service Cancellation L...

Страница 241: ...ess Setting for LISA PC Note For the setting operation ask confirm with the person in charge of the system management in the client s company to perform 1 Click Control Panel in the Start menu to display the Control Panel window 2 Click Network and Internet and in the displayed window select Network and Sharing Center Note The displayed window varies depending on the LAN cable connection status LA...

Страница 242: ...the subnet mask set as the device to be connected to LISA For IP address the address should not be duplicated with any of those used in the machines connected in the same network Note For the connection with the any other PCs execute Command Prompt and confirm it using the command ping However unless the firewall is cancelled in the PC where the command is to be received the result will be NG No G...

Страница 243: ...ystem Stop and Service Registration Cancellation 1 Double click the LisaCtrl exe icon on the desktop window to start up 2 Press the Stop button in the LISA System Service Control window The Status indication in the window will change to RUN Stop Processing and Stop in this order 3 Press the Unregister button to cancel the service registration Note In the case that the LISA system is used together ...

Страница 244: ...ation Version up 1 Double click the ACV Server Service Control icon on the desktop window to start up 2 Press the Stop button in the ACV System Server Service Control window The Status indication in the window is changed to RUN Stop Processing and Stop in this order 3 Press the Setup button in the window The ACV System Server Set up window will appear Then Press the Unregister button in the ACV Sy...

Страница 245: ...software is installed using ACV Server System Make sure to install ACV Server System 1 Start up the Install Launcher Software 2 Select LISA Basic Package and press the Install button 3 Press the Next button and Install button according to the instructions displayed in the window Note In the course of the operation a message When the installation setting is checked or changed is displayed However t...

Страница 246: ...lect the file The extension of the license files is vtx The MAC address for the install PC is required for the license issue Execute the Command Prompt and check it using the ipconfig all command 3 Press the OK button to return the SoftGuard Service Setter window and set the Server radio button to Enable to start up the license server When the license item is added set the Service radio button to ...

Страница 247: ...g Check for the setting check procedure Name Port number TCP UDP 1 LISA LineMng Server1 56799 TCP 2 LISA LineMng Server2 56801 TCP 3 LISA LineMng Server3 56835 TCP 4 LISA McCom Server 56836 TCP 5 LISA BcrCom Server1 56844 TCP 6 LISA BcrCom Server2 56847 TCP 7 LISA FTP Server 56846 TCP 8 License Server 56795 TCP 9 SysLogD 514 UDP 10 EventLogD 56839 UDP add_MemLogD_LISA BAT Execute the service regis...

Страница 248: ...d execute the batch file of C LISA LisanSys add_firewall Windows7 BAT Set the communication through the firewall related to the ACV Server System to Approve Note For a PC except for Windows7 execute add_firewall BAT Refer to 7 1 6 3 Setting Check for the setting check procedure Name Port number TCP UDP 1 ACV DB Line Server 56800 TCP 2 ACV Line Server 56807 TCP 3 ACV Event in Line Server 56808 TCP ...

Страница 249: ...cal System The service is registered using the Register button in the ACV Server Service Control window When the approval setting is to be cancelled execute the following batch file delete_firewall Windows7 BAT or delete_firewall BAT delete_MemLogD BAT 7 1 6 3 Setting Check 1 Firewall Communication Ports 1 Click Control Panel in the Start menu to display the Control Panel window 2 Click System and...

Страница 250: ...me in the list and click the Properties command Change the tab sheet and check the description 2 Service Registration 1 Click Control Panel in the Start menu to display the Control Panel window 2 Click System and Security and in the displayed window select Administrative Tools 3 Select Double click Service in the displayed list In the displayed service list make sure that the registered service na...

Страница 251: ...ed description 7 1 7 LISA System Start up Preparation 7 1 7 1 LISA System Service Registration and System Start up Check 1 Double click the LisaCtrl exe icon on the desk top window The information on the right figure is displayed 2 Press the Register button to register the service 3 Press the Start button to start up the system The Status indication in the window is changed to Stop Start up Proces...

Страница 252: ... Press the Set button The ACV System Server Setting window will be displayed Press the Register button in the ACV System Server Setting window The information message for Service Registration is displayed twice Note When the LISA system service registration is performed in advance the following massage is displayed This is for duplicated registration Ignore it and go to the next step 3 Press the S...

Страница 253: ...up with the RUN indication in the Status item in the LISA System Service Control window Moreover make sure that is indicated for all programs using the Monitor button 7 1 8 2 ACV Service System Start up Check It should be performed when the ACV server system is started up in the PC where the LISA server system has been installed 3 Confirm the ACV Service System with the RUN indication in the Statu...

Страница 254: ... Address Setting By means of setting the fixed IP address the automatic IP address change when the PC is re started up is prevented When the IP address is changed the communication between the machine and the NT 100 system software is unavailable Therefore make sure to set the fixed address Confirm the fixed IP address value with the network manager When PC is started up press Control Panel in the...

Страница 255: ...hange adaptor Settings When the Network Connection window opens press the Local Area Connection to select Right Click the selected Local Area Connection key and press the Properties When the Local Area Connection Properties window opens press on the character string of Internet Protocol Version 4 TCP IPv4 to select and press the Properties button ...

Страница 256: ...the IP address and Subnet mask data boxes Then press the OK button to close the window IP Address Description IP Address Identification No to be allocated to each of the PCs Subnet Mask It shows that until which character indicates the network address in the IP address character string It is the same value as that of the PC in the machine to be communicated Press the OK button in the Local Area Co...

Страница 257: ...mate 32bit CPU Pentium4 1 8GHz or more INTEL Core 2Duo or more recommended Hard Disk Capacity Free Space of 200MB or more Memory 1GB or more free space required 2GB to 4GB recommended Graphics Direct X9 graphic processor with the driver of Windows Display Driver Model WDDM 1 0 or more Other It should have the LAN function For the specification details applicable to Windows NT 2000 XP Vista refer t...

Страница 258: ...n SI1705004E 00 SIGMA G5SII Service Manual 258 273 The Computer Basic Information Display window opens Hard Disk Capacity Press Computer in the Start menu The value indicated in the Free Space box shows the Hard Disk free space OS CPU Memory ...

Страница 259: ...0 SIGMA G5SII Service Manual 259 273 Graphics Others Press Control Panel in the Start menu When the Control Panel window opens press Device Manager The Device Manager window will open Display Adaptor For Graphics Network Adaptor For employed LAN Function ...

Страница 260: ... functions it disturbs the NT 100 system software operation 4 NT 100 System Software Setup The same procedure is applied when the software is newly setup and when the already setup software is graded up Insert the NT 100 system software CD ROM into the CD ROM drive in the started up computer Display the Install Launcher window Press the Computer in the Start menu When the Computer window opens dou...

Страница 261: ... completed wait for about 30 seconds until the next window opens The following blue window is for InstallShield Wizard CAD Conversion Software Installation About thirty seconds after the NT 100 system software installation completion the CAD conversion software installation window is displayed automatically After the window is displayed perform the installation operation according to the instructi...

Страница 262: ...ed is displayed selecting Disable once and then selecting Enable again might settle the problem Log Indication Software Use Status Display is performed 6 License Client Setting Perform the license client to operate the License Client Function correctly 6 1 Host Name IP Address Check Procedure Select Search programs and files in the Start menu Enter the file name in the Search programs and files wi...

Страница 263: ...For Service Engineer Service Information SI1705004E 00 SIGMA G5SII Service Manual 263 273 Enter ipconfig all and press the Enter key on the keyboard in PC The Host Name and IP Address are displayed ...

Страница 264: ...dow in PC and double click the machine to communicate with it Communication Status Icon Description Machine without connection processed Machine where the connection cannot be processed Machine with connection processed 2 Pattern Program Data Communication The pattern program data is communicated Pattern program data transmission and receipt Pattern program data deletion Pattern program data renam...

Страница 265: ...e Total 3 can be checked only in the machine and it cannot be sent to NT 100 system 5 Nozzle Related Data Communication The nozzle related data is communicated Placement Nozzle Data Communication Placement Nozzle Type Data Communication 6 Machine System Data Communication The machine system data is communicated Machine System Data transmission and receipt 7 Back up Recovery Communication The patte...

Страница 266: ... perform it carefully Network Installation Procedure Backup the machine using the NT 100 system software For the machines connected to LISA communicate each of them to backup Send the software from the NT 100 system software to the machine The software can be sent to all the machines connected to LISA at once However at present only Sigma F8 and Sigma G 5 are applicable Sigma G5S is not applicable...

Страница 267: ...ntinue the production by means of changing the deficient component ID to the other component ID when component shortage occurs during the automatic operation Multi vendor system means that the components manufactured by two or more makers are employed not using the component manufactured by a single maker There is only one alternative component list that can be saved in the machine The alternative...

Страница 268: ... Service Manual 268 273 12 Operation Mode Selection Communication The operation mode selection data is communicated The Operation Mode Selection File Receipt and Transmission Operation Mode Selection data saving destination folder D ntdata mdata Curparam Machine Name ...

Страница 269: ...tput machine can be checked 7 3 1 Management Data Monitoring Function Setting Procedure 1 Install Start up the installer and install the production manager in the PC The management data monitoring function cannot be used unless the Microsoft Excel is installed Select the PC which has not been optimized if possible as the PC where the Production Manager is to be installed The CPU load is increased ...

Страница 270: ... Service Information SI1705004E 00 SIGMA G5SII Service Manual 270 273 Start up the Production Manager and select the setting items as follows Select Option and Machine Status Select Option Management Data and Data Setting ...

Страница 271: ...ified time period Press Start Control Panel Power Option and Change plan Settings in this order to open the Plan Setting Change window Set the item Transfer the Computer to Sleep Mode to Disable When it is cleared the difference is not found and the correct calculation is unavailable Therefore remove the check mark Because the data can be accumulated only for some days in the machine it should be ...

Страница 272: ...tically and periodically Select Product Manager Option Management Data and Time Setting in this order and the periodical receipt is set in the Time Setting window Date and Time Setting Item Description Disable The totaling is performed using the locally saved data Enable The totaling is performed using the locally saved data Enable Automatic If there is any file missing locally the communication w...

Страница 273: ...For Service Engineer Service Information SI1705004E 00 SIGMA G5SII Service Manual 273 273 Revision history No Contents Note Date 000 First release December 27 2017 ...

Отзывы: