WHEELS/TIRES
Tire
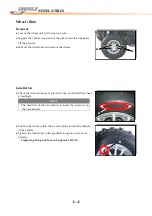
Removal
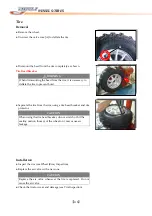
A
●
Remove
the
wheel.
●
Unscrew
the
valve
core
[A]
to
deflate
the
tire.
●
Dismount
the
bead
from
the
rim
completely
as
shown.
Tire
Bead
Breaker
【
2-6
】
WARNING
●
Separate
the
tire
from
the
rim
using
a
tire
bead
breaker
and
rim
protector.
Installation
●
Inspect
the
rim
(see
Wheel
(Rim)
Inspection).
●
Replace
the
air
valve
with
a
new
one.
●
Check
the
tire
for
wear
and
damage
(see
Tire
Inspection)
CAUTION
When
using
the
tire
bead
breaker,
do
not
scratch
or
hit
the
sealing
portion
(hump)
of
the
wheel
or
it
may
cause
air
leakage.
CAUTION
Replace
the
air
valve
whenever
the
tire
is
replaced.
Do
not
reuse
the
air
valve.
When
dismounting
the
bead
from
the
rim,
it
is
necessary
to
deflate
the
tire
to
prevent
burst.
Содержание DL-702 2008
Страница 1: ...FOREWORD INDEX 0 0...
Страница 41: ...3 11 BRAKE...
Страница 180: ...6 70 ENGINE Install the starter motor...
Страница 201: ...7 21 COOLING AND LUBRICATION SYSTEM Engine Lubrication System Chart...
Страница 202: ...7 22 COOLING AND LUBRICATION SYSTEM Engine Lubrication System 1 2 3 1 2 3 1 2 3...
Страница 203: ...7 23 COOLING AND LUBRICATION SYSTEM 1 2 3...
Страница 205: ...7 2 ELECTRICAL SYSTEM Fuses 7 30 Main Fuse Removal 7 30 Fuse Inspection 7 30 Switches 7 31 Wiring Diagram 7 32...
Страница 235: ...7 32 ELECTRICAL SYSTEM Wiring Diagram...
Страница 236: ...7 33 ELECTRICAL SYSTEM Wiring Diagram...
Страница 237: ...7 34 7 34 ELECTRICAL SYSTEM ELECTRICAL SYSTEM...
Страница 238: ...7 35 ELECTRICAL SYSTEM NOTE...
Страница 240: ...9 2 PERIODIC MAINTENANCE...
Страница 246: ...9 8 PERIODIC MAINTENANCE Intake Side...
Страница 247: ...9 9 PERIODIC MAINTENANCE Exhaust Side Side...
Страница 270: ...9 32 PERIODIC MAINTENANCE 1 2 3 4 18 19 12 16 17 21 13 14 15 22 23 5 6 7 8 9 12 10 11 20...

