5 - 1 3
5
Installation and Wiring
AC INPUT
L1 L2 L3
L1 L2 L3
L1 L2 L3
BYPASS INPUT
UPS OUTPUT
N
+
-
INPUT
BREAKER
OUTPUT
BREAKER
BYPASS
BREAKER
MANUAL BYPASS
BREAKER
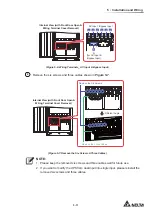
Internal View (with Front Door Open &
Wiring Terminal Cover Removal)
Battery Input
(Figure 5-9: Wiring Terminals_ Battery Input)
AC INPUT
L1 L2 L3
L1 L2 L3
L1 L2 L3
BYPASS INPUT
UPS OUTPUT
N
INPUT
BREAKER
OUTPUT
BREAKER
BYPASS
BREAKER
MANUAL BYPASS
BREAKER
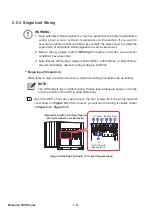
Internal View (with Front Door Open &
Wiring Terminal Cover Removal)
L1
L2
L3
UPS Output
(Figure 5-10: Wiring Terminals_ UPS Output)
AC INPUT
L1 L2 L3
L1 L2 L3
L1 L2 L3
BYPASS INPUT
UPS OUTPUT
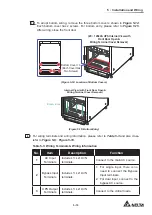
Internal View (with Front Door Open &
Wiring Terminal Cover Removal)
Grounding Terminals
( & )
INPUT
BREAKER
OUTPUT
BREAKER
BYPASS
BREAKER
MANUAL BYPASS
BREAKER
(Figure 5-11: Wiring Terminals_ Grounding)
2
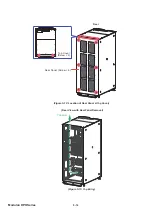
To adopt top wiring, please remove the rear panel (total 6 screws) and top cover
(total 2 screws) shown in the
Figure 5-12
. For top entry, please refer to
Figure 5-13
.
After wiring, reinstall the rear panel.
Содержание Modulon DPH series
Страница 26: ......
Страница 58: ......
Страница 168: ......
Страница 237: ...8 1 8 Optional Accessories 8 Optional Accessories...
Страница 240: ......
Страница 241: ...9 1 9 Maintenance Maintenance 9...
Страница 243: ...A1 1 Appendix 1 7HFKQLFDO 6SHFL FDWLRQV Technical 6SHFL FDWLRQV A1 A1...
Страница 246: ......
Страница 247: ...A2 1 Appendix 2 Warranty Warranty A2 A2...
Страница 250: ......

