


CHAPTER 2 INSTALLATION AND BASIC OPERATION
2-22
!
CAUTION:
Remove each transparency immediately.
Printing on transparencies from the manual feed tray (For HL-5130 and HL-5140)
NOTE: When the back output tray is open, the printer has a straight paper path from the
manual feed tray to the back output tray.
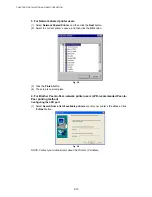
(1) Select the Paper Size, Media Type, Paper Source, and other settings in the printer
driver.
(2) Send the print data to the printer.
NOTE: A NO PAPER status is shown by the control panel LEDs until you put a
transparency in the manual feed tray.
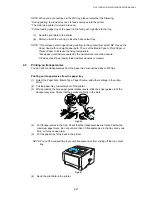
(3) Open the manual feed tray. Slide the paper guides to the transparency size.
(4) Using both hands put the transparency in the manual feed tray until its front edge
touches the paper feed roller. Hold the transparency in this position until the printer
automatically feeds it in for a short distance, and then let go of the transparency.
NOTE: *Make sure that the transparency is straight and in the proper position on the
manual feed tray. If it is not, the transparency may not be fed properly, resulting in
a skewed printout or a jam.
*Do not put more than one transparency in the manual feed tray at any one time,
or it may cause a jam.
*If you put any Media (paper, transparency and so on) in the manual feed tray
before the printer is in the READY state, the media may be ejected without being
printed on.
(5) After the printed transparency comes out of the printer, put in the next transparency
as described in Step 4 above. Repeat for each transparency that you want to print.
!
CAUTION:
Remove each transparency immediately after printing. Stacking the printed transparencies
may cause a paper jam or the transparency to curl.
Содержание HL-5130
Страница 114: ...HL 5130 5140 5150D 5150DN Service Manual 4 13 24 Remove the paper rear guide Fig 4 20 Paper tray Paper rear guide 2 1 1 ...
Страница 271: ...APPENDIX A 9 Appendix 9 Engine PCB Circuit Diagram 1 2 NAME CODE B512153CIR 1 2 LJ923001 A 9 ...
Страница 272: ...APPENDIX A 10 Appendix 10 Engine PCB Circuit Diagram 2 2 NAME CODE B512153CIR 2 2 LJ923001 A 10 ...
Страница 273: ...APPENDIX A 11 Appendix 11 Low voltage Power Supply PCB Circuit Diagram 120V NAME Low voltage PS Circuit 120V A 11 ...
Страница 274: ...APPENDIX A 12 Appendix 12 Low voltage Power Supply PCB Circuit Diagram 230V NAME Low voltage PS Circuit 230V A 12 ...
Страница 275: ...APPENDIX A 13 Appendix 13 High voltage Power Supply PCB Circuit Diagram NAME High voltage PS Circuit A 13 ...


