Removal and Replacement
6-5
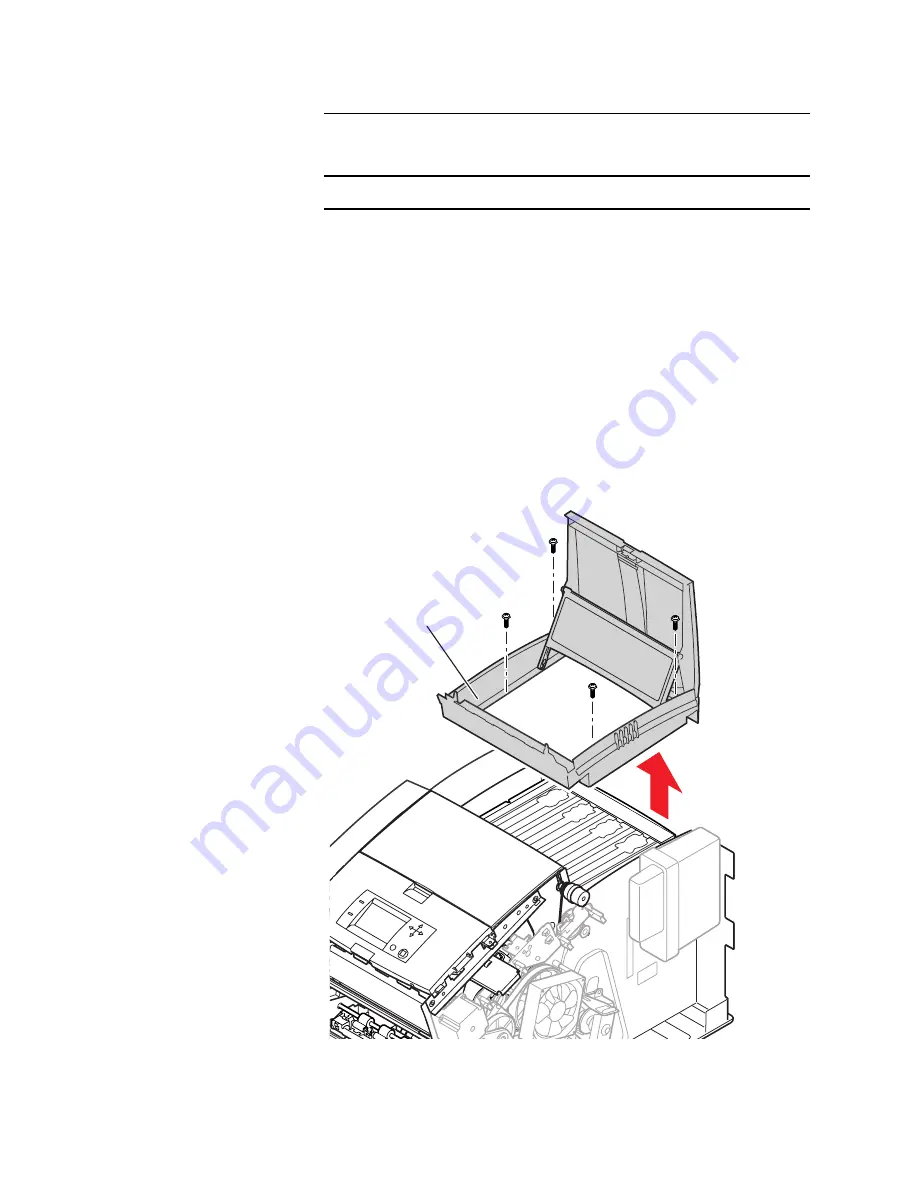
Removing the Top Cover
NOTE: Vacuum dust out of the top cover before you remove it.
1. Remove the right cover.
2. Remove the left cover.
3. Open the ink load door and tilt it back. Unclip the ink load
door arms from the ink loader’s spring crossarm.
4. Slide the ink loader’s spring crossarm to the rear of the ink
loader. Note how pins on the ends of the ink-loader crossarm
align with notches in the top cover for removal.
5. Remove the four screws securing the top cover in place.
6. Tilt up the rear-end of the top cover and lift and remove the top
cover.
Reverse these steps to install the top cover.
Figure 6-2. Removing Top Cover
840-4-04
Top
cover
Summary of Contents for Nuvera 100
Page 1: ...General Information 1 1 Chapter...
Page 24: ...1 24 ii LINX Solid Inkjet 100 Service Manual 1239 35b Figure 1 13 Repacking the Printer...
Page 27: ...General Information 1 27...
Page 28: ...1 28 ii LINX Solid Inkjet 100 Service Manual...
Page 79: ...Error Codes and Messages 2 1 Chapter...
Page 101: ...Troubleshooting 3 1 Chapter...
Page 145: ...Adjustments 4 1 Chapter...
Page 180: ...4 36 ii LINX Solid Inkjet 100 Service Manual...
Page 181: ...Cleaning and Maintenance 5 1 Chapter...
Page 190: ...5 10 iiLINX Solid Inkjet 100 Service Manual...
Page 191: ...Removal and Replacement 6 1 Chapter...
Page 249: ...Printer Networking 7 1 Chapter 7...
Page 280: ...7 32 ii LINX Solid Inkjet 100 Printer Service Manual...
Page 281: ...Material Number Listings A 1 Appendix...
Page 285: ...Material Number Listings A 5 7 5 6 8 1 2 4 0388 21 3 Figure A 1 Cabinet parts...
Page 289: ...Material Number Listings A 9 0388 16 2 1 5 11 10 9 12 6 4 3 7 13 8 Figure A 3 Paper Path Parts...
Page 291: ...Material Number Listings A 11 0388 14 7 4 3 5 6 2 1 Figure A 4 Motor and Fan Parts...
Page 295: ...Material Number Listings A 15 4 5 3 2 1 0388 23 Figure A 6 Solenoid and Clutch Parts...
Page 304: ...A 24 ii LINX Solid Inkjet 100 Service Manual...


