


Exterior Parts: 9D-10
2) Remove the fasteners (3), bolt (4) and screw (5).
3) Move the rear fender upside.
4) Remove the fuel tank outer cover (6).
Installation
Install the fuel tank outer cover in the reverse order of
removal.
Rear Fender
Removal
1) Remove the rear carrier. Refer to
“Rear Carrier
Removal and Installation: in Section 9E”
.
2) Remove the seat. Refer to “Seat Removal and
Installation (Page 9D-11)”.
3) Remove the side covers, left and right. Refer to
“Front Side Exterior Parts Removal and Installation
(Page 9D-6)”.
4) Remove the engine side cover. Refer to “Rear Side
Exterior Parts Removal and Installation (Page 9D-
9)”.
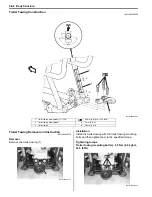
5) Remove the screws (1) and fasteners (2).
6) Remove the battery. Refer to
“Battery Removal
and Installation: in Section 1J”
.
7) Disconnect the couplers (2) and remove the starter
relay (3) along with the battery (+) lead wire. Refer to
“Starter Relay Removal and Installation: in
Section 1I”
.
8) Remove the neutral relay/fuse box (4), ECM (5), fuel
pump relay (6) and 4WD/diff-lock relay (7).
3
3
4
5
I931H1940023-01
6
I931H1940024-01
1
2
I931H1940025-02
1
2
I931H1940026-02
3
2
I931H1940027-01
4
5
6
7
I931H1940028-01
Summary of Contents for 2009 LT-A500XP
Page 2: ......
Page 4: ......
Page 14: ...00 9 Precautions ...
Page 224: ...1E 3 Engine Lubrication System EXHAUST SIDE INTAKE SIDE I931H1150003 02 ...
Page 304: ...1K 4 Exhaust System ...
Page 346: ...2D 5 Wheels and Tires ...
Page 438: ...3D 26 Propeller Shafts ...
Page 482: ...4D 6 Parking Brake ...
Page 512: ...5A 28 Automatic Transmission ...
Page 624: ...Prepared by December 2008 Part No 99500 44080 03E Printed in U S A 624 ...


