


: Feb. 9 2004
1
AR-M550/M620/M700 SIMULATION 8 - 82
Operation/Procedure
(Various print patterns output) (Table 1)
1) Select PRINT PATTERN with 10-key.
2) Enter the number corresponding to the print pattern to be printed
with 10-key.
3) Press [START] key.
4) Select PRINT START with 10-key.
5) Press [START] key.
(Print condition setting in this simulation)
∗
To select paper (paper feed tray), perform the following procedures.
1) Select TRAY SELECT with 10-key.
2) Press [START] key.
3) Enter the number corresponding to the paper feed tray of the tar-
get paper with 10-key.
4) Press [START] key. (The paper feed tray is selected.)
∗
To adjust the print density, perform the following procedures.
1) Select DENSITY with 10-key.
2) Enter the adjustment value with 10-key.
3) Press [START] key.
∗
To set the print quantity, perform the following procedures.
1) Select MULTI with 10-key.
2) Enter the print quantity with 10-key.
3) Press [START] key.
∗
To set the print quality mode, perform the following procedures.
1) Select MODE with 10-key.
2) Enter the number corresponding to the print quality mode with 10-
key.
3) Press [START] key.
∗
To set the print level, perform the following procedures.
1) Select LEVEL with 10-key.
2) Enter the adjustment value with 10-key.
3) Press [START] key.
NOTE: In some print patterns, changing the level may not change the
picture quality.
∗
To set duplex/simplex print, perform the following procedures.
1) Select DUPLEX with 10-key.
2) Enter the number corresponding to the operation mode with 10-
key.
3) Press [START] key.
(Table 1)
(Note 1) Print pattern
Press [START] key.
Press [CUSTOM SETTINGS] key or [START] key.
64
64-1
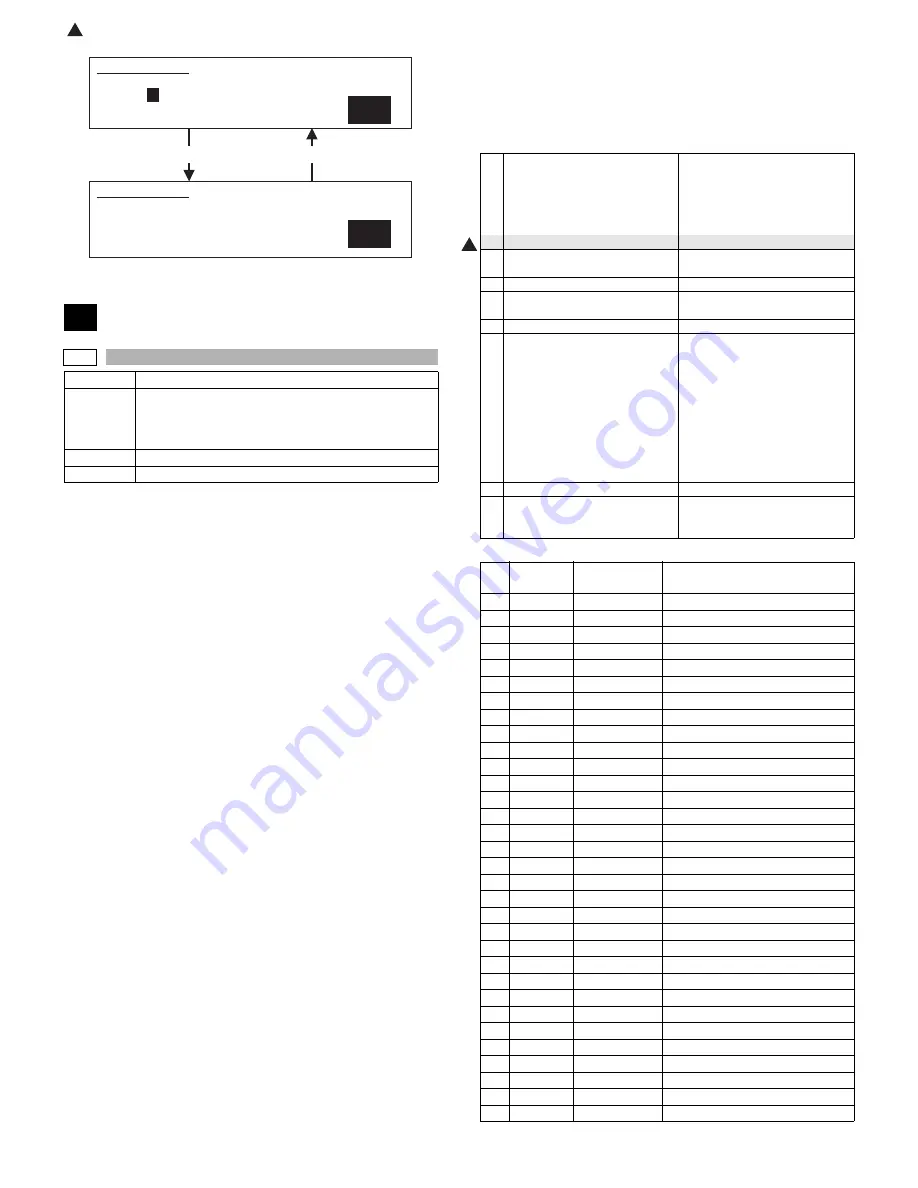
Purpose
Operation test/Check
Function
(Purpose)
Used to check the operation of the printer section (self-
print operation), (The print pattern, the paper feed
mode, the print mode, the print quantity, and the
density can be optionally set.)
Section
Item
Operation
SIMULATION 63-7
SHADING POSITION ADJUSTMENT. PRESS START.
1. CCD
0
1
SIMULATION 63-7
SHADING POSITION ADJUSTMENT. INPUT VALUE 1-16, AND
PRESS START.
1. CCD
0
0
TRAY SELECT
1. TRAY1
2. TRAY2
3. TRAY3
4. TRAY4
5. BPT
Paper feed tray
1: Tray 1
2: Tray 2
3: Tray 3
4: Tray 4
5: Manual feed
6. LCC
6: LCC
1
PRINT START
Print execution (Printing of the set
data is executed.)
2
PRINT PATTERN
Print pattern (Note 1)
3
DENSITY
Graphic density (Valid only when
No. 79, 80 or 84 is selected.)
4
MULTI
Print quantity
5
MODE
1. STANDARD
2. SMOOTHING
3. TONER SAVE
4. HALF TONE
5. SMO TONER SAVE
6. SMO HALF TONE
7. TONER SAVE + HALF TONE
8. SMO TONER SAVE
+ HALF TONE
Print mode
1. Standard
2. Smoothing ON
3. Smoothing ON
3. Toner save ON
4. Half tone ON
5. Smo toner save
6. Smo half tone
7. Toner save + half tone
8. Smo toner save + half
tone
6
LEVEL
(Parameter of print image process)
7
DUPLEX
1. NO
2. YES
Duplex
0: NO (Simplex)
1: YES (Duplex)
NO
ENGINE
PATTERN
CONTROLLER
PATTERN
1
❍
For off-center adjustment
2
❍
Main scanning direction 1 by 5
3
❍
Main scanning direction 1mm-pitch
4
❍
Main scanning direction 3 by 3
5
❍
Sub scanning direction 1 by 1
6
❍
Sub scanning direction 1 by 5
7
❍
Sub scanning direction 2 by 4
8
❍
Sub scanning direction 3 by 3
9
❍
Right oblique 1 by 2
10
❍
Right oblique 1 by 5
11
❍
Right oblique 2 by 4
12
❍
Right oblique 3 by 3
13
❍
Left oblique 1 by 2
14
❍
Left oblique 1 by 5
15
❍
Left oblique 2 by 4
16
❍
Left oblique 3 by 3
17
❍
Dot 1 by 1
18
❍
Dot 3 by 3
19
❍
Dot
20
❍
Solid black
21
❍
Main scanning direction 1 by 1
22
❍
Main scanning direction 5 by 1
23
❍
Main scanning direction 4 by 2
24
❍
Main scanning direction 3 by 3
25
❍
Sub scanning direction 1 by 1
26
❍
Sub scanning direction 5 by 1
27
❍
Sub scanning direction 4 by 2
28
❍
Sub scanning direction 3 by 3
29
❍
Right oblique 2 by 1
30
❍
Right oblique 5 by 1
31
❍
Right oblique 4 by 2
32
❍
Right oblique 3 by 3
1
Summary of Contents for AR-M550N
Page 456: ...Memo ...
Page 457: ...Memo ...