


Tel: 886.909 602 109 Email: [email protected]
62
2.4 Data management
This Section introduces the methods for saving/loading of working state, file management, and
printing/saving of screenshot of the S1465 series signal generator.
2.4.1.1 Reset state of instrument
The S1465 series signal generator provides the user with the option of power-on reset state
(Factory, User and Last State) as the initial state of start-up configuration. In case of an instrument
configuration error, the initial state of instrument during normal operation usually can be recovered by
resetting the instrument state. The settings of reset state of the signal generator are as follows:
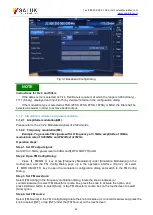
Step 1. Activate the system configuration window:
Press
【
System
】
key or tap [System] on the touchscreen to pop up the system configuration
window on the user interface, and select [Reset] option, as shown in Fig.2.40.
Step 2. Set the reset option:
Turn RPG clockwise (or anticlockwise), select [Reset] combo box, press the knob to activate the
option, and press the Up and Down keys, or switch among the options of Factory | User | Last State on
the touchscreen to select the reset state of the signal generator.
Select “Factory”: Press
【
Reset
】
key or restart the instrument, and then the instrument enters
the factory default state;
Select “User” and press the “ Save User State” key: The instrument automatically saves the
current configuration. Press
【
Reset
】
key or restart the instrument, and then the instrument is
initialized to the setting state previously saved by the user.
Select “Last State”: Press
【
Reset
】
key or restart the instrument, and then the instrument
enters the state automatically saved before the shutdown last time.
Fig.2.40 Setting of Reset State
2.4.1.2 Saving/loading of user state
The S1465 series signal generator provides the function of saving/loading the instrument setting
state, which facilitates the user to recover the saved setting state, reduce the complexity of operation,
and observe, evaluate and save the required measurement data again. See “4.2.12 Saving/loading” in
“4.2 Menu Description” for specific setting parameters.
Step 1.: Open the saving/loading configuration window:
Press
【
Save
】
key to pop up the saving/loading configuration window on the user interface,
as shown in Fig.2.41.
Step 2. Set saving/loading file number:
Turn RPG clockwise (or anticlockwise) or select “Saving/Loading File No.” input box on the
touchscreen, and press the knob to enable the input box in an editing state. Input numbers in the
range of 0-99, and complete it by pressing Enter on the front panel. After saving, it‘s required to wait
for a few seconds to complete the saving process; after loading, it‘s required to wait for more than ten
seconds so that the signal generator can reset the hardware and software settings according to the
selected instrument state.