


Tel: 886.909 602 109 Email: [email protected]
35
on disk D and software data backup stored by users. Backup data in Disk E can be copied to external
storage media so that even the hard drive needs to be replaced, only the backup data will be
recovered to the new hard drive.
2.1.2.5 System backup & recovery
1)
Hard drive OS or data recovery
The signal generator‘s hard drive recovery system can used to fix software errors on Disk C
(may be caused by loss of system files or data) or recover the original factory data.
Recovery of original factory data will affect on the following entries:
User-defined Windows 7 settings, such as newly added user accounts, need to be reset after
system recovery;
Other third-party software installed by users needs to be re-installed after system recovery.
The data generated during configuration should be stored in the Disk D; it is recommended to
periodically transfer the data to a computer or other storage media through local network
connections.
2)
How to use the instrument recovery program
Step 1. Check if the instrument is shut down.
Step 2. Plug a standard keyboard into the USB interface on the rear panel.
Step 3. Switch on the instrument and after the display of manufacturer information, an OS
menu with timer appears:
When the timer counts down to 0, use the Up/down arrows on the standard keyboard to highlight
the [System Recovery Tool] and press Enter after selecting it.
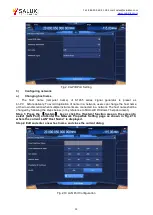
Step 4. Perform the recovery in the recovery program screen as below:
1) Select and run GHOST 8.2 wizard tool shelf and wait to enter the prompt interface of next action.
Select Item 5 to start GHOST 8.2 manual operation and wait to enter GHOST 8.2 operating
interface, and press Enter when a dialog with OK button appears.
2) Select Local
Partition
From Image; in the OpenFileDialog, activate the “File name” input box by
using the Tab key and enter d:\system.gho.
3) In the pop-up SelectSourcePartition and SelectFile Dialog, switch to click OK by using the Tab
key and press Enter. In the pop-up SelectObjectDeviceDialog, switch to click OK by using the
Tab key and press Enter. In the pop-up SelectObjectPartitionDialog, select Partition 1, and switch
to click OK by using the Tab key and press Enter.
4) In the Alert & Confirmation Dialog, select Yes and press Enter.
5) The the system recovery finishes, reboot as prompted.
Step 5. After the instrument reboots, the system will be restored to the status of last backup.
Step 6. After system recovery, we recommend that users do a self test on the instrument
after it runs steadily 30 min after startup to check for errors.
2.1.3 Routine maintenance
This section introduces the routine maintenance method of the S1465 series signal generator.
2.1.3.1 Cleaning method
1)
Cleaning of instrument surface
Clean the instrument surface as per the following steps:
Step 1. Power off the instrument, and disconnect the power cord from the instrument;
Step 2. Gently wipe the surface with dry or slightly moistened soft cloth. Do not wipe the
inside of the instrument.
Step 3. Do not use chemical cleaning agents such as alcohol, acetone, or dilutable cleaning