background image


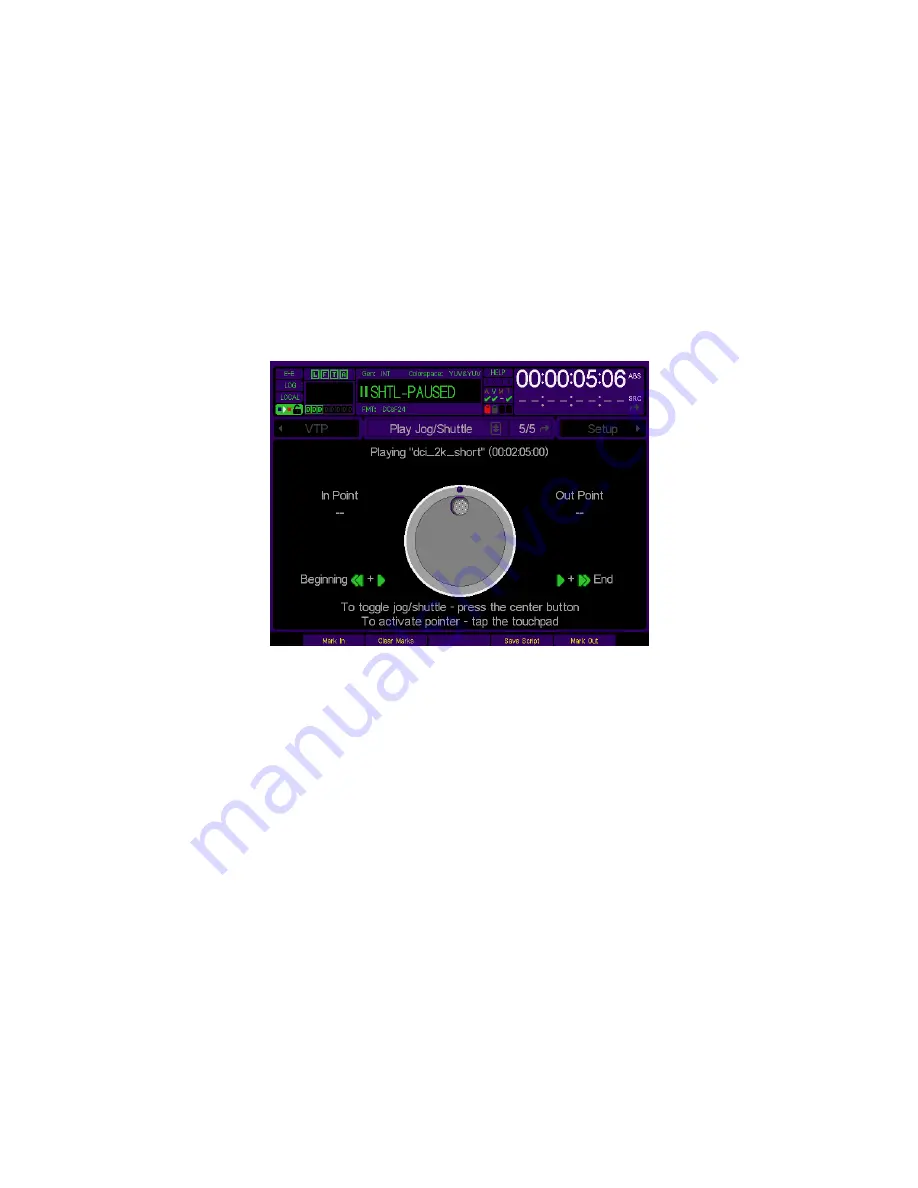
PLAY JOG/SHUTTLE (5/5) menu page 

The Jog/Shuttle menu screen is automatically loaded when playback of a clip is initiated, if the playstyle is set to 

Play jog/shuttle

. During jog/shuttle playback, either the outer shuttle ring or the inner jog dial will appear highlighted, 

indicating which function is active. The physical Jog/Shuttle wheel to the right of the display performs primary 
transport control of the Jog and Shuttle functions. The buttons labeled Jog and Shuttle directly beneath the physical 
wheel are used to activate the appropriate control style. The active control style is indicated both on the GUI 
Dashboard as well on the active button, which will illuminate. 
 
The QuVIS Acuity does retain touchpad control functionality in order to maintain proper control of the Jog/Shuttle 
functions remotely using the QuDAC remote control software. Likewise, the VTR Transport buttons (located above 
the Jog/Shuttle wheel itself) may be used to adjust the speed of shuttle playback or frame-step through the clip 
while under Jog control. 


Operational Notes 

1. 

Shuttle playback (at 1x speed) is the default control method when playback of a clip is started. 


2. 

To change the Shuttle playback speed and direction of the clip, press the 

SHTL

 button (if it is not already selected) 

to activate the outer ring of the Jog/Shuttle wheel.  


Shuttle Forward 

Turn the shuttle ring clockwise from the center indent to modify the speed of forward playback.  
 

Shuttle Reverse


Turn the shuttle ring counter-clockwise from the center indent to modify the reverse playback speed.


Note:

 You may also modify the speed and direction of shuttle playback by pressing the 

FWD 

(fast forward) or 

REV 

(reverse) button above the Jog/Shuttle wheel. Each time the button is pressed, the speed of playback will increase 
in the direction indicated.  


3. 

To step through the clip or media file frame-by-frame, press the 

JOG 

button (if it is not already selected) to active 

the center jog dial. 


Jog Forward


To advance through the clip frame-by-frame rotate the center dial clockwise using your finger. 
 

Jog Reverse


To backup or transverse the clip frame-by-frame, rotate the center dial counter-clockwise using your finger. 

QuVIS Acuity


Page 88 

QSR Version 3.3 

Summary of Contents for Acuity

Page 1: ......

Page 2: ...ay be obtained by contacting QuVIS Inc QuVIS Inc 2921 SW Wanamaker Drive Suite 107 Topeka Kansas 66614 5324 USA 785 272 3656 Disclaimer Product options and specifications are subject to change without...

Page 3: ...s or components contained in this product are covered by QuVIS Inc s limited warranty for this product and the product may contain fully tested recycled parts warranted as if new For warranty informat...

Page 4: ...ng Down 18 Turn ON Power To shutdown or restart 18 Configuring for basic PLAY operation Select Video Output Settings 20 Select Audio Output Settings Configuring for basic RECORD operation 23 Select Vi...

Page 5: ...ge 63 Control Panel Overview LCD menu display 64 Transport controls Touchpad 66 Soft Function buttons Introduction to the Graphical User Interface GUI 69 GUI Overview Dashboard 71 Dashboard sections C...

Page 6: ...software release Chapter 8 Remote Control and Virtual Tape Operations 172 About remote control protocol support Supported QuVIS Media Types 173 Configuring remote control Sony and Odetics protocol RS...

Page 7: ...uity user interface to accomplish key tasks playing and creating play sequences using the Show Builder Chapter 3 Product Description Provides the functional description and an overview of the Acuity u...

Page 8: ...www quvis com Printed manuals in PDF format All printed materials are available in the Adobe Acrobat file format pdf on the QuVIS Companion CD QuVIS Inc Web site The current user manuals and product d...

Page 9: ...port Telephone support is available 24 hours a day 7 days a week Support technicians are available during normal business hours Monday Friday 9am 5pm CST After hours phone support is available for war...

Page 10: ...r Cord To avoid fire hazard use only the power cord specified for this product Ground the Product This recorder is equipped with a 3 blade grounding type plug to satisfy FCC rules If you are unable to...

Page 11: ...at registers stoves and other products including amplifiers that produce heat Connecting to Other Equipment To avoid electric shock this product should be turned off when making connections between th...

Page 12: ...e the recommended ambient temperature range will cause a degradation of performance AC Power Proper operation of this product requires that its AC power source is capable of supplying the AC input req...

Page 13: ...work Connecting Serial RS 422 Important If you have not installed a QuVIS Acuity before please take the time to read through each step thoroughly before actually connecting this product This can help...

Page 14: ...is enables the same video signal to be routed to two different monitors or input devices at the same time There are two BNC connectors for each set of serial digital input and outputs The connector la...

Page 15: ...ink B connector Connect SDI Link A here Connect SDI Link B here Dual link SDI 4 4 4 3D 4 4 4 4 or SMPTE 372M Output video connections Dual link video modes including QPE and DCI JPEG2000 3D formats re...

Page 16: ...g Component Input Sync on green connections For standard 3 wire analog component Input applications make cable connections as follows Connect Red channel cable here Connect Blue channel cable here Con...

Page 17: ...Genlock for those applications that require video timing to be locked to a common house video signal Standard definition video applications NTSC and PAL normally use an analog Black Burst BB signal fo...

Page 18: ...digital audio channels one through eight 1 8 are grouped together and channels nine through twelve 9 12 are grouped on the second digital audio connector Connect D sub 25 pin digital audio breakout ca...

Page 19: ...e the front panel power button and press The power button is located under the front panel near the bottom left of the machine Power button To shutdown or restart Software shutdown Use the following p...

Page 20: ...and hold the power button located underneath the front panel for 4 seconds WARNING Do not attempt to power off the Acuity manually while the system is actively performing an operation To avoid the ri...

Page 21: ...lect Video Output Settings Select Audio Output Settings Select Video Output Settings 1 Navigate to the Play Video menu page 2 Make the appropriate configuration changes in the Video Output section a S...

Page 22: ...system Dither is also not recommended when dubbing content to recording device the added noise can make for a poorer signal This control affects all outputs h Set the Analog Colorspace to match the re...

Page 23: ...set the volume level for analog headphone output stereo jack is located on the front of the QuVIS Acuity d Use the Master volume control to set the volume level for all audio channels This control is...

Page 24: ...GUI Interface and Chapter 5 Modifying Configuration Configuration tasks Select Video Input Settings Select Advanced Video Input Settings Select Audio Input Settings Select Video Input Settings 1 Navig...

Page 25: ...tandards Select QMF2 if the recorded media file needs to be backward compatible with the QuBit 2 x product line QuBit ST EL and DS running QSR 2 3 or higher Select QMF3 for JPEG2000 formats For additi...

Page 26: ...o record a specific area of the incoming serial digital stream as metadata When metadata is present in the input stream the metadata presence indicator M on the dashboard will illuminate c Noise corin...

Page 27: ...Digital audio inputs and Analog audio inputs to specify which audio channels should be recorded and whether channels 1 and 2 should be analog or digital c If channels 1 and 2 are selected to be analog...

Page 28: ...g Basic Operations Play a short clip to confirm that your connections and system setup are correct Refer to Chapter 2 Quick Start Procedures for play and record procedures QuVIS Acuity Page 27 QSR Ver...

Page 29: ...d that you can apply that understanding to make the required settings If you need help with these procedures contact your network administrator Once the networks settings have been made and the approp...

Page 30: ...twork server The QuVIS Acuity is assigned an unused IP address from a pool of TCP IP address maintained by the DHCP server DHCP provides safe reliable and simple TCP IP network configuration prevents...

Page 31: ...ork address is composed of four parts octets separated by a period To modify the next part octet of the network address you must use the period button to advance 4 To change the Subnet Mask place the...

Page 32: ...CAT 6 twisted pair Ethernet cables The QuVIS Acuity s network cable port is located on the back of the unit on the bottom board module Attach RJ 45 Ethernet cable here Port 1 Connecting to a network h...

Page 33: ...es are currently on the network Verify the Acuity s Ethernet connection and presence on your network by either pinging the Acuity s IP address or opening a client connection using a Telnet or FTP clie...

Page 34: ...tware that uses the industry standard RS 422 serial protocol To operate the QuVIS Acuity remotely using the RS 422 protocol a RS 422 cable male must be connected to the Acuity and the controlling devi...

Page 35: ...QuVIS Acuity Page 34 QSR Version 3 1 CHAPTER 2 QUICK START PROCEDURES Procedures in this chapter include Play a clip from the GUI Record a clip from the GUI Local record Basic file management...

Page 36: ...rectory place the pointer on the directory you wish to open and press the center touchpad button TIP If the Play Browser menu page is not the active screen you can press the VTR PLAY button as a short...

Page 37: ...selected clip or media file press the VTR PLAY button Note The QuVIS Acuity will automatically switch to the appropriate output video format if needed before playback will begin QuVIS Acuity Page 36 Q...

Page 38: ...he load the Record menu group a Image Format Record Video 1 5 b Digital audio inputs Record Audio 3 5 c Analog audio inputs Record Audio 3 5 d Resolution Record Audio 3 5 e Frequency Record Audio 3 5...

Page 39: ...ndicator in the dashboard to read Record 5 Press REC PLAY to begin recording The GUI will automatically switch to the Record Panel menu page so that the record process may be monitored 6 To stop recor...

Page 40: ...y Rename a File Delete a file Copy a file local Create a new directory 1 Navigate to the Play Browser menu page 2 Navigate to the volume and or directory path where you wish to create a new directory...

Page 41: ...the center touchpad button Once the file has been highlighted it is ready to be renamed 3 Click on the Tools button to activate the list of additional file operations To rename the selected file sele...

Page 42: ...be copied in a single operation To select multiple files click on the first file and continue to hold down the center touchpad button and drag the pointer using the touchpad over the additional files...

Page 43: ...em Security Features Image Processing QuVIS Media file types QuVIS Image Format Files QuVIS Acuity and Digital Cinema Content Mastering Factors that affect picture quality when Recording Factors that...

Page 44: ...eal time DCI 2K JPEG2000 Acquisition and Playback Real time DCI AES Encryption Real time Composition Timeline Editing and Preview Real time QuVIS TitleMaster server based DCI Subtitle rendering and Re...

Page 45: ...drive is the proper logical drive in the stripe sequence This auto sequencing feature is very useful when using hot swap removable drives allowing the operator to concentrate on the process and not th...

Page 46: ...led from the media bay the solenoid lock must first be disengaged Use the following procedure to remove a media drive while the system is powered on 1 Lift up the front control panel and secure it in...

Page 47: ...tes With hot swap removable drive support the dismounting and mounting of removable drive volumes can be done live with the system powered on Archiving Data Using native software tools data and media...

Page 48: ...by the QuVIS Acuity with CPU 7 Other factors resulting in a USB device not functioning properly may include Improper power source device may require an external power source instead of relying upon b...

Page 49: ...Administrator level permissions USER This is the power on default and lowest user level This user level is essentially limited to being able only to play and The system log is viewable by users in or...

Page 50: ...if an Admin user has not been defined Account security may be enabled disabled only using an ADMIN level user account Login from the front panel GUI With System Security active the operator must logi...

Page 51: ...on the GU Dashboard to visually indicate that someone is logged in If you click on the indicator a dialog window will be displayed showing who is currently logged in from the GUI and their assigned p...

Page 52: ...uction and post production workflows DCI JPEG2000 Real time Image Encoding Record Optional Real time DCI JPEG2000 Image Encoding for Digital Cinema 2K formats is available as an optional processing mo...

Page 53: ...The KDM files enables the Acuity to decrypt the encrypted content for playback purposes Before a KDM file can be generated for a QuVIS Acuity the server must be registered with the content management...

Page 54: ...ing playback of unencrypted content per Digital Cinema exhibition guidelines Image Watermarking is automatically disabled for encrypted content if the WatermarkOff keyword is present in the Annotation...

Page 55: ...is used to identify media files that may only be created or played on QuVIS video servers running a QSR release of 2 x or greater including QSR 3 x The QuVIS Acuity Cinema Player Encore Acuity and QuB...

Page 56: ...S video servers to emulate a traditional linear tape editing process while providing the additional flexibility of a digital workflow MXF Digital Cinema Media files that have been loaded from a Digita...

Page 57: ...ack A script file or digital cinema Composition Play List CPL file may be played from the primary GUI interface Only QuVIS script files may be played from the Cinema control interface CineGUI If a scr...

Page 58: ...it Early Digital Cinema some still exist video projectors were unable to display the entire frame of an HD image Windowed formats enabled the exact size of the picture the projector could accept 1280x...

Page 59: ...am is being recorded The QuVIS Acuity also combines powerful composition timeline assembly and editing tools with the ability to preview a composition in its entirety before it is encrypted and finali...

Page 60: ...ce content can be played as a real time video stream then the Acuity can be configured to record that source and perform JPEG2000 image compression encoding real time DCP Composition image and audio t...

Page 61: ...mum Data Rate Record Video menu page MDR can have a moderate to more extreme effect on picture quality based on whether it is set correctly or incorrectly for the source material and SNR Set correctly...

Page 62: ...Uncompressed HD 10 bit 2 Dither Play Video When turned ON Dither inserts electronically generated noise into the picture This may be useful for some displays where it may produce a sharper looking im...

Page 63: ...running a signal into it via a different input i e using HD via RGB rather than SDI 2 Cable quality and cable length The quality of your cable makes a big difference Cables of the same length but fro...

Page 64: ...viewed from the server s status webpage Summary displays general server information and its current operational status Disks displays a list of mounted storage volumes and their usage properties Stat...

Page 65: ...ding easy access to the internal disk storage Transport controls LCD Menu Display Soft Function buttons Touchpad LCD menu display The LCD screen is used to display the Graphical User Interface or GUI...

Page 66: ...playback or resume playback of the selected clip s If the system is not playing or recording a clip this button may be used as a GUI shortcut to load the PLAY menu group FWD The FWD button is used to...

Page 67: ...has a visible and physical center position indent or market to identify the pause or zero speed playback position Jogging a clip With the JOG button engaged illuminated turn the inner wheel in the de...

Page 68: ...sed to select multiple non contiguous files This functionality is the same as pressing the CTRL button on a keyboard and selecting individual files from a PC file browser To select multiple files plac...

Page 69: ...ssignments between sessions custom assignments must be saved in a Configuration file Temporary Soft Button Assignments The ability to temporarily assign individual menu page functions to soft buttons...

Page 70: ...4 5 PLAY PG 3 5 PLAY PG 2 5 RECORD PG 1 5 DASHBOARD PLAY PG 5 5 PLAY PG 4 5 PLAY PG 3 5 PLAY PG 2 5 PLAY PG 1 5 DASHBOARD IMPORTANT The exact number of menu groups and pages may change The example giv...

Page 71: ...Menu list may be opened by placing the pointer over the arrow control to right of the name of the current menu page center tab and pressing the center touchpad button Once the list is displayed place...

Page 72: ...ntrols when the pointer hovers over an adjustable control it will appear as a hand Otherwise it will appear as an arrow Nothing in the dashboard can affect the system settings adversely so feel free t...

Page 73: ...d may be clicked on using the cursor arrow and the center touchpad button to open a large audio meter window and volume control interface Individual audio channel volume settings may be set from the l...

Page 74: ...nning Fwd at n speed n is a decimal SHTL nX System is scanning Rev at n speed n is a decimal JOG System is in Jog mode COPYING System is currently performing a copy operation ARMED SYS System is pause...

Page 75: ...me of 00 00 00 00 FRM frame This timecode type displays the current position in frame numbers INP input Shows the current timecode value being monitored on the LTC input In record mode the upper displ...

Page 76: ...NTERFACE Information in this chapter includes details of the front panel Graphical User Interface GUI including menu groups menu pages and system controls PLAY menu group RECORD menu group SETUP menu...

Page 77: ...at are most commonly used to control playback operations Menu pages covered in this section include PLAY BROWSER 1 5 menu page PLAY VIDEO 2 5 menu page PLAY AUDIO 3 5 menu page PLAY ADVANCED 4 5 menu...

Page 78: ...play or to perform maintenance operations on From here the operator can access all of the mounted volumes directories and files on the system with the exception of the sys directory which is a protect...

Page 79: ...r the listed media files Encrypt displays the encryption status locked unlocked for those media files that have been AES encryption for security purposes Style popup and Play button These two controls...

Page 80: ...on to another Files may even be copied to a remote QuVIS server over Ethernet Single and multiple copy operations are supported Del Use this button to delete a selected file s or directory To delete a...

Page 81: ...ight list volume view top level view root directory of the current volume and display the parent directory up one level Current Path The current path including volume and directory is displayed here R...

Page 82: ...urce Metadata Output the Metadata that was recorded with the clip Same as LTC output Outputs the same signal specified in the LTC Out setting SDI Output Colorspace This control is used to select the v...

Page 83: ...he data in color difference XYZ or DCP XYZ QuVIS term format During playback an inverse ICT is applied to the DCI JPEG2000 content DCP XYZ form in order to transform the colorspace back to CAP XYZ for...

Page 84: ...i Level black burst Tri Level and Separate H V Ana Sync Analog Sync Note Display devices may need a specific form of sync signal to show image properly The type of sync signal required is dependent up...

Page 85: ...ls may be heard as stereo output on the analog out pair or headphone jack Alternately all channels may be routed to a single analog channel for monitoring purposes Analog Mix Left Right This does not...

Page 86: ...the volume level for all audio channels Master Frame Delay This control is used to delay all audio channels by the specified number of frames to compensate for any creation or equipment routing offset...

Page 87: ...until the end of the clip is reached If the playstyle is set to Play loop repeat then the clip will continue to play until playback is manually stopped To manually stop the triggered playback session...

Page 88: ...Start playing at and Stop playing at controls 2 Select a clip or playable media Play Browser menu page and then press PLAY to place the system into an armed state awaiting the start trigger event When...

Page 89: ...gh the clip while under Jog control Operational Notes 1 Shuttle playback at 1x speed is the default control method when playback of a clip is started 2 To change the Shuttle playback speed and directi...

Page 90: ...oaded from jog shuttle control and playback halted by pressing the STOP again 6 During playback of a clip under the Play jog shuttle playstyle the navigation pointer is hidden in order to ensure prope...

Page 91: ...nd its marked In and Out points press the Save Script soft button The script will be saved with a system assigned name and will be stored in the directory the current clip is stored 6 To play the save...

Page 92: ...A message line is located at the bottom of each record setup menu page in order to provide visual confirmation that the selected record settings are not in conflict with each other If the selected se...

Page 93: ...typical setting used in a production environment ranges from 51 63dB The higher the number the higher the quality and larger the data set The Image Quality settings used to record DCI JPEG2000 content...

Page 94: ...module and requires specific hardware components Destination Select the destination volume and directory where recorded assets will be stored A volume in QuVIS terminology is a set of one 1 or more h...

Page 95: ...g clips Your choices include QPE spatial and ADR spatial Both are a spatial form of encoding motion imagery meaning they are frame based and yield fully editable content QPE is the standard wavelet ba...

Page 96: ...r of audio tracks Include metadata Metadata is ancillary data inserted in the serial digital data stream and may or may not be present in serial digital recorded content When metadata is present the m...

Page 97: ...lected image format and will change appropriately when the image format is changed Non drop this override setting will force the system to always record non drop frame timecode 1 1000 regardless of th...

Page 98: ...e A special file extension axx is used to identify the media file as a single audio track The source audio channel number is specified in the file extension in place of xx Example Channel 10 will have...

Page 99: ...mat required for Digital Cinema mastering projects Format Note The resulting audio wa file is a superset of the Broadcast Wave standard and is only playable by QuVIS servers while in clip form QuVIS c...

Page 100: ...record end trigger is turned off To manually stop the triggered record session you must use the STOP button on the front panel of the Acuity Elapsed Time Enables the Acuity to automatically end the t...

Page 101: ...hat the system is in a Record Ready by looking on the dashboard If the VTR status window displays RECORD the system is currently in record mode vmode r 4 To arm the system to record and wait for the R...

Page 102: ...t name provide a new name or delete the clip if there was an error during record Several displays on this menu page are informational only If you wish to change a setting you must go to the appropriat...

Page 103: ...The default name is derived from the current date mmddyyyy and the current system time hhmmss A underscore character is used to separate date and time elements of the filename for readability Review U...

Page 104: ...ed to setup the Acuity to record JPEG2000 content are located on the Record menu pages Image Format this control is used to specify the clip format and resolution of the JPEG2000 clip asset Input Sour...

Page 105: ...limit to your ability to record high quality high frame rate material depending upon the number of disks that make up the destination volume The minimum number of drives in a volume is generally deter...

Page 106: ...8kHz for DCI JPEG2000 projects It is important that the frequency of the audio input source matches this setting Format this control should be set to WAVE for DCI JPEG2000 projects This setting is use...

Page 107: ...settings Menu pages covered in this section include SETUP CONFIG 1 8 menu page SETUP SERIAL 2 8 menu page SETUP GUI 3 8 menu page SETUP NETWORK 4 8 menu page SETUP GPI INPUTS 5 8 menu page SETUP GPI O...

Page 108: ...ill load its factory defaults Default Startup Config File This control is used to load a previously saved configuration file The popup file browser will automatically set the current working directory...

Page 109: ...pages using the Menu Page navigation popup located next to the name of the current menu page QuVIS Acuity Page 108 QSR Version 3 3...

Page 110: ...and Stop Bits settings for both RS 232 serial ports on the Acuity are fixed at 8N1 which is the most common setting for this type of serial port Setup Serial Options Description Use this control to a...

Page 111: ...on this serial port Flow control is also referred to as handshaking RS 232 A Settings Flow Note The QuVIS Acuity supports both software Xon Xoff and hardware handshaking Hardware Handshaking may be tu...

Page 112: ...operations similar to clicking the left mouse button on a computer Touch levels include Light touchpad requires a soft light touch Medium touchpad requires an average medium touch Heavy touchpad requ...

Page 113: ...entry option is used you can no longer tap on dialog window buttons i e Okay to invoke the action i e close the window You may still move the pointer using the touchpad and click on controls using th...

Page 114: ...e 2 Click center touch pad button or left mouse click on the Soft button control in the DEFAULT SOFT BUTTONS section 3 From the menu page listing select the menu page to be assigned to the soft button...

Page 115: ...to projector control communication Setup Network Options Description This control is used to assign a unique TCP IP network address to the Acuity The IP address is the primary setting needed for comm...

Page 116: ...en made to the network settings from the front panel this button may be used to return the network values to the original settings that were active the last time the system was powered on This button...

Page 117: ...accept the new address setting The new setting does not take affect until the system is restarted To abort operation click on the Cancel button using the center touchpad button QuVIS Acuity Page 116 Q...

Page 118: ...channel GPI Input Options When a signal is received the system will perform the operation defined for that channel There are six 6 system options that may be assigned to a GPI input channel They are...

Page 119: ...s contained within a Batch bat file 1 GPI Input channel action must be set to Batch Note Other GPI Input actions may not be used to invoke batch file processing 2 A valid batch file must be associated...

Page 120: ...front panel by pressing the PLAY VTR transport button Alternately the paused Show Playlist may be restarted using the Script Transport Resume command if a separate GPI Input channel is configured to...

Page 121: ...with an external CP650 audio processor All of the Show Playlist or script CP650 commands are supported although only a couple of examples is provided Examples Script Automation CP650 Fader 5 5 Script...

Page 122: ...is met GPI 2 Use this control to instruct the system to output a GPI signal on this channel when the specified condition is met GPI 3 Use this control to instruct the system to output a GPI signal on...

Page 123: ...a Warning log message is generated Errors This setting instructs the server to output a GPI signal on the selected channel s anytime an Error log message is generated User This setting assigns the use...

Page 124: ...m one volume and play content from another without manually navigating to the non system volume Use this control to specify how Subtitles will be rendered Remote Use this setting if Subtitle rendering...

Page 125: ...jector Control IP Address Use this control to enter the TCP IP network address of the Control Panel interface for the attached Digital Cinema projector The control panel interface allows the server to...

Page 126: ...urrently installed software release QuVIS Soft Release QSR Displays the list of currently installed hardware including optional circuit cards and their revision number Hardware Info Click this button...

Page 127: ...menu group is the collection of menu pages that are used to create and edit Virtual Tapes VTP Menu pages covered in this section include VTP CREATE 1 2 menu page VTP EDITOR 2 2 menu page QuVIS Acuity...

Page 128: ...ored and the virtual tape file itself vtp Virtual tape name Use this control to specify at what location volume and directory path the virtual tape project directory and virtual tape file will be stor...

Page 129: ...editing project If these settings do not match the requirements of your project click on any of the settings in this section and the Record setup menu page will automatically load This allows you to...

Page 130: ...rojects IMPORTANT The VTP Editor does not support the intermixing of both QPE and JPEG2000 assets within the same VTP project The VTR transport buttons and Jog Shuttle wheel provide real time playback...

Page 131: ...abeled Ax is for audio all channels as a group and the bottom track labeled S is for subtitle assets All track assets are automatically placed onto the appropriate track determined by the asset type T...

Page 132: ...el of the timeline will determine how wide the cursor line appears on screen At higher zoom levels more detail views the cursor will be drawn wider than at lower zoom levels less detail views Edit Sna...

Page 133: ...browser window Open Project Save Use this option to save changes to the virtual tape project file Note Each time the virtual tape project is updated via system action add asset modify edit position or...

Page 134: ...nd will place the selected asset onto the VTP timeline without justifying any existing assets on the timeline The new asset will simply be placed onto the timeline in the position indicated If there a...

Page 135: ...rtion point of the new asset This is commonly referred to as a ripple edit If the In point of the new asset is located anywhere within an existing asset on the timeline the existing asset will be spli...

Page 136: ...CE button to complete the Add Asset operation Lift Asset The Lift Asset command is used to remove a selected asset from the VTP timeline Existing assets to the right will remain in place To select an...

Page 137: ...ect is loaded in the VTP Editor Paste Asset The Paste Asset command is used to paste an asset file stored in the VTP Editor clipboard to the VTP timeline in its entirety The asset will be copied to th...

Page 138: ...edit correspond to the beginning and end of the source asset clip the Slip edit will not have an affect IMPORTANT This edit function is only to be performed on video and audio track assets Do not use...

Page 139: ...on the timeline to a position occupied by another edit will result in an edit overlay whereby the existing edit will be replaced by the overlay in part or in full If you need to move more than one ed...

Page 140: ...05 2 The duration of the selected edit is automatically updated to reflect the change made to the assets In point Example The duration of an edit is 00 00 09 23 10 seconds prior to trimming the In po...

Page 141: ...ation of the selected asset video and audio edits only IMPORTANT This edit command is only to be performed on video and audio track assets Do not use this edit function on Subtitle track assets Note t...

Page 142: ...he edits Out point position end of last frame on the timeline is modified by five frames as well 00 10 00 05 To trim the Out point of an asset 1 Select the edit that is to be adjusted Press the Trim O...

Page 143: ...ut points This will cause unintended consequences as Subtitle track assets will function in a manner not reflected on the timeline To Delete assets between the Mark In and Mark Out points 1 Set the de...

Page 144: ...lace the timeline cursor at the desired timeline timecode position 2 To mark the In point press the Mark In button at the bottom of the screen using the soft button directly below the display Mark Out...

Page 145: ...ve the defined Mark Out flag View Commands Button Command Description The Zoom In command is used display a more detailed view of the timeline The maximum Zoom In level allows you to view details such...

Page 146: ...nd of the last asset edit on the VTP project timeline Finish Commands Button Command Description The Encrypt Asset command is used to apply content encryption to the selected asset For DCI JPEG2000 VT...

Page 147: ...file pem of the Content Management system where the encrypted content will be managed i e QuStudio The public key of the Content Management system is needed in order to encrypt the content so that it...

Page 148: ...d and may not be placed on the VTP timeline When adding a new video asset clip file to the timeline that file must conform to the format settings of the virtual tape Example A 1080i60 clip may not be...

Page 149: ...standards Subtitle Types Digital Cinema subtitles can be in one of two forms Timed text and Image PNG overlay Timed text subtitles consist of text based XML files that store the appropriate subtitle d...

Page 150: ...quite will likely overlay during playback o Razor The VTP Editor will give the appearance that the subtitle track file has been split by the operation However both subtitle track files will execute i...

Page 151: ...position and active view to the end of the last event on the timeline End Prev Edit move the timeline cursor position to the first edit point to the left of the cursor includes event In Out points an...

Page 152: ...Keyboard Hotkeys Description ENTER Complete current edit QuVIS Acuity Page 151 QSR Version 3 3...

Page 153: ...pages provides access to a set of advanced utilities and settings that are infrequently updated or used Menu pages covered in this section include ADVANCED SETUP 1 2 menu page ADVANCED SETUP 2 2 menu...

Page 154: ...special menu page that provides management functions for attached SCSI devices such as internal or external hard drives Toggle Active This function is used to activate deactivate which SCSI ID s per S...

Page 155: ...d drive space has not been reused then it s possible to recover the deleted file using the Recover command Delete Method Secure This deletion method permanently removes the file from the system s File...

Page 156: ...her or not the system will perform a small audio dissolve between successive audio edits This can be used to eliminate strange audio transitions If this control is enabled the system will render a sma...

Page 157: ...59 padded to n digits ISE n IRIG seconds 0 59 padded to n digits IFS n IRIG fraction of a second period and n digits IDYn IRIG days 1 366 padded to n digits 4 Rounding works as follows On fields that...

Page 158: ...ore the number but only if the number is required For example XYZ OPT4 would produce the following names XYZ XYZ_0000 XYZ_0001 8 Other Punctuation Miscellaneous punctuation can be inserted between rul...

Page 159: ...tivated CineGUI may be loaded as the primary interface upon bootup by modifying the Environment Variable general defaultGUI in the active Default Startup Config File file In a production environment w...

Page 160: ...r STEP through the current script To SCAN through a script To scan or shuttle through the current script press the REV or FWD buttons while the script is playing To frame STEP through a script In orde...

Page 161: ...rmation in this chapter includes Configuring Acuity overview Set the Default Startup Config File Save current settings to a config file Load custom settings from a config file Restore factory settings...

Page 162: ...specific set of custom settings from a configuration file each time the unit is powered on If you do not set the default startup config file the Acuity will load factory settings as defined in the re...

Page 163: ...ettings to a configuration file 1 Navigate to the Setup Config menu page and click on the Save current setup to config file option 2 At the input window enter a filename for the new config file If you...

Page 164: ...ctory where all config files are stored user cfg 3 Click Load to load the settings stored in the select config file Note If any changes are made to the system settings locally using the GUI or remotel...

Page 165: ...Acuity Page 164 QSR Version 3 1 CHAPTER 6 QSHELL COMMAND LINE OPERATIONS Information in this chapter includes QShell Overview QShell via serial connection QShell via Telnet connection Advanced QShell...

Page 166: ...paths and file names While typing in a file name type in the first couple of characters and then press the TAB key If there are multiple files with the same prefix keep pressing the TAB key until the...

Page 167: ...ver via the serial port you will likely need to create a connection profile for the terminal application The settings of the terminal program must match the serial settings of the Acuity If you are un...

Page 168: ...rt your Telnet client and start a new connection 2 Provide the IP address of the QuVIS Acuity in the method required by the Telnet client software 3 If the connection is successful a remote QShell ses...

Page 169: ...t SerCtrl Volutil Dir Net Set Wait Encrypt Path Shell WhatIs Exit Play Show Which GetTC PlayScript Shuttle Print Stat Help PWD StopClip Acuity How to get detailed command help Enter most any command n...

Page 170: ...R 7 INSTALLING SYSTEM SOFTWARE Information included in this chapter QuVIS Soft Release QSR Overview Installing new system software Restoring a previous software release QuVIS Acuity Page 169 QSR Versi...

Page 171: ...ades and license A hardware upgrade s may be necessary to gain access to some of the new features Those features that are hardware dependent will not be fully accessible until an appropriate hardware...

Page 172: ...ng software that can corrupt you installation and data QuVIS update software has a built in failsafe feature If you inadvertently install a software update that is not supported by your hardware or pr...

Page 173: ...bout remote control protocol support Configuring remote control Starting remote control Remote control status Virtual Tape Overview Create a Virtual Tape Edit a Virtual Tape Insert Edit Record into a...

Page 174: ...r the QuVIS Acuity you must first select the serial protocol to be used SETUP SERIAL 2 8 menu page and then enable remote control See the Configuring remote control section for detailed setup instruct...

Page 175: ...ired protocol option has been selected from the list press the center touchpad button to complete the selection Note If you select the Odetics protocol you must also complete step 3 to assign the dire...

Page 176: ...under remote LDV8000 control Make sure the Acuity is in the proper play mode for the LDV clip selected You may do this by selecting the clip from the front panel and press the PLAY button on the PLAY...

Page 177: ...ypass the need to directly turn on remote control by using the playstyle Load Remote Control Play Browser 1 5 menu page to automatically place the QuVIS Acuity under remote control when playback is in...

Page 178: ...ely using the Sony RS 422 protocol See section Edit a Virtual Tape for more details 1 From the Play Browser 1 5 menu page select the clip media file you wish to place under remote control Note Even if...

Page 179: ...serial control a status window is displayed on the GUI to indicate that the QuVIS Acuity and the selected media asset is under remote control Remote control status window Clip play only Remote contro...

Page 180: ...eo servers these are all settings you can specify that define a virtual tape Editing a Virtual Tape Once a virtual tape is created you may select it and play it just as if it were a blacked videotape...

Page 181: ...ll automatically generate a new one Media Asset Files Each time an insert or assemble edit video and or audio is performed on a virtual tape a media asset file or clip is created and stored within the...

Page 182: ...u think you ll need Editing virtual tapes can create leftover clips During the course of creating and editing a virtual tape you may decide to dub over an existing segment that was previously recorded...

Page 183: ...s Use the following steps to create a new virtual tape to be used to edit the DCP project timeline 1 Navigate to the VTP Create menu page on the QuVIS Acuity 2 Make sure that the current recording set...

Page 184: ...ese settings button at the bottom of the menu page 5 Enter a brief project description into the VTP Comment window Click Enter to complete the VTP creation process A general comment might consist of t...

Page 185: ...trol playstyle 3 Navigate to the Play Browser 1 5 menu page and select the virtual tape vtp file to be edited 4 Press the VTR PLAY button on the front panel A message box will appear indicating that t...

Page 186: ...oad an existing virtual tape into the VTP Editor for project timeline editing 1 Navigate to the VTP Editor menu page on the QuVIS Acuity 2 Click on the Open Project button to select the VTP project to...

Page 187: ...ed at the start of the timeline 2 Select the type of asset insert you would like to perform and click on the corresponding command button in the Asset section Overlay will place the asset on the timel...

Page 188: ...ion it stores Unlike video and audio asset files that contain media that is output on a frame by frame basis Subtitle XML files are text based and use text formatted events with timing information to...

Page 189: ...imeline cursor has been positioned at the start of the timeline 00 00 00 00 in order to insert the Subtitle Track file at the beginning of reel 1 Click the Asset Overlay command to select the subtitle...

Page 190: ...QuVIS Acuity Page 189 QSR Version 3 1...

Page 191: ...e end of the last frame of the incoming source asset clip will begin is set to 00 00 10 00 2 Source clip In point is set Mark In to 00 00 00 00 3 Source clip Out point is set Mark Out to 00 00 05 23 4...

Page 192: ...and Out points using the Mark In and Mark Out commands 2 Define the new edit by selecting the Add Asset option from the Asset menu a A file browser window will open to allow the source asset file for...

Page 193: ...e timeline In this example the timeline s marked In and Out points overlapped with an existing edit The new edit is placed on the timeline as an Overlay and does not displace roll or ripple the existi...

Page 194: ...he transport status on the dashboard will change to VTP INSERT to indicate that the system is in a VTR insert record wait state 5 Once the system is armed for the local insert edit final changes to th...

Page 195: ...tape If the virtual tape containing audio edits are transferred from another QuVIS Acuity using a removable drive and if those assets are not copied to the same parent location of the virtual tape con...

Page 196: ...ape timeline specify both source virtual tape files and use the AVSync parameter to identify the appropriate audio adjustment The first virtual tape file should be the video source VTP and the second...

Page 197: ...6 QSR Version 3 1 Graphical VTPMerge Examples The following is a graphical depiction of both virtual tape merging and audio synchronization operations The timeline represents a timecode based section...

Page 198: ...Ext H V 1920 1108 QPE 1920x1080 24 sF hd2_1920x1080sF24 274M 15 16 9 Ser Ser YES YES Tri level Ext H V 1920 1108 QPE 1920x1080 23 98 sF hd2_1920x1080sF23 98 274M 16 16 9 Ser Ser YES YES Tri level Ext...

Page 199: ...NO NO 2048 1108 QPE 2048x1080 24 sF jp2k_2048x1080sF24 DCI Full Ser Ser NO NO 2048 1108 JPEG 2048x858 24 sF jp2k_2048x858sF24 DCI Scope Ser Ser NO NO 2048 1108 JPEG 2048x857 24 sF jp2k_2048x857sF24 DC...

Page 200: ......

Reviews: