ELECTRICAL
10.15
CHARGING SYSTEM TESTING
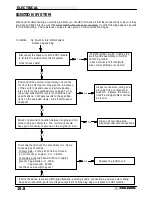
Whenever charging system problems are suspected, proceed with the following system check.
Check for owner modification, and
discuss operating habits. The battery
will continually discharge if operated
below the “Break Even” RPM. Con-
tinued problems would call for battery
inspection.
Disconnect the Yellow/Red, Yellow, and Yel-
low/Brn (if applicable) wires from the regula-
tor/rectifier. Using a multitester, perform an
Alternator Output (AC amp) test. See
test procedure on page 10.17 for proce-
dure.
Is output above 5 amps?
Inspect the wiring harness be-
tween the panel and the stator for
damage. If no damage is found,
remove the recoil and flywheel.
Inspect the flywheel magnets, sta-
tor coils and stator wire harness
for damage. Repair or replace
any damaged components.
Reconnect the alternator wires. Note: Red
wire must be connected to harness. Battery
voltage must be present on red wire terminal
on harness side of voltage regulator connector.
Is it?
Check regulator/rectifier connections
and ground, battery connections, cir-
cuit breaker and connecting wires.
Repair or replace faulty wiring or
components.
If all of the previous tests indicate a
good condition, but the charging voltage
does not rise above battery voltage at the
connector or terminal board, replace the
voltage regulator.
No
Yes
No
Yes
Perform system “Break Even Amperage”
test outlined on page 10.16.
Does charging occur as specified?
Using a multitester set on D.C. volts, mea-
sure the battery open circuit voltage (See
page 10.12). It should be 12.4 volts or
more. Is it?
Remove the battery and properly ser-
vice. Reinstall the fully charged battery
or a fully charged shop battery.
With the transmission in neutral, start the
engine and increase RPM to between 3000
and 4000. Read battery voltage with the
multitester. Readings should increase to be-
tween 13.0 and 14.6 V D.C. Are they?
No
Yes
No
Yes
Check Key off Current Draw
No
Meter Setting: AC Amps
Meter Setting: DC Amps
Meter Setting: DC Volts
Meter Setting: DC Volts
Yes
Ohm stator wire (Y/YR) If bad replace, if good,
continue with alternator output test.
Summary of Contents for Sportsman 400
Page 6: ...SPORTSMAN 400 A01CH42AC GENERAL INFORMATION 1 4 MODEL COLOR IDENTIFICATION ...
Page 21: ...Newton Meter to Pound Foot and Pound Inch GENERAL INFORMATION 1 19 TORQUE CONVERSIONS ...
Page 22: ...Newton Meter to Pound Foot and Pound Inch GENERAL INFORMATION 1 20 TORQUE CONVERSIONS ...
Page 152: ...Forward FUEL SYSTEM CARBURETION 4 2 FUEL TANK ASSEMBLY ...
Page 366: ...ELECTRONIC SPEEDOMETER WIRING DIAGRAM ELECTRICAL 10 32 ...
Page 372: ...ELECTRICAL 10 38 NOTES ...
Page 379: ...ELECTRICAL 10 39 WIRING DIAGRAM 2001 SPORTSMAN 400 ...
Page 380: ...ELECTRICAL 10 40 WIRING DIAGRAM 2001 SPORTSMAN 500 EARLY ...
Page 381: ...ELECTRICAL 10 41 WIRING DIAGRAM 2001 SPORTSMAN 500 LATE ...


