CLUTCH
6.2
PVT OPERATION
The Polaris variable transmission (PVT) consists of three major assemblies: 1) drive clutch; 2) drive belt; and
3) driven clutch. The internal components of the drive clutch and driven clutch control clutch engagement (for
initial vehicle movement), clutch upshifting and backshifting. During the development of an ATV, the PVT system
is matched first of all to the engine power curve; then to average riding conditions and to vehicle design usage.
Modifications to the PVT or variations of components at random are never recommended. Proper PVT system
setup and careful inspection of existing components must be the primary objective when troubleshooting and tun-
ing.
WARNING
All PVT system maintenance repairs must be performed only by an authorized Polaris service technician
who has attended a Polaris sponsored service training seminar and understands the proper procedures as out-
lined in this manual. Because of the critical nature and precision balance incorporated into the PVT sys-
tem, it is absolutely essential that no attempt at disassembly or repair be made without factory autho-
rized special tools and service procedures.
DRIVE CLUTCH OPERATION
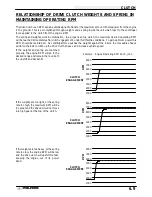
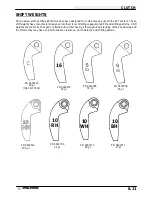
The drive clutch primarily senses engine RPM. The two major components which control its shifting function are
the shift weights and the coil spring. When the engine RPM is increased, the centrifugal force of the shift weights
working against the coil spring increases. When this force reaches a force higher than the preload in the spring,
the moveable sheave of the drive clutch will move inward, contacting the drive belt. The force will pinch the belt
between the spinning sheaves and cause the drive belt to move. This movement in turn rotates the driven clutch.
At light throttle settings the drive belt will stay low in the drive clutch and high in the driven clutch. As engine RPM
increases, so does the centrifugal force on the shift weights, causing the drive belt to be forced upward in the drive
clutch and downward into the driven clutch. The forces in the driven clutch will now affect the upshift.
DRIVEN CLUTCH OPERATION
The driven clutch primarily senses torque. It opens and closes according to the forces applied to it from the drive
belt and the transmission input shaft. If the torque resistance on the input shaft is greater than the load from the
drive belt, it will keep the drive belt outward at the top of the driven clutch sheaves. As the throttle setting and
engine horsepower increase, there will be a greater load on the drive belt, pulling the belt down into the driven
clutch and up on the drive clutch. This action, which increases the driven clutch speed, is called upshifting.
If the throttle setting remains the same and the vehicle is subjected to a heavier load, the driven clutch senses
this load, moving the belt back up on the sheaves of the driven clutch and down into the sheaves of the drive clutch.
This action, which decreases the driven clutch speed, is called downshifting.
In situations where loads vary (such as uphill and downhill) and throttle settings are constant, the drive and driven
clutches are continually shifting to maintain optimum engine RPM. At full throttle a perfectly matched PVT system
will hold the engine RPMs at the peak of the power curve. This RPM should be maintained during clutch upshift
and backshift. In this respect the PVT system is similar to a power governor. Rather than change throttle position,
as a governor does, the PVT system changes engine load requirements by either upshifting or downshifting.
Summary of Contents for Sportsman 400
Page 6: ...SPORTSMAN 400 A01CH42AC GENERAL INFORMATION 1 4 MODEL COLOR IDENTIFICATION ...
Page 21: ...Newton Meter to Pound Foot and Pound Inch GENERAL INFORMATION 1 19 TORQUE CONVERSIONS ...
Page 22: ...Newton Meter to Pound Foot and Pound Inch GENERAL INFORMATION 1 20 TORQUE CONVERSIONS ...
Page 152: ...Forward FUEL SYSTEM CARBURETION 4 2 FUEL TANK ASSEMBLY ...
Page 366: ...ELECTRONIC SPEEDOMETER WIRING DIAGRAM ELECTRICAL 10 32 ...
Page 372: ...ELECTRICAL 10 38 NOTES ...
Page 379: ...ELECTRICAL 10 39 WIRING DIAGRAM 2001 SPORTSMAN 400 ...
Page 380: ...ELECTRICAL 10 40 WIRING DIAGRAM 2001 SPORTSMAN 500 EARLY ...
Page 381: ...ELECTRICAL 10 41 WIRING DIAGRAM 2001 SPORTSMAN 500 LATE ...


