background image

CLUTCH

6.31

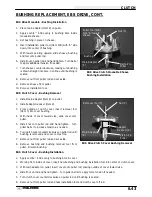
DRIVEN CLUTCH MOVEABLE SHEAVE - BUSHING REMOVAL,
CONT.

5.

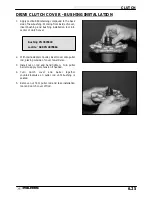
Working from the top, install bushing removal tool
(Item 5) into center of clutch sheave with smaller
diameter toward bushing to be removed.

See

illustration at right.

6.

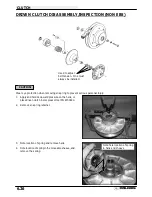
Install sheave onto puller.

7.

Install nut onto puller rod and tighten by hand. Turn
puller barrel for further tension if needed.

8.

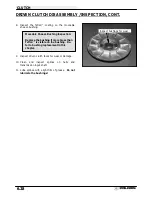
Turn clutch sheave counterclockwise until bushing
is removed. Repeat steps 5 - 8 for other bushing.

9.

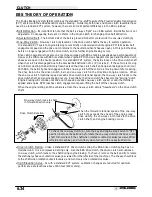
Remove nut from puller rod and set aside.

10. Remove adapters from puller.

11. Remove bushing and removal tool from adapters.

Discard bushing.

Bushing
Removal Tool (#5)

Summary of Contents for Sportsman 400

Page 1: ...PTER 1 GENERAL CHAPTER 2 MAINTENANCE CHAPTER 3 ENGINE CHAPTER 4 FUEL SYSTEM CARBURETION CHAPTER 5 BODY SUSPENSION CHAPTER 6 PVT SYSTEM CHAPTER 7 FINAL DRIVE CHAPTER 8 TRANSMISSION CHAPTER 9 BRAKES CHAPTER 10 ELECTRICAL ...

Page 2: ...sions 1 8 1 10 Specifications Sportsman 400 1 11 1 12 Specifications Sportsman 500 DUSE 1 13 1 14 Specifications Sportsman 500 H O 1 15 1 16 Publication Numbers 1 17 Paint Codes 1 17 Standard Torque Specifications 1 18 Torque Conversion Table 1 19 1 20 Decimal Equivalent Chart 1 21 Conversion Table 1 22 Tap Drill Charts 1 23 Glossary of Terms 1 24 1 25 ...

Page 3: ...t No Individual Serial No Body Style Check Digit World Mfg ID This could be either a number or a letter ENGINE SERIAL NUMBER LOCATION Whenever corresponding about an engine be sure to refer to the engine model number and serial number This information can be found on the sticker applied to the recoil housing on the right side of engine A An additional number is stamped on the center top of crankca...

Page 4: ...rom the original key To identify which series the key is take the first two digits on the original key and refer to the chart to the right for the proper part number Series Part Number 31 4110141 32 4110148 67 4010278 68 4010278 27 4010321 28 4010321 31XX Key Series Number ...

Page 5: ...SPORTSMAN 400 A01CH42AB SPORTSMAN 400 A01CH42AA GENERAL INFORMATION 1 3 MODEL COLOR IDENTIFICATION ...

Page 6: ...SPORTSMAN 400 A01CH42AC GENERAL INFORMATION 1 4 MODEL COLOR IDENTIFICATION ...

Page 7: ...SPORTSMAN 500 H O A01CH50AB SPORTSMAN 500 H O A01CH50AA GENERAL INFORMATION 1 5 MODEL COLOR IDENTIFICATION ...

Page 8: ...SPORTSMAN 500 DUSE A01CH50AD SPORTSMAN 500 H O A01CH50AE GENERAL INFORMATION 1 6 MODEL COLOR IDENTIFICATION ...

Page 9: ...SPORTSMAN 500 H O DUSE A01CH50AF SPORTSMAN 500 H O RSE A01CH50AJ GENERAL INFORMATION 1 7 MODEL COLOR IDENTIFICATION ...

Page 10: ...SPORTSMAN 500 SPORTSMAN 400 30 in 76 2 cm 45 in 114 3 cm 41 in 104 1 cm 22 in 55 8 cm 22 in 55 8 cm 42 in 106 6 cm 46 in 116 8 cm 32 in 81 2 cm GENERAL INFORMATION 1 8 MACHINE DIMENSIONS ...

Page 11: ...SPORTSMAN 400 SPORTSMAN 500 51 in 129 5 cm 35 in 89 cm 13 5 in 34 29 cm 81 in 205 7 cm 81 in 205 7 cm 50 5 in 128 2 cm 34 in 86 3 cm 15 in 38 1 cm GENERAL INFORMATION 1 9 MACHINE DIMENSIONS ...

Page 12: ... 400 SPORTSMAN 500 46 in 116 8 cm 9 25 in 23 5 cm 38 in 96 5 cm 47 in 119 4 cm 45 in 114 3 cm 45 in 114 3 cm 48 in 121 9 cm 37 in 93 9 cm 10 in 25 4 cm 47 in 119 3 cm GENERAL INFORMATION 1 10 MACHINE DIMENSIONS ...

Page 13: ... 4 Cycle Single Cyl Displacement 425 cc Bore 3 461I 87 9mm Stroke 2 756I 70mm Valve Clearance In Ex 0 006 0 006I TDC on compression Compression Ratio 9 2 1 Full Stroke Cooling Liquid Lubrication Type Dry Sump Operating RPM 200 6300 RPM Idle RPM 200 lights off 1200 RPM Compression Pressure Std 15 CARBURETION Type BST 34 Mikuni Main Jet 167 5 Pilot Jet 40 Jet Needle JF 3 Needle Jet Q 0 829 Throttle ...

Page 14: ...y Style Gen IV Chain Type Shaft Drive Front Suspension MacPherson Strut Gear Reduction Low 6 69 1 Tow Capacity 850 lbs 385 6kg Gear Reduction Rev 5 17 1 Turning Radius 65I 165 1cm Gear Reduction High 3 34 1 Toe Out 1 8I 1 4I 3 6 35mm Front Drive Ratio 2 1 Ground Clearance 11I 27 94cm Center Drive Ratio N A Front Vertical Travel 6 7I 17 02cm Final Drive Ratio 3 16 1 Rear Suspension Progressive Rate...

Page 15: ...NGINE Type 4 Cycle Single Cyl Displacement 499 cc Bore 3 6248I 92mm Stroke 2 955I 75mm Valve Clearance In Ex 0 006 0 006I TDC on compression Compression Ratio 10 2 Full Stroke Cooling Liquid Lubrication Type Dry Sump Operating RPM 200 6000 RPM Idle RPM 200 lights off 1200 RPM Compression Pressure Std 15 CARBURETION Type BST 34 Mikuni Main Jet 162 5 Pilot Jet 40 Jet Needle 4HB41 3 Needle Jet Q 0 51...

Page 16: ... Style Gen IV Chain Type Shaft Drive Front Suspension MacPherson Strut Gear Reduction Low 6 69 1 Tow Capacity 1225 lbs 555 6kg Gear Reduction Rev 5 17 1 Turning Radius 65I 165 1cm Gear Reduction High 3 34 1 Toe Out 1 8I 1 4I 3 6 35mm Front Drive Ratio 2 1 Ground Clearance 11I 27 94cm Center Drive Ratio N A Front Vertical Travel 6 7I 17 02cm Final Drive Ratio 3 16 1 Rear Suspension Progressive Rate...

Page 17: ...ustment ENGINE Type 4 Cycle Single Cyl Displacement 499 cc Bore 3 6248I 92mm Stroke 2 955I 75mm Valve Clearance In Ex 0 006 0 006I TDC on compression Compression Ratio 10 2 Full Stroke Cooling Liquid Lubrication Type Dry Sump Operating RPM 200 6500 RPM Idle RPM 200 lights off 1200 RPM Compression Pressure Std 15 CARBURETION Type BST 40 Mikuni Main Jet 152 5 Pilot Jet 40 Jet Needle KE 3 683 Needle ...

Page 18: ...pe Shaft Drive Front Suspension MacPherson Strut Gear Reduction Low 6 69 1 Tow Capacity 1225 lbs 555 6kg Gear Reduction Rev 5 17 1 Turning Radius 65I 165 1cm Gear Reduction High 3 34 1 Toe Out 1 8I 1 4I 3 6 35mm Front Drive Ratio 2 1 Ground Clearance 11I 27 94cm Center Drive Ratio N A Front Vertical Travel 6 7I 17 02cm Final Drive Ratio 3 16 1 Rear Suspension Progressive Rate Independent Brake Han...

Page 19: ... A01CH50AA AB AE AF AJ 9915754 9916446 9916447 When ordering service parts be sure to use the correct parts manual PAINT CODES PAINTED PART COLOR DESCRIPTION DITZLER NUMBER POLARIS NUMBER 400 Springs Rims Black 9440 P 067 500 Springs Rims Black 9440 P 067 500 Opt B Springs Black 9440 P 067 500 Opt B Rims Brushed Aluminum N A P 117 FRAME COLOR All P067 Medium Gloss Black 9440 8520147 Order direct f...

Page 20: ...4 27 3 1 43 5 0 60 6 9 10 32 31 3 6 49 5 6 68 7 8 Torque ft lbs Nm 1 4 20 5 7 8 11 12 16 1 4 28 6 8 10 14 14 19 5 16 18 11 15 17 23 25 35 5 16 24 12 16 19 26 29 40 3 8 16 20 27 30 40 45 62 3 8 24 23 32 35 48 50 69 7 16 14 30 40 50 69 70 97 7 16 20 35 48 55 76 80 110 1 2 13 50 69 75 104 110 152 1 2 20 55 76 90 124 120 166 Metric 6 x 1 0 72 78 In lbs 8 x 1 25 14 18 ft lbs 10 x 1 25 26 30 ft lbs To c...

Page 21: ...Newton Meter to Pound Foot and Pound Inch GENERAL INFORMATION 1 19 TORQUE CONVERSIONS ...

Page 22: ...Newton Meter to Pound Foot and Pound Inch GENERAL INFORMATION 1 20 TORQUE CONVERSIONS ...

Page 23: ...906 10 mm 3937 13 32 4063 27 64 4219 11 mm 4331 7 16 4375 29 64 4531 15 32 4688 12 mm 4724 31 64 4844 1 2 5 13 mm 5118 33 64 5156 17 32 5313 35 64 5469 14 mm 5512 9 16 5625 37 64 5781 15 mm 5906 19 32 5938 39 64 6094 5 8 625 16 mm 6299 41 64 6406 21 32 6563 17 mm 6693 43 64 6719 11 16 6875 45 64 7031 18 mm 7087 23 32 7188 47 64 7344 19 mm 7480 3 4 75 49 64 7656 25 32 7813 20 mm 7874 51 64 7969 13 ...

Page 24: ...ubic centimeters cc x 0 061 Cubic inches cu in Imperial pints Imp pt x 0 568 Liters l Liters l x 1 76 Imperial pints Imp pt Imperial quarts Imp qt x 1 137 Liters l Liters l x 0 88 Imperial quarts Imp qt Imperial quarts Imp qt x 1 201 US quarts US qt US quarts US qt x 0 833 Imperial quarts Imp qt US quarts US qt x 0 946 Liters l Liters l x 1 057 US quarts US qt US gallons US gal x 3 785 Liters l Li...

Page 25: ... 64 1 1 8 12 1 3 64 1 1 4 7 1 7 64 1 1 4 12 1 11 64 1 1 2 6 1 11 32 1 1 2 12 1 27 64 1 3 4 5 1 9 16 1 3 4 12 1 43 64 2 4 1 2 1 25 32 2 12 1 59 64 2 1 4 4 1 2 2 1 32 2 1 2 4 2 1 4 2 3 4 4 2 1 2 3 4 2 3 4 METRIC TAP DRILL SIZES Tap Size Drill Size Decimal Equivalent Nearest Fraction 3 x 50 3 x 60 4 x 70 4 x 75 5 x 80 5 x 90 6 x 1 00 7 x 1 00 8 x 1 00 8 x 1 25 9 x 1 00 9 x 1 25 10 x 1 25 10 x 1 50 11...

Page 26: ...icator while crankshaft is supported between centers on V blocks or resting in crankcase Measure at various points especially at PTO DCV Direct current voltage Dial Bore Gauge A cylinder measuring instrument which uses a dial indicator Good for showing taper and out of round in the cylinder bore Electrical Open Open circuit An electrical circuit which isn t complete Electrical Short Short circuit ...

Page 27: ...engine RPM increases Reservoir Tank The fill tank in the liquid cooling system Resistance Inthemechanical sense frictionor load Inthe electrical sense ohms Bothresult inenergy conversionto heat Right Side Always referred to based on normal operating position of the driver RPM Revolutions per minute Secondary Clutch Driven clutch on chaincase or jackshaft Seized Piston Galling of the sides of a pis...

Page 28: ...djustments 2 13 2 15 Fuel System 2 16 2 17 Compression Test 2 18 Battery Maintenance 2 19 Electrical 2 20 Coolant System Maintenance 2 21 2 22 Air Filter Service 2 23 Air Box Sediment Tube Service 2 24 Breather Filter 2 24 Recoil Housing 2 25 Oil Change Filter 2 26 2 27 Valve Clearance 2 28 2 29 Steering and Toe Alignment 2 30 2 32 Front Hub Maintenance 2 33 Exhaust System Maintenance 2 34 Brake S...

Page 29: ...00 Inspect hose routing hose condition EH Valve Clearance 100 hrs 12 months 1000 1600 Inspect Adjust E Idle Speed As required As required Adjust H Throttle Cable ETC Switch 50 hrs 6 months 500 800 Inspect Adjust Lubricate Replace if necessary Choke Enricher Cable 50 hrs 6 months 500 800 Inspect Adjust Lubricate Replace if necessary Carburetor Float Bowl 50 hrs 6 months 500 800 Drain bowl periodica...

Page 30: ...ears Brake Fluid Level Pre ride Pre ride Inspect Daily Pre Ride Inspection Item Brake Lever Travel Pre ride Pre ride Inspect Daily Pre Ride Inspection Item H Brake Pad Wear 10 hrs Monthly 100 160 Inspect Periodically Auxiliary Brake Adjustment As required As required Inspect Deflection Daily Adjust Brake System Pre ride Pre ride Pre Ride Inspection Item Wheels Pre ride Pre ride Pre Ride Inspection...

Page 31: ...r Oil Oil in selector box should be at the center line of the shift selector plungers Do not overfill or the selector may hydro lock 8 4 Coolant Level Polaris Premium 60 40 Pre mixed Antifreeze Coolant or a 50 50 mixture high quality antifreeze coolant and distilled water Fill reservoir tank to full line Add if neces sary If reservoir was empty or extremely low allow engine and cooling system to c...

Page 32: ...350046 CV Joint Grease Pack 30g 1350047 CV Joint Grease Pack 50g 2871329 Dielectric Grease Nyogelt 2871654 Premium Demand Drive Hub Fluid 12 oz Coolant 2871323 60 40 Coolant Gallon 2871534 60 40 Coolant Quart Additives Sealants Thread Locking Agents Misc 2870585 Loctitet Primer N Aerosol 25g 2871949 Loctitet Threadlock 242 50ml 2871950 Loctitet Threadlock 242 6ml 2871951 Loctitet Threadlock 262 50...

Page 33: ... Polaris Synthet ic Gear Case Lubricant Add lube to FULL level on dip stick Change annually 3 Brake Fluid Polaris DOT 3 Brake Fluid Fill master cylinder reservoir to in dicated level inside reservoir See page 2 36 As required Change fluid every 2 years More often under severe use such as operated in water or under severe loads Operating Range 2 Transmission Dipstick Filter 1 Engine Oil and Filter ...

Page 34: ...ront A Arm Pivot Shaft Polaris All Season Grease Locate grease fitting on pivot shaft and grease with grease gun Semi annually 8 Tie Rod Ends Polaris All Season Grease Lift boot Clean away dirt and grease Apply fresh grease by hand and reassemble Semi annually 9 Steering Post Bush ings All Season Grease Locate fittings on upper and lower steering post and grease with grease gun Semi annually More ...

Page 35: ...U Joint Grease Locate fittings and grease 3 pumps maximum Annually More often under severe use such as operated in water or under severe loads Semi annually or 50 hours of operation refer to Maintenance Schedule for additional information More often under severe conditions operating in water or hauling heavy loads Annually or 100 hours of operation refer to Maintenance Schedule for additional info...

Page 36: ...d grease Semi annually 16 Rear Anti Roll Bar Polaris All Season Grease Locate fittings and grease Semi annually More often under severe use such as operated in water or under severe loads Semi annually or 50 hours of operation refer to Maintenance Schedule for additional information More often under severe conditions operating in water or hauling heavy loads Annually or 100 hours of operation refe...

Page 37: ...cked with a dipstick or by visual reference The gearcase must be drained and re filled with the proper amount of lubricant Refer to procedure below To change lubricant 1 Remove gearcase drain plug located on the bottom and drain oil Catch and discard used oil properly 2 Clean and reinstall drain plug using a new sealing washer 3 Remove fill plug 4 Add proper amount of lubricant 5 Install fill plug...

Page 38: ...necessary 2 Place a drain pan beneath the transmission oil drain plug area 3 Remove the drain plug and wipe the magnetic end clean to remove accumulated metallic filings 4 After the oil has drained completely install a new sealing washer and install the drain plug Torque to 14 ft lbs 19 Nm 5 Add the proper lubricant through the dipstick hole un til the oil level is between the upper and lower limi...

Page 39: ...ways adjust both linkage rods The adjustment of one rod can prevent proper adjustment of the other rod Remove necessary components to gain access to shift linkage rod ends i e exhaust heat shield exhaust pipe etc 1 Inspect shift linkage tie rod ends clevis pins and pivot bushings and replace if worn or damaged Lubricate the tie rod ends with a light aerosol lubricant or grease 2 Loosen all rod end...

Page 40: ...ounterclockwise until the same resistance is felt counting the revolutions as the rod is turned 9 Turn the rod clockwise again one half of the revolutions counted in Step 9 10 Tighten the rod end jam nuts securely while holding the rod end The jam nuts must be tightened with both front and rear rod ends parallel to each other If jam nuts are properly tightened the rod should rotate freely 1 4 turn...

Page 41: ...ay in the carburetor If the plunger is not seated on the fuel passage way inside the carburetor not enough cable freeplay the engine willflood or run too rich causing plug fouling and poor performance If cable slack is excessive the choke fuel passage will not open far enough which may cause cold starting difficulty Also the half choke position used for intermittent applica tions will not function...

Page 42: ...re screw clockwise using the pilot screw wrench until RPM begins to decrease by 50 RPM or greater 5 Slowly turn mixture screw counterclockwise until idle speed increases to maximum RPM Continue turning counterclockwise until idle RPM begins to drop 6 Center the pilot screw between the points in step 5 and 6 7 Re adjust idle speed if not within specification IDLE SPEED ADJUSTMENT 1 Start engine and...

Page 43: ...n in line cable adjuster Ill 1 5 Turn adjuster until 1 16 to 1 8 freeplay is achieved at thumb lever Ill 2 While making adjustment quickly actuate the thumb lever several times 6 Tighten lock nut securely and slide boot completely in place to ensure a water tight seal 7 Turn handlebars from left to right through the entire turning range If idle speed increases check for proper cable routing If cab...

Page 44: ...es for signs of wear deterioration damage or leakage Replace if necessary 2 Be sure fuel lines are routed properly and secured with cable ties CAUTION Make sure lines are not kinked or pinched 3 Replace all fuel lines every two years VENT LINES 1 Check fuel tank oil tank carburetor battery and transmission vent lines for signs of wear deterioration damage or leakage Replace every two years 2 Be su...

Page 45: ...valve to the off position 2 Place a clean container beneath the bowl drain spigot or bowl drain hose 3 Turn drain screw out two turns and allow fuel in the float bowl and fuel line to drain completely 4 Inspect the drained fuel for water or sediment 5 Tighten drain screw 6 Turn fuel valve to on 7 Start machine and check for leaks NOTE If there is a tube attached it must be replaced as this will ef...

Page 46: ...alfunction or worn or damaged exhaust cam lobes Inspect camshaft and automatic decompression mechanism if compres sion is abnormally high A cylinder leakage test is the best indication of engine condition on models with automatic decompression Follow manufacturer s instructions to perform a cylinder leakage test Never use high pressure leakage tester as crank shaft seals may dislodge and leak ENGI...

Page 47: ...ving or reinstalling the battery disconnect the negative black cable first and reinstall the negative cable last 3 Disconnect the vent hose 4 Remove the battery 5 Remove the filler caps and add distilled water only as needed to bring each cell to the proper level Do not overfill the battery Fully recharge after refilling To refill use only distilled water Tap water contains minerals which are harm...

Page 48: ...auge Refer to specifications for proper spark plug type and gap Adjust gap if necessary by bending the side electrode carefully 6 If necessary replace spark plug with proper type CAUTION Severe engine damage may occur if the incorrect spark plug is used 7 Apply a small amount of anti seize compound to the spark plug threads 8 Install spark plug and torque to 14 ft lbs IGNITION TIMING Refer to Elec...

Page 49: ...strength of the coolant using an antifreeze hydrometer S A 50 50 or 60 40 mixture of antifreeze and distilled wa ter will provide the optimum cooling corrosion protec tion and antifreeze protection S Do not use tap water straight antifreeze or straight wa ter in the system Tap water contains minerals and im purities which build up in the system S Straight water or antifreeze may cause the system t...

Page 50: ... and in spect for signs of trapped air in system RADIATOR COOLANT LEVEL INSPECTION NOTE This procedure is only required if the cooling sys tem has been drained for maintenance and or repair However if the recovery bottle has run dry or if overheat ing is evident the level in the radiator should be inspected and coolant added if necessary WARNING Never remove the pressure cap when the engine is war...

Page 51: ...ter assembly Cleaning 5 Slip the pre filter element off of main element Clean the pre filter with high flash point solvent followed by hot soapy water 6 Rinse and dry thoroughly 7 Inspect element for tears or damage 8 Apply foam filter oil or clean engine oil and squeeze until excess oil is removed 9 Inspect main element and replace if necessary If the filter has been soaked with fuel or oil it mu...

Page 52: ...le ATV engines are equipped with a breather filter The in line filter is similar in appearance to a fuel filter and is visible on the left side Location A 1 In line breather filters should be installed with the arrow pointing toward the engine away from the air box NOTE In line breather filter service life is extended when the foam air box pre filter is in place and maintained prop erly Never oper...

Page 53: ...oil housing especially when trav elling in wet areas If it is not sealed properly water may enter the recoil housing and damage compo nents S Water will enter the recoil housing if the starter handle is disengaged from the rope guide when under water S After travelling in wet areas the recoil housing and starter should always be drained completely by re moving the recoil S Do not open the crankcas...

Page 54: ... until warm Stop engine 3 Clean area around drain plug B at bottom of oil tank 4 Place a drain pan beneath oil tank and remove drain plug CAUTION Oil may be hot Do not allow hot oil to come into contact with skin as serious burns may result 5 Allow oil to drain completely 6 Replace sealing washer A on drain plug NOTE The sealing surfaces on drain plug and oil tank should be clean and free of burrs...

Page 55: ...ng procedure below Stop the engine and inspect for leaks 24 Re check the oil level on the dipstick and add oil as necessary to bring the level to the upper mark on the dipstick 25 Dispose of used filter and oil properly OIL PUMP PRIMING PROCEDURE NOTE This priming procedure must be per formed whenever the oil hose connection be tween the oil tank and pump inlet has been dis connected 1 Clamp or pi...

Page 56: ... from the cylinder head 5 Remove timing inspection plug from recoil housing CAUTION Failure to position the crankshaft at TDC on compression stroke will result in improper valve adjust ment 6 Rotate engine slowly with recoil rope watching the intake valve s open and close NOTE At this point watch the camshaft sprocket locating pin and slowly rotate engine until locating pin is facing up ward direc...

Page 57: ...or the other intake valve EXHAUST VALVE CLEARANCE ADJUSTMENT NOTE The exhaust valves share a common rocker arm and must be adjusted using two feeler gauges 1 Insert 006 feeler gauge s between end of exhaust valve stem and adjuster screw s 2 Loosen locknut s and turn adjuster screw s until there is a slight drag on feeler gauge s NOTE Both feeler gauges should remain inserted during adjustment of e...

Page 58: ...enuine Polaris replacement parts One of two methods can be used to measure toe alignment The string method and the chalk method If adjust ment is required refer to following pages for procedure TIE ROD END STEERING INSPECTION S To check for play in the tie rod end grasp the steering tie rod pull in all directions feeling for movement S Repeat inspection for inner tie rod end on steering post S Rep...

Page 59: ...ear of rim NOTE String should just touch side surface of rear tire on each side of machine NOTE The steering post arm frog can be used as an indicator of whether the handle bars are straight The frog should always point straight back from the steering post Rear rim measure ment should be 1 16 to 1 8 2 to 3 cm more than front rim measure ment ...

Page 60: ... 1 4 3 to 6 cm toe out This means the measurement at the front of the tire A is 1 8 to 1 4 3 to 6 cm wider than the measurement at the rear B TOE ALIGNMENT ADJUSTMENT 7 If toe alignment is incorrect measure the distance between vehicle center and each wheel This will tell you which tie rod needs adjusting NOTE Be sure handlebars are straight ahead before determining which tie rod s need adjustment...

Page 61: ... 1 Place a drain pan beneath the hub 2 Remove 3 screws and hub cap Pry equally in notches provided until cap is removed 3 Allow fluid to drain completely 4 Inspect hub cap O rings for nicks cuts or abrasions Replace if necessary 5 Remove check fill plug 6 Reinstall the hub cap NOTE The check fill plug must be removed before reinstalling the hub cap 7 Turn wheel until front hub fill check plug is i...

Page 62: ...er drive the machine onto the incline so the front of the machine is one foot higher than the rear Set the parking brake and block the wheels Make sure the machine is in neu tral and repeat steps 2 and 3 WARNING SEE BELOW 6 Repeat steps 2 through 5 until no more particles are ex pelled when the engine is revved 7 Stop the engine and allow the arrestor to cool 8 Reinstall the clean out plugs WARNIN...

Page 63: ...luid PN 2870990 S Check brake system for fluid leaks S Check brake for excessive travel or spongy feel S Check friction pads for wear damage and looseness S Check surface condition of the disc S Inspect thickness of brake pad friction material BRAKE PAD INSPECTION S Pads should be changed when friction material is worn to 3 64 1 cm or about the thickness of a dime HOSE FITTING INSPECTION Check bra...

Page 64: ...nd replace any worn parts Bleeding If free play is correct and brake pedal travel is still exces sive air may be trapped somewhere in the system Bleed the hydraulic auxiliary brake system in a conventional manner following the procedure outlined in the Brake chapter AUXILIARY BRAKE TESTING The auxiliary brake should be checked for proper adjust ment 1 Support the rear wheels off the ground 2 While...

Page 65: ...on Damping should be smooth throughout the range of travel Check all front suspension components for wear or dam age Inspect front strut cartridges for leakage REAR SUSPENSION Compress and release rear suspension Damping should be smooth throughout the range of travel Check all rear suspension components for wear or dam age Inspect shock for leakage Rear Spring Adjustment Cam Shock Spanner Wrench ...

Page 66: ...ng and adjustment Brake control and switch must be positioned to allow brake lever to travel throughout entire range without contacting switch body Align throttle control assembly clamp with knurl on handle bar Spacer Tab Throttle assembly clamp Align clamp edge with knurl ...

Page 67: ...cing a suitable stand under the footrest frame 4 Remove the wheel nuts and remove the wheel WHEEL INSTALLATION 1 With the transmission in gear and the parking brake locked place the wheel in the correct position on the wheel hub Be sure the valve stem is toward the outside and rotation arrows on the tire point toward forward rotation 2 Attach the wheel nuts and finger tighten them 3 Lower the vehi...

Page 68: ...y affect ATV handling Tire Tread Depth Alwaysreplacetireswhentreaddepthiswornto1 8 3 mm or less WARNING Operating an ATV with worn tires will increase the possibility of the vehicle skidding easily with possible loss of control Worn tires can cause an accident Always replace tires when the tread depth measures 1 8 3 cm or less FRAME NUTS BOLTS FASTENERS Periodically inspect the tightness of all fa...

Page 69: ...15 EH42PL EH50PL Engine Exploded View 3 16 EH42Pl EH50PL Engine Top End Disassembly 3 17 3 30 EH42PL EH50PL Valve Seat Service 3 31 3 35 EH42PL EH50PL Cylinder Head Assembly 3 35 3 36 EH42PL EH50PL Engine Bottom End Disassembly 3 37 3 54 EH42PL EH50PL Crankcase Bearing Assembly 3 55 EH42PL EH50PL Crankshaft End Play Inspection 3 56 3 57 EH42PL EH50PL Counter Balancer End Play Insp 3 58 EH42PL EH50...

Page 70: ...rocedure Refer to Engine Assembly for torque procedure Drive Clutch Bolt 7 16 20 40 55 Nm 40 55 Nm Flywheel 16mm 58 72 78 98 Nm 58 72 78 98 Nm Oil Delivery Pipe 12mm 11 15 15 21 Nm 11 15 15 21 Nm Oil Drain Bolt Crankcase 14mm 14 17 19 23 Nm 14 17 19 23 Nm Oil Filter Pipe Fitting 20mm 36 43 49 59 Nm 36 43 49 59 Nm Oil Hose Fitting 1 8 Pipe Thread 6 5 11 9 15 Nm 6 5 11 9 15 Nm Oil Pump 6mm 5 6 5 7 9...

Page 71: ...STENER TORQUE PATTERNS Tighten cylinder head cylinder base and crankcase fasteners in 3 steps following the sequence outlined below 6mm 1 2 3 4 6 5 Cylinder Head Cylinder Base 425 500 Crankcase 425 500 1 2 3 4 9 7 6 8 5 10 ...

Page 72: ...n as to diameter length and design Four stroke engine rings are rectangular profile See text for oil control ring upper rail installation Use the information below to identify pistons and rings Engine Model No Oversize Available mm Piston Length Standard Piston Identification EH42PLE05 25 50 66mm B EH50PLE09 13 25 50 72mm C Pistons and rings marked 25 equal 25mm 010I oversized Pistons and rings ma...

Page 73: ...ft Oil clearance Std 0022 0035 055 090 mm 0022 0035 055 090 mm Limit 0039 10 mm 0039 10 mm Cylinder Head Surface warpage limit 0020 05 mm 0020 05 mm y Standard height 3 870 98 3 mm 3 870 98 3 mm Valve Seat Contacting width In Std 028 7 mm 028 7 mm g Limit 055 1 4 mm 055 1 4 mm Ex Std 039 1 0 mm 039 1 0 mm Limit 071 1 8 mm 071 1 8 mm Valve Guide Inner diameter 2362 2367 6 0 6 012 mm 2362 2367 6 0 6...

Page 74: ... by hand fit at 68 F 20 C Piston Ring Piston ring installed gap Top ring Std 0079 0138 20 36 mm 0079 0138 20 36 mm g g g p p g Limit 039 1 0 mm 039 1 0 mm Second i Std 0079 0138 20 36 mm 0079 0138 20 36 mm ring Limit 039 1 0 mm 039 1 0 mm Oil ring Std 0079 0276 20 70 mm 0079 0276 20 70 mm g Limit 059 1 5 mm 059 1 5 mm Piston Ring Standard clearance i i i Top ring Std 0016 0031 040 080 mm 0016 0031...

Page 75: ...r 2 Remove recovery bottle hose from coolant filler 3 Connect a Mity Vac PN 2870975 to radiator and pressurize system to 10 PSI The system must retain 10 lbs of pressure for five minutes or longer If pressure loss is evident within five minutes check radiator all cooling system hoses and clamps or water pump seal Radiator Cap Pressure Test 1 Remove radiator cap and test using a cap tester commerci...

Page 76: ...dup of deposits which may restrict coolant flow and reduce heat dissipation resulting in possible engine damage Polaris Premium 60 40 Antifreeze Coolant is recommended for use in all cooling systems and comes pre mixed and ready to use COOLING SYSTEM SPECIFICATIONS Fan Switch Off Fan Switch On 149 F 65 C 8 180 F 82 C 3 Hot Light On 221 F 105 C System Capacity 2 25 Quarts Radiator Cap Relief Pressu...

Page 77: ...ker Arms S Cam Chain and Sprockets S Water Pump Water Pump Mechanical Seal The following components require engine removal for service S Oil pump Oil Pump Drive Gear S Counterbalance Shaft or Bearing s S Connecting Rod S Crankshaft S Crankshaft Main Bearings S Crankcase It may be necessary to loosen engine mounts and move engine slightly to access water pump Special tool PN 2872105 is required to ...

Page 78: ...Remove air pre cleaner and duct 9 Remove airbox 10 Remove carburetor Insert a shop towel into the carburetor flange to prevent dirt from entering the intake port 11 Refer to PVT System to remove outer clutch cover drive belt drive clutch driven clutch and inner cover 12 Starter motor Note ground cable location Mark positive cable mounting angle and remove cable 13 Remove transmission linkage rods ...

Page 79: ... gaskets Seal connections with high temp silicone sealant 2 Check to be sure all springs are in good condition Bleed Cooling System 1 Remove radiator cap and slowly add coolant to top of filler neck 2 Fill coolant reservoir tank to full mark 3 Install radiator cap and squeeze coolant lines to force air out of system 4 Again remove radiator cap and slowly add coolant to top of fill neck 5 Start eng...

Page 80: ...attern to ensure piston ring seating and to aid in the retention of the fuel oil mixture during initial break in Hone cylinder according to hone manufacturer s instructions or these guidelines S Use a motor speed of approximately 300 500 RPM run the hone in and out of the cylinder rapidly until cutting tension decreases Remember to keep the hone drive shaft centered or cylinder centered on arbor a...

Page 81: ...correct a situation like the one shown in the illustration at right squeeze the crankshaft at point A Use tool from alignment kit 3 If the crank rod pin location is 180_ from the dial indicator opposite that shown above it will be necessary to spread the crankshaft at position A as shown in the illustration at right When rebuilding and straightening a crankshaft runout must be as close to zero as ...

Page 82: ...e cylinder head and attach the gauge 3 Start engine and allow it to reach operating temperature monitoring gauge indicator NOTE Use Polaris Premium 4 Synthetic Engine Lubricant OIL PUMP PRIMING PROCEDURE NOTE This priming procedure must be performed whenever the oil hose connection between the oil tank and pump inlet has been disconnected 1 Clamp or pinch off vent line approximately 2I from oil ta...

Page 83: ...e it passes through the slotted friction bearing located in the stator plate into the crankshaft An oil seal on the stator plate prevents oil from entering the stator flywheel area Oil travels through the crankshaft to the crank pin lubricating the connecting rod large end bearing directly Oil also passes through an oil jet drilled orifice in the end of the crank pin to the PTO end main bearings a...

Page 84: ... Small End Bearing Cylinder Sleeve Main Bearing PTO Large End Bearing Crank Pin Crankshaft Screen Fitting Bottom of Tank EH42PL EH50PL Oil Flow Chart Top of Oil Tank Union Fitting Lower Oil Jet Union Fitting Upper Through Cylinder Stud Front Left Indirect Lubrication Prevents oil from draining into crankcase with engine off Bottom fitting is oil exhaust or return to tank Top fitting is oil feed or...

Page 85: ...ENGINE 3 16 EH42PL EH50PL ENGINE EXPLODED VIEW Crankcase Cylinder Cylinder Head Crankshaft and Piston Valve Train A ...

Page 86: ...sprocket marks and the mark in the timing inspection hole 4 Align single TDC mark on flywheel with projection in inspection hole and the cam sprocket pin facing upward aligned with the camshaft to crankshaft center line NOTE The cam lobe should be pointing down and valves should have clearance at this point 5 Remove cam chain tensioner plug sealing washer and spring CAUTION The plug is under sprin...

Page 87: ...l and hold it The plunger should move smoothly in and out of the tensioner body 3 Release ratchet pawl and push inward on plunger It should remain locked in position and not move inward 4 Measure free length of tensioner spring Replace spring if excessively worn Compare to specifications 5 Replace entire tensioner assembly if any part is worn or damaged B A Tensioner Spring Free Length 2 320I 5 9 ...

Page 88: ... Inspect each rocker arm cam follower surface If there is any damage or uneven wear replace the rocker arm NOTE Always inspect camshaft lobe if rocker arms are worn or damaged 3 Measure O D of rocker shaft Inspect it for wear or damage Compare to specifications Rocker Shaft O D 8656 8661I 21 987 22 0 mm ...

Page 89: ... shaft O D from rocker arm shaft support I D This is the oil clearance Compare to specifications 7 Inspect rocker adjuster screws for wear pitting or damage to threads of the adjuster or locknut Replace all worn or damaged parts NOTE The end of the adjuster screw is hardened and cannot be ground or re faced Rocker Arm Support I D 8669 8678I 22 020 22 041 mm Rocker Shaft Oil Clearance Std 0008 0021...

Page 90: ...VAL 1 Remove thermostat housing 2 Remove camshaft sprocket inspection cover 3 Loosen three camshaft sprocket bolts 4 Remove camshaft end cap and O Ring 5 Inspect camshaft end cap thrust face for wear Replace if worn or damaged ...

Page 91: ...w removal of cam sprocket and remove sprocket from camshaft and chain 8 Secure cam chain with a wire to prevent it from falling into the crankcase 9 Inspect cam sprocket teeth for wear or damage Replace if necessary 10 Slide camshaft out the PTO side of the cylinder head Inspect for Areas of Tooth Wear or Damage Decompressor Ball Retainer Sleeve Decompressor Shaft ...

Page 92: ...lide spring onto shaft 2 Apply engine oil to release lever shaft The actuator ball must be held outward to allow instal lation of the release lever shaft If Camshaft Is Removed From Engine 3 Turn the camshaft until the actuator ball is in the lowest position and install the release lever shaft If Camshaft Is Installed In The Engine 4 Use a small magnet to draw the actuator ball outward or rotate t...

Page 93: ...ce by subtracting journal OD from journal bore ID Compare to specifications Replace camshaft if damaged or if any part is worn past the service limit Replace cylinder head if camshaft journal bore is damaged or worn excessively Lubrication holes Lobe height Cam Lobe Height Intake Exhaust Std 1 2884 1 2924I 32 726 32 826 mm Limit 1 2766I 32 426 mm Journal O D Journal Camshaft Journal O D Mag PTO En...

Page 94: ...ENGINE 3 25 CYLINDER HEAD EXPLODED VIEW 1 Remove the two 6mm flange bolts A from cylinder head A ...

Page 95: ...e thread 4 Remove cylinder head and head gasket CYLINDER HEAD INSPECTION 1 Thoroughly clean cylinder head surface to remove all traces of gasket material and carbon CAUTION Use care not to damage sealing surface CYLINDER HEAD WARPAGE 1 Lay a straight edge across the surface of the cylinder head at several different points and measure warpage by inserting a feeler gauge between the straight edge an...

Page 96: ...1 Using a valve spring compressor compress the valve spring and remove the split keeper NOTE To prevent loss of tension do not compress the valve spring more than necessary 2 Remove spring retainer and spring NOTE The valve springs should be positioned with the tightly wound coils against the cylinder head on progres sively wound springs A 3 Push valve out keeping it in order for reassembly in the...

Page 97: ...pring if either measurement is out of specification 5 Remove valve seals CAUTION Replace seals whenever the cylinder head is disassembled Hardened cracked or worn valve seals will cause excessive oil consumption and carbon buildup Valve Spring Free Length Coil Fatigue Squareness Valve Spring Length Std 1 654I 42 0 mm Limit 1 575I 40 0 mm Squareness 075I 1 9 mm ...

Page 98: ...tting wear or damage A 4 Inspect split keeper groove for wear or flaring of the keeper seat area B NOTE The valves cannot be re faced or end ground They must be replaced if worn bent or damaged 5 Measure diameter of valve stem with a micrometer in three places and in two different directions six measurements total Compare to specifications A B Measure valve stem in several places Valve Stem Diamet...

Page 99: ...stem to guide clearance NOTE Be sure to measure each guide and valve combination individually 8 Replace valve and or guide if clearance is excessive Compare to specifications NOTE If valve guides are replaced valve seats must be reconditioned Refer to Valve Seat Reconditioning for pro cedure COMBUSTION CHAMBER Clean all accumulated carbon deposits from combustion chamber and valve seat area with a...

Page 100: ...otection when performing cylinder head service Valve guide replacement will require heating of the cylinder head Wear gloves to prevent burns Valve Guide Removal Installation 1 Remove all carbon deposits from the combustion chamber valve seat and valve guide area before attempting to remove valve guides CAUTION Carbon deposits are extremely abrasive and may damage the valve guide bore when guides ...

Page 101: ...e removed 2 Using valve guide driver drive guides out of the cylinder head from the combustion chamber side Be careful not to damage guide bore or valve seat when removing guides 3 Place cylinder head on cylinder head table NOTE Be sure cylinder head is still at 212 F 100 C before installing new guides 4 Place a new guide in the valve guide installation tool and press guide in to proper depth Chec...

Page 102: ... of the cutter is in the same place the valve guide is distorted from im proper installation and must be replaced Be sure the cylinder head is at the proper temper ature and replace the guide S If the contact area of the initial cut is greater than 75 continue to cut the seat until all pits are removed and a new seat surface is evi dent NOTE Remove only the amount of material necessary to repair t...

Page 103: ...arrow the seat S If the seat is too narrow widen using the 45 cutter and re check contact point on the valve face and seat width after each cut NOTE When using an interference angle the seat contact point on the valve will be very narrow and is a normal condition Look for an even and continuous contact point on the black marker all the way around the valve face 8 Clean all filings from the area wi...

Page 104: ...and camshaft oil supply passage A thoroughly 13 If oil passage blind plug was removed apply 3 Bond 1215 or equivalent sealer to the threads and install torquing to 8 ft lbs 1 1 kg m CAUTION Do not allow sealant to enter oil passage 14 Spray electrical contact cleaner into oil passage and dry using compressed air CYLINDER HEAD ASSEMBLY CAUTION Wear eye protection during assembly NOTE Assemble the v...

Page 105: ...keepers with the gap even on both sides 7 Repeat procedure for remaining valve 8 When all valves are installed tap lightly with soft faced hammer on the end of the valves to seat the split keepers VALVE SEALING TEST 1 Clean and dry the combustion chamber area 2 Pour a small amount of clean high flash point solvent into the intake port and check for leakage around each intake valve The valve seats ...

Page 106: ...rocedures to remove valve cover camshaft and rocker arms and cylinder head 1 Remove cam chain guide at front of cylinder 2 Loosen all four oil pipe banjo bolts and then remove the bolts and eight sealing washers Remove the pipes 3 Loosen hose clamps and remove coolant inlet hose ...

Page 107: ... in a criss cross pattern until loose and remove bolts The bolts are inside the water jacket 6 Tap cylinder lightly with a plastic hammer in the reinforced areas only until loose 7 Rock cylinder forward and backward and lift it from the crankcase supporting piston and connecting rod Support piston with piston support block PN 2870390 8 Remove dowel pins from crankcase ...

Page 108: ...ng and lift it off the piston CAUTION Do not expand the ring more than the amount necessary to remove it from the piston or the ring may break By hand Placing both thumbs as shown spread the ring open and push up on the opposite side Do not scratch the ring lands 4 Repeat procedure for second ring The oil control ring is a three piece design consisting of a top and bottom steel rail and a center e...

Page 109: ...uge 3 Inspect cylinder for wear scratches or damage 4 Inspect cylinder for taper and out of round with a telescoping gauge or a dial bore gauge Measure in two different directions front to back and side to side on three different levels 1 2 down from top in the middle and 1 2 up from bottom Cylinder Warpage 002 05 mm 1 2 Down From Top of Cylinder 1 2 Up From Bottom X X Y Y X Y ...

Page 110: ... a point 5 mm up from the bottom of the piston at a right angle to the direction of the piston pin 2 Subtract this measurement from the maximum cylinder measurement obtained in step 5 above Cylinder Taper Limit 002 Max Cylinder Out of Round Limit 002 Max Standard Bore Size 3 6216 3 6224I 91 99 92 01 mm 5 mm Piston Piston Pin Piston to Cylinder Clearance Std 0006 0018I 015 045 mm Piston O D Std 3 6...

Page 111: ...ton pin O D Replace piston and or piston pin if out of tolerance 3 Measure connecting rod small end ID Piston Pin Bore 9055 9057I 23 0 23 006 mm Piston Pin Measurement Locations Piston Pin O D 9053 9055I 22 994 23 0 mm Connecting Rod Small End I D 9058 9063I 23 007 23 020 mm ...

Page 112: ...ent exceeds the service limit replace the rings If ring gap is below specified limit file ring ends until gap is within specified range NOTE Always check piston ring installedgap afterre boring a cylinder or when installing new rings A re bored cylinder should always be scrubbed thoroughly with hot soapy water rinsed and dried completely Wipe cylinder bore with an oil rag immediately to re move re...

Page 113: ... and replace if necessary 4 Measure the OD of the starter drive shaft on both ends and record 5 Measure the ID of the bushing in the recoil housing A and in the crankcase and record Measure in two directions 90 apart to determine if bushing is out of round Calculate bushing clearance Replace bushing if clearance exceeds the service limit 6 Inspect gear teeth on starter drive Replace starter drive ...

Page 114: ... coils may be damaged 3 Mark or note position of stator plate on crankcase 4 Remove bolts and carefully remove stator assembly being careful not to damage crankshaft bushing on stator plate 5 Replace crankshaft seal 6 Remove oil passage O Ring 7 Remove large sealing O Ring from outer edge of stator plate NOTE If bushing is to be replaced oil hole in bushing must align with hole in stator plate A O...

Page 115: ... blade and inspect for cracks wear or damage 3 Remove cam chain Inspect chain for worn or missing rollers or damage Stretch chain tight on a flat surface and apply a 10 lb 4 53 kg load Measure length of a 20 pitch section of chain Replace if worn past service limit A Chain Service Limit 5 407 13 7 cm ...

Page 116: ...d parts ONE WAY VALVE The one way valve prevents oil from draining out of the oil tank and into the crankcase when the engine is off It must be clean and have adequate spring pressure in order to seal properly 1 Remove cap bolt sealing washer spring and one way valve from PTO side crankcase 2 Inspect free length of spring and check coils for distortion 3 Inspect valve for wear 4 Check seat area fo...

Page 117: ... in the crankcase if necessary to ensure the balancer shaft stays in the PTO side crankcase Watch the gap along the crankcase mating surface and separate the crankcase evenly It may also be necessary to tap the oil pump shaft lightly to separate the crankcase CAUTION Do not strike the oil pump shaft at an angle or the shaft may bend causing irreparable damage Tap only lightly on the pump shaft if ...

Page 118: ...move 2 bolts holding pump drive gear C NOTE On 500 H O models this gear is retained by 3 bolts 3 Inspect drive gear teeth for cracks damage or excessive wear 4 Remove three oil pump retaining bolts and pump 5 Inspect mating surface of crankcase and oil pump Check for nicks burrs or surface irregularities A B C ...

Page 119: ...the three screws and strainer screen from pump 7 Clean screen thoroughly 8 Remove pump body screw and feed chamber cover 9 Measure pump end clearance using a feeler gauge and straight edge Pump End Clearance Std 001 003 0254 0762 mm Wear Limit 004 1016 mm ...

Page 120: ... use gasket sealer on the pump body mating surfaces or oil passages will become plugged 2 Install pump shaft and scavenge rotor drive pin 3 Install outer scavenge rotor inner scavenge rotor and scavenge casing 4 Install outer feed rotor and inner feed rotor drive pin 5 Install inner feed rotor and feed chamber cover with screw 6 Tighten screw securely 7 Install screen on pump body 8 Install oil pu...

Page 121: ...ear and pump shaft drive gear 5 Replace the shaft if gear teeth are abnormally worn or damaged 6 Inspect the balancer shaft bearings NOTE Due to extremely close tolerances and minimal wear the balancer shaft ball bearings must be inspected visually and by feel Look for signs of discoloration scor ing or galling Turn the inner race of each bearing The bearings should turn smoothly and quietly The o...

Page 122: ...asure the connecting rod big end side clearance 4 Place the crankshaft in a truing stand or V blocks and measure the runout on both ends with a dial indicator 5 Measure the connecting rod big end radial clearance 6 Inspect the crankshaft main bearing journals for scoring and abnormal wear Connecting Rod Big End Side Clearance Std 0039 0256I 1 65 mm Limit 0315I 80 mm Max Runout 0024 06 mm Big End R...

Page 123: ... remove balancer shaft bearings and pump shaft bearing use a blind hole bearing puller NOTE Bearings are stressed during the removal pro cess and should not be re used PUMP SHAFT OIL SEAL WATER PUMP MECHANICAL SEAL REMOVAL ENGINE DISASSEMBLED NOTE The water pump mechanical seal can be re moved without removing the engine Refer to Water Pump Mechanical Seal Installation Replace the pump shaft seal ...

Page 124: ...d BEARING INSTALLATION NOTE To ease bearing installation warm the crank case until hot to the touch Place the bearings in a freez er 1 Install the bearings so the numbers are visible 2 Drive or press new bearings into the crankcases using the proper driver CAUTION Press only on outer race of bearing to prevent bearing damage S 70mm 2 755 driver For crankshaft main bearings S 46mm 1 810 For counter...

Page 125: ...idle and slow speeds Too little play will side load the bearings which may lead to premature bearing failure CRANKSHAFT END PLAY ADJUSTMENT 1 Make sure all bearings are firmly seated in the both Mag and PTO crankcase 2 Measure the distance from the PTO crankcase mating surface to the main bearing using a dial caliper and a straight edge 3 Subtract the thickness of the straightedge from the measure...

Page 126: ...ep 3 and Step 5 and record below Total Case Width 7 Measure the width of the crankshaft at the bearing seats with a micrometer or dial caliper and record Crankshaft Width 8 Subtract the Crankshaft Width measured in Step 7 from the Total Case Width recorded in Step 6 and record below Total End Play 9 Subtract the thickness of the existing shim from the result of step 8 to determine if a different s...

Page 127: ...e Subtract the thickness of the straightedge and record 4 Measure the distance from the PTO crankcase mating surface to the bearing using the same method outlined in Step 1 2 and 3 5 Add the readings obtained in Step 3 and Step 4 6 Subtract the counter balancer shaft width measured in step 2 from the figure obtained in step 5 7 Subtract the thickness of the existing shim from the result of step 6 ...

Page 128: ...th of the pump and gear Subtract this measurement from the measurement recorded in Step 2 4 Subtract the thickness of the existing shim from the result of Step 3 to determine if a different shim is needed PUMP SHAFT OIL SEAL INSTALLATION 1 Install the seal from the outside of the crankcase water pump side with the spring facing inward toward the pump shaft bearing 2 Drive or press the seal into pl...

Page 129: ...e and install the oil pump NOTE Do not use gasket sealer on the pump mating surfaces NOTE After engine is assembled and machine is readied for field operation oil pump MUST be primed Follow oil pump priming procedure on page 3 13 6 Align the drive gear with the drive pin on the pump shaft and install the gear Be sure the gear is fully seated and properly engaged 7 Install the proper shim washer on...

Page 130: ...ut removing the engine and splitting the cases CAUTION Improper or careless use of this tool or procedure can result in a bent water pump shaft Pump shaft replacement requires engine removal and crankcase separation Use caution while performing this proce dure Make sure that the puller is parallel to the shaft at all times Do not place side loads on the water pump shaft or strike the puller or sha...

Page 131: ...the puller legs is fully sup ported by the main body of the tool Ill 4 5 Tighten the hex socket screws on the puller legs suffi ciently so the lip of the puller legs will grasp the me chanical seal Ill 5 6 Turn the puller T Handle clockwise until it contacts the water pump shaft Continue rotating until the remaining portion of mechanical seal has been removed from the cases Ill 6 Pump shaft oil se...

Page 132: ...nstall the Woodruff key drive sprocket and slotted nut Tighten the nut tothe specifiedtorque TENSIONER BLADE INSTALLATION 1 Install the tensioner blade and tighten the mounting bolt to specified torque One Way Valve Plug Torque 16 ft lbs 2 2 kg m A B Tighten Slotted Nut Torque 35 51 ft lbs 4 71 6 86 kg m Tensioner Blade Mounting Bolt Torque 6 ft lbs 828 kg m ...

Page 133: ... squarely together and must not overlap 2 Install the oil ring top rail NOTE The top rail has a locating tab to prevent rota tion The tab must be positioned in the notch on the side of the piston as shown A 3 Install the bottom rail with the gap at least 30 from the end of the expander on the side opposite the top rail gap See Ill 4 Install the second ring with the R mark facing up Position the en...

Page 134: ...of radial tension Severe engine damage may result if circlips are re used or deformed during installation 4 Apply clean engine oil to the piston rings ring lands piston pin bore piston pin and piston skirt Lubricate the connecting rod both ends balancer drive gear and crankshaft main bearing area 5 Install the piston on the connecting rod with the arrow or mark facing the magneto RH end of the cra...

Page 135: ...d install the compressor following manufacturers instructions CAUTION Make sure the oil control ring upper rail tab is positioned properly in the notch of the piston Verify all ring end gaps are correctly located 4 Apply clean engine oil liberally to the cylinder bore and tapered area of the sleeve Install the cylinder with a slight rocking motion until the rings are captive in the sleeve 5 Remove...

Page 136: ...o disassembly photos 1 Install the cam chain tensioner guide Be sure bottom end of guide is located properly in crankcase 2 Install the two dowel pins and a new cylinder head gasket 3 Place the cylinder head on the cylinder Apply a film of engine oil to the cylinder head bolt threads and washers and hand tighten the bolts The following procedure must be used to torque the cylinder head properly Cy...

Page 137: ... the camshaft main journals and cam lobes Lubricate automatic compression release mechanism with clean engine oil To install the compression release mechanism refer to page 3 23 2 Install the camshaft with the lobes facing downward and the sprocket alignment pin facing upward 3 Disconnect the wire from the cam chain and rotate the engine to align the single TDC timing mark Top Dead Center on the f...

Page 138: ...procket on the camshaft Apply Loctite 242 to the cam sprocket bolts and torque to specifications 7 Verify TDC mark in timing inspection hole and alignment pin is directly in line with crankshaft to camshaft centerline Refer to Ill on following page 8 Apply 3 Bond 1215 P N 2871557 to the camshaft end cap and install using a newO Ring 9 Check all cam timing marks to verify proper cam timing and inst...

Page 139: ...ENGINE 3 70 CAMSHAFT TIMING Single TDC Mark Aligned Crankshaft to Camshaft Centerline Sprocket Alignment Pin Do Not Use Advance Marks Rotation TDC Mark Dots ...

Page 140: ... engine in the frame Stator 1 Apply a light film of grease to the crankshaft seal Apply molybdenum disulfide grease or assembly lubricant to the crankshaft bushing 2 Install a new O Ring in the oil passage recess in the crankcase 3 Apply 3 Bond 1215 P N 2871557 or an equivalent sealer to the stator plate outer surface and install a new O Ring 4 Install the stator plate being careful not to damage ...

Page 141: ...l to specification Starter Drive 1 Be sure the washer is positioned on the back of the drive gear 2 Apply starter drive grease to the drive bushing in the crankcase and all moving surfaces of the starter drive mechanism Install the starter drive 3 Install recoil housing gasket and recoil housing Stator Plate Bolt Torque 5 1 6 5 ft lbs 68 88 kg m Flywheel Nut Torque 58 72 ft lbs 7 85 9 81 kg m Star...

Page 142: ... to the valve adjustment procedure found in Chapter 2 Maintenance 8 Apply clean engine oil liberally to the valve springs cam chain rocker arms and camshaft 9 Place a new rocker cover gasket on the cylinder head and install the cover and bolts THERMOSTAT INSTALLATION Install the thermostat with one of the air bleed holes positioned next to the upper thermostat cover bolt hole as shown OIL PIPES In...

Page 143: ...for cracks or damage which may allow water or dirt to enter the recoil housing through the rope NOTE The handle must seal tightly on the recoil housing to prevent water from entering 3 Remove center bolt from recoil friction plate A 4 Inspect plate for wear or damage Inspect plate friction spring for wear damage and proper tension The spring should fit tightly on friction plate 5 Remove ratchet pa...

Page 144: ...pring tension is released 8 Slowly and carefully remove reel from recoil housing making sure the spring remains in the housing Inspect the reel hub and bushing A for wear 9 Unwind rope and inspect for cuts or abrasions 10 Inspect drive tab on hub return spring for damage To remove hub return spring hold outer coils in place with one hand and slowly remove spring one coil at a time from the inside ...

Page 145: ... notch on outer edge of reel 4 Apply a small amount of grease or equivalent to the center post of the housing and the bushing 5 Install reel into housing making sure the spring drive tab on the reel engages the spring and the reel is fully seated in the housing 6 Apply downward pressure on the reel and rotate counterclockwise approximately 6 7 turns to pre wind the spring Continue rotating counter...

Page 146: ...et locating pins S Loose jets in carburetor or calibration incorrect for altitude temperature S Incorrect float level setting S PVT system calibrated incorrectly or components worn or mis adjusted S Fuel quality poor old or octane too high S Low compression S Restricted exhaust S Weak ignition loose coil ground faulty coil stator or ETC switch S ETC switch mis adjusted S Restricted air filter main...

Page 147: ...eather restricted Engine Idles But Will Not Rev Up S Spark plug fouled weak spark S Broken throttle cable S Obstruction in air intake S Air box removed reinstall all intake components S Incorrect or restricted carburetor jetting S ETC switch limiting speed S Reverse speed limiter limiting speed S Carburetor vacuum slide sticking diaphragm damaged S Incorrect ignition timing S Restricted exhaust sy...

Page 148: ...en or sticking S Bent valve or stuck valve S Valve spring broken or weak S Valve not seating properly bent or carbon accumulated on sealing surface S Rocker arm sticking Backfiring S ETC or speed limiter system malfunction S Fouled spark plug or incorrect plug or plug gap S Carburetion faulty lean condition S Exhaust system air leaks S Ignition system faulty Spark plug cap cracked broken Ignition ...

Page 149: ...l pump or fuel valve S Fuel pump output weak S Restricted radiator internally or cooling fins S Water pump failure S Cooling system restriction S Cooling fan inoperative or turning too slowly perform current draw test S Ignition timing misadjusted S Low oil level S Spark plug incorrect heat range S Faulty hot light circuit S Thermostat stuck closed or not opening completely Temperature Too Low S T...

Page 150: ...Carburetor Vent System 4 Cycle 4 5 CV Carburetor Operation 4 6 4 8 Exploded View Mikuni BST 34 Carburetor 4 9 Exploded View Mikuni BST 40 Carburetor 4 10 Disassembly Notes CV Carburetor 4 11 4 12 Cleaning CV Carburetor 4 12 Inspection CV Carburetor 4 13 Assembly CV Carburetor 4 14 Adjustment CV Carburetor 4 15 4 16 Fuel Pump Disassembly Inspection Assembly 4 17 Fuel Pump Exploded View 4 18 Trouble...

Page 151: ...ET SELECTION IMPORTANT The following guidelines must be followed when establishing a main jet setting 1 Select the lowest anticipated temperature at which the machine will be operated 2 Determine the lowest approximate altitude at which the machine will be operated 3 Select the correct main jet from the chart 4 Clutching changes may also be required for changes in elevation Refer to clutching char...

Page 152: ...Forward FUEL SYSTEM CARBURETION 4 2 FUEL TANK ASSEMBLY ...

Page 153: ...FUEL SYSTEM CARBURETION 4 3 FUEL FLOW DIAGRAM Fuel Tank Fuel Valve Engine Filter Fuel Pump Carburetor Fuel Tank Vent Carburetor Vent Fitting Screens L L Located Above Oil Tank ...

Page 154: ...0 3130557 122 5 3130558 125 3130559 127 5 3130560 130 3130561 132 5 3130562 135 3130563 137 5 3130564 140 3130527 142 5 3130566 145 3130567 147 5 3130568 150 3130569 152 5 3130570 155 3130571 157 5 3130572 160 3131141 162 5 3131142 165 3131143 167 5 3131144 170 3131145 Mikuni BST Carburetor Jet Number Part Number 40 0 3130624 42 5 3130526 Pilot Jet Part Numbers ...

Page 155: ... throttle ranges Greatest effect at low throttle settings and idle Pilot Idle System Pilot Jet Passageways Pilot Mixture Screw with Spring Washer and Sealing O Ring Bypass Ports Behind Throttle Plate Pilot Air Jet Pilot Outlet Throttle Plate Primarily supplies fuel at idle and low throttle settings Mainly idle to 1 4 throttle Minimal effect after 1 2 throttle Main System Main Jet Main Air Jet Main...

Page 156: ...movement and assists the return of the slide When the throttle plate is opened and engine speed begins to increase the pressure in the venturi and therefore in the chamber above the diaphragm becomes significantly lower than atmospheric Atmospheric pressure in the chamber below the diaphragm forces the diaphragm upward raising the slide against spring pressure When the pressure above and below the...

Page 157: ...s charged into the main bore through pilot outlet 7 STARTER SYSTEM CHOKE OR ENRICHMENT When the choke cable 1 is activated the starter plunger 5 is lifted off the seat Fuel is drawn into the starter circuit from the float chamber 2 through the starter jet 3 Starter jet meters this fuel which then flows into starter pipe 4 and mixes with the air 7 coming from the float chamber The mixture rich in f...

Page 158: ...er the needle valve admits and shuts off fuel alternately to maintain a practically constant fuel level inside the float chamber MAIN SYSTEM As throttle valve 1 is opened engine speed rises and this increases negative pressure in the venturi Consequently the vacuum slide 2 moves upward The fuel in float chamber 3 is metered by main jet 4 and the metered fuel enters needle jet 5 in which it mixes w...

Page 159: ...g 19 E Ring 20 Cap 21 Screw 22 Drain Screw 23 O Ring 24 Washer 25 Adjuster 26 Spring 27 Pilot Jet 28 Main Jet 29 Washer 30 Jet Needle 31 Float Assembly 32 Float Body Assembly 33 Float Pin 34 Needle Valve 35 O Ring 36 O Ring 37 Filter 38 Screw 39 Screw 40 Screw 41 Guide Holder 42 Spring 43 Plunger Assembly 44 Spring Washer 45 Screw 46 Air Jet 47 Cable Guide 48 Spring 49 Ring 50 Adjust Screw 51 Scre...

Page 160: ...r 6 Jet Needle 7 Diaphragm Assembly 8 Throttle Valve 9 Cable Guide 10 Spring 11 Adjuster Cable 12 Drain Plug 13 O Ring 14 Jet Main 15 Spacer Ring 16 Drain Screw 17 O Ring 18 Float Assembly 19 Plug 20 Pilot Screw 21 Spring 22 Washer 23 O Ring 24 Pilot Jet 25 Valve Inlet Needle 26 Shaft Seal 27 O Ring 28 Air Jet 29 Choke Plunger Guide 30 Spring 31 Choke Plunger 32 Cap 33 O Ring 34 Jet Block Assembly...

Page 161: ...ver DO NOT use an impact driver to remove the screws or carburetor may be permanently damaged 2 Use a small spring loaded center punch to remove pressed float pin NOTE Set the center punch to the softest setting if adjust able to avoid damage to float pin tower 3 Remove inlet needle seat retaining screw along with plate and carefully remove needle seat NOTE Do not use a pliers to remove the seat o...

Page 162: ...r plastic components such as the vacuum slide diaphragm needle seat screen or O Rings in caustic cleaning solutions Irreparable damage may occur Do not use agitator type carburetor cleaning equipment Rubber parts must be cleaned with mild detergent and hot water only 2 If the carburetor is extremely dirty or contaminated with fuel residue and varnish soak for short periods only in carburetor clean...

Page 163: ... it contacts the needle jet is the most likely wear point If jet needle shows signs of wear replace both needle and needle jet to prevent a rich condition 2 Inspect the inlet needle tapered surface for any sign of wear or damage Be sure the spring loaded pin is free moving and returns freely when pushed The inlet needle and seat should be pressure tested after assembly Inspect this area Good Condi...

Page 164: ...ip Refer to parts manual for more information 3 Be sure the tab E on outer edge of diaphragm is positioned properly in the carburetor body 4 Install the pilot mixture screw spring washer and O ring as an assembly Lubricate the O Ring with oil or light grease before installation CAUTION Do not damage the O ring during installation Turn the screw in until it lightly contacts the seat Back out the sp...

Page 165: ...face to the top of step in float as shown Both sides of float should be parallel to each other The measurement should be made at the mid point on the top of the float using float adjustment tool PN 2872314 or a vernier caliper When measuring the height be sure the inlet needle valve spring is not compressed 3 If adjustment is necessary bend the tongue slightly Be sure float arms are even on left a...

Page 166: ...ht of the fuel in the float bowl without removing the carburetor The fuel level can be ob served with the engine either running or shut off however engine must run briefly to allow fuel level to stabilize 1 Attach a clear line to drain fitting Be sure line fits tightly on fitting Position hose along side of carburetor as shown 2 Open bowl drain screw by turning counterclockwise approximately two t...

Page 167: ...s from the pump diaphragm cover Note the location of the two longer screws 3 Remove the diaphragm cover gasket diaphragm and valve body gasket 4 Remove the outlet check valve cover diaphragm and gasket FUEL PUMP INSPECTION ASSEMBLY 1 Inspect inlet and outlet check valves for cracks warpage or damage Inspect the diaphragms for cracks holes or swelling 2 To clean the valves or pump body remove the s...

Page 168: ...N 4 18 FUEL PUMP EXPLODED VIEW 3 2 1 5 5 4 1 Fuel Pump Assembly 2 Diaphragm Gasket Set 3 Screw and Washer Assembly 4 Screw and Washer Assembly 5 Screw and Washer Assembly 6 Pressure Regulator 7 Fuel Inlet 8 Fuel Outlet 6 8 7 ...

Page 169: ...ck closed or sticky S Improper spring S Jet needle position incorrect S Incorrect pilot screw adjustment Rich Mixture Symptoms Fouls spark plugs black sooty exhaust smoke rough idle poor fuel economy engine runs rough misses poor performance bog engine loads up backfire S Air intake restricted inspect intake duct S Air filter dirty plugged S Choke plunger sticking incorrectly adjusted choke S Chok...

Page 170: ...rrect S Worn jet needle needle jet Erratic Idle S Choke cable bending or incorrectly adjusted S Throttle cable incorrectly adjusted S Air leaks dirty carburetor passages pilot circuit S Pilot mixture screw damaged or adjusted incorrectly S Tight valves S Ignition timing incorrect S Belt dragging S Dirty air cleaner S Engine worn S Spark plug fouled S Idle speed set incorrectly speed limiter S Worn...

Page 171: ...l Removal 5 3 Headlight Pod Exploded View 5 4 Side Panel Removal 5 5 Steering Assembly Exploded View 5 6 A Arm Replacement 5 7 Rear Suspension Assembly 5 8 Strut Assembly Exploded View 5 9 Front Strut Weldment Replacement 5 10 Front Strut Ball Joint Replacement 5 11 Steering Post Assembly 5 12 Decal Replacement 5 12 ...

Page 172: ...Bolt 30 ft lbs 41 Nm Strut Rod Retaining Nut Top 15 ft lbs 21 Nm Strut Casting Pinch Bolt 15 ft lbs 21 Nm Tie Rod End Jam Nut 12 14 ft lbs 17 19 Nm Tie Rod End Castle Nut 40 45 ft lbs 54 61 Nm Tie Rod End Attaching Bolt 25 30 ft lbs 35 41 Nm NOTE Refer to exploded views throughout this chapter for identification and location of components SPECIAL TOOLS Description Part No Strut and Ball Joint Tool...

Page 173: ...y Front Cab Assembly Seat Latch Release Storage Rear Mud Guard Rear Cab Side Cover Front Cover Front Cab Footrest Front Mud Guard Pull UP on rear of seat and back to disengage tabs at front of seat All warning information labels must be in place when body parts are assembled ...

Page 174: ...Rear rack 1 screw nut and washer at rear of inner left footrest 4 screws at bottom of left rear mudflap 1 screw nut and washer at rear of inner right footrest 4 screws at bottom of right rear mudflap 4 bolts and flat washers from top of cab assembly under seat 2 screws at rear bottom of cab assembly near tail light Disconnect taillight harness Front rack Remove 4 screws lock washers and flat washe...

Page 175: ...Assembly S Install bottom of pod onto handlebar and secure to brackets S Install key switch choke cable and headlight S Connect indicator light wire coupler to indicator lights in top half of pod S Connect 12V power outlet where applicable S Connect headlight S Connect speedometer cable or connectors to speedometer S Install top of pod onto bottom half making sure interlocking tabs mate properly S...

Page 176: ... behind the fuel tank With a quick and firm motion push down on the side panel to disengage the top rear two tabs Then pull up on side panel to disengage front upper and lower tab 3 To reinstall side panel align panel tabs with slots on front cab Push panel upward and forward until tabs lock Bend rear of side panel and insert the two tabs into the rear cab Pull forward and out to disengage two rea...

Page 177: ...mbly Install w open end to ward rear of machine B 1 2 1 30 ft lbs 41 Nm A 2 12 14 ft lbs 17 17 Nm 40 45 ft lbs 54 61 Nm Steering Post Steering Post Arm Frog 1 2 NOTE To avoid damage to tie rods and other steering components be sure to install tie rod end bolts in the proper direction The steering post arm bolt B points up the rod end bolts A point down Be sure inner rod ends are placed between the...

Page 178: ...g features on the existing bolts were destroyed during removal DO NOT reuse old bolts Serious injury or death could result if fasteners come loose during opera tion 8 Attach A arm to hub strut assembly Tighten ball joint nut to 25 ft lbs 35 Nm If cotter pin holes are not aligned tighten nut slightly to align Installa newcotter pin with open ends toward rear of machine Bend both ends in opposite di...

Page 179: ...rd 17 ft lbs 24 Nm 35 ft lbs 48 Nm Upper Control Arm Orientate Bushings Correctly 30 ft lbs 41 Nm 30 ft lbs 41 Nm Lower Control Arm 35 ft lbs 48 Nm 100 ft lbs 136 Nm 20 ft lbs 27 Nm 17 ft lbs 24 Nm 35 ft lbs 48 Nm 30 ft lbs 41 Nm Rear Front Bushing Orientation ...

Page 180: ...ut replacement will be necessary Grease fitting 2 location Check lubrication guide for recommended service intervals Specified pole gap is 0 001 0 0254mm 1 2 15 ft lbs 21 Nm Nut 15 ft lbs 21 Nm 18 ft lbs 25 Nm Seal Sleeve Install Using tool PN 2871199 Washer Upper Pivot Ball Lower Pivot Ball Washer Spacer Rubber Spring Retainer Spring Bolt Spacer Washer Clamp Wire retainer Hub Coil Spring Retainer...

Page 181: ...cartridge 5 Remove two pinch bolts from strut casting 6 Remove strut cartridge 7 Install cartridge until bottomed in strut casting 8 Install pinch bolts with wire clamp s Torque pinch bolts to 15 ft lbs 21 Nm 9 Reassemble spring and top pivot assembly Be sure all parts are installed properly and seated fully 10 Torque strut rod nut to specification Do not over torque nut Strut Spring Compressor To...

Page 182: ...extension cap B S Apply grease to extension cap and threads of puller bolt to ease removal S Thread bolt D with nut C ontoball joint stud as shown S Apply heat to ease removal S Hold bolt D and turn nut C clockwise until ball joint is removed from strut housing 8 To install new ball joint S Remove extension cap and attach puller guide using short bolts provided in the kit S Insert new ball joint E...

Page 183: ...iminate the whitish stress marks that are sometimes left after a fender or cab is bent flexed or damaged WARNING The following procedure involves the use of an open flame Perform this procedure in a well ventilated area away from gasoline or other flammable materials Be sure the area to be flame treated is clean and free of gasoline or flammable residue To flame treat the decal area 1 Pass the fla...

Page 184: ...Clutch Assembly 6 17 6 18 Drive Belt Tension 6 18 Drive Belt Removal Inspection 6 19 6 20 Drive Belt Installation 6 20 Clutch Alignment Offset 6 21 Drive Clutch Bushing Service 6 22 6 25 Driven Clutch Disassembly Inspection 6 26 6 28 Driven Clutch Assembly 6 29 Driven Clutch Bushing Service 6 30 6 33 EBS Theory of Operation 6 34 EBS Operation Guidelines 6 35 EBS Exploded View 6 36 EBS Drive Clutch...

Page 185: ...1226 Piston Pin Puller Used with 2871226 2870386 EBS Offset Alignment Tool 2872292 EBS Clutch Bushing Tool Kit 2201379 Loctitet 680 2870584 RTV Silicone Sealer 2870661 Loctite Gasket Remover 2870601 PVT SYSTEM FASTENER TORQUES Drive Clutch Retaining Bolt 40 ft lbs Driven Clutch Retaining Bolt 17 ft lbs PVT Inner Cover Bolts 12 ft lbs Drive Clutch Spider Standard Clutch 200 ft lbs EBS Clutch 185 ft...

Page 186: ...the drive belt to move This movement in turn rotates the driven clutch At light throttle settings the drive belt will stay low in the drive clutch and high in the driven clutch As engine RPM increases so does the centrifugal force on the shift weights causing the drive belt to be forced upward in the drive clutch and downward into the driven clutch The forces in the driven clutch will now affect t...

Page 187: ...the following pages The PVT system is air cooled by fins on the drive clutch stationary sheave The fins create a low pressure area in the crankcase casting drawing air into the system through an intake duct The opening for this intake duct is locatedat ahigh point on the vehicle location varies by model The intake duct draws fresh air through a vented cover All connecting air ducts as well as the ...

Page 188: ...ing Slow and easy clutch engagement Fast effective use of the throttle for efficient engagement Towing Pushing at low RPM low ground speed Use Low Range only Plowing snow dirt etc utility use Use Low Range only Stuck in mud or snow Shift the transmission to Low Range carefully use fast aggressive throttle application to engage clutch WARNING Excessive throttle may cause loss of control and vehicle...

Page 189: ... 2 Remove or loosen rear cab fasteners as necessary to gain access to PVT outer cover 3 Remove PVT air outlet duct hose 4 Remove outer cover screws and clip Refer to page 6 8 5 Mark the drive belt direction of rotation and remove drive belt See page 6 19 for drive belt removal 6 Remove drive clutch retaining bolt and remove drive clutch using puller Drive Clutch Puller PN 2870506 ...

Page 190: ...ller if necessary 8 Remove driven clutch offset spacers from the transmission input shaft 9 Remove screws and retainer plate 10 Remove inner cover retaining bolts at rear of cover 11 Remove cover along with foam seal on back of coveror shaft Driven Clutch Puller PN 2870913 Keep Spacers In Order ...

Page 191: ...nsmission input shaft 9 Apply a light film of grease to the splines on the shaft 10 Install the driven clutch washer lock washer and retaining bolt Torque to specification 11 Clean end of taper on crankshaft and the taper bore inside drive clutch 12 Install drive clutch and torque retaining bolt to specification 13 Reinstall drive belt noting direction of rotation If a new belt is installed instal...

Page 192: ...CLUTCH 6 8 PVT SEALING AND DUCTING COMPONENTS Outer Cover Exhaust Duct Inner Cover Seal Inlet duct Retainer Clip Inner Cover Outer Cover Seal ...

Page 193: ...e weights against the rollers the moveable sheave will force the belt to climb up the drive clutch sheave and increase vehicle speed If the weights and spring are matched properly the engine RPM will go to the desired range and remain there on both the upshift and backshift If the weights are too light or the spring rate too high the maximum RPM will be too great and the drive belt will not move i...

Page 194: ...ld always be inspected for toler ance limits during any clutch operation diagnosis or repair With the spring resting on a flat surface measure its free length from the outer coil surfaces as shown Refer to the spring specification chart for specific free length measurements and tolerances Also check to see that spring coils are parallel to one another Distortion of the spring indicates stress fati...

Page 195: ... RPM and shifting patterns Shift weights should not be changed or altered without first having a thorough understanding of their positioning and the effects they may have on belt to sheave clearance clutch balance and shifting pattern PN 5630513 50 5 gr PN 5630509 55 gr 55 16 PN 5630279 43 gr PN 5630418 50 gr High Alt 350L PN 5630095 53 gr 53 PN 5630709 44 gr PN 5630710 46 gr PN 5630711 47gr RH BH...

Page 196: ...tons and inspect surface of towers See spider removal page 6 15 2 Inspect sheave surfaces Replace the entire service clutch if worn damaged or cracked WARNING The clutch assembly is a precisely balancedunit Never replace parts with used parts from another clutch as sembly All PVT system maintenance repairs must be per formed only by an authorized Polaris service technician who has attended a Polar...

Page 197: ...EW Drive Clutch Mark with permanent marker before disassembly Teflon coated brass bushing Teflon coated brass bushing EBS Drive Clutch Spacer Sleeve PTFE Washers One Way Clutch Spider Lock Nut Mark with permanent marker before disassembly ...

Page 198: ...shing A Theouter coverbushing is manufactured with a Teflon coating Bushing wear is determined by the amount of Teflon remaining on the bushing 4 Inspect area on shaft where bushing rides for wear galling nicks or scratches Replace clutch assembly if worn or damaged 5 Remove and inspect spring See page 6 10 Mark X Mark A Cover Bushing Inspection Replace the cover bushing if more brass than Teflon ...

Page 199: ...r and thickness of these washers To maintain proper clutch balance and belt to sheave clearance be sure to reinstall original quantity and thickness washers Moveable Sheave Bushing Inspection 2 Inspect the Teflon coating on the moveable sheave bushing Clutch Holding Fixture PN 2871358 Spider Removal Tool PN 2870341 Moveable Sheave Bushing Inspection Replace the cover bushing if more brass than Tef...

Page 200: ...roller and bushing are separating Bushing must fit tightly in roller Use pin removal tool PN 2870910 to replace rollers and pins Take care not to damage roller bushing or bearing surface of the new pin during installation 4 Rubber backed buttons can and should be used in all ATV clutches if the hollow roller pin is changed to the solid roller pin NOTE The rubber side of the button is positioned to...

Page 201: ...fixed sheave 3 Install spider spacers Use same quantity and thickness as were removed 4 Compress spider buttons for each tower and install spider making sure that X or the marks that were made earlier on spider aligns with X or the marks that were made earlier in moveable sheave 5 Torque spider to specification using the holding fixture and spider tool Torque with smooth motion to avoid damage to ...

Page 202: ...is out of specification adjust by removing or adding shims between the driven clutch sheaves S Remove shims to decrease belt deflection S Add shims to increase belt deflection See Driven Clutch Disassembly Inspection pages 6 26 6 28 NOTE At least one shim must remain between the inner and outer sheave of the driven clutch If proper belt deflection cannot be obtained measure drive belt width length...

Page 203: ...lt deflection S The top edges have been trimmed on some drive belts It will be necessary to project the side profiles and measure from corner to corner S Place a straight edge on each side of the drive belt S Place another straight edge on top of belt S Measure the distance where the side straight edges intersect the top as shown in the illustra tion at right 5 Inspect belt for loose cords missing...

Page 204: ...lace belt if worn past the service limit Belts with thin spots burn marks etc should be replaced to eliminate noise vibration or erratic PVT operation See Troubleshooting Chart at the end of this chapter for possible causes NOTE If a new belt is installed check belt deflection DRIVE BELT INSTALLATION 1 Loop belt over drive and over top of driven sheave 2 While pushing down on top of belt turn the ...

Page 205: ... by adding shims between the frame and front lower left engine mount to increase the distance at point A If a shim is pres ent it can be removed to decrease the distance at point A CLUTCH OFFSET Important Inspect clutch alignment and center distance be fore adjusting offset 1 Install offset alignment tool as shown Offset is correct when rear of tool contacts rear of inner sheave with driven clutch...

Page 206: ...dapter 5020633 DRIVE CLUTCH MOVEABLE SHEAVE BUSHING REMOVAL 1 Install handle end of piston pin puller securely into bench vise and lightly grease puller threads 2 Remove nut from puller rod and set aside 3 Install main adapter Item 8 onto puller 4 Insert adaptor 2 into bushing from belt side as shown With towers pointing toward vise slide sheave and bushing onto puller rod 5 Install nut removed in...

Page 207: ... on puller 2 Apply Loctite 680 retaining compound to the back side of new bushing Push bushing into center of sheave on tower side by hand 3 Insert installation tool Item 2 into center of sheave and with towers pointing away from vise slide sheave onto puller rod 4 Install nut on puller rod and hand tighten Turn barrel to apply additional tension if needed 5 Turn sheave and barrel together counter...

Page 208: ...ide of cover toward vise slide cover onto puller 4 Install nut onto puller rod and hand tighten Turn puller barrel to increase tension as needed 5 Turn clutch cover counterclockwise on puller rod until bushing is removed 6 Remove nut from puller rod and set aside 7 Remove bushing and bushing removal tool from puller Discard bushing Main Adaptor Piston Pin Puller PN 2870386 ...

Page 209: ...lutch cover 2 With main adapter on puller insert cover onto puller rod placing outside of cover toward vise 3 Install nut on rod and hand tighten Turn puller barrel to apply more tension if needed 4 Turn clutch cover and barrel together counterclockwise on puller rod until bushing is seated 5 Remove nut from puller rod and take installation tool and clutch cover off rod Bushing PN 3576510 Loctitet...

Page 210: ...n removing snap ring to prevent serious personal injury 1 Apply and hold downward pressure on the helix or place driven clutch in compressor tool PN 8700220 2 Remove snap ring retainer 3 Note location of spring and remove helix 4 Note location of spring in themoveable sheave and remove the spring Note hole location of spring in helix and sheave ...

Page 211: ... the spring coils are distorted 6 Inspect ramp buttons in the moveable sheave and replace if worn NOTE The ramp buttons are secured by Torx screws T20 7 Remove moveable sheave and note the number of spacer washers One spacer must remain between the sheaves when adjusting belt deflection Tabs Aligned Belt deflection adjustment washers ...

Page 212: ...ces for wear or damage 10 Clean and inspect splines on helix and transmission input shaft 11 Lube splines with a light film of grease Do not lubricate the bushings Inspect bushings for wear Moveable Sheave Bushing Inspection Replace the bushing if more brass than Teflon is visible on the bushing Re fer to bushing replacement in this chapter ...

Page 213: ...eatest amount of spring tension will raise engine RPMs during clutch upshift and allow quicker backshift or downshift when pulling or negotiating a hill for example The least amount of tension will create a slower downshift and a harder upshift 4 Line up boss spline and push helix down until it engages the splines 1 2 to 3 4 5 While holding downward pressure on helix wind moveable sheave countercl...

Page 214: ...close as possible to the bushing bore when using a press 1 Install main adapter Item 8 onto puller 2 Insert adapter reducer Item 9 onto puller sliding it inside the main adapter 3 Remove ramp buttons from moveable sheave 4 Using a hand held propane torch apply heat directly on bushing until tiny smoke tailings appear CAUTION Clutch components will be hot In order to avoid serious burns wear some t...

Page 215: ...llustration at right 6 Install sheave onto puller 7 Install nut onto puller rod and tighten by hand Turn puller barrel for further tension if needed 8 Turn clutch sheave counterclockwise until bushing is removed Repeat steps 5 8 for other bushing 9 Remove nut from puller rod and set aside 10 Remove adapters from puller 11 Remove bushing and removal tool from adapters Discard bushing Bushing Remova...

Page 216: ... insert adapter number ten onto puller See illustration at right 2 Start new bushing evenly in moveable sheave Apply Loctite 680 retaining compound to the back side of new bushing 3 Install sheave onto puller with new bushing upward as shown Install adaptor number two Adapter Number Ten ...

Page 217: ...ut onto puller rod and hand tighten against installation tool 5 Turn clutch sheave counterclockwise until bushing is seated 6 Remove nut from puller rod and set aside 7 Remove installation tool and clutch sheave from puller 8 Repeat installation procedure for other moveable bushing ...

Page 218: ...ownhill or coasting the drive train turns the driven clutch belt and one way clutch in the direction of engine rotation When the one way clutch rotational speed exceeds drive clutch rotational speed the one way clutch locks to the drive clutch shaft and engine braking occurs Essentially the driven clutch has becomethe driving clutch Engine braking will continue until drive clutch speed exceeds one...

Page 219: ...dible engagement noise may be heard during this transition and is a normal condition S Changes to drive clutch calibration are recommended if the vehicle will be oper ated at elevations above 3000 ft 900 meters Refer to the model specific clutch ing chart for type of drive clutch weight and or drive clutch spring to install for high elevation WARNING All PVT system maintenance repairs must be perf...

Page 220: ... Drive 2 25 PTFE Washer Washer Ramp Flat Spacer Compression Spring Screw Drive Belt PTFE Washer Retaining Ring Flat Washer Drive Clutch Assembly Driven Clutch Assembly Cover Bushing Roller Bushing Assembly Retaining Ring Bushing Bushing Ramp Bushing Torque to 185 Ft Lbs Roller EBS Exploded View One Way Clutch Driven Spider Lock Nut ...

Page 221: ...ated counterclockwise the clutch should lock to the shaft without slipping If problems are noted in either direction continue with disassembly DRIVE CLUTCH INSPECTION NOTE Remove cover spring and spider following in structions for standard non EBS drive clutch then pro ceed as follows 1 Remove moveable sheave spacer sleeve and the 2 PTFE washer Visually inspect the washer for damage Measure the th...

Page 222: ...rn or damaged 5 Remove 2 1 2 PTFE washer from shaft Visually inspect the washer for damage Measure the thickness and compare to specification Replace if worn or damaged MOVEABLE SHEAVE BUSHING INSPECTION 1 Inspect the Teflon coating on the moveable sheave bushing Shaft Diameter Standard 1 3745 1 375 Service Limit 1 3730 PTFE Washer Thickness Standard 030 76mm Service Limit 025 64mm Moveable Sheave...

Page 223: ...lutch moveable in a counterclockwise direction as shown at right The sheave should rotate on the shaft with only a slight amount of drag There should not be any binding or rough spots 2 When rotated clockwise the inner moveable sheave should lock to the shaft and outer sheave without slipping 3 Remove driven clutch from the transmission input shaft Do not disassemble the driven clutch from the out...

Page 224: ... necessary NOTE ROLLER PIN DISASSEMBLY New roller re taining bolts have a dry locking agent applied to the threads Before attempting to remove the roller pins heat the threaded area lightly with a propane torch Use a high quality hexagonal wrench Allent in good con dition to avoid screw damage A small amount of valve grinding compound can be applied to the tip of the hex wrench to ensure a tight f...

Page 225: ... driven clutch shaft in the one way clutch If the shaft can be moved laterally or if the one way clutch does not function properly as described in Step 1 and 2 on page 6 39 replace driven clutch assembly Moveable Sheave Bushing Inspection Replace the bushing if more brass than Teflon is visible on the surface of the bushing ...

Page 226: ...ch Moveable Sheave Bushing Removal 1 Remove clutch as outlined previously in this chapter 2 Install handle end of piston pin puller PN 2870386 securely into bench vise and lightly grease puller threads 3 Remove nut from puller rod and set aside 4 Install puller adapter Item 10 from kit 2871226 5 Install main adapter Item D onto puller 6 With towers pointing toward the vise slide sheave onto puller...

Page 227: ...e cover onto puller 5 Install nut onto puller rod and hand tighten Turn puller barrel to increase tension as needed 6 Turn clutch cover counterclockwise on puller rod until bushing is removed and cover comes free 7 Remove nut from puller rod and set aside 8 Remove bushing and bushing removal tool from puller Discard bushing EBS Clutch Cover Bushing Installation 1 Apply Loctitet 609 evenly to bushi...

Page 228: ...il bushing is removed and sheave comes free 8 Remove nut C left hand thread from puller rod and set aside 9 Remove adapters from puller 10 Remove bushing and removal tool from adapters Discard bushing EBS Driven Bushing Installation 1 Slide adapter Item 10 onto puller 2 Apply Loctitet 609 evenly to bushing bore inside moveable sheave 3 Install sheave onto puller belt surface up 4 Place new bushing...

Page 229: ...emove bushing and removal tool from adapters Discard bushing EBS Driven Backside Outer Bushing Installation 1 Install puller adapter Item 10 onto puller 2 Install adapter Item 9 onto puller 3 Apply Loctitet 609 evenly to bushing bore inside moveable sheave 4 Install sheave face down on puller 5 Install new bushing on installation tool Item 2 and install assembly into sheave 6 Install left hand thr...

Page 230: ...ts Disassemble and clean clutch inspecting shift weights and rollers Reassemble without the spring and move sheaves through entire range to further determine probable cause Disassemble clean and inspect driven clutch noting worn sheave bushing and ramp buttons and helix spring location Clean sheaves with denatured alcohol or brake clearner install new belt Harsh drive clutch engage ment Drive belt...

Page 231: ...clutch engagement Caution operator to operate machine within guidelines Vehicle operated with park brake on Inspect brake system Fast effective use of throttle for efficient engagement PVT noise Belt worn or separated thin spots loose belt Broken or worn clutch components cover hitting clutches Replace belt Inspect and repair as necessary Engagement erratic or stabby Thin spots on belt worn belt D...

Page 232: ...7 12 Front CV Joint Boot Replacement 7 13 7 14 Front Drive Axle Exploded View 7 15 Front Strut Casting Seal Replacement 7 16 Front Strut Seal Sleeve Replacement 7 17 Front Prop Shaft Removal 7 18 U Joint Disassembly 7 19 7 20 U Joint Assembly 7 20 7 21 Front Gearcase Removal 7 22 Front Gearcase Disassembly 7 22 7 23 Front Gearcase Assembly 7 24 7 25 Front Gearcase Installation 7 25 Front Gearcase ...

Page 233: ...ub Nut Refer to text for procedure Pg 7 5 Rear Hub Retaining Nut 100 Ft Lbs Refer to exploded views and text for torque values of other fasteners CAUTION Locking nuts and bolts with preapplied locking agent should be replaced if removed The self locking properties of the nut or bolt are reduced or destroyed during removal ...

Page 234: ...pring refer to appropriate parts manual and use installation tool PN 2870888 WARNING It is important that the front and rear axle drive ratio and tire size are not changed Changing this ratio will cause erratic engagement which could result in a loss of vehicle control and serious injury or death ELECTRIC HUB ENGAGEMENT AWD When AWD is selected in a forward gear current flows through a coil of wir...

Page 235: ... sure the machine is solidly supported before proceeding Serious injury could occur if the machinetips orfalls 2 Remove the front wheels and thoroughly clean the area around the hub strut casting brake caliperand brake disc 3 Remove the two brake caliper attaching bolts CAUTION Do not hang the caliper by the brake hose Use wire to hang the caliper to prevent possible damage to the brake line or sp...

Page 236: ...th the outside surface of the hub 2 Grease hub seal to allow it to slideover rollerclutch components 3 Install wheel hub inner bearing NOTE All bearings must slide freely onto the spindle If bearings do not slide freely wheel bearing torque will be affected 4 Install wheel hub outer bearing washer and attaching nut NOTE It is very important that the hub is not moved outward once installed or the s...

Page 237: ...NOTE If cotter pin hole does not align tighten slightly to align and install pin Do not exceed 144 in lbs 6 Reinstall hub cap 7 Remove fill check plug and rotate hole to either 4 00 or 8 00 position 8 Fill with Polaris Premium Demand Drive Hub Fluid or Type F Automatic Transmission Fluid until fluid trickles out NOTE Do not force the oil into the hub under pressure This can cause seal damage and l...

Page 238: ...ature Plate Brake Disc Bearing Race Bearing 1 000 I D Garter Spring Spacer Cotter Pin Washer Wheel Nut Refer to text on page 7 5 for more information Detail Front Hub Clutch Bearing 1 000 I D Use new cotter pin O Ring FINAL DRIVE 7 6 AWD FRONT HUB EXPLODED VIEW ...

Page 239: ...y out the old seal as shown Do not damage the surface of the seal cavity Clean the hub in the seal mating area 4 With spring side of new seal facing toward hub casting press it in until flush with brake disc mating surface CAUTION Do not use a hammer as damage to the seal will result 5 Thoroughly clean the brake disc with brake cleaner It is very important that the brake disc be free of any oil or...

Page 240: ...ditional information Once the seal sleeve is properly positioned a 1 16I 16 cm bead of silicone should remain around the inner edge Clean off all excess silicone The seal sleeve area must be free of silicone or the hub seal may leak NOTE Always install a new seal sleeve when replacing the coil Use tool PN 2871199 It may be necessary to apply more silicone or an equivalent fast drying glue to the w...

Page 241: ...of the rollers and cage WARNING If this procedure is not followed the spring will be over stressed and lose its tension Springs with incorrect tension may allow rollers to move outward at high vehicle speeds If the rollers move outward the front hub s will engage and cause vehicle instability which could result in serious injury or death WARNING Be sure to use correct garter spring These springs a...

Page 242: ...owever the wear rings should be even 2 Install the roller clutch Hilliard Clutch assembly and be sure the armature plate A is positioned properly Also when installing the hub assembly be sure the armature plate tabs remain engaged with the roller clutch cage CAUTION After the hub is installed the slightest movement outward with the hub may cause the armature plate tabs to disengage from the roller...

Page 243: ...s service procedure Wear eye protection when remov ing and installing drive axles or component parts 3 Remove wheel nuts and wheels 4 Remove hub cap 5 Remove the two brake caliper attaching bolts CAUTION Do not hang the caliper by the brake hose Use wire to hang the caliper to prevent possible damage to the brake line 6 Place a catch pan beneath the front hub andremove the hub cap 7 Remove cotter ...

Page 244: ...ller bearing Install the new seal until it bottoms against the shoulder in the strut casting AWD FRONT DRIVE AXLE INSTALLATION 1 Install spring washer and drive shaft Align hole in U joint yoke with hole in eccentric shaft and install new roll pin 2 Install new seal in strut casting Refer to page7 16 3 Install drive shaft in strut 4 Install lower ball joint torque nut to 25 ft lbs 34 5 Nm and inst...

Page 245: ...harp edges or hot engine and exhaust components S The driveshaft is not to be used as a lever arm to position other suspension components S Never use a hammer or sharp tools to remove or to install boot clamps S Be sure joints are thoroughly clean and that the proper amount and type of grease is used to refill when joint boots are replaced and when joints are cleaned Refer to text for grease capac...

Page 246: ... drive axle CV boot replacement requires 30g of grease If CV joint is cleaned an additional 30g of grease is required Refer to information below 8 Before installing the new boot remove all grease from the boot area and shaft NOTE It is very important to use the correct type and quantity of grease by using the grease contained in the boot kit DO NOT use a substitute grease and DO NOT overfill or un...

Page 247: ...U Joint Assy Yoke Front Drive Axle Components Front Prop Shaft Components O Ring Yoke Propshaft to Transmission Prop Shaft Cross and Bearing Kit Spring Pin Yoke Front Gearcase Propshaft Assembly FINAL DRIVE 7 15 AWD FRONT DRIVE AXLE EXPLODED VIEW ...

Page 248: ...the shoulder in the strut casting 4 Apply grease to the seal inner lip reinstall the spindle and axle assembly 5 Reinstall the A arm to the ball joint Torque to 25 ft lbs 35 Nm NOTE If the cotter pin hole does not align at the above torque tighten slightly until the cotter pin hole aligns and install the pin with open ends toward rear of machine BEARING REPLACEMENT NOTE FOR FRONT DRIVE AXLE AND FR...

Page 249: ...casting until flush with the inner magnet pole Use the flat side no step of tool PN 2871199 4 To check the gap between the inner and outer poles place a straight edge on the outer pole so that it just intersects with the inner pole The gap between the straight edge and inner pole should be 0 to 001I 0 025mm This measurement should be checked in three different positions around the pole assemblies ...

Page 250: ... the roll pin from prop shaft at rear of housing Slide prop shaft back and away from front housing Pull sharply forward to remove from transmission shaft NOTE If removing front housing use roll pin remover to remove the roll pins from both front drive axles Roll Pin Remover Tool P N 2872608 ...

Page 251: ...bearing is removed cross bearing must be replaced Note orientation of grease fitting and mark inner and outer yoke for correct re positioning dur ing installation 2 Support inner yoke as shown and drive outer yoke down bearing cap out with a soft face hammer 3 Support U joint in vise as shown and drive inner yoke down to remove remaining bearing caps ...

Page 252: ...se fitting properly positioned inward toward center of shaft Take care not to dislodge needle bearings upon installation of cross joint Tighten vise to force bearing caps in 2 Using a suitable arbor fully seat bearing cap in one side Continually check for free movement of bearing cross as bearing caps are assembled 3 Install snap ring to contain bearing cap just installed Repeat procedure for othe...

Page 253: ...ring caps on outer yoke 6 Seat all bearing caps against snap rings by supporting cross shaft and tapping on each corner as shown 7 When installation is complete Yokes must pivot freely in all directions without binding If the joint is stiff or binding tap the yoke lightly to center the joint until it pivots freely in all directions ...

Page 254: ...re beginning this service procedure Wear eye protection when re moving and installing bearings and seals 4 Remove right wheel nuts and wheel 5 Remove cotter pin lower ball joint nut and A arm from ball joint 6 Punch spring pins out from both axle splines and front prop shaft 7 Remove bolts securing bottom of housing to frame Remove vent line Remove housing from right side of frame FRONT HOUSING DI...

Page 255: ... shim 4 Clean all parts and inspect spacers for wear Inspect ring gear for chipped broken or missing teeth 5 Remove pinion cover and O ring 6 Unscrew fill plug and remove pinion shaft assembly Inspect pinion gear for chipped broken or missing teeth NOTE Pinion shaft assembly will not clear the fill plug unless it is backed out ...

Page 256: ... wear the bearings must be inspected visually and by feel While rotating bearings by hand inspect for rough spots discoloration or corrosion The bearings should turn smoothly and quietly with no detectable up and down movement and minimal movement side to side 5 Clean pinion shaft and lock nut with PrimerNt and apply red LocTitet to threads Tighten lock nut to specification 6 Install pinion shaft ...

Page 257: ...r with new o ring and torque bolts to 14 ft lbs FRONT HOUSING INSTALLATION 1 To install housing reverse removal procedure Use new roll pins in drive shafts 2 Add Polaris Premium Front Housing Lubricant or GL5 80 90 gear lube to front housing Check drain plug for proper torque Equal Shims Cover Bolts Torque 14 ft lbs Fill Plug Premium Front Housing Fluid PN 2871653 12 oz Front Housing Capacity 4 0 ...

Page 258: ...FINAL DRIVE 7 26 AWD FRONT HOUSING EXPLODED VIEW Pinion Cover Seal O Ring Bearing Pinion Shaft Output Shaft Bearing Shim O Ring Output Cover Thrust Button Shim Seal Vent Bushing Seal Retaining Ring ...

Page 259: ...rake Remove rear hub cap 2 Remove cotter pin 3 Loosen the hub retaining nut 4 Loosen the wheel nuts 5 Safely support the rear of the ATV CAUTION Serious injury could occur if machine tips or falls 6 Remove hub nut domed washer and flat washer 7 Remove wheel nuts and wheel ...

Page 260: ...FINAL DRIVE 7 28 REAR HUB BEARING CARRIER REMOVAL CONT 8 Remove hub 9 Remove upper control arm bolt as shown 10 Remove both lower control arm bolts 11 Remove bearing carrier ...

Page 261: ... torque upper control arm bolt and torque to specification 5 Pull drive shaft outward and install hub onto driveshaft splines 6 Install cone washers with domed side facing outward 7 Install retainer nut wheel and wheel nuts 8 Remove jackstand and torque axle nut and wheel nuts 9 Install a new cotter pin Tighten nut slightly to align holes if required 10 Install hub cap Lower Control Arm Bolt Torqu...

Page 262: ...outer edges so bearing can be removed 3 Inspect bearing NOTE Due to extremely close tolerances and mini mal wear the bearings must be inspected visually and by feel While rotating bearings by hand inspect for rough spots discoloration or corrosion The bearings should turn smoothly and quietly with no detectable up and down movement and minimal movement side ways between inner and outer race 4 Insp...

Page 263: ...ort bottom of bearing carrier housing 2 Start bearing in housing 3 Press bearing into place until outer race bottoms on housing CAUTION Use an arbor and press only on the outer race as bear ing damage may occur 4 Install snap ring into groove ...

Page 264: ... interconnecting shaft to avoid disassembly or potential damage to the driveshaft joints S Over angling of joints beyond their capacity could result in boot or joint damage S Make sure surface ground areas and splines of shaft are protected during handling to avoid damage S Do not allow boots to come into contact with sharp edges or hot engine and exhaust components S The driveshaft is not to be u...

Page 265: ...er control arm Torque bolt to 35 ft lbs 48 Nm 5 Install hub flat washer domed washer domed side out and nut Torque center nut to 100 ft lbs Install new cotter pin and hub cap 6 Install rear wheel and torque wheel nuts to specification 7 Grease all fittings thoroughly with Premium U Joint Lubricant Rear Hub Nut Torque 100 ft lbs 138 Nm Out Cone Washer Cone washer dome to outside 100 ft lbs 138 Nm F...

Page 266: ...ase away from recess in CV joint inner hub to locate snap ring 3 Open the snap ring using a snap ring pliers or small needle nose pliers Tap CV housing off shaft with a soft faced hammer while holding snap ring open CV Boot Clamp Pliers Earless Type 8700226 Snap ring located in recessed area Snap ring Tap CV Housing Off Shaft Spread ends of snap ring to remove joint from shaft ...

Page 267: ...tall and tighten large boot clamp with boot clamp pliers 7 Remove excess grease from the CV joint s external surfaces and position joint boot over housing making sure boot is seated in groove Position clamp over boot end and make sure clamp tabs are located in slots Note Before tightening boot clamp on inboard joint make sure any air pressure which may have built up in joint boot has been released...

Page 268: ...joint cleaning to the joint as shown below Be sure grease penetrates all parts of the joint Boot Installation 5 Fit joint boot and clamps on interconnecting shaft Make sure small end of boot is fully seated in groove 6 Position small clamp over small end of boot Be sure it is seated all the way around in the clamp recess on the boot 7 Tighten boot clamp using boot clamp pliers 8 Fill boot with gre...

Page 269: ...Selector Disassembly 8 2 8 3 Gear Shift Selector Assembly 8 4 Gear Shift Selector Installation 8 5 Boot Replacement 8 5 Transmission Removal 8 6 8 8 Transmission Installation 8 9 8 10 Transmission Disassembly 8 11 8 19 Transmission Assembly 8 20 8 31 Transmission Exploded View 8 32 Troubleshooting 8 33 ...

Page 270: ...smission Case Bolts 12 ft lbs 16 6 Nm Bell Crank Nut 12 ft lbs 16 6 Nm Transmission Drain Plug 14 ft lbs 19 3 Nm Transmission Mounting Bolts 25 ft lbs 34 5 Nm LUBRICATION Refer to maintenance section for transmission lubricant type and capacity ...

Page 271: ...racket 4 Lift gear selector out of mountingbracket andaway from frame GEAR SHIFT SELECTOR DISASSEMBLY CAUTION Wear eye protection during this procedure Read each step completely before proceeding Essential parts may be lost or damaged if you do not heed this caution 1 Clamp gear selector body lightly in a soft jawed vice Using a cross pattern loosen eachof thefour screws holding the gear shift sel...

Page 272: ... to jar the dowel pin and two detent bullets loose Pull the detent bullets and the dowel pin out of the gear shift selector body 7 Remove the two slides one at a time NOTE The LH low slide has two short notches and the RH high rev slide has one short and one long notch The slides must be replaced in the proper chan nels 8 Inspect O rings for damage Replace if any damage is found 9 Flush housing wi...

Page 273: ...Polaris 0W 40 All Season Synthetic motor oil The oil level should be at one half the height of the slides approx 1 oz CAUTION Too much oil could cause the selector to hy drolock Be sure the selector box is level when adding oil 5 Wipe gear selector dry clean surfaces of cover and selector box with Loctite Primer T and place a bead of Loctite 518 Gasket Eliminator or 3 Bond 1215 completely around t...

Page 274: ...otted screwdriver remove cap from gear shift knob 2 Remove torx screw securing knob to selector rod 3 Pull selector knob off selector rod 4 Remove band clamp on rubber boot 5 Slide boot off selector rod and replace with a new one 6 Apply RTV silicone to selector rod to seal top of boot 7 Place band clamp in position and tighten using CV boot clamp pliers 8 Replace shift knob securing it to selecto...

Page 275: ... or falls Be sure machine is secure before beginning this service procedure Wear eye protection when re moving and installing bearings and seals 5 Remove wheel nuts and wheels 6 Apply hand and auxiliary brake and remove brake disc retaining nut and washer NOTE Domed side of washer faces nut 7 Remove rear auxiliary brake caliper and disc Support caliper on right hand foot rest 8 Disconnect transmis...

Page 276: ...l arm 12 Remove left side shock absorber 13 Remove left rear drive shaft see page 7 32 14 Remove left side upper control arm 15 Remove both lower transmission mounting bolts from each side 16 Remove all 8 bolts attaching the stabilizer support bracket and remove support Lower Mounting Bolts Stabilizer Mounting Bolts ...

Page 277: ...ISSION REMOVAL CONT 17 Remove front support bracket 18 Remove bottom transmission bolts as shown in illustration 19 Lift and remove transmission out right side of frame Front Transmission Support Bracket Forward Remove bolts ...

Page 278: ...ion mounting bolts front transmission bracket and rear stabilizer support bracket Tighten transmission bolts securely in the following sequence S Front support bracket upper and lower S Stabilizer bracket upper and lower S Bottom transmission bolts S Lower left and right transmission mounting bolts 5 Apply anti seize to splines of rear drive shafts insert drive shafts into transmission Install lef...

Page 279: ...VT system Refer to PVT section for procedure 10 Install airbox assembly and transmission vent line Be sure vent line is not kinked or pinched 11 Add Polaris Premium Synthetic Gearcase Lubricant to the proper level on dipstick Approximately 1 quart Do not overfill 12 Install rear wheel nuts and torque to specification 13 Refer to Maintenance Section to adjust transmission linkage Premium Synthetic ...

Page 280: ...or switches BEFORE disassembly 2 Drain and properly dispose of transmission oil 3 Remove all cover bolts Tap cover with soft face hammer to remove Note 2 bolts in center of cover CAUTION Do not pry on case half sealing surfaces Remove switches Drain Remove all bolts ...

Page 281: ...for assembly Note location of chain tensioner cam If fully extended chain is worn beyond service limit Replace chain and chain tensioner shoe 5 Remove chain tensioner along with mounting pins and spring 6 Remove rear output gear and chain as an assembly by lifting straight outward ...

Page 282: ...MISSION DISASSEMBLY CONT 7 Remove oil deflector 8 Make sure hole in oil deflector is clear and unobstructed 9 Using a puller remove Hi Lo Reverse HLR shaft bearing and bearing thrust washer Remove Screws Be sure hole is clear ...

Page 283: ...e Low gear in and out until needle bearing slides out of gear and can be removed Remove needle bearing low gear and inner thrust washer 11 Inspect shift dogs for excessive rounding on the leading edges Replace if worn 12 Remove low range shift fork and dog Replace along with mating gear if wear is evident ...

Page 284: ...ce of shift fork for excessive wear discoloration or bending 14 Remove center shaft assembly by tapping on opposite side with a soft face hammer 15 Remove the remaining gears and shafts as an assembly Rotate the shift bellcrank with a 1 2 wrench to aid in removal ...

Page 285: ... pinion gear assembly 17 Inspect pinion gear for broken chipped or worn teeth Check bearing condition and snap ring location 18 Loosen front output housing pinch bolts CAUTION Do not lose pinch plate Must be used for reassembly or transmission will be damaged Loosen Pinch Bolts Pinch Plate ...

Page 286: ...mbly 20 Using 2 1 8 wrench PN 2871701 unscrew the front drive housing from the transmission casting until O ring is exposed 1 2 13mm NOTE Do not attempt to unscrew the front drive housing completely at this time 21 Remove bottom access plate 22 Bend the lock plate tab away from ring gear retaining bolt ...

Page 287: ...emove front output ring gear retaining bolt lock tab washer and flat washer 24 Remove front output ring gear Inspect for broken chipped or worn teeth 25 Unscrew front drive housing and remove it from case Apply electrical tape to threads of housing to prevent damage Lock Plate Flat Washer Ring Gear ...

Page 288: ...7 Slide seal off shaft and remove snap ring and shims Record of shims and thickness of each for reference 28 Inspect center shaft bushing for wear If necessary remove with the large end of bushing drive tool 29 Remove all remaining seals from transmission cases and clean all parts thoroughly Bushing Drive Tool PN 2871697 Bearing Shim s Seal Retaining Ring Shaft Housing ...

Page 289: ...s and install center shaft cover Tighten screws securely FRONT OUTPUT HOUSING SNORKEL ASSEMBLY 1 Bearing is a light press fit on ring gear end of front output shaft Heat inner bearing on a hot plate or with a heat gun to ease installation Install bearing on shaft until inner race bottoms on flange of shaft CAUTION Do not use a torch bearing damage may re sult Bushing Drive Tool PN 2871697 Shaft Bu...

Page 290: ... over and install front bearing until fully seated 4 Front output shaft end play must be measured and adjusted if shaft or housing was replaced To measure end play Install snap ring on shaft without shims in place Clamp housing lightly in soft jawed vise 5 Set up a dial indicator to measure shaft end play Bearing Shaft Transmission End of Housing ...

Page 291: ...ied end play 000 003 Remove snap ring install shims reinstall snap ring It may be necessary to tap snap ring into place NOTE Shaft should rotate freely when finished Confirm end play measurement with dial indicator Do not install front housing seal until backlash is adjusted 7 Remove electrical tape and liberally apply anti seize compound to the threads of the front output housing 8 Screw in housi...

Page 292: ...Primer N on threads and housing Apply Loctite 242 to bolts and torque to specification FRONT OUTPUT HOUSING SNORKEL BACKLASH ADJUSTMENT 11 Lubricate front housing O ring thoroughly with Polaris All Season grease Continue to screw front housing in making sure O ring enters housing without damage Be sure ring and pinion gear teeth mesh properly 12 Rotate front shaft while slowly turning housing inwa...

Page 293: ... at 008 014 20 36mm S Check backlash in several locations of ring gear 14 Install special tool PN 2871695 on shaft as shown With pinion gear held stationary rotate output shaft back and forth reading the total movement of dial indicator The dial indicator must be positioned as shown at the proper distance aligned with outermost mark on tool and 90 to the tool surface or indicated backlash will be ...

Page 294: ...install the front seal until flush with housing 18 Assemble Hi Low Reverse shaft as shown Machined flat side of retainer should face direction of thrust Sliding high reverse engagement dog is symmetrical and can be installed either way The low gear dog must face low gear Access Plate Screws 8 10 ft lbs 11 14 Nm Low Gear Reverse Gear High Gear H L R Shaft Bearing Washer Engagement Dog Low Bearing E...

Page 295: ...onger than 3 0904I 20 Assemble the input shaft and Hi Low Reverse gear cluster as shown 21 The two shift forks can be easily identified by the indentations Low Neutral shaft has 2 detents and Hi Neutral Reverse has 3 detents 22 Install Hi Reverse cluster in transmission as an assembly If necessary use a soft face hammer to install shafts until fully seated Chain Stretch Limit 8 pitch length 3 0904...

Page 296: ... center shaft assembly 24 Install Low shift fork with sliding dog in place Dogs must be positioned outward toward you Slide the shift dog over the spline and the low range shift shaft 25 Lubricate and install inner thrust washer low gear and needle bearing ...

Page 297: ...oil deflector Apply Loctite 242 or 243 blue to screw threads Be sure deflector pin seats into case NOTE Do not over tighten deflector screws or deflector may crack 28 Install drive gear with chain 29 Install chain tensioner Refer to Illustration on following page Oil Deflector Screws Loctite 242 or 243 Blue ...

Page 298: ... Cam Forward Forward Lift Spring Over Rear Mounting Pin With chain and sprockets installed 1 Place tensioner cam on front spacer and tensioner shoe on rear spacer 2 Insert pins through cam and through shoe 3 Place spring over front pin and hook spring leg under cam 4 Lift leg of spring up and over the rear pin Tensioner cam will lift shoe and tension chain ...

Page 299: ...Apply 3Bondt 1215 to surface of case and install cover bolts Torque to specification in three steps following a cross pattern Start with the center 2 bolts 33 Install seal installation tool in drive gear as shown Lubricate new seal with grease and slide onto tool Drive seal into place using large end of slide hammer Repeat procedure for other side Torque 5 16 bolts 2 17 20 ft lbs 23 5 27 7 Nm Torq...

Page 300: ...seal being careful to work the lip of the seal over the step in the shaft before using installation tool Install the seal flush with transmission housing 35 Install gear indicator switches Apply Loctitet 242 blue to threads of switch screws and torque to 13 16 in lbs 1 5 1 9 Nm Seal Installation Tool PN 2871282 ...

Page 301: ...terlock Pins Reverse Gear High Gear Oil Deflector Pinion Gear Retainer Plate Output Sprocket Bearings Drive Chain Center Drive Shaft Dipstick Vent Tube Seals Bottom Access Plate Bushing Seal Front Output Ring Gear Bearing Front Output Shaft Front Output Housing Shims Retaining Ring Shoe Pins Cam Spring Forward Position Switches Bearing Seal ...

Page 302: ...djustment and rod end positioning S Shift selector rail travel S Worn broken or damaged internal transmission components NOTE To determine if shifting difficulty or problem is caused by an internal transmission problem isolate the transmission by disconnecting linkage rods from transmission bellcranks Manually select each gear range at the transmission bellcrank and test ride vehicle If it functio...

Page 303: ... Master Cylinder Assembly 9 11 9 12 Master Cylinder Installation 9 13 Front Pad Removal 9 14 Front Pad Assembly 9 15 9 16 Front Disc Inspection 9 16 Front Disc Removal Replacement 9 17 Front Caliper Removal 9 18 Front Caliper Disassembly 9 18 9 19 Front Caliper Inspection 9 19 Front Caliper Assembly 9 20 Front Caliper Installation 9 21 Front Caliper Exploded View 9 22 DH Pad Removal 9 23 DH Pad In...

Page 304: ...3 81mm Brake Disc Thickness 177 187 4 496 4 750mm 167 4 242mm Brake Disc Thickness Variance Between Measurements 002 051mm Brake Disc Runout 005 127mm Master Cylinder I D Front 750 Master Cylinder I D Aux Rear 500 TORQUE SPECIFICATIONS Item Torque ft lbs except where noted Torque Nm Front Caliper Mounting Bolts 18 0 25 Output Shaft Caliper Mounting Bolts 15 0 21 Master Cylinder Mounting Bolts 55 i...

Page 305: ... reservoir is unobstructed S Test for brake drag after any brake system service and investigate cause if brake drag is evident S Make sure caliper moves freely on guide pins where applicable S Inspect caliper piston seals for foreign material that could prevent caliper pistons from returning freely S Perform a brake burnishing procedure after installing new pads to maximize service life BRAKES 9 2...

Page 306: ...o clean imbedded material from disc or pads Pad s dragging on disc noise or premature pad wear Improper adjustment Insufficient lever or pedal clearance Master cylinder reservoir overfilled Master cylinder compensating port restricted Master cylinder piston not returning completely Caliper piston s not returning Operator error riding the brake park brake applied Adjust pad stop front calipers Chec...

Page 307: ... cause the brakes to feel spongy Too much fluid could cause brakes to drag due to fluid expansion Located within the master cylinder is the compensating port C which is opened and closed by the master cylinder piston assembly The port is open when the lever is released and the master cylinder piston is outward As the temperature within the hydraulic system changes this port compensates for fluid e...

Page 308: ...brake The basic procedure for bleeding the brake system is the same as outlined on page 9 7 9 8 howev er each system must be bled separately Hydraulic Auxiliary Brake inspection and adjustment is outlined on page 9 6 Uppermost inner bleed screw and brake line is for hand brake system Lower outer bleed screw and brake line is for auxiliary foot brake system Ill 1 NOTE Caliper style and location of ...

Page 309: ...t the rear wheels off the ground 2 While turning the rear wheels by hand apply the auxil iary foot brake This brake should not stop the wheels from turning until the lever is half way between its rest position and bottoming on the footrest Bleeding If the free play is correct but pedal travel is excessive or spongy then air is trapped somewhere in the system Bleeding the auxiliary brake system is ...

Page 310: ...hanging fluid remove old fluid from reservoir with a Mity Vac pump or similar tool NOTE Do not remove brake lever when reservoir fluid level is low 5 Add brake fluid to the indicated MAX level inside reservoir 6 Begin bleeding procedure with the caliper that is farthest from the master cylinder Install a box end wrench on caliper bleeder screw Attach a clean clear hose to fitting and place the oth...

Page 311: ... cylinder 10 Tighten bleeder screw securely and remove bleeder hose 11 Repeat procedure steps 5 9 for the remaining caliper s 12 Add brake fluid to MAX level inside reservoir 13 Install diaphragm cover and screws Tighten screws to specification 14 Field test machine at low speed before putting into service Check for proper braking action and lever reserve With lever firmly applied lever reserve sh...

Page 312: ...onents 2 Place a shop towel under brake line connection at master cylinder Loosen banjo bolt remove bolt and sealing washers CAUTION Brake fluid will damage finished surfaces Do not allow brake fluid to come in contact with finished surfaces 3 Remove master cylinder from handlebars Banjo Bolt Master Cylinder Piston Assy Cover Diaphragm Sight Glass ...

Page 313: ... lever 4 Clean surfaces of the reservoir and master cylinder body Be sure supply port is clean before reassembly 5 Remove outer dust seal Be ready to catch piston assembly NOTE The return spring may force piston out when dust seal has been removed 6 Remove piston assembly and return spring from master cylinder Replace piston assembly and spring Vent Slots Cover Supply Port Outer Dust Seal ...

Page 314: ...worn replace lever MASTER CYLINDER ASSEMBLY 1 Install new primary and secondary seals on the piston 2 Select the appropriate master cylinder piston installation tool and insert into master cylinder bore Primary Seal Secondary Seal Return Spring Components of Kit 2200879 2201190 2201191 Components of Kit 2201177 Plunger Handle Installation Tool Insert in Master Cyl inder Bore Type IV Master Cylinde...

Page 315: ...4 Push the piston assembly through the installation tool using the plunger handle Continue pushing until plunger is solid against installation tool 5 Hold piston assembly inward while removing both tools Install dust seal plate spring and plunger Install a new dust seal Be sure dust seal iscompletely seated in the groove NOTE The piston assembly should move freely in the bore and spring back again...

Page 316: ...ee times with finger over the outlet end to purge master cylinder of air 2 Place new sealing washers on each side of banjo line and torque banjo bolt to specification 3 Fill reservoir with DOT 3 fluid 4 Follow bleeding procedure on pages 9 7 9 8 Check all connections for leaks and repair if necessary Brake Line Banjo Bolt Sealing Washers Torque to 15 ft lbs 21 Nm Master Cylinder Mounting Bolt Torq...

Page 317: ...nto caliper bore slowly usinga C clamp or locking pliers with pads installed NOTE Brake fluid will be forced through compensating port into master cylinder fluid reservoir when piston is pushed back into caliper Remove excess fluid from reservoir as required 5 Push mounting bracket inward and slip outer brake pad past edge Remove inner pad 6 Measure the thickness of the pad material Replace pads i...

Page 318: ...unting bolts 4 Slowly pump the brake lever until pressure has been built up Maintain at least 1 2 12 7 mm of brake fluid in the reservoir to prevent air from entering the brake system PAD ADJUSTMENT 5 Install the adjuster screw and turn clockwise until stationary pad contacts disc then back off 1 2 turn counterclockwise 6 Be sure fluid level in reservoir is up to MAX line inside reservoir and inst...

Page 319: ... nicks scratches or damage 2 Measure the disc thickness at 8 different points around the pad contact surface using a 0 1 micrometer Replace disc if worn beyond service limit 3 Mount dial indicator as shown to measure disc runout Slowly rotate the disc and read total runout on the dial indicator Replace the disc if runout exceeds specifications Front Wheel Nut Torque 20 ft lbs 27 Nm Brake Disc Thic...

Page 320: ...lts and disc 3 Clean mating surface of disc and hub 4 Install disc on hub 5 Install new bolts and tighten to specified torque CAUTION Always use new brake disc mounting bolts The bolts have a pre applied locking agent which is destroyed upon removal 18 ft lbs 25 Nm Use new bolts with pre applied locking agent Front Brake Disc Mounting Bolt Torque 18 ft lbs 25 Nm ...

Page 321: ...2 Using a line wrench loosen and remove brake line to caliper Place a container under caliper to catch fluid draining from brake line 3 Remove brake caliper and drain fluid into container FRONT CALIPER DISASSEMBLY 1 Remove brake pad adjuster screw 2 Push upper pad retainer pin inward and slip brake pads past edge 3 Remove mounting bracket pin assembly and dust boot Remove Mounting Bracket ...

Page 322: ...ure bore size and compare to specifications Replace if damage is evident or if worn beyond service limit 2 Inspect piston for nicks scratches wear or damage Measure diameter and replace if damaged or worn beyond service limit 3 Inspect the brake disc and pads as outlined for brake pad replacement this section See page 9 16 Front Caliper Piston Bore I D Std 1 191 1 192 30 25 30 28 mm Service Limit ...

Page 323: ...ton should slide in and out of bore smoothly with light resistance 3 Lubricate the mounting bracket pins with Polaris Premium All Season Grease and install the rubber dust seal boots 4 Compress the mounting bracket and make sure the dust seals are fully seated Install the pads as shown on page 9 15 Clean the disc and pads with brake parts cleaner or denatured alcohol to remove any dirt oil or grea...

Page 324: ...ollow brake bleeding procedure outlined on pages 9 7 9 8 5 Install wheels and torque wheel nuts to specification NOTE If new brake pads are installed it is recommended that a burnishing procedure be performed toextend padser vice life and reduce noise Start machine and slowly in crease speed to 30 mph Gradually apply brakes to stopma chine Repeat procedure 10 times Front Caliper Mounting Bolt Torq...

Page 325: ...BRAKES 9 22 FRONT BRAKE CALIPER EXPLODED VIEW Pads Caliper Mount Piston Pin Boot Square O Rings Adjuster Screw ...

Page 326: ...ing port into master cylinder fluid reservoir when piston is pushed back into caliper Remove excess fluid from reservoir as required 3 Remove brake pad retaining pin and pad spacer NOTE This is a spring pin do not spread apart farther than necessary to remove it 4 Clean pad retainer pins with a wire brush 5 Clean the caliper w brake cleaner or alcohol 6 Measure the thickness of the pad material Re...

Page 327: ...mm of brake fluid in the reservoir to prevent air from entering the master cylinder 4 It is recommended that a burnishing procedure be performed after installation of new brake pads to extend service life and reduce noise Start machine and slowly increase speed to 30 mph Gradually apply brakes tostop machine Repeat procedure 10 times Spacer DH Brake Caliper Torque 18 ft lbs 24 9 Nm Auxiliary Brake...

Page 328: ...brake fluid draining from brake lines 3 Remove caliper 4 Remove brake pad retaining pin pads and pad spacer NOTE This is a spring pin Do not spread apart farther than necessary to remove it 5 Remove Allen head screw and separate caliper halves and remove pistons with piston pliers 6 Remove O rings and clean O ring grooves 7 Clean disc caliper body and pistons with brake cleaner or alcohol ...

Page 329: ...ings in caliper body 2 piston seals per caliper half Be sure O ring grooves are thoroughly cleaned of all residue or piston may bind in bore Apply brake fluid to pistons and install carefully with a twisting motion to ease assembly until fully seated 2 Install new O rings between caliper halves 3 Carefully assemble caliper body making sure O rings are properly positioned in groove Torque body scre...

Page 330: ...mounting bolts 6 Install brake lines and tighten with a flare nut wrench 7 Follow bleeding procedure outlined on pages 9 7 9 8 of this section and refer to system overview and illustration on page 9 5 8 Field test unit for proper braking action before putting into service Inspect for fluid leaks and firm brakes Make sure the brake is not dragging when lever is released If the brake drags re check ...

Page 331: ...t points around perimeter of disc Replace disc if worn beyond service limit 3 Mount dial indicator and measure disc runout Replace the disc if runout exceeds specifications Measure Thickness Rear Brake Disc Brake Disc Thickness Service Limit 167 4 242 mm New 177 187 4 496 4 750 mm Brake Disc Thickness Variance Service Limit 002 051 mm difference between measurements Brake Disc Runout Service Limit...

Page 332: ...urn Spring Auxiliary Brake Disc Auxiliary Mas ter Cylinder Hand Brake Line Auxiliary Brake Line Auxiliary Brake Pads DH Caliper Auxiliary Reservoir Hand Brake Bleed Auxilia ry Brake Bleed Torque 8 ft lbs 11 Nm Torque 18 ft lbs 25 Nm Torque 45 ft lbs 62 Nm ...

Page 333: ...ted lever S Incorrectly adjusted stationary pad S Worn or damaged master cylinder or components S Improper clearance between lever and switch Lever Vibration S Disc damaged S Disc worn runout or thickness variance exceeds service limit Caliper Overheats Brakes Drag S Compensating port plugged S Pad clearance set incorrectly S Auxiliary brake pedal incorrectly adjusted S Brake lever or pedal bindin...

Page 334: ...ooting 10 10 Battery Service 10 11 10 14 Charging System Testing 10 15 10 17 Starter System Troubleshooting 10 18 Starter System Testing 10 19 Starter Motor Service 10 20 10 24 Starter Drive 10 25 Electronic Speedometer Troubleshooting 10 26 10 32 Coolant Sensor Tests 10 33 Fan Control Circuit Operation 10 34 Fan Motor Current Draw Test 10 35 Transmission Gear Position Switch Testing 10 36 Electro...

Page 335: ...nd record the resistance The resistance of the component is equal to tested value minus the lead resistance SBecome familiar with the operation of your meter Be sure leads are in the proper jack for the test being performed i e 10A jack for current readings Refer to the Owner s manual included with your meter for more information SVoltage amperage and resistance values included in this manual are ...

Page 336: ...center of the low beam lamp 5 Adjust beam to desired position HIGH BEAM HEADLIGHT LAMP REPLACEMENT CAUTION Do not service while headlight is hot Serious burns may result 1 Remove three Phillips screws at back of headlight pod 2 Remove Phillips screws from bottom of headlight pod at each front corner NOTE To aid in accessing these screws it may be helpful to turn handlebars to left or right and use...

Page 337: ...assemble pod 10 Adjust headlight aim by turning adjusting knob TAILLIGHT BRAKELIGHT LAMP REPLACEMENT If the taillight brakelight does not work the lamp may need to be replaced 1 From the rear of the taillight remove two screws hold ing lens cover in place and remove lens cover 2 Remove lamp and replace it with recommended lamp Apply Nyogelt grease PN 2871329 3 Reinstall the lens cover removed in s...

Page 338: ...timing check hole and check the ignition timing NOTE Do not allow the engine to warm up The timing will retard approximately 2 when the engine is warm If the ignition timing is not within the specified range adjust the stator plate position as described below Flywheel Rotation 32 Timing Pointer 30 28 EH42PL EH50PL Timing Inspec tion Hole Stator Adjustment 1 Remove the magneto housing 2 Remove the ...

Page 339: ...point may vary by several hundred RPM either above or below 3500 Use the point of maximum advance when checking ignition timing 8 10 12 14 16 18 20 22 24 26 28 30 IGNITION TIMING DEGREES B T D C MAXIMUM ADVANCE POINT 0 1000 2500 3000 3500 4000 4500 5000 5500 6000 ...

Page 340: ...ation The flywheel can be identified by the stamp mark in location A or B Refer to I D location in chart below Do not use the cast mark to determine flywheel application Engine Application Cast Stamp Comment Flywheel I D Stamp EH42PLE05 FF95 02 200W A EH50PLE09 13 FF97 06 250W A ...

Page 341: ...TE CDI boxes may look the same but have different internal circuitry Be sure to always use the correct CDI box part number Battery Charging Coils Ignition Kill Wire Black Coil Lead 3 Ω 6300 Ω Pulse Coil Trigger Air Gap 016 040 4 1 0 mm Flywheel and Ring Gear Casting Refer to page 10 6 for identification Refer to wiring diagrams for specified stator coil resistance 200 W 3 wires 250 W 2 Wires Check...

Page 342: ... 10 7 or the wiring schematic for meter connections and specifications Compare results to the specifica tions on the exploded views Are all within speci fications Inspect connectors wiring and grounds to the component in question Replace the compo nent if a wiring problem cannot be found Yes No Yes Yes No Check coil ground connection between engine and coil mount using an ohmmeter The coil mount s...

Page 343: ...king the engine with the electric start er spark plug installed The starter system must be in good condition and the battery fully charged 200 Watt 4 Stroke Sportsman 400 Coil Connect Meter Wires To Reading With Peak Reading Volt meter Exciter 1 Black Red and Red 140 DCV Exciter 2 Black Red and Green 140 DCV Exciter 3 Green and Red 5 DCV Pulse Trigger White Red and White 2 5 DCV 250 Watt 4 Stroke ...

Page 344: ...rd or connections wet corroded SPoor ignition coil ground e g coil mount loose or corroded SFaulty stator measure resistance of all ignition related windings SIncorrect wiring inspect color coding in connectors etc SFaulty ignition coil winding measure resistance of primary and secondary SWorn magneto RH end Crankshaft bearings SSheared flywheel key SFlywheel loose or damaged STrigger coil air gap...

Page 345: ...w battery perform the following steps NOTE Do not service the battery unless it will be put into regular service within 30 days After initial service add only distilled water to the battery Never add electrolyte after a battery has been in service NOTE New Battery Battery must be fully charged before use or battery life will be significantly reduced 10 30 of batterys full potential 1 Remove vent p...

Page 346: ...y vent tube from vehicle to battery vent WARNING Vent tube must be free from obstructions and kinks and securely installed If not battery gases could accumulate and cause an explosion Vent should be routed away from frame and body to prevent contact with electrolyte Avoid skin contact with battery electrolyte severe burns could result If electrolyte contacts the vehicle frame corrosion will occur ...

Page 347: ...35 less than 1 115 At 80_F NOTE Subtract 01 from the specific gravity reading at 40_ F LOAD TEST CAUTION Remove spark plug high tension leads and connect securely to engine ground before proceeding NOTE This test can only be performed on machines with electric starters This test cannot be performed with an engine or starting system that is not working properly A battery may indicate a full charge ...

Page 348: ...attery dis charges The chart at below indicates freezing points by specific gravity CHARGING PROCEDURE Charge the battery with a charger no larger than 1 10 of the battery s amp hr rating for as many hours as needed to raise the specific gravity to 1 270 or greater Electrolyte Freezing Points Specific Gravity of Electrolyte Freezing Point 1 265 75 F 1 225 35 F 1 200 17 F 1 150 5 F 1 100 18 F 1 050...

Page 349: ... voltage regulator connector Is it Check regulator rectifier connections and ground battery connections cir cuit breaker and connecting wires Repair or replace faulty wiring or components If all of the previous tests indicate a good condition but the charging voltage does not rise above battery voltage at the connector or terminal board replace the voltage regulator No Yes No Yes Perform system Br...

Page 350: ...ds lights etc and begins to charge the battery Depending on battery condition and system load the break even point may vary slightly The battery should be fully charged before performing this test SConnect an ammeter set to DC amps in series be tween the negative battery cable and terminal SConnect a tachometer according to manufacturer s in structions SWith engine off and the key and kill switch ...

Page 351: ...ds to the Yellow and Yellow Red wires leading from the alternator SStart the engine and let it idle Reading should be a minimum of 7A at idle CAUTION This test simulates a full load on the alter nator Do not perform this test longer than required to obtain a reading or the alternator stator windings may overheat 3 5 seconds is acceptable Alternator Current Output Minimum of 7 AC Amps To Calculate ...

Page 352: ...problem seized or binding Can engine be rotated easily with recoil starter SFaulty or worn brushes in starter motor SAutomatic compression release inoperative Starter Motor Turns Engine Does Not Rotate SFaulty starter drive SFaulty starter drive gears or starter motor gear SFaulty flywheel gear or loose flywheel VOLTAGE DROP TEST The Voltage Drop Test is used to test for bad connections When perfo...

Page 353: ...enoid Connect the tester black lead to the battery positive and the red lead to the solenoid end of the battery to solenoid wire De press starter button Reading should be less than 1 V D C Clean the battery to solenoid cable ends or replace the cable Connect the black tester lead to solenoid end of battery to solenoid cable Connect red tester lead to solenoid end of solenoid to starter cable De pr...

Page 354: ...e a residue or damage inter nal parts and insulation 1 Note the alignment marks on both ends of the starter motor casing These marks must align during reassembly 2 Remove the two bolts washers and sealing O Rings Inspect O Rings and replace if damaged 3 Remove brush terminal end of housing while holding other two sections together ...

Page 355: ...rge phenolic washer two small phenolic washers and O Ring from brush terminal Inspect the O Ring and replace if damaged 3 Remove brush plate and brushes Measure length of brushes and replace if worn past the service limit Replace springs if they are discolored or have inadequate tension 4 Inspect surface of commutator for wear or discoloration See steps 3 6 of armature testing on page 10 23 5 Inst...

Page 356: ... tape on the threads of the terminal bolt to prevent O Ring damage during reinstallation 7 Install the O Ring over the bolt Make sure the O ring is fully seated 8 Remove the electrical tape and reinstall the two small phenolic washers the large phenolic washer flat washer and nut ...

Page 357: ...less 4 Measure the resistance between each commutator segment and the armature shaft The reading should be infinite no continuity 5 Check commutator bars for discoloration Bars discolored in pairs indicate shorted coils requiring replacement of the starter motor 6 Place armature in a growler Turn growler on and position a hacksaw blade or feeler gauge lengthwise 1 8 3 cm above armature coil lamina...

Page 358: ...grease and install housing aligning marks 4 Install O Ring on other end of field magnet casing Make sure it is in good condition and not twisted on the case 5 Align casing marks and install housing pushing back brushes while installing shaft in bushing 6 Reinstall starter motor housing bolts Make sure O Rings are in good condition and seated in groove 7 Inspect permanent magnets in starter housing...

Page 359: ...e back flange of the anti kick out shoes 2 Remove the lock ring end washer spring retainers and clutch return spring Screw the overrun clutch off the end of the pinion shaft Remove the old spring and install a new one Lightly grease the pinion shaft and reinstall the clutch spring retainers end washer and lock ring in the reverse order Make sure the end washer is positioned properly so that it wil...

Page 360: ...ur meter logs hours when the speedometer is powered up The engine does not have to be running Reverse Speed Limit The transmission gear signal is sent to the speedom eter on pin F The operating speed of the ATV is limit ed when the transmission is shifted into reverse gear The ignition spark to the engine is turned off if the ground speed exceeds 7 to 9 MPH in reverse gear Ignition spark returns w...

Page 361: ...p should light F GRAY ORANGE Reverse signal With transmission in reverse around 12 V DC Should go to 0 V DC when the override button is pushed WARNING All tests done with key and engine stop switch ON All voltages are with reference to pin B ground Polaris probe kit 2201209 will help in measurements but is not necessary if care is used when probing the connectors ELECTRONIC SPEEDOMETER HARNESS WIR...

Page 362: ...NO SPEEDOMETER AND OR ODOMETER DISPLAY N N N Y Y Y Y N N Y Y Y Y N N N Y N N TEST 1 NO ALL WHEEL DRIVE Note If AWD light comes on speedometer is O K Proceed to AWD system tests in Service Manual Check hub coils related wiring and mechanical system for fault and repair as necessary REMOVE 6 PIN PLUG FROM BACK OF SPEEDOMETER HEAD PROCEED WITH HARNESS TEST PERFORM TEST 2 MEASURE PIN E TO PIN B IS BAT...

Page 363: ...EST 4 NO HIGH SPEED ENGAGEMENT LIMIT 1 RAISE VEHICLE WHEELS OFF GROUND AND SUPPORT IN A SAFE MANNER 2 REASSEMBLE SPEEDO MONITOR VOLTAGE BETWEEN BROWN WHITE WIRE OF HUB COIL AND VEHICLE GROUND OR WATCH AWD LAMP 3 TURN AWD OFF START ENGINE REV ABOVE 3000 RPM AND TURN AWD ON HUBS SHOULD NOT ENGAGE VOLTAGE SHOULD REMAIN AT 12 VDC AWD LAMP OFF 4 LOWER RPM AT APPROXIMATELY 2600 RPM VOLTAGE SHOULD GO TO ...

Page 364: ...T 6 WHEEL SPEED SENSOR Tools Required SL E D Test Light tool P N 2871745 SAdaptor Harness P N 2460761 or equivalent jumper wires To test wheel speed sensor 1 Disconnect 3 Pin connector from speedometer 2 Connect wires from test light to sensor 3 Pin connector as shown at right using adaptor harness P N 2460761 or jumper leads 3 Elevate front right side of vehicle until tire is off the ground 4 Slo...

Page 365: ...edometer lost power For example If the ATV was traveling 30 mph when the engine stop switch is turned off speedo may indicate 30 mph until reset 1 Operate vehicle at a speed greater than indicated on speedometer past point where needle is stuck Needle will return to normal operation 2 In the above example the ATV speed would have to exceed 30 mph to reset ELECTRICAL 10 31 ELECTRONIC SPEEDOMETER TR...

Page 366: ...ELECTRONIC SPEEDOMETER WIRING DIAGRAM ELECTRICAL 10 32 ...

Page 367: ...engine cold disconnect lead and measure resistance of sensor between connector terminal and ground There should be no continuity or very high resistance megohms To test the ON temperature heat the switch in a water bath to the temperature shown in table below The switch should become conductive low resistance at indicated temperature Do not immerse switch past the threads or allow switch to contac...

Page 368: ...ace a jumper wire between the wires in the connector 3 Turn ignition key and engine stop switch ON The fan should start running 4 If the fan runs with the jumper wire installed check the fan control switch and connector terminals If the fan does not run or runs slowly with the jumper wire installed check the fan motor wiring ground and motor condition refer to Fan Motor Testing this section Repair...

Page 369: ...acts Reading should be infinite 4 Apply brake at handlebar lever and check for continuity between switch contacts Replace switch if there is no continuity or greater than 5 ohms resistance when the brake is applied with slight pressure HEADLAMP SWITCH Remove the headlight pod cover Probe the headlamp plug wires Brown and Yellow at back of connector Turn headlight on Test for battery voltage across...

Page 370: ...se F F F F Low Range D C B A C B A D F F F F F F F F F F F F High Neutral Reverse Switch Low Neutral Switch H N R Switch L N Switch ELECTRICAL 10 36 GEAR POSITION INDICATOR SWITCH TEST Switch Continuity Table Switch Schematic ...

Page 371: ...le lever position In the event of a mechanical problem in the throttle mechanism cable tension is lost the switch contacts close connecting the CDI black wire to ground preventing ignition spark This is the same as turning the key or engine stop switch OFF Test the ETC switch at the harness connector NOTE Adjust throttle cable freeplay ETC switch and make sure throttle mechanism is functioning pro...

Page 372: ...ELECTRICAL 10 38 NOTES ...

Page 373: ...d Level 2 35 Brake Hose Fitting Inspection 2 35 Brake Inspection Auxiliary 9 6 Brake Light Switch Testing 10 35 Brake Noise 9 3 Brake Pad Adjustment Front 9 15 Brake Pad Application 9 2 Brake Pad Assembly Front 9 15 9 16 Brake Pad Inspection 2 35 Brake Pad Installation Rear 9 24 Brake Pad Kits 9 2 Brake Pad Removal Front 9 14 Brake Pad Removal Rear 9 23 Brake System Inspection 2 35 Brake System Op...

Page 374: ...nkcase Inspection 3 55 Crankcase Installation 3 60 Crankcase Separation 3 48 Cranking Output Test 10 9 Crankshaft End Play Adjustment 3 56 3 57 Crankshaft Removal Inspection 3 53 Crankshaft Straightening 3 12 Current Draw 10 16 CV Joint Handling Tips 7 13 7 32 Cylinder Cleaning 3 11 Cylinder Head Assembly 3 35 3 36 Cylinder Head Disassembly 3 27 3 28 Cylinder Head Inspection 3 26 Cylinder Head Ins...

Page 375: ...stment 2 29 F Fan Control Circuit Testing 10 34 Fan Control Switch Bypass Test 10 34 Fan Control Switch Testing 10 34 Fan Motor Current Draw Test 10 35 Fastener Torque 2 18 Flywheel Identification 10 6 Flywheel Installation 3 72 Flywheel Removal Inspection 3 45 Frame Nuts Bolts Fasteners 2 40 Front Axle Exploded View 7 15 Front Axle Installation 7 12 Front Axle Removal 7 11 7 12 Front Axle Seal Sl...

Page 376: ...cation Transmission 2 10 8 1 M Machine Dimensions 1 8 1 10 Main Jet Selection 4 1 Maintenance Chart Periodic 2 1 2 2 Master Cylinder Assembly 9 11 9 12 Master Cylinder Disassembly 9 9 9 10 Master Cylinder Inspection 9 11 Master Cylinder Installation 9 13 Model Serial Number Location 1 1 Model Color Identification 1 3 1 7 Model Identification 1 1 N Neutral Light Testing 10 35 O Oil Check Engine 2 2...

Page 377: ...nkage Adjustment 2 11 2 12 Shift Weights 6 11 Side Panel Removal 5 5 Spark Plug Maintenance 2 20 Special Tools PVT 6 1 Special Tools Suspension 5 1 Specific Gravity Test 10 13 Specifications Brake 9 1 Specifications Cooling System 3 7 Specifications Drive Clutch Spring 6 10 Specifications Model 1 11 1 16 Specifications Torque Brakes 9 1 Specifications Torque Engine 3 1 Specifications Torque Final ...

Page 378: ...ooting Engine 3 78 3 79 Troubleshooting Fuel System Carb 4 19 4 20 Troubleshooting Ignition System 10 10 Troubleshooting Spark Plug 3 77 Troubleshooting Starter System 10 18 Troubleshooting Transmission 8 33 U U Joint Assembly 7 20 7 21 U Joint Disassembly 7 19 7 20 Unit of Measure Conversion Table 1 22 V Valve Clearance 2 28 Valve Guide Removal Installation 3 31 Valve Inspection 3 29 3 30 Valve S...

Page 379: ...ELECTRICAL 10 39 WIRING DIAGRAM 2001 SPORTSMAN 400 ...

Page 380: ...ELECTRICAL 10 40 WIRING DIAGRAM 2001 SPORTSMAN 500 EARLY ...

Page 381: ...ELECTRICAL 10 41 WIRING DIAGRAM 2001 SPORTSMAN 500 LATE ...

Reviews: