background image

3

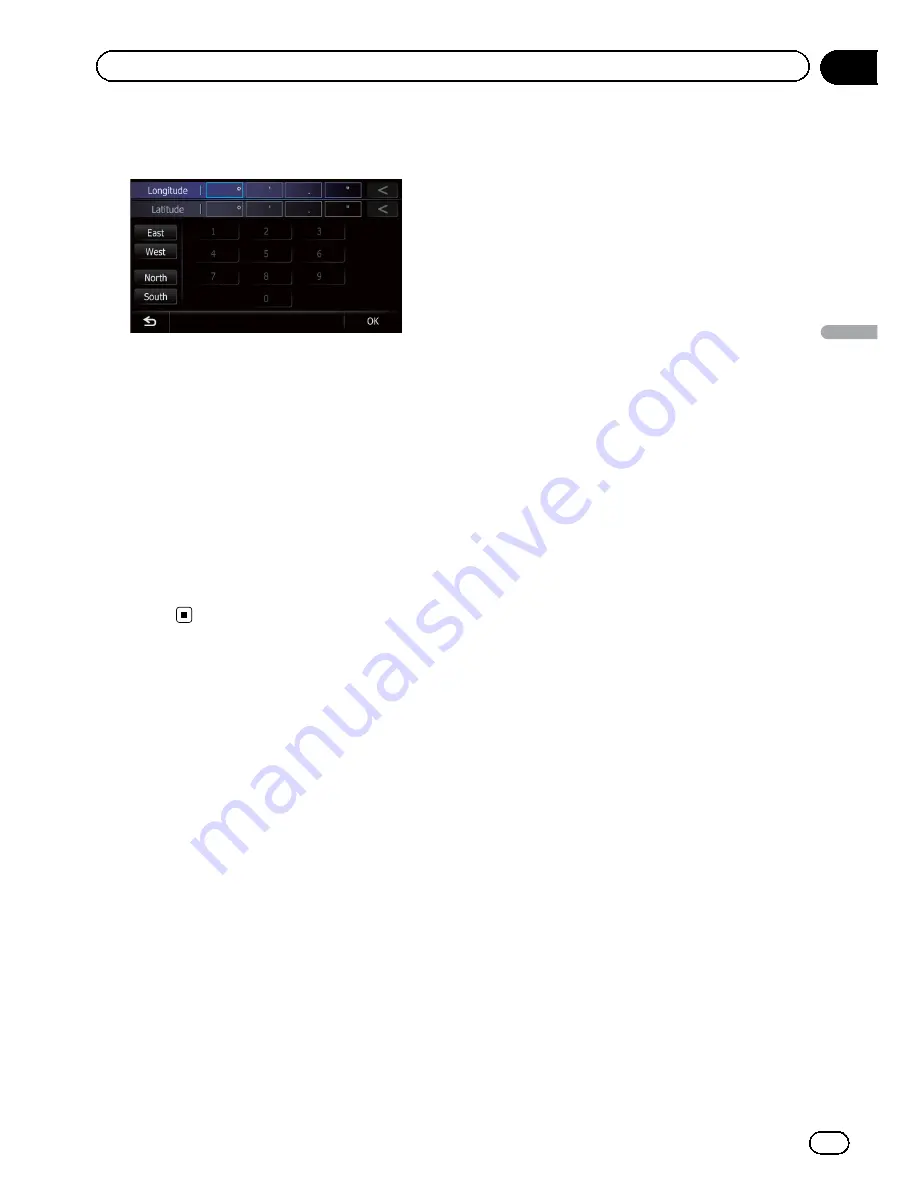
Touch [East] or [West], and then enter

the longitude.

To enter W 50°1

2.5

for example, touch

[

West

], [0], [5], [0], [0], [1], [0], [2], and [5].

4

Touch [North] or [South], and then

enter the latitude.

To enter N 5°1

2.5

for example, touch [

North

],

[0], [5], [0], [1], [0], [2], and [5].

5

Touch [OK].

The searched location appears on the map
screen.

=

For the subsequent operations, refer to

Set-

ting a route to your destination

on the next

page.

En

41

Chapter

06

Searc

hing

for

and

selecting

a

location

Searching for and selecting a location

Summary of Contents for AVIC-X930BT

Page 1: ...cle s parking brake and depending on your vehicle additional installation may be required For more information please contact your Authorized Pioneer Electronics retailer or call us at 800 421 1404 Be sure to read Important Information for the User first Important Information for the User includes the important information that you must understand before using this navigation system English ...

Page 2: ...Inserting and ejecting an SD memory card 16 Inserting an SD memory card for AVIC Z130BT 16 Ejecting an SD memory card for AVIC Z130BT 17 Inserting an SD memory card for AVIC X930BT and AVIC X9310BT 18 Ejecting an SD memory card for AVIC X930BT and AVIC X9310BT 18 Plugging and unplugging a USB storage device 19 Plugging in a USB storage device 19 Unplugging a USB storage device 19 Connecting and di...

Page 3: ...ng waypoints 45 Adding a waypoint 45 Deleting a waypoint 45 Sorting waypoints 46 Canceling the route guidance 46 Registering and editing locations Storing favorite locations 47 Registering a location by Favorites 47 Registering a location by scroll mode 47 Editing registered locations 47 Editing the favorite location in the list 47 Editing your home 48 Sorting the favorite locations in the list 48...

Page 4: ... 69 Basic operations of the AV source Displaying the AV operation screen 70 Selecting a source 70 Operating list screens e g iPod list screen 70 Switching between the AV operation screen and the list screen 70 Selecting an item 71 Returning to the previous display 71 Using the radio FM Starting procedure 72 Reading the screen 72 Using the touch panel keys 73 Storing and recalling broadcast frequen...

Page 5: ...ck 103 Slow motion playback 103 Starting playback from a specified time 104 Operating by hardware buttons 104 Using advanced functions 104 DVD Video or DivX setup Displaying DVD DivX Setup menu 105 Setting the top priority languages 105 Setting the angle icon display 105 Setting the aspect ratio 106 Setting the parental lock 106 Setting the code number and level 106 Setting the auto play 107 Setti...

Page 6: ...songs 140 Using the SIRIUS tuner Starting procedure 141 Reading the screen 141 Using the touch panel keys 142 Selecting a SIRIUS channel directly 143 Display the Radio ID 143 Storing and recalling broadcast stations 143 Using the song alert function 144 Using the Instant Replay function 144 Operating by hardware buttons 145 Using advanced functions 145 Setting the memorized songs 145 Using the Gam...

Page 7: ...view camera 166 Adjusting the response positions of the touch panel touch panel calibration 167 Setting the illumination color 167 Checking the version information 168 Selecting the video for rear display 168 Adjusting the picture 169 Displaying the screen for AV system settings 170 Setting video input 1 AV1 170 Setting video input 2 AV2 171 Changing the wide screen mode 171 Setting the rear outpu...

Page 8: ...e setting information 206 Route search specifications 206 Handling and care of discs 206 Built in drive and care 207 Ambient conditions for playing a disc 207 Playable discs 207 DVD Video and CD 207 AVCHD recorded discs 208 Playing DualDisc 208 Dolby Digital 208 Detailed information for playable media 208 Compatibility 208 Media compatibility chart 211 Bluetooth 215 About the SAT RADIO READY Logo ...

Page 9: ...cribed in ALL CAPITAL BOLD lettering e g HOME button MODE button Menu items screen titles and functional components are described in bold with double quotation marks e g Destination Menu screen or AV Source screen Touch panel keys that are available on the screen are described in bold in brackets e g Destination Settings Extra information alternatives and other notes are presented in the following...

Page 10: ...ribution systems such as pay audio or audio on demand applica tions An independent license for such use is required For details please visit http www mp3licensing com iPod compatibility This product supports only the following iPod models and iPod software versions Others may not work correctly iPod touch fourth generation Ver 4 1 iPod touch third generation Ver 4 1 iPod touch second generation Ve...

Page 11: ...etc p To protect the LCD screen from damage be sure to touch the touch panel keys with your finger only and gently touch the screen Notes on internal memory Before removing the vehicle battery If the battery is disconnected or discharged the memory will be erased and must be repro grammed p Some data remains Be sure to read Setting items to be deleted first For details refer to Setting items to be...

Page 12: ...tions This chapter gives information about the names of the parts and the main features using the buttons 7 6 5 4 3 2 1 AVIC Z130BT with the LCD panel closed 8 9 AVIC Z130BT with the LCD panel open En 12 Chapter 02 Basic operation ...

Page 13: ...ld to turn off the screen dis play 4 MODE button Press to switch between the map screen and the AV operation screen Press to display the map screen while the navigation function screen is dis played Press and hold to display the Picture Adjustment screen For details refer to Adjusting the pic ture on page 169 5 TRK button Press to perform manual seek tuning fast forward reverse and track search co...

Page 14: ...ir mouths After removing the front panel keep it in a safe place so it is not scratched or damaged Keep the front panel out of direct sunlight and high temperatures When removing or attaching the front panel do so after turning the ignition switch off ACC OFF Removing the front panel p The navigation system cannot be operated while the front panel is removed from the navigation system 1 Press and ...

Page 15: ...areful not to get your fingers caught Do not use with the LCD panel left open If LCD panel is left open it may result in injury in the event of an accident CAUTION Do not open or close the LCD panel by force This may cause malfunction Do not operate this navigation system until the LCD panel completely opens or closes If this navigation system is operated while the LCD panel is opening or closing ...

Page 16: ...SD memory card Be sure to eject the SD memory card by the pro cedure described in this manual If data loss or corruption occurs on the sto rage device for any reason it is usually not possible to recover the data Pioneer accepts no liability for damages costs or expenses arising from data loss or corruption Do not insert anything other than SD memory cards p This system is not compatible with Mult...

Page 17: ...ecting an SD memory card for AVIC Z130BT 1 Press the h button The Monitor Setup screen appears 2 Touch Eject SD The LCD panel opens 3 Press the middle of the SD memory card gently until it clicks 4 Pull the SD memory card out straight 5 Press the h button The LCD panel closes p When you eject the SD memory card by touching Eject SD the model information that you are using will be automatically sto...

Page 18: ...h the terminal contacts facing down and press the card until it clicks and locks completely p If data related to map data such as custo mized POI data is stored on the SD mem ory card the navigation system restarts Ejecting an SD memory card for AVIC X930BT and AVIC X9310BT 1 Press the h button The touch panel keys for ejecting the media appear 2 Touch Eject SD A message prompting you to remove th...

Page 19: ...ity for damages costs or expenses arising from data loss or corruption Plugging in a USB storage device Plug a USB storage device into the USB and mini jack connector USB and mini jack connector USB storage device p Compatibility with all USB storage devices is not guaranteed This navigation system may not achieve op timum performance with some USB sto rage devices p Connection via a USB hub is no...

Page 20: ...ing ac cessed Startup and termination 1 Start the engine to boot up the system After a short pause the splash screen comes on for a few seconds p To protect the LCD screen from damage be sure to touch the touch panel keys with your finger only and gently touch the screen 2 Turn off the vehicle engine to termi nate the system The navigation system is also turned off On first time startup When you u...

Page 21: ...shown will differ depending on the previous conditions p When there is no route the disclaimer ap pears after the navigation system reboots Read the disclaimer carefully checking its details and then touch OK if you agree to the conditions p If the anti theft function is activated you must enter your password Read the disclaimer carefully checking its details and then touch OK if you agree to the ...

Page 22: ...Screen switching overview 2 5 6 1 1 3 4 En 22 Chapter 03 How to use the navigation menu screens ...

Page 23: ... You can use this screen to check the current vehicle position information and route to the destination Shortcut Menu Registering your favorite menu items in short cuts allows you to quickly jump to the regis tered menu screen by a simple touch on the Shortcut Menu screen Selecting the shortcut p Up to 15 menu items can be registered in shortcuts 1 Press the HOME button repeatedly to display the S...

Page 24: ... the displayed area touching the key to the right of the item allows you to see remain ing characters Operating the on screen keyboard 1 4 3 5 7 6 2 8 1 Screen title The screen title appears 2 Text box Displays the characters that are entered If there is no text in the box an informative guide with text appears 3 Keyboard Touch the keys to enter the characters 4 The previous screen returns 5 Keys ...

Page 25: ... Distance to the guidance point Shows the distance to the next guidance point p Touching this item enables you to hear the next guidance again 4 Second Maneuver Arrow Shows the turning direction after next gui dance point and the distance to there For details refer to Displaying maneu vers on page 159 5 Map control Touching displays touch panel keys for changing the map scale and the map orienta t...

Page 26: ...int is set on the route the route after the next waypoint is high lighted in another color e Direction line The direction towards your destination next waypoint or the position of a cursor is indi cated with a straight line f Multi Info window Each touch of Multi Info window changes the display information as follows Distance to the destination or dis tance to waypoint Estimated time of arrival at...

Page 27: ... will display full route guidance including turn by turn voice directions and arrow icons Roads without turn by turn instructions Routable roads the route displayed and high lighted in violet have only basic data and can only be used to plot a navigable route Pioneer Navigation will only display a navigable route on the map only the arrival guidance for the destination or a waypoint is available P...

Page 28: ... the function for a few seconds the touch panel keys for map dis play control disappear Scrolling the map to the position you want to see 1 Display the map screen 2 Touch and drag the map in the desired direction to scroll 2 1 1 Cursor 2 Distance from the current position Positioning the cursor to the desired location results displaying in a brief informational over view about the location at the ...

Page 29: ...uick Access displayed on screen The Quick Access described here are prepared as the default setting For details refer to Selecting the Quick Ac cess menu on page 162 p Items marked with an asterisk cannot be removed from the Quick Access menu When the map is displayed touch Quick Access menu Route Options Displayed when the map is not scrolled This item can be selected only during route gui dance ...

Page 30: ... 3D View Displays a map with an antenna view 3D map Street View Information on the next four guidance points closest to the current location ap pear in order from top to bottom on the left side of the screen The following informa tion is displayed Name of the next route to be taken by the vehicle Arrow indicating the direction of the ve hicle Distance to the guidance points p This mode is availabl...

Page 31: ... For details refer to Checking the eco friendly driving status on the next page En 31 Chapter 04 How to use the map How to use the map ...

Page 32: ...e The View Mode screen appears 3 Touch Eco Graph The Eco Graph screen appears 2 4 3 1 1 Eco Score The result of the comparison of your past average fuel mileage and current average fuel mileage appears as a value from 0 0 Pts points to 10 0 Pts The higher the value the better the fuel mileage when compared to past route guidance The green gauge indicates the current score and the gray gauge indica...

Page 33: ...idance This navigation system is equipped with the Eco Drive Level function that estimates how well you have driven in an environmentally friendly way The points of Eco Drive Level change ac cording to Eco Score when the vehicle reaches the destination When a certain num ber of points is reached the level increases and a message appears Tree icon As the level increases a tree icon changes from a y...

Page 34: ...c flow of creating your route 1 Park your vehicle in a safe place and apply the parking brake j 2 Display the Destination Menu screen For details of the operations refer to Screen switching overview on page 22 j 3 Select the method of searching for your destination j 4 Enter the information about your destina tion to calculate route j 5 Confirm the location on the map For details refer to Setting ...

Page 35: ...ess 3 Touch the key next to Country to se lect the country If the destination is in another country change the country setting p Once the country has been selected you only have to change countries when your destination is outside of the country you se lected 4 Touch the key next to State and touch the desired state province or terri tory on the list If the location that you want to search for is ...

Page 36: ...l automatically search the database for all possible options Only the characters you enter are active p If the search candidates number reaches 20 or less the screen automatically changes to the search result screen 1 Display the Address Search screen 2 Touch House The Enter House Number screen appears 3 Enter the house number and then touch OK The Enter Street Name screen appears 4 Enter the stre...

Page 37: ...es Points Of Interest POI such as gas stations parking lots or restaurants is available You can search for a POI by selecting the category or entering the POI Name Searching for POIs by preset categories You can search for POIs with a single touch from the preset category 1 Display the Destination Menu screen For details of the operations refer to Screen switching overview on page 22 2 Touch POI 3...

Page 38: ...e 22 2 Touch POI The POI Search screen appears 3 Touch Near Me POIs are divided into several categories 4 Touch the category you want The POI List screen appears p If there are more detailed categories within the selected category repeat this step as many times as necessary 5 Touch the POI you want The searched location appears on the map screen For the subsequent operations refer to Set ting a ro...

Page 39: ...ou touch the geographic center of the city appears on the map screen 6 Touch the category you want POIs are divided into several categories 7 Touch the POI you want The searched location appears on the map screen For the subsequent operations refer to Set ting a route to your destination on page 42 Selecting destination from Favorites Storing locations you visit frequently saves time and effort Se...

Page 40: ...s refer to Set ting a route to your destination on page 42 Selecting a location you searched for recently The places that you have set as destination or waypoint in the past are automatically stored in History p If no location is stored in Destination His tory you cannot select History If you perform a route calculation you can select History p History can store up to 100 locations If the entries ...

Page 41: ... and then enter the latitude To enter N 5 1 2 5 for example touch North 0 5 0 1 0 2 and 5 5 Touch OK The searched location appears on the map screen For the subsequent operations refer to Set ting a route to your destination on the next page En 41 Chapter 06 Searching for and selecting a location Searching for and selecting a location ...

Page 42: ... 2 Distance to the destination 3 Estimated fuel cost to your destination For details refer to Inputting the fuel consumption information for calculating the fuel cost on page 152 4 Route calculation condition If you touch the message confirming whether to cancel the calculated route appears If you touch Yes the calculated route is can celed and the map screen appears 2 3 1 4 1 Multiple Route For d...

Page 43: ...uch the desired items to change the route calculation conditions and then touch OK The route is recalculated and the Route con firmation screen appears Items that users can operate Settings marked with an asterisk show that these are default or factory settings Route Condition This setting controls how the route should be calculated by taking into account the time dis tance or main road Determines...

Page 44: ...ct On On Calculates a route while avoiding streets or bridges with traffic restrictions during a cer tain time Off Calculates a route while ignoring traffic re strictions p The system may calculate a route that in cludes streets or bridges that are subject to traffic restrictions during a certain time even if On is selected CAUTION If the time difference is not set correctly the navi gation system...

Page 45: ...ts List screen The route is recalculated and the Route con firmation screen appears p If you set waypoints you cannot display multiple routes Deleting a waypoint You can delete waypoints from the route and then recalculate the route You can delete successive waypoints 1 Display the Route Overview screen For details refer to Displaying the route overview on page 43 2 Touch Waypoints The Waypoints L...

Page 46: ...is recalculated and the Route con firmation screen appears 7 Touch OK The map of the current position appears Canceling the route guidance If you no longer need to travel to your destina tion follow the steps below to cancel the route guidance 1 Display the Destination Menu screen For details of the operations refer to Screen switching overview on page 22 2 Touch Cancel Route A message confirming ...

Page 47: ... tion in the list on this page 6 Touch OK The registration is complete Registering a location by scroll mode p This function is available when Registra tion is set in the Quick Access menu For details refer to Selecting the Quick Access menu on page 162 1 Touch and drag the screen to scroll the map to the position that you want to regis ter 2 Touch to display the Quick Access menu 3 Touch The loca...

Page 48: ...t 3 Touch next to the home location The Edit Favorite screen appears 4 Touch the item that you want to change the setting 1 2 1 Phone To dial the number touch Call 2 Modify Location You can change the registered location by scrolling the map p For home information Name and Icon are not editable 5 Touch OK The registration is complete Sorting the favorite locations in the list 1 Display the Destina...

Page 49: ...EEDS which is available sepa rately on your PC p If there is previous data in the SD memory card the data is overwritten with new data 1 Insert an SD memory card into the SD card slot For details of the operation refer to Insert ing and ejecting an SD memory card on page 16 2 Display the Destination Menu screen For details of the operations refer to Screen switching overview on page 22 3 Touch Fav...

Page 50: ...om the list Items in History can be deleted All entries in History can be deleted at once 1 Display the Destination Menu screen For details of the operations refer to Screen switching overview on page 22 2 Touch History The Destination History List screen ap pears 3 Touch Delete The Delete from History screen appears 4 Select the location you want to delete A check mark appears next to the selecte...

Page 51: ...lowing types of traffic infor mation stop and go stopped traffic closed blocked roads This information is always taken into consideration when checking your route and the information related with these events cannot be turned off If you select other traffic information in Traffic Settings the information can be displayed in a list or on a map For details refer to Selecting traffic infor mation to ...

Page 52: ...the same as Traffic Event List screen For details refer to Checking all traffic infor mation on the previous page How to read traffic information on the map The traffic event information displayed on the map is as follows p A line is displayed only when the map scale is 2 5 miles 5 km or lower p Icon appears only when the scale on the map is 10 miles 20 km or lower If the scale is changed the icon...

Page 53: ...of the screen If you touch Refresh while new traffic infor mation is received current information is chan ged and old information is removed The traffic information list is updated to reflect the new si tuation Touch The traffic event information displayed on the map is as follows Traffic flow icon and line Red average speed in this area is slower than 15 mph 24 km h Yellow average speed in this a...

Page 54: ... re turns to the previous screen Checking traffic information manually Touching the notification icon on the map screen allows you to check traffic information on your route while the icon is displayed The notification icon is only displayed on the navi gation map screen if there is any traffic infor mation on your route p The notification icon is not available if your vehicle deviates from the ro...

Page 55: ... screen appears 5 Touch the traffic information item to display A check mark appears next to the selected traffic information If you touch All you can select all entries If you want to deselect all entries touch None 6 Touch OK The selected traffic information icon is added to the screen 7 Touch OK Selecting preferred RDS TMC service provider manually A default preferred TMC service provider for e...

Page 56: ... device oper ation Registering your Bluetooth devices You need to register your devices featuring Bluetooth wireless technology when you con nect it for the first time A total of 5 devices can be registered Three registration methods are available Searching for nearby Bluetooth devices Pairing from your Bluetooth devices Searching for a specified Bluetooth device p If you try to register more than...

Page 57: ...ooth connection is established from the navigation system Pairing from your Bluetooth devices You can register the Bluetooth device by set ting the navigation system to standby mode and requesting connection from the Bluetooth device 1 Activate the Bluetooth wireless tech nology on your devices For some Bluetooth devices no specific action is necessary to activate Bluetooth wireless technology For...

Page 58: ...ction manual of your devices 2 Display the Settings Menu screen For details of the operations refer to Screen switching overview on page 22 3 Touch Bluetooth Settings The Bluetooth Settings screen appears 4 Touch Registration The Nearby Device List screen appears 5 Touch Select specific devices The Select specific devices screen appears 6 Touch the Bluetooth device name to be connected The system ...

Page 59: ...one book entries and call history lists that correspond to the phone will be also cleared 1 Display the Settings Menu screen For details of the operations refer to Screen switching overview on page 22 2 Touch Bluetooth Settings The Bluetooth Settings screen appears 3 Touch Registration A message prompting you to delete a regis tered device appears 4 Touch OK The Delete from Connection List screen ...

Page 60: ...sfree and Audio Connects the device as the hands free phone and the Bluetooth audio player Audio Connects the device as Bluetooth audio player Handsfree Connects the device as the hands free phone Connection starts When a connection is successfully estab lished a connection complete message ap pears and the map screen returns by touching OK p To cancel the connection to your device touch Cancel p ...

Page 61: ...ress the HOME button to display the Top Menu screen 2 Touch Phone The Phone Menu screen appears 2 1 3 45 1 Name of connected cellular phone 2 Network name of the cellular phone com pany 3 Strength of the Bluetooth connection be tween the navigation system and the device 4 Reception status of the cellular phone 5 Battery status of the cellular phone Making a phone call You can make a phone call in ...

Page 62: ...on the alphabet tabs 1 Display the Phone Menu screen For details refer to Displaying the phone menu on the previous page 2 Touch Contacts The Contacts List screen appears 3 Touch alphabet tabs The screen jumps to the top of the page dis playing the entries that start with the selected letter or number p Touching ABCDE displays all entries that start with symbols or numbers p Touching Others displa...

Page 63: ...he call after the system starts dialing touch If you touch Detail the Detailed Informa tion screen appears You can check the details of the party before mak ing a phone call 4 Touch to end the call Dialing a favorite location You can make a call to an entry stored in the Favorites list 1 Display the Destination Menu screen For details of the operations refer to Screen switching overview on page 22...

Page 64: ...ion system Answering an incoming call The system informs you that it is receiving a call by displaying a message and producing a ring sound p You can set the system to automatically an swer incoming calls If not set to automati cally answer incoming calls you will have to answer the calls manually For details refer to Answering a call automatically on page 67 p If the voice on the other end of the...

Page 65: ...d 1 000 the extra entries will not be transferred If more than one number is re gistered for one person such as work place and home each number may be counted separately p Each entry can hold up to 5 phone num bers p Depending on the cellular phone that is connected to this navigation system via Bluetooth technology this navigation sys tem may not be able to display the phone book correctly Some c...

Page 66: ...d Changing the phone settings Editing the device name You can change the device name to be dis played on your cellular phone Default is PIONEER NAVI 1 Display the Settings Menu screen For details of the operations refer to Screen switching overview on page 22 2 Touch Bluetooth Settings The Bluetooth Settings screen appears 3 Touch Device Name The keyboard to enter the name appears 4 Touch to delet...

Page 67: ...cho Cancel Each touch of Echo Cancel changes the set tings as follows On default Activates echo canceling and noise reduc tion Off Deactivates echo canceling and noise re duction Answering a call automatically The navigation system automatically answers incoming calls to the cellular phone so you can answer a call while driving without taking your hands off the steering wheel 1 Display the Setting...

Page 68: ...ssed Calls List Clears the missed call history list If you touch Clear All all the data is cleared that correspond to the connected cellular phone 5 Touch Yes Data on the selected item is cleared from this navigation system s memory If you do not want to clear the memory that you have selected touch No Updating the Bluetooth wireless technology software Update files will be available for download ...

Page 69: ...e the volume level for hands free phoning This may reduce the echo With some cellular phones even if you press the accept button on the cellular phone when a call comes in hands free phoning may not be performed The registered name appears if the phone number of the received call is already regis tered in the phone book When one phone number is registered under different names the name that comes ...

Page 70: ...n can also be dis played by touching AV Source Con tents on the Top Menu Selecting a source Source icons 1 Touch then drag any source icons up or down to display additional source icons The AV source icons will scroll and previously hidden icons will appear 2 Tap the icon of the source you want to select The operation screen of the selected source appears p The currently selected source icon is hi...

Page 71: ...ing items up or down to display the item you want to se lect p Flicking a list item enables you to quickly scroll through the list To stop scrolling gently touch the list 2 Tap the item p The item currently selected is highlighted Returning to the previous display Touch to return to the previous screen En 71 Chapter 13 Basic operations of the AV source Basic operations of the AV source ...

Page 72: ...to Using the touch panel keys on the next page Reading the screen 1 2 3 6 5 4 7 8 9 1 Source icon Shows which source has been selected 2 Band indicator Shows which band the radio is tuned to FM1 to FM3 3 Program service name indicator Shows the program service name station name of the current station 4 Signal level indicator 5 Frequency indicator 6 STEREO indicator Shows that the frequency selecte...

Page 73: ...ower keys and the upper keys ap pear only when the preset channel is se lected 3 Recalls equalizer curves For details refer to Using the equalizer on page 175 4 Displays the Function menu For details refer to Using advanced func tions on the next page 5 Switches between the AV operation screen and the preset list display You can switch the screen display according to your preference For details of...

Page 74: ...on menu appears 1 2 1 Stores the strongest broadcast frequen cies 2 Tunes in strong signals For details of each function refer to sec tions below with the relative titles Storing the strongest broadcast frequencies BSM best stations memory lets you automa tically store the six strongest broadcast fre quencies under the preset tuning keys P1 to P6 and once stored there you can tune into them with t...

Page 75: ... Off local seek tuning is turned off 4 Touch cPrev or Nextd to set the sen sitivity There are four levels of sensitivity for FM Level 1 2 3 4 p The level 4 setting allows reception of only the strongest stations while lower settings let you receive weaker stations En 75 Chapter 14 Using the radio FM Using the radio FM ...

Page 76: ...en to display the AM screen When the tuner has been tuned in to an HD Radio broadcasting AM cannot be selected 3 Use the touch panel keys on the screen to control the radio For details refer to Using the touch panel keys on the next page Reading the screen 1 3 2 4 5 6 1 Source icon Shows which source has been selected 2 Signal level indicator 3 Frequency indicator 4 Current time 5 Frequency indica...

Page 77: ...he preset channel you want to select and tap the channel p The lower keys and the upper keys ap pear only when the preset channel is se lected 3 Recalls equalizer curves For details refer to Using the equalizer on page 175 4 Displays the Function menu For details refer to Using advanced func tions on the next page 5 Switches between the AV operation screen and the preset list display You can switc...

Page 78: ...unes in strong signals For details of each function refer to sec tions below with the relative titles Storing the strongest broadcast frequencies BSM best stations memory lets you automa tically store the six strongest broadcast fre quencies under the preset tuning keys P1 to P6 and once stored there you can tune into them with the touch of a key p Storing broadcast frequencies with BSM may replac...

Page 79: ...ch Off local seek tuning is turned off 4 Touch cPrev or Nextd to set the sen sitivity There are two levels of sensitivity for AM Level 1 2 p The level 2 setting allows reception of only the strongest stations while lower settings let you receive weaker stations En 79 Chapter 15 Using the radio AM Using the radio AM ...

Page 80: ...ting HD Radio broadcasting is high quality audio and data services HD Radio broadcasting is brought to you by your local FM or AM sta tions HD Radio broadcasting features the following High quality audio FM multicasting Data services Sub channel AM band Analog AM Analog AM Digital AM FM band Analog FM Analog FM Digital FM Analog FM Digital FM 1ch Digital FM 2ch Digital FM 3ch Main channel Starting...

Page 81: ...iver Appears when the navigation system is storing song informa tion The icon is displayed on all op eration screens of AV sources 8 Song info status indicator Shows the status of the song information stored in the navigation system Indicator Meaning The number of song information items stored in the navigation system is displayed The icon is displayed on all op eration screens of AV sources Appea...

Page 82: ... When an analog station is received tun ing up or down is conducted within ana log broadcasts If a digital broadcast is not yet received tuning up or down tunes into the next or previous analog station Analog FM Analog FM Analog FM Digital FM 1ch Digital FM 2ch Digital FM 3ch 2 Selects a preset channel The keys can be used to switch preset chan nels Scroll by dragging the keys up or down to dis pl...

Page 83: ...u can easily store up to six broadcast frequencies for later recall also with the tap of a key 1 Select a frequency that you want to store in memory 2 Display the preset channel list For details refer to Switches between the AV operation screen and the preset list display on this page 3 Keep touching a preset tuning key Pre set 1 to Preset 6 Preset list display Preset tuning keys For details refer...

Page 84: ...d nano 3rd generation iPhone 4 iPhone 3GS iPhone 3G iPhone p The version of iTunes must be 7 4 or higher 1 Tune into the digital broadcast station When song information is received is displayed while the desired song is being broadcast and Tag becomes active For details refer to Song info reception in dicator on page 81 2 Touch Tag The information on the song on air is stored in the navigation sys...

Page 85: ... seek tuning 1 Touch on the Tuner screen 2 Touch Seek to select the desired set ting All Seeks stations from both analog and digital broadcasting HD Seeks from digital broadcasting only p If you select HD on this setting while Blending is set to Analog the setting on Blending turns to D A Auto automa tically Tuning in strong signals Local seek tuning allows you to tune in only those radio stations...

Page 86: ...roadcasting only D A Auto Automatically switches to the analog broad cast of the same frequency level as the digi tal broadcast p If you select Analog on this setting while Seek is set to HD the setting on Seek turns to All automatically En 86 Chapter 16 HD Radio reception ...

Page 87: ... condition Scanning tracks of a CD Indicator Meaning Cancels the scan play Plays the beginning of each track in the current repeat play range for about 10 seconds Playing tracks in random order Indicator Meaning Does not play tracks in random order Plays all tracks in the current disc in random order Setting a repeat play range Indicator Meaning Repeats the current disc Repeats just the current tr...

Page 88: ... starts playback Tapping the lower key during random play back skips to the next track Tapping the upper key jumps to the start of the current track 5 Recalls equalizer curves For details refer to Using the equalizer on page 175 6 Displays the Function menu For details refer to Using advanced func tions on the next page 7 Playback and Pause Touching f switches between playback and pause 8 Selects ...

Page 89: ...Disc automatically 3 Scans tracks of a CD Each touch of Scan turns it on or off Scan play lets you hear the first 10 seconds of each track on the CD When you find the track you want touch Scan to turn scan play off p After scanning is finished normal play back of the tracks will begin again p If you turn the scan play on when the re peat play range is set to Track the re peat play range changes to...

Page 90: ...condition indicator Indicates the current playback condition Scanning folders and files Indicator Meaning Cancels the scan play Plays the first audio files of each folder for about 10 seconds when the repeat range is set to Disc Plays the beginning of each audio file in the current folder for about 10 seconds when the repeat range is set to Folder Playing files in random order Indicator Meaning Do...

Page 91: ... no corre sponding information 4 Current time 5 File information File number indicator File name indicator File type indicator Shows the type of audio files En 91 Chapter 18 Playing music files on ROM Playing music files on ROM ...

Page 92: ... repeat range on the next page 4 Selects a file to play Scrolling the keys up or down displays files and tapping a file starts playback Tapping the lower key during random play back skips to the next file Tapping the upper key jumps to the start of the current file 5 Recalls equalizer curves For details refer to Using the equalizer on page 175 6 Displays the Function menu For details refer to Usin...

Page 93: ...der is selected it is not pos sible to playback a subfolder of that folder p When playing discs with compressed audio files and audio data CD DA re peat play is performed within the cur rently playing data session even if Disc is selected 2 Plays files in random order Each touch of Random turns it on or off When the random play is turned on the files in the current repeat play range are randomly p...

Page 94: ...tivates Sound Retriever function MODE 2 Activates Sound Retriever function Off Deactivates Sound Retriever function p MODE 2 has a stronger effect than MODE 1 and is more effective when playing back highly compressed audio data En 94 Chapter 18 Playing music files on ROM ...

Page 95: ...e Reading the screen b 1 5 6 7 2 3 4 a 8 9 1 Title number indicator Shows the title number currently playing 2 Audio track indicator Shows the audio track number and audio lan guage currently selected 3 Chapter number indicator Shows the chapter number currently playing 4 Audio channel indicator Shows the current audio channel type such as Mch Multi channel 5 Subtitle number indicator Shows the su...

Page 96: ...uching Disp changes the indication on the information plate as follows Disc information display Repeat range and L R select display 4 Switches to the next page of touch panel keys 5 Displays the DVD menu keypad For details refer to Using DVD menu by touch panel keys on page 98 6 Playback and Pause Touching f switches between playback and pause 7 Hides the touch panel keys and informa tion of the c...

Page 97: ...to the DVD re turns to the specified point and begins play back from that point g Searches for a desired scene and starts playback from a specified time For details refer to Searching for a speci fic scene and starting playback from a specified time on the next page h Changes the audio track Multi audio Each touch of Audio switches between audio tracks recorded in the disc p DTS audio format canno...

Page 98: ...need to enter a numerical command during DVD play back 1 Touch Search 2 Touch 10Key 3 Touch 0 to 9 to input the desired number 4 While the input number is displayed touch Enter Operating the DVD menu You can operate the DVD menu by touching the menu item on the screen directly p This function can be used when the key is displayed on the lower right corner of the LCD screen p This function may not ...

Page 99: ...during slow motion playback Each time you touch q or r it changes the speed in four steps in the following order 1 16 f 1 8 f 1 4 f 1 2 p There is no sound during slow motion play back p With some discs images may be unclear during slow motion playback p Reversed slow motion playback is not possi ble Operating by hardware buttons Pressing the TRK button You can skip chapters forward or backward Pr...

Page 100: ...ws L R Left and right L Left R Right Mix Mixing left and right p This function is not available when disc playback has been stopped 3 DVD setup adjustments For details refer to Displaying DVD DivX Setup menu on page 105 En 100 Chapter 19 Playing a DVD Video ...

Page 101: ...n the next page Reading the screen a 1 5 6 23 4 7 9 8 1 Folder number indicator Shows the folder number currently playing 2 Audio track indicator Shows the audio track number currently se lected 3 File number indicator Shows the file number currently playing 4 Audio channel indicator Shows the current audio channel type such as Mch Multi channel 5 Subtitle number indicator Shows the subtitle numbe...

Page 102: ...essed audio file DivX DivX video files 2 Displays the Function menu For details refer to Using advanced func tions on page 104 3 Recalls equalizer curves For details refer to Using the equalizer on page 175 4 Switches the information Touching Disp changes the content of the in formation panel as follows Disc information display Current folder name display Current file name display 5 Switches to th...

Page 103: ...motion playback on this page c Fast reverse or forward Touch and hold m or n to perform fast reverse or forward If you keep touching m or n for five seconds fast reverse fast forward continues even if you release either of these keys To re sume playback at a desired point touch f or opposite key of m or n which you touched d Changes the subtitle Multi subtitle Each touch of S Title switches betwee...

Page 104: ...button You can perform fast reverse or fast for ward Using advanced functions Touch on the DivX screen The Function menu appears 1 2 1 Changes the repeat range Each touch of Repeat changes the setting as follows Disc Plays throughout the current disc File Repeats just the current file Folder Repeats just the current folder p If you select another folder during repeat play the repeat play range cha...

Page 105: ...d the cur rently set language is selected 3 Touch the desired language When you select Others a language code input display is shown Input the four digit code of the desired language then touch Enter For details refer to Language code chart for DVDs on page 108 p If the selected language is not recorded on the disc the default language specified on the disc is output and displayed p You can also s...

Page 106: ... as de sired p When you set a parental lock level and then play a disc featuring parental lock code number input indications may be dis played In this case playback will begin when the correct code number is input Setting the code number and level When you first use this function register your code number If you do not register a code number parental lock will not operate 1 Display the DVD DivX Se...

Page 107: ...e repeat range is automatically set to Disc Setting the subtitle file for DivX You can select whether to display DivX exter nal subtitles or not p If no DivX external subtitle files exist the original DivX subtitles are displayed even when Custom is selected 1 Display the DVD DivX Setup screen For details refer to Displaying DVD DivX Setup menu on page 105 2 Touch Subtitle File Touching Subtitle F...

Page 108: ...cy 0325 Welsh ln 1214 Lingala sv 1922 Swedish da 0401 Danish lo 1215 Lao sw 1923 Swahili de 0405 German lt 1220 Lithuanian ta 2001 Tamil dz 0426 Dzongkha lv 1222 Latvian te 2005 Telugu ee 0505 Ewe mg 1307 Malagasy tg 2007 Tajik el 0512 Greek mi 1309 Maori th 2008 Thai en 0514 English mk 1311 Macedonian ti 2009 Tigrinya eo 0515 Esperanto ml 1312 Malayalam tk 2011 Turkmen es 0519 Spanish mn 1314 Mon...

Page 109: ...en to display the USB or SD screen 4 Use the touch panel keys on the screen to control the external storage device USB SD For details refer to Using the touch panel keys Music on page 111 Reading the screen 1 2 3 4 5 p This unit may not achieve optimum perfor mance with some external storage devices p You can playback the files on a USB sto rage device compliant with Mass Storage Class For details...

Page 110: ...vailable Album title Shows the title of the album of the cur rent file when available Track title Shows the title of the track currently playing when available p If the title of a track is not available the file name appears Play time Shows the elapsed playing time within the current file p is displayed if there is no corre sponding information 4 Current time 5 File information File number indicat...

Page 111: ...ower key during random play back skips to the next file Tapping the upper key jumps to the start of the current file 5 Recalls equalizer curves For details refer to Using the equalizer on page 175 6 Displays the Function menu For details refer to Using advanced func tions on the next page 7 Playback and Pause Touching f switches between playback and pause 8 Selects a file from the list Touching th...

Page 112: ...s the current folder p If you skip the file forward or backward when the repeat play range in Track the repeat play range changes to Folder 2 Plays files in random order Random play lets you playback files in ran dom order within the current repeat range Each touch of Random turns it on or off p If you turn the random play on when the repeat play range is set to Track the repeat play range changes...

Page 113: ...lder 02 3 Tap USB or SD on the left edge of the screen to display the USB or SD screen 4 Touch the screen to display the touch panel keys 5 Use the touch panel keys on the screen to control the external storage device USB SD For details refer to Using the touch panel keys Video on the next page Reading the screen 8 7 4 1 2 3 5 6 p This unit may not achieve optimum perfor mance with some external s...

Page 114: ...touch panel keys and informa tion of the current video Touching Hide shows only the current video p If you want to display the touch panel keys and information of the current video again touch anywhere on the LCD screen 7 Skips forward or backward Touching p skips to the start of the next file Touching o once skips to the start of the current file Touching it twice quickly will skip to the previou...

Page 115: ...ails of the operations refer to Dis playing the AV operation screen on page 70 2 Touch the screen to display the touch panel keys 3 Touch The Function menu appears p If the touch panel keys are not shown touch anywhere on the screen to display them 1 2 1 Changes the repeat range Each touch of Repeat changes the setting as follows Media Repeats all video files in the se lected external storage devi...

Page 116: ...ls of the operation refer to Using the touch panel keys on page 118 Reading the screen Music 6 5 1 2 3 4 Video 6 7 1 7 3 1 Playback condition indicator Indicates the current playback condition Setting the shuffle play Indicator Meaning Cancels the shuffle play Plays back songs or videos in random order within the se lected list Selects an album randomly and then plays back all songs in that album ...

Page 117: ...ator Shows the genre of the current song 6 Source icon Shows which source has been selected 7 Current video information Chapter number Shows the current chapter number when the video with chapters played when available Artist name podcast title Shows the artist name currently playing When a podcast is played the podcast title is displayed when available File number indicator Shows the number of th...

Page 118: ...fle play setting can be changed by touching only one key For details refer to Sets the shuffle play for music on page 123 2 Sets a repeat play range The repeat play range can be changed by touching only one key For details refer to Sets repeat play on page 122 3 Displays the MusicSphere screen En 118 Chapter 24 Using an iPod iPod ...

Page 119: ...ays the album list d Displays the artist list e Switches the operation screen Tapping this key displays the touch panel key Video or Music to switch between the screen to operate video files and the screen to operate music files For details of the operation refer to Starting the video playback on the next page p This touch panel key is available only when there are both audio and video file in you...

Page 120: ...o a video source 2 Tap Music A list of videos by category appears 3 Tap one of the categories in that con tains the video you want to play 4 Tap your desired item on the list to nar row down them until the video list ap pears For details refer to Narrowing down a song or video with the list on this page 5 On the video list tap the video you want to play Video playback will start 6 Touch the screen...

Page 121: ...of the list to start playing the first song in the selected list and display the next hierarchy 5 On the song episode or video list tap the song episode or video you want to play p After you select the song episode or video using this function touching displays the list previously selected Operating the functions from your iPod You can control the navigation system via the connected iPod When you ...

Page 122: ...the playlist 3 Playlist name indicator Shows the name of the playlist currently se lected 4 Current time 5 Category name Shows the category name in the playlist Using the touch panel keys 1 2 1 Switches to the AV operation screen 2 Plays the playlist Tapping a key moves the playlist to the center of the screen and tapping the center key starts playback p To change the playlist to be displayed rota...

Page 123: ...Plays video in wide screen mode If the video is compatible with wide screen format set Widescreen to On in order to view the video image in the wide screen Each touch of Widescreen changes the setting as follows On Outputs the wide screen video from an iPod Off Outputs the normal sized video from an iPod p Display size is changed after you change Widescreen setting and select the video to play p T...

Page 124: ...ate information can be found at http www pioneerelectronics com pandora Starting procedure 1 Start up the Pandora application in stalled on the iPod p In some iPod modes selecting a source may start up an iPod application If the mes sage Start up the application from your Device appears start up the application from your iPod p Before starting up sign in to Pandora from your iPod 2 Display the AV ...

Page 125: ...song p is displayed if there is no corre sponding information 2 Current time 3 Album artwork Album art of the current song is displayed if it is available 4 Source icon Shows which source has been selected En 125 Chapter 25 Using Pandora Using Pandora ...

Page 126: ...is indicated on the upper right of the screen You can sort the items in the list al phabetically You can sort the items in the list in order of dates the items were cre ated 2 Thumbs Up Touching the key gives Thumbs Up to the song currently playing 3 Thumbs Down Touching the key gives Thumbs Down to the song currently playing and skip to the next song 4 Bookmark Touching the key displays the scree...

Page 127: ...ica tion is required to be installed on your iPhone in order to enjoy Aha Radio content on this na vigation system Because the application for the iPhone is not provided by Pioneer the required version of the application may not yet be available at the time of purchase of the navigation system Availability version and update information can be found at http www pioneerelectronics com aharadio Star...

Page 128: ...information Shows the information on the content currently being played p is displayed if there is no corresponding information Rating information Shows the rated value of the current content displayed only when and where applicable 2 Current time 3 Content image Displays an image of the current content if one is available 4 Source icon Shows which source has been selected En 128 Chapter 26 Using ...

Page 129: ...content to play Scrolling the keys up or down displays avail able content while tapping a key starts play back 4 Performs additional functions of each sta tion or content currently playing p The icons displayed vary depending on each station or content Indicator Meaning Touching the key discloses the current car location through Aha Radio Touching the key retweets the selected tweets with your Twi...

Page 130: ...ith Aha Radio If you select a station with content that in cludes POI location information the corre sponding POI icons will appear on the map screen A maximum of 30 POI icons are dis played at one time Detailed information can be displayed by pla cing the scroll cursor over the POI icon For details refer to Viewing information about a specified location on page 28 p The POI icons on the map will ...

Page 131: ...y operating on your cellu lar phone the signal from your cellular phone may cause a noise on the song play back p Even if you switch to another source while listening to a song on your Bluetooth audio player the playback of song continues to elapse p Depending on the Bluetooth audio player you connected to this navigation system operations on this navigation system to control the player may differ...

Page 132: ...playing when available Play time indicator Shows the elapsed playing time within the current file File number indicator Shows the file number currently playing when available p In the following cases file information will only be displayed after a file starts or resumes playing You connect the Bluetooth audio player compatible with AVRCP1 3 and operate the player to start play ing You select anoth...

Page 133: ...fer to Changes the repeat range on the next page 3 Playback and Pause Touching d or e switches between play back and pause 4 Connects the Bluetooth audio player Touching Connect displays the connection standby screen and the navigation system waits for the Bluetooth wireless connection re quest 5 Recalls equalizer curves For details refer to Using the equalizer on page 175 6 Displays the Function ...

Page 134: ... follows All Repeats all audio files in the Bluetooth audio player Track Repeats just the current file Off Does not repeat p If you skip the file forward or backward when the repeat play range in Track the repeat play range changes to All 2 Plays files in random order Random play lets you playback files in ran dom order within the current repeat range Each touch of Random turns it on or off En 134...

Page 135: ... in the na vigation system can be displayed for each channel The logo of a newly established chan nel that is not contained cannot be displayed When a logo is not available the following substitute icon is displayed Substitute icon p The icon of each broadcast station is con tained in the NAND flash memory based on the data provided by XM Satellite Radio as of September 2010 p Any changes made by ...

Page 136: ... Shows what preset item has been se lected 5 XM channel category Shows the category of broadcast channel 6 XM channel select mode indicator Shows what channel select mode has been selected You can select a channel from all channels in All CH Mode and select a channel from selected category in Category Mode 7 Source icon Shows which source has been selected En 136 Chapter 28 Using the XM tuner ...

Page 137: ...s manual tuning The channels move up or down one at a time p If you keep touching o or p you can skip the broadcasting channels 2 Switches between the AV operation screen and the preset list display You can switch the screen display according to your preference En 137 Chapter 28 Using the XM tuner Using the XM tuner ...

Page 138: ...st names For details refer to Selecting a channel from the list on the next page b Switches to the list display of XM station names For details refer to Selecting a channel from the list on the next page c Selects an XM band Tapping the key repeatedly switches between the following XM bands XM 1 XM 2 or XM 3 p This function is convenient for preparing different preset lists for each band d Perform...

Page 139: ...names on the pre vious page 2 Touch List XM channel list appears in the display Each touch of List changes the screen as fol lows CH Name List Channel name Song Title List Song title Artist Name List Artist name 3 Tap the desired channel that you want to listen to For details refer to Operating list screens e g iPod list screen on page 70 p During Category Mode touch c or d to switch to another ca...

Page 140: ...ou can move channels up or down by holding down the button Using advanced functions Touch on the XM screen The Function menu appears 1 1 Sets the memorized songs Setting the memorized songs Selecting the songs to alert The list of song titles memorized for the MyMix Function MyMix list is displayed You can change the notification setting when the song is broadcast again You can enable or disable n...

Page 141: ...e screen to control the SIRIUS tuner For details refer to Using the touch panel keys on the next page Reading the screen All CH Mode 7 6 1 5 2 3 4 Category Mode 7 6 1 5 2 3 4 1 SIRIUS band indicator Shows the SIRIUS band that has been se lected 2 SIRIUS channel number indicator Shows the SIRIUS channel number that the tuner is tuned to 3 Current time 4 Preset number indicator Shows what preset ite...

Page 142: ...tails refer to Using the Instant Replay function on page 144 2 Performs manual tuning The channels move up or down one at a time p If you keep touching o or p you can skip the broadcasting channels 3 Selects a SIRIUS channel directly For details refer to Selecting a SIRIUS channel directly on the next page En 142 Chapter 29 Using the SIRIUS tuner ...

Page 143: ...edly switches between the following SIRIUS bands SIRIUS1 SIRIUS2 or SIRIUS3 p This function is convenient for preparing different preset lists for each band c Switches the channel category Touch c or d to select the desired cate gory Selecting a SIRIUS channel directly You can select a SIRIUS channel directly by entering the desired channel number 1 Touch Direct 2 Touch 0 to 9 to input the desired...

Page 144: ...rack If you touch Stay the channel does not switch p If the alert for the song is Off or set Alert to Off no notification will be pro vided even when that song is broadcast For details refer to Setting the memor ized songs on the next page p Notification may not be provided depend ing on the situation of the Navigation Sys tem For details refer to Selecting the songs to alert on the next page Usin...

Page 145: ...turn the setting on When the alert for the song is activated On appears at the beginning of the selected title p Touch On Off again to turn the setting off Changing the alert setting You can enable or disable alerts for all items at the same time This function is useful when you want to turn alerts off temporarily without changing each memorized song 1 Touch Memo Edit 2 Touch Alert Each touch of A...

Page 146: ...ur favorite teams is broadcast A message is displayed Touch Jump to switch the station to view the game informa tion If you touch Stay the station does not switch p Alerts may not be available depending on the status of the navigation system Displaying Game Information An alert will be displayed when a game with the team you selected is about to start or is currently under way You can also display...

Page 147: ...tion screen on page 70 3 Tap AV1 on the left edge of the screen The image is displayed on the screen 4 Touch the screen to display the touch panel keys Using AV2 You can display the video image output by the equipment connected to video input 2 1 Touch AV2 Input on the AV System Settings menu For details refer to Setting video input 2 AV2 on page 171 2 Display the AV operation screen For details o...

Page 148: ...at differ from those described in the external unit s opera tion manual p Operation varies depending on the external unit connected In some cases the exter nal unit may not respond Starting procedure 1 Display the AV operation screen For details of the operations refer to Dis playing the AV operation screen on page 70 2 Tap EXT1 or EXT2 on the left edge of the screen to select the external unit 3 ...

Page 149: ...tion You can turn automatic and manual function on or off You can switch between Auto and Manual functions of the external unit con nected Initially this function is set to Auto p Operating commands set for Auto and Manual operations vary depend ing on the external unit connected 5 Sends a command a b c or d Touch to operate the external unit p Operation varies depending on the ex ternal unit conn...

Page 150: ...e The Speed Pulse value detected by the navi gation system is shown 0 is shown while the vehicle is stationary 2 GPS Antenna Indicates the connection status of the GPS antenna the reception sensitivity and from how many satellites the signal is received Color Signal com munication Used in posi tioning Orange Yes Yes Yellow Yes No p When the GPS antenna is connected to this navigation system OK is ...

Page 151: ...dicates driving distance 4 Speed Pulse Indicates the total number of speed pulses 5 Learning Status Indicates the current driving mode 6 Inclination Indicates the degree of slope of the street that you are currently on 7 Degree of learning Sensor learning situations for distance Distance right turn Right Turn left turn Left Turn and 3D detection 3D are indi cated by the length of bars p When tires...

Page 152: ... tion Enter the following items Surface Road Gas Mileage Enter the fuel cost when you drive on ordin ary roads Freeway Gas Mileage Enter the fuel cost when you drive on the freeway Gas Price Per Unit Enter the fuel unit price Gas Unit Set the fuel unit Currency Set the unit of currency p The unit in Surface Road Gas Mileage and Freeway Gas Mileage depend on the one chosen in Gas Unit When Gas Unit...

Page 153: ...nce traveled since the previous fueling is recorded Gas Pumped Enter the amount of fuel pumped Gas Price Per Unit Enter the fuel unit price When all the items are entered the fuel con sumption is displayed next to Gas Mileage 5 Touch OK The Gas Mileage Setting screen appears Exporting the data of fuel cost information Exporting the fuel cost data to an SD memory card is possible p The data stored ...

Page 154: ...k log to the SD mem ory card p While the setting is On the navigation system continues to store the track logs in the inserted SD memory card 5 Touch Type Each time you touch the key changes the set ting Private default Changes the track log attribute to Private Business Changes the track log attribute to Busi ness Other Changes the track log attribute to Other Using the demonstration guidance Thi...

Page 155: ...he screen for navigation settings on page 150 2 Touch Modify Current Location 3 Scroll to the position where you want to set then touch OK 4 Touch the arrow key on the screen to set the direction then touch OK Changing the eco function setting You can change the eco function setting 1 Display the Navi Settings screen For details refer to Displaying the screen for navigation settings on page 150 2 ...

Page 156: ...ing the auto zoom display This setting enables switching to an enlarged map around the point where your vehicle is approaching an intersection entrance exit of freeway or a junction 1 Display the Map Settings screen For details refer to Displaying the screen for map settings on this page 2 Touch Displayed Info The Displayed Information screen appears 3 Touch Close Up View Each time you touch the k...

Page 157: ...s page 2 Touch Displayed Info The Displayed Information screen appears 3 Touch City Map Barrier Each time you touch the key switches between On and Off On default Displays the barrier graphic for city map When the vehicle position or cursor enters the barrier graphic area the graphic disap pears and a normal map is displayed full screen Off Does not display the barrier graphic for city map When th...

Page 158: ...Name Each time you touch the key changes the set ting View default Displays the street name or city name on the map Hide Hides the street name or city name on the map Setting the display of icons of favorite locations You can select whether to display the Favor ites icon on the map p Favorites icons are displayed when the map scale is 10 miles 20 kilometers or less For details refer to Editing the...

Page 159: ...lects whether to display Eco Meter indicat ing the fuel consumption information on the map p Eco Meter appears when 2D View or 3D View is selected 1 Display the Map Settings screen For details refer to Displaying the screen for map settings on page 156 2 Touch Displayed Info The Displayed Information screen appears 3 Touch Show Eco Meter Each time you touch the key changes the set ting View defaul...

Page 160: ...and touch OK p When only a few detailed categories are se lected a blue check mark will appear next to the selected subcategory 7 Touch OK The Overlay POI Main Category screen returns If you want to select or deselect other items repeat these steps as many as necessary 8 To finish the selection touch OK in the Overlay POI Main Category screen Displaying the customized POIs Creating a customized PO...

Page 161: ...nges the set ting Automatic default You can change the colors of a map be tween daytime and nighttime according to whether the vehicle lights are on or off Day The map is always displayed with daytime colors p To use this function with Automatic the orange white lead of the navigation system must be connected correctly Changing the road color You can set the road color to bluish or reddish 1 Displ...

Page 162: ...cons for surrounding facilities POI on the map For details refer to Displaying POI on the map on page 159 Volume Displays the Volume Settings screen For details refer to Setting the Volume for Guidance and Phone on page 165 Contacts Displays the Contacts List screen For details refer to Calling a number in the phone book on page 62 Whole Route Overview Displays the entire route currently set with ...

Page 163: ...gional Settings The Regional Settings screen appears 3 Touch Program Language The language list is displayed 4 Touch the desired language After the language is selected the previous screen returns 5 Touch Voice Language The Voice Language Selection screen ap pears 6 Touch the desired language After the language is selected the previous screen returns 7 Touch OK on the Regional Settings screen A me...

Page 164: ...Displaying the screen for system settings on page 162 2 Touch Regional Settings The Regional Settings screen appears 3 Touch km mile A message confirming whether to change the setting appears 4 Touch Yes Each time you touch the key changes the set ting mile default Shows distance in miles Mile Yard Shows distance in miles and yards km Shows distance in kilometers If you touch No the setting is can...

Page 165: ...he beep sound is muted If you touch the key next to VR Beep the set ting is changed On default Voice recognition beep is enabled Off Voice recognition beep is disabled p This function is available for AVIC Z130BT only 4 To finish the setting touch OK Changing the preinstalled splash screen You can change the splash screen to the other images preinstalled in the navigation system 1 Display the Syst...

Page 166: ...era The following two functions are available The rear view camera feature requires a separately sold rear view camera e g ND BC4 For de tails consult your dealer Rear view camera The navigation system features a function that automatically switches to the full screen image of the rear view camera installed on your vehicle When the shift lever is in the RE VERSE R position the screen automatically...

Page 167: ...The target indicates the order After you touch all marks the adjusted posi tion data is saved p Do not turn off the engine while saving the adjusted position data If you press the MODE button the previous adjustment position returns If you press and hold the MODE button the adjustment is canceled Setting the illumination color The illumination color can be selected from 8 different colors Furtherm...

Page 168: ...ervice Information The Service Information Screen screen ap pears 3 Check the version information Selecting the video for rear display You can choose either to show the same image as the front screen or to show the se lected source on the rear display 1 Display the AV operation screen For details of the operations refer to Dis playing the AV operation screen on page 70 2 Tap on the left edge of th...

Page 169: ...view camera 1 Press and hold the MODE button The Picture Adjustment screen appears 2 Touch or to adjust the desired item Brightness Adjusts the black intensity Contrast Adjusts the contrast Color Adjusts the color saturation Color Temp Adjusts the tone of color which color is emphasized red or blue Dimmer Adjusts the brightness of display p Touching Camera switches to the picture adjustment screen...

Page 170: ... desired item 4 Touch The previous screen returns Displaying the screen for AV system settings 1 Press the HOME button to display the Top Menu screen 2 Touch Settings The Settings Menu screen appears 3 Touch AV Settings The AV System Settings menu appears 4 Touch the item that you want to change the setting AVIC Z130BT AVIC X930BT AVIC X9310BT If you touch the previous screen returns Setting video...

Page 171: ... propor tion as Full or Zoom in the horizontal di rection and by an intermediate proportion between Full and Zoom in the vertical direction ideal for a cinema sized picture wide screen picture where captions lie outside the frame Zoom zoom A 4 3 picture is enlarged in the same pro portion both vertically and horizontally ideal for a cinema sized picture wide screen picture Normal normal A 4 3 pict...

Page 172: ...ce voice When you use a cellular phone via Bluetooth technology dialing talking incoming call When the voice recognition mode is ac tivated Tel VR The volume is muted or attenuated according to the following conditions When you use a cellular phone via Bluetooth technology dialing talking incoming call When the voice recognition mode is ac tivated Off The volume does not change AVIC X930BT AVIC X9...

Page 173: ...ing is completed you can deactivate VR Catalog Menu until you update the content data on iPod If you up date the iPod data activate VR Catalog Menu again to transfer the music infor mation and synchronize the music informa tion for voice commands with the data on iPod p After you select Off in VR Catalog Mode the system doesn t catalog the data on the iPod In such case the pre viously cataloged da...

Page 174: ... a registration code has already been acti vated it cannot be displayed 3 Touch Registration Code Your 10 digit registration code is displayed p Make a note of the code as you will need it when you register with a DivX VOD provider Displaying your DivX VOD deregistration code A registration code registered with a deregis tration code can be deleted p This feature is available when the selected sou...

Page 175: ...lance moves towards the front or the rear Front 15 to Rear 15 is displayed as the front rear speaker balance moves from front to rear Set Front and Rear to 0 when using a two speaker system 4 Touch c or d to adjust left right speaker balance Each time you touch c or d the left right speaker balance moves towards the left or the right Left 15 to Right 15 is displayed as the left right speaker balan...

Page 176: ...equalizer curve you selected appears For details of the operations refer to Adjust ing the equalizer curve automatically Auto EQ on the next page Customizing the equalizer curves You can adjust the currently selected equalizer curve setting as desired Adjustments can be made with a 8 band graphic equalizer p This function is not available when Auto EQ is On For details refer to Using the auto ad j...

Page 177: ...to Auto EQ to turn the auto adjusted equalizer on or off 4 Select the equalizer curve Adjusting the equalizer curve automatically Auto EQ By measuring the vehicle s acoustics the equalizer curve can be adjusted automatically to suit the interior of the vehicle WARNING A loud tone noise may be emitted from the speakers when measuring the vehicle s acous tics Never perform the Auto EQ measurement wh...

Page 178: ... the lower sounds If an error occurs during measurement a message appears and measurement is canceled Check the following before mea suring the vehicle s acoustics Front speakers left right Rear speakers left right Noise Microphone for acoustical measure ment sold separately Low battery Performing Auto EQ p Auto EQ changes the audio settings as fol lows Auto EQ on the EQ Menu screen is set to On F...

Page 179: ...noise is emitted from the speakers and the Auto EQ measurement begins 11 Wait until the measurement is com pleted When Auto EQ is completed a message is dis played indicating that the measurement is completed p If the vehicle s acoustics cannot be mea sured correctly an error message will be displayed p The measurement time varies depending on the type of vehicle p To stop the measurement touch St...

Page 180: ...e output level 6 to 24 is displayed as the level is in creased or decreased 6 Touch c or d next to Frequency Hz to select cut off fre quency Each time you touch c or d cut off fre quencies are selected in the following order 50Hz 63Hz 80Hz 100Hz 125Hz Only frequencies lower than those in the se lected range are output from the subwoofer Using the high pass filter When you cut lower sounds from the...

Page 181: ...he utility program AVIC FEEDS which is available separately to the navigation system 1 Use AVIC FEEDS to replicate the set tings and store them on an SD memory card 2 Insert an SD memory card into the SD card slot For details of the operation refer to Insert ing and ejecting an SD memory card on page 16 3 Press the HOME button to display the Top Menu screen 4 Touch Settings The Settings Menu scree...

Page 182: ...ress Flow of the voice operation You can start the voice operation any time even when the map screen is displayed or AV is operating Some operations are not avail able The basic steps of the voice operations are as follows 1 Switch the screen to map screen or AV op eration screen j 2 Press the button to activate voice oper ations j 3 Speak a command into the microphone after the beep When the comm...

Page 183: ...ect a search by address or by POI appears 4 Say Find an address A message prompting the next operation is given 5 Say the state name that you want to set to your destination 6 Say the city name that you want to set to your destination 7 Say the street name that you want to set to your destination 8 Say the house number that you want to set to your destination Your navigation system sets the route ...

Page 184: ... the navigation system p To use the content data on the iPod for voice operation transfer the data to this system first For details refer to Acquiring Cataloging iPod music information on page 173 Examples of voice operation of the iPod are shown below A method for playing the album title named Pioneer is described here along with an operational example 1 Press the MODE button to display the map s...

Page 185: ...nt to play Play the artist Artist name d Starts playback from the top of the selected artist Play albums d Displays the album list d Say the album title that you want to play Play the album Album name d Starts playback from the top of the selected album Play playlists d Displays the playlist d Say the playlist that you want to play Play the playlist Playlist name d Starts playback from the top of ...

Page 186: ...e d Displays the first or last page of the the selection list 1 1 Voice commands are available only when the selection list is displayed Voice operation for AV source other than iPod AV source selection Voice commands and operations Change Source to DISC d Switches the AV source to Disc Change Source to Tuner d Switches the AV source to Tuner Change Source to XM Satellite Radio d Switches the AV s...

Page 187: ...o call d Displays the message confirming whether to dial d Say Yes d The system starts dialing to the number Make a call d Say the name of entry stored on Contacts you want to call d Displays the message confirming whether to dial d Say Yes d The system starts dialing to the number 2 List outgoing calls d Display the list of recent outgoing calls Dialed Calls to select the number and call 4 List r...

Page 188: ...scellaneous noise from outside the vehicle can interfere with voice operation Position the microphone carefully For optimum pick up the microphone should be fixed at a suitable distance directly in front of the driver Pause before giving a command Speaking too soon may cause the recognition to fail Pronounce your commands carefully Speak slowly deliberately and clearly En 188 Chapter 33 Operating ...

Page 189: ...enter the password to confirm the setting 8 Touch OK Password protection is applied p If you want to change the password cur rently set enter the current password and then enter the new one Entering the password On the password input screen you must enter the current password If you enter an incorrect password three times the screen is locked and operations using touch panel keys are dis abled 1 E...

Page 190: ... default or factory settings p Be sure to read Setting items to be deleted before you perform this operation For details refer to Setting items to be deleted on the next page 1 Display the System Settings screen For details refer to Displaying the screen for system settings on page 162 2 Touch Restore Factory Settings The message confirming whether to restore the settings appears 3 Touch Yes Retur...

Page 191: ...eset screen Navigation functions Method 1 Method 2 Method 3 Method 4 Map function View mode and scale setting on the map 1 1 Direction of the map 1 1 Last cursor position on the map screen 1 1 1 Route setting Current route 1 1 1 Guidance state of the current route 1 1 Vehicle position information 1 1 Options 1 1 1 Others Keyboard 1 1 1 Learnt data used in Learning Route 1 1 1 Destination Point reg...

Page 192: ...s deleted AV functions Method 1 Method 2 Method 3 Method 4 Volume 1 AV Settings Wide Mode Mute VR Cata log Menu 1 1 1 Other settings 1 AV Sound All settings 1 CD ROM DVD V DivX FM AM Audio Bluetooth audio All settings 2 1 SD USB All settings 2 1 1 1 Other functions Picture Adjustment 1 Tilt 1 2 All settings including the setting on the Function menu are deleted En 192 Chapter 34 Other functions ...

Page 193: ...ausing reduced positioning accu racy Check the GPS signal reception and the position of the GPS antenna if necessary Obstacles are blocking signals from the satellites The quality of signals from the GPS satellites is poor causing reduced positioning accu racy Check the GPS signal reception and the position of the GPS antenna if necessary or continue driving until reception improves Keep the anten...

Page 194: ... tions Then park your vehicle in a safe place turn off the navigation system and turn the power to the navigation system back on The map color does not switch automatically between daytime and nighttime Day Night Display is set to Day Check Day Night Display setting and make sure Automatic is selected Page 161 The orange white lead is not con nected Check the connection The screen is too bright Pi...

Page 195: ... keys are touched or a different key responds The touch panel keys deviate from the actual positions that respond to your touch for some reason Perform touch panel calibration Page 167 The external storage device USB SD cannot be used The USB storage device has been removed immediately after plugging it Park your vehicle in a safe place and turn off the engine Turn the ignition key back to off ACC...

Page 196: ...spect ratio The aspect setting is incorrect for the display Select the appropriate setting for that image Page 171 Page 106 A parental lock message is dis played and DVD playback is not possible Parental lock is on Turn parental lock off or change the level Page 106 Parental lock for DVD playback cannot be canceled The code number is incorrect Input the correct code number Page 106 Playback is not...

Page 197: ...ntering the range for service The connection between the cellular phone and the navigation system cannot be established now Perform the connection process If the screen becomes frozen Park your vehicle in a safe place and turn off the engine Turn the ignition key back to off ACC OFF Then start the engine again and turn the power to the navigation system back on En 197 Appendix Appendix Appendix ...

Page 198: ...mountain and the route calculation is impossible Set a destination and waypoint s on roads Reset the destination after you drive the ve hicle to any road Route to destination cannot be calculated The destination or waypoint s are in an isolated island etc without a ferry and the route calculation is im possible If there is no road con nected to your starting point or destination this message will ...

Page 199: ...one exists in the sur roundings when the system searches for connectable cellular phones featuring Bluetooth wireless technology Activate the target phone s Bluetooth wire less technology Check whether your cellular phone is acti vated and whether the distance to your cellu lar phone is not too far Registration failed The cellular phone s Bluetooth wire less technology is turned off during the reg...

Page 200: ...ure of the navigation system is out of the normal operat ing range Wait until the unit s temperature returns to within normal operating limits Tracks that cannot be played back will be skipped FILE SKIPPED Files that are protected by digital rights management DRM The protected files are skipped Cannot play back all tracks PROTECTED DISC All the files on the inserted disc are secured by DRM Replace...

Page 201: ...ed USB storage device consumes more than 1 A maximum allowable current Disconnect the USB storage device and do not use it Turn the ignition switch to off then back ACC to on or turn the ignition switch on and then connect the compliant USB storage device The USB interface cable for iPod is short circuited Confirm that USB interface cable for iPod or USB cable is not caught in something or da mage...

Page 202: ...tem with connect ing the speed pulse the system will become more accurate than no connection of speed pulse So you connect the speed pulse without fail to get the accuracy of positioning p The position of the speed detection circuit vary depending on the vehicle model For details consult your authorized Pioneer dealer or an installation professional p Some types of vehicles may not output a speed ...

Page 203: ...be received from more than two GPS satellites In some driving conditions signals from GPS satellites may not reach your vehicle In this case it is impossible for the system to use GPS positioning In tunnels or en closed parking garages Under elevated roads or similar structures When driving among high build ings When driving through a dense forest or tall trees If a car phone or cellular phone is ...

Page 204: ...ayed on the map screen If you make a slight turn If there is a parallel road If there is another road very nearby such as in the case of an elevated freeway If you take a recently opened road that is not on the map If you drive in zigzags If the road has a series of hairpin bends If there is a loop or similar road configura tion If you take a ferry If you are driving on a long straight road or a g...

Page 205: ...on a gravel road or in snow If you put on chains or change your tires for ones with a different size If trees or other obstacles block the GPS signals for a considerable period If you drive very slowly or in a start and stop manner as in a traffic congestion If you join the road after driving around a large parking lot When you drive around a traffic circle When starting driving immediately after ...

Page 206: ... you pass intersections turns and other guidance points in rapid succes sion some may delay or not be announced It is possible that guidance may direct you off a freeway and then back on again In some cases the route may require you to travel in the opposite direction to your current heading In such cases you are in structed to turn around so please turn around safely by following the actual traff...

Page 207: ...clean a disc wipe it with a soft cloth moving outward from the center Condensation may temporarily impair the built in drive s performance Leave it to ad just to the warmer temperature for about one hour Also wipe any damp discs with a soft cloth Playback of discs may not be possible be cause of disc characteristics disc format recorded application playback environ ment storage conditions and so o...

Page 208: ...led information about DualDiscs Dolby Digital This product will down mix Dolby Digital sig nals internally and the sound will be output in stereo p Manufactured under license from Dolby Laboratories Dolby and the double D symbol are trademarks of Dolby Laboratories Detailed information for playable media Compatibility Common notes about disc compatibility Certain functions of this product may not ...

Page 209: ...e vice USB SD with complex folder hierar chies Operations may vary depending on the kind of an external storage device USB SD It may not be possible to play some music files from SD or USB because of file char acteristics file format recorded applica tion playback environment storage conditions and so on USB storage device compatibility For details about USB storage device com patibility with this...

Page 210: ...the DivX file before the extension are associated with the DivX file The character strings before the extension must be exactly the same However if there is only one DivX file and one subtitle file in a single folder the files are associated even if the file names are not the same The subtitle file must be stored in the same folder as the DivX file Up to 255 subtitle files may be used Any more sub...

Page 211: ...ck time of audio file stored in the external storage device USB SD 7 5 h 450 minutes MP3 compatibility Media CD R RW DVD R RW R DL USB storage de vice SD memory card File extension mp3 Bit rate 8 kbps to 320 kbps CBR VBR Sampling frequency 16 kHz to 48 kHz 32 kHz 44 1 kHz 48 kHz for emphasis 8 kHz to 48 kHz ID3 tag ID3 tag Ver 1 0 1 1 2 2 2 3 ID3 tag Ver 1 0 1 1 2 2 2 3 2 4 Notes Ver 2 x of ID3 ta...

Page 212: ...xtension WAV files on the CD R RW DVD R RW R DL cannot be played wav Format Linear PCM LPCM IMA ADPCM Sampling frequency LPCM 16 kHz to 48 kHz IMA ADPCM 22 05 kHz and 44 1 kHz Quantization bits LPCM 8 bits and 16 bits MS ADPCM 4 bits Note The sampling frequency shown in the display may be rounded AAC compatibility Media CD R RW DVD R RW R DL USB storage de vice SD memory card File extension m4a Bi...

Page 213: ...imum file size 4 GB Notes The navigation system is not compatible with the following DivX Ultra format DivX files without video data DivX files encoded with LPCM Linear PCM audio codec Depending on the file information composition such as the number of audio streams there may be a slight delay in the start of playback on discs If a file contains more than 4 GB playback stops before the end Some sp...

Page 214: ... The navigation system may not operate cor rectly depending on the application used to encode WMA files Depending on the version of Windows Media Player used to encode WMA files album names and other text information may not be correctly displayed There may be a slight delay when starting playback of audio files encoded with image data The navigation system is not compatible with packet write data...

Page 215: ...okia Corp Toshiba and IBM in 1998 and it is currently developed by nearly 2 000 companies worldwide The Bluetooth word mark and logos are re gistered trademarks owned by Bluetooth SIG Inc and any use of such marks by Pioneer Corporation is under license Other trademarks and trade names are those of their respective owners About the SAT RADIO READY Logo The SAT RADIO READY logo indicates that the S...

Page 216: ...ivX video codec from DivX Inc This unit can play DivX video files recorded on CD R RW ROM and DVD R RW ROM discs Keeping the same terminology as DVD video individual DivX video files are called Titles When naming files titles on a CD R RW or a DVD R RW disc prior to burning keep in mind that by default they will be played in alphabeti cal order p DivX DivX Certified and associated logos are tradem...

Page 217: ...eveloper to meet Apple performance standards Apple is not responsible for the operation of this device or its compliance with safety and regulatory standards Please note that the use of this accessory with iPod or iPhone may affect wireless perfor mance iPhone iPod iPod classic iPod nano and iPod touch are trademarks of Apple Inc regis tered in the U S and other countries iTunes iTunes is a tradem...

Page 218: ... tions Do not use the LCD screen at temperatures higher or lower than the operating tem perature range because the LCD screen may not operate normally and could be da maged The LCD screen is exposed in order to in crease its visibility within the vehicle Please do not press strongly on it as this may damage it Do not push the LCD screen with excessive force as this may scratch it Never touch the L...

Page 219: ...the LCD screen Image quality will improve with an increase in temperature The product lifetime of the LED backlight is more than 10 000 hours However it may decrease if used in high temperatures If the LED backlight reaches the end of its product lifetime the screen will become dimmer and the image will no longer be visible In that case please consult your dealer or the nearest authorized Pioneer ...

Page 220: ...ll Name 37 Near Me 38 Near Destination 38 Around City 38 AVIC FEEDS 40 Favorites 39 47 History 40 50 Cancel Route 46 Traffic 51 Coordinates 40 Route Overview 43 Phone Menu Page Dial Pad 61 Call Home 62 Contacts 62 Contacts Transfer 65 Received Calls 63 Dialed Calls 63 Missed Calls 63 En 220 Appendix Appendix ...

Page 221: ... 174 Map Settings 156 Bluetooth Settings 66 Setting Replicator 181 Navi Settings menu Page Connection Status 150 3D Calibration Status 151 Gas Mileage 152 Drive Log Settings 154 Demo Mode 154 Set Home 154 Modify Current Location 155 Eco Settings 155 En 221 Appendix Appendix Appendix ...

Page 222: ...nformation 168 Restore Factory Settings 190 Map Settings menu Page Displayed Info Close Up View 156 City Map 156 City Map Barrier 157 Show Traffic Incident 157 Bluetooth Connected 158 Current Street Name 158 Favorites Icon 158 3D Land Mark 158 Show Maneuver 159 Show Eco Meter 159 Quick Access Selection 162 Overlay POI 159 View Mode 30 Day Night Display 161 AV Guide Mode 161 Road Color 161 En 222 A...

Page 223: ... Off 67 Echo Cancel 67 Page Auto Answer Preference 67 Refuse All Calls 67 Clear Memory 68 Firmware update 68 AV System Settings menu Page AV1 Input 170 AV2 Input 171 Wide Mode 171 Auto EQ Meas 177 Mute 172 Mute Level 172 Rear SP 171 DivX VOD 174 VR Catalog Menu 173 En 223 Appendix Appendix Appendix ...

Page 224: ...AV Sound Settings menu Page FAD BAL Balance 175 EQ 175 Loudness 180 Sub Woofer 180 HPF 180 SLA 180 Bass Booster 181 Sonic Center Control 179 En 224 Appendix Appendix ...

Page 225: ...DivX is a popular media technology created by DivX Inc DivX media files contain highly com pressed video with high visual quality that maintains a relatively small file size DivX files can also include advanced media features like menus subtitles and alternate audio tracks Many DivX media files are available for down load online and you can create your own using your personal content and easy to u...

Page 226: ... choose your viewing angle as desired Multi audio Multilingual dialog Some videos feature dialog recorded in multi ple languages or audio recorded in multiple tracks For example dialog in up to eight lan guages can be recorded on a single DVD Vi deo letting you choose the language as desired Multi session Multi session is a recording method that al lows additional data to be recorded later When re...

Page 227: ...ther functions Track log Your navigation system logs routes that you al ready passed through if the track logger is ac tivated This recorded route is called a track log It is handy when you want to check a route traveled or if returning along a complex route VBR VBR is short for variable bit rate Generally speaking CBR constant bit rate is more widely used But by flexibly adjusting the bit rate ac...

Page 228: ...3 7 g 0 2 lbs Display Screen size aspect ratio AVIC Z130BT 7 inch wide 16 9 AVIC X930BT 6 1 inch wide 16 9 AVIC X9310BT 6 1 inch wide 16 9 Effective display area AVIC Z130BT 157 mm 83 mm AVIC X930BT 137 mm 72 mm AVIC X9310BT 137 mm 72 mm Pixels 384 000 800 480 Display method TFT Active matrix driving Backlight LED Color system NTSC compatible Tolerable temperature range Power on 14 F to 140 F Powe...

Page 229: ...MA AAC WAVE H 264 MPEG4 WMV SD AVIC Z130BT SD memory card SDHC memory card Compatible physical format Version 2 00 File system FAT16 FAT32 Decoding format MP3 WMA AAC WAVE H 264 MPEG4 WMV SD AVIC X930BTand AVIC X9310BT microSD card microSDHC card Compatible physical format Version 2 00 File system FAT16 FAT32 Decoding format MP3 WMA AAC WAVE H 264 MPEG4 WMV Bluetooth Version Bluetooth 2 0 EDR Outp...

Page 230: ...Z130BT Rated power source 13 8 V DC allowable voltage range 10 0 V to 14 5 V DC Grounding system Negative type Maximum current consumption 60 mA Dimensions W H D 68 mm 49 mm 19 mm 2 5 8 in 1 7 8 in 3 4 in Weight 180 g 0 397 lbs CEA2006 Specifications Power output 14 W RMS 4 Channels 4 W and 1 THD N S N ratio 91 dBA reference 1 W into 4 W Note Specifications and design are subject to possible modif...

Page 231: ...EER ELECTRONICS AUSTRALIA PTY LTD 5 Arco Lane Heatherton Victoria 3202 Australia TEL 03 9586 6300 PIONEER ELECTRONICS OF CANADA INC 300 Allstate Parkway Markham Ontario L3R 0P2 Canada TEL 1 877 283 5901 TEL 905 479 4411 PIONEER ELECTRONICS DE MEXICO S A de C V Blvd Manuel Avila Camacho 138 10 piso Col Lomas de Chapultepec Mexico D F 11000 TEL 55 9178 4270 先鋒股份有限公司 總公司 台北市中山北路二段44號13樓 電話 02 2521 35...

Page 232: ...n Press to display the touch panel keys for ejecting the media HOME button Press to display the Top Menu screen Multi control Volume knob GJ MUTE Rotate to adj ust the AV Aud io and Video source volume Press briefly to hear the current route guid ance Press and hold to mute the AV source MODE button Press to switch between the map screen and the AV operation screen TRK button ...

Page 233: ...ic items on the map I CD Name of the street to be used or next guidance point Cu rrent ti me Esti mated ti me of arrival defau It Cu rrent route Dragging the map allows scrolling N Garey St 0 4 ml Current position Street name that you r veh icle is traveling along J Eco Meter Map control Next di rection of travel ...

Page 234: ...rants and other facilities Points Of Interest POI in the data base Searches for POls by using the data on the microSD card Stores and selects you r favorite locations Returns to the previous screen j Selects a previously routed desti nation Searches for a location by coordinates Cancels your current route guidance Displays the current route information Displays traffic information ...

Page 235: ...i rmation screen appears 5 Touch OK Touch one of the options After narrowing down your destina tion I the Location confi rmation screen will appear Searching for your destination by address 1 Display the Destination 4 Touch OK Menu screen and touch r _ Address 2 Select the country you desire 3 Input the information that you want to set as the des tination ...

Page 236: ...m Settings Volume Inserting and ejecting a microSD card For details about playable files refer to Operation Manual Inserting a microSD card 1 Insert your microSO card into the SO card slot until it clicks Ejecting a microSD card 1 Press the button 2 Touch Eject SO 3 Press the middle of the microSO card gently until it clicks 4 Pull the microSO card out straight ...

Page 237: ... until a broadcast strong enoug h for good reception is found by touching and holding seek tu ning Playing your Apple iPod You can control an iPod by connecting the USB interface cable for iPod CD I U51 V sold separately to the navigation system 1 Connect your iPod USB and mini jack connector o o 1 USB interface cable for iPod The source changes and then playback will start ...

Page 238: ...lays the song title list Displays the genre list Selects the song to play by scrolling the keys up or down To play the song tap it j Switches the Iist screen between music and video Retu rns to the iPod opera tion screen Starts playback by tapping an item to select Selects a song by scrolling the character tab up or down Tap the tab of the character for the song title that you want to display ...

Page 239: ...phone on the list 6 Enter the PI N code from your phone The default code is 1111 When pai ri ng succeeds a message wi II appear Transferring the phone book 1 Connect the cellular phone 2 Touch Contacts Transfer on the Phone Menu screen 3 Check that the followi ng screen is displayed and operate your cellular phone to transfer the phone book entries When data transfer is fin ished a message asking ...

Page 240: ...Installation Manual Manuel d installation MULTIMEDIA AV NAVIGATION RECEIVER RECEPTEUR DE NAVIGATION AN MULTIMEDIA AVIC Z130BT AVIC X930BT AVIC X9310BT ...

Page 241: ...onnecting the rear display 18 When using a rear display connected to rear video output 18 When connecting the external unit featuring video source 19 Installation Precautions before installation 20 To avoid electromagnetic interference 20 Before installing 20 For AVIC Z130BT users 21 Installing the navigation system 21 Installation notes 21 Parts supplied 22 Installation using the screw holes on t...

Page 242: ...stem yourself We recom mend that only authorized Pioneer service personnel who have special training and ex perience in mobile electronics set up and in stall this product NEVER SERVICE THIS PRODUCT YOURSELF Installing or servi cing this product and its connecting cables may expose you to the risk of electric shock or other hazards and can cause damage to the navigation system that is not covered ...

Page 243: ...re with or become caught in any of the vehicle s moving parts espe cially the steering wheel shift lever park ing brake sliding seat tracks doors or any of the vehicle s controls Do not route wires where they will be ex posed to high temperatures If the insula tion heats up wires may become damaged resulting in a short circuit or malfunction and permanent damage to the product Do not cut the GPS a...

Page 244: ...ternal power amps Such connection could cause excessive current drain and malfunction Be sure not to use this lead as the power supply lead for the auto antenna or anten na booster Such connection could cause excessive current drain and malfunction 0 Power amp Ground wire The black cable is ground When instal ling this unit or power amp sold sepa rately make sure to connect the ground wire first E...

Page 245: ... AVIC Z130BT AVIC X930BT AVIC X9310BT The navigation unit Traffic tuner USB and mini jack connector Microphone m En Power cord GPS antenna RCA connector The navigation unit GPS antenna RCA connector Power cord USB and mini jack connector Microphone ...

Page 246: ...Section _C_o_n_n_e_ct_i_ng_th_e_sy_s_t_e_m G En CD ...

Page 247: ...emote Control Adapters sold separately Antenna jack III 30cm I 12 in 3 If you use AVIC X930BT or AVIe X931 OBT you will need to install the Traffic tuner ND TMC10 sold separately Vehicle Traffic tuner antenna I _ I 1 I I 1 USB and minijack connector 2 m 6 ft 7 In 2 1 Connect either the USB Interface Cable for iPod or an appropriate USB storage device 2 When connecting your IPod both connections ar...

Page 248: ...nna to the antenna jack of the navigation unit IP BUS cable I L supplied with HD Radio tuner Black IP BUS cable supplied with SIRIUS Satellite Radio tuner L SiriusConnect cable _i 22L J sold separately AWARNING To avoid the risk of accident and the potential violation of applicable laws this product should never be used while the vehicle is being driven except for navigation purposes And also rear...

Page 249: ...ed to this navigation system instead of a rear speaker change the rear output setting in the initial setting Refer to Operation Manual The subwoofer output of this navigation system is monaural r White Front speaker 8 With a two speaker system do not connect anything to the speaker leads that are not connected to speakers Gray Front speaker 8 When using a subwoofer of 70 W 2 0 be sure to connect w...

Page 250: ...te while the following sounds will not be muted or attenuated For details refer to Operation Manual Voice gUidance of the navigation Incoming ring tone and incoming voice of the cellular phone that is connected to this navigation system via Bluetooth wireless technology When the voice recognition mode is activated AVIC Z130BT only Blue white To auto antenna relay control termrnal If the vehicle ha...

Page 251: ...speed detection circuit and the position of the parking brake switch vary depending on the vehicle model For details consult your authorized Pioneer dealer or an installation professional Parking brake switch Ground side Clamp firmly with needle nosed pliers Clamp the lead of the power supply side of the parking brake switch Connection method Light green PARKING BRAKE Used to detect the ON OFF sta...

Page 252: ...lead to the lead whose voltage changes when the shift lever is put in reverse Unless connected the sensor may not detect your vehicle traveling forward backward properly and thus the position of your vehicle detected by the sensor may be misaligned from the actual position aNote When you use a rear view camera please make sure to connect this lead Otherwise you cannot switch to the rear view camer...

Page 253: ...ng to separately sold power amp En RCA connecto _ l Subwoofer outputs SWL SWR Power cord Rear outputs REAR OUTPUT c 15 cm 5 7 8 in Front outputs FRONT OUTPUT c 15 cm 5 7 8 in Blue white To system control terminal of the power amp max 300 mA 12 V DC ...

Page 254: ...r Right f System remote control Left Rearspeaker Front speaker J RCA cables sold separately __________ __ I_ c IlIIIIIJI t lc D tc D Subwoofer Subwoofer _Note You can change the RCA output of the subwoofer depending on your subwoofer system Refer to Operation Manual En ill ...

Page 255: ...R MIRROR IMAGE REAR VIEW CAMERA OTHER USE MAY RESULT IN INJURY OR DAMAGE 6 CAUTION The screen image may appear reversed The rear view camera is used as an aid to keep an eye on trailers or backing into a tight parki ng spot Do not use th is fu nction for en tertai nment pu rposes Objects in rear view may appear closer or more distant than in reality Please note that the image area shown by the rea...

Page 256: ...other cables the wiring position might differ resulting in disturbed images and sounds L Left audio White R Right audio Red V Video Yellow G Ground OK S L treL V G R R G V USB and mini jack connector 2 m 6 ft 7 in To audio outputs Ii Yellow Il r t RCA cables sold separately To video output You must set AV1 Input in AV System Settings to Video when connecting the external video component For detail...

Page 257: ...while driving This navigation system s rear video output is for connection of a display to enable passengers in the rear seats to watch the video source C J When connecting the rear display RCAcables 0 sold separately TO audio outputs t t To video output The navigation unit 20Cm 7718 n RCA connector fl Red white Yellow II AUDIO INPUT VIDEO INPUn You must set AV2 Input in AV System Settings to Vide...

Page 258: ...en connecting the external unit featuring video source The navigation unit 20cm t RCA connector 1 Ye OW i VIDEO INPUn You must set AV2Input in AV System Settings to EXT when connecting the ex ternal unit For details refer to Operation Manual J En ill ...

Page 259: ...mechanism of a seat resulting in a short circuit Please confirm the proper function of your vehicle s other equipment after in stallation of the navigation system En Do not install this navigation system where it may i obstruct the driver s vi sion ii impair the performance of any of the vehicle s operating systems or safety features including airbags hazard lamp buttons or iii impair the driver s...

Page 260: ... the shift lever Before installing this navigation system be sure to leave sufficient space so that the LCD panel does not obstruct the shift lever when it is fully opened This may cause inter ference with the shift lever or a malfunction of the mechanism of this navigation system 0 Installing the navigation system Installation notes Do not install the navigation system in places subject to high t...

Page 261: ...r four locations on each side Use either the binding screws 5 mm x 8 mm or flush surface screws 5 mm x 9 mm de pending on the shape of the bracket s screw holes The semiconductor laser will be damaged if it overheats so don t install the naviga tion unit anywhere hot for instance near a heater outlet Parts supplied Parts marked are supplied with AVIC X930BTand AVIC X9310BT Be sure to use he screws...

Page 262: ...t_a_lI_at_io_n a Fastening the front panel o This description is for AVIC X930BT and AVIC X9310BT If you do not plan to remove the front panel the front panel can be fastened with suppl ied screw Screw 2 mm x 4 mm En ...

Page 263: ...ption from the satellite is blocked IliJ9 9 I I I I I I I I I I I I I I I I I I I I I I I I I I I I I I Parts supplied GPS antenna Metal sheet Dashboard Rear shelf When installing the GPS antenna inside the vehicle be su re to use the metal sheet provided with your system If this is not used the reception sensitivity will be poor Do not cut the accessory metal sheet This would reduce the sensitivi...

Page 264: ...x to the dashboard Affix the metal sheet on the surface as level as possible where the GPS antenna faces the window Place the GPS antenna on the metal sheet The GPS antenna is fastened with its magnet Metal sheet GPS antenna Peel off the protective sheet on the rear Make sure the surface is rr _ _II free of moisture dust grime oil etc before I emetalsheet I The metal sheet contains a strong adhesi...

Page 265: ... of the vehicle Installing the microphone Install the microphone in a place where its direction and distance from the driver make it easiest to pick up the driver s voice Make sure to connect the microphone to the navigation system after the system is tu rned off ACC OFF Parts supplied Microphone J Double sided tape Microphone clip Mounting on the sun visor 1 Install the microphone in the micro ph...

Page 266: ... sun visor when it is in the up position It cannot recognize the driver s voice if the sun visor is in the down po sition Installation on the steering column Mount the microphone on the steering column Double sided tape Install the microphone on the steering column keeping it away from the steering wheel Clamps Use separately sold clamps to secure the lead where necessary inside the vehicle m CO t...

Page 267: ...Section D Installation Adjusting the microphone angle The microphone angle can be adjusted En ...

Page 268: ... 9586 6300 PIONEER ELECTRONICS OF CANADA INC 300 Allstate Parkway Markham Ontario L3R OP2 Canada TEL 1 877 283 5901 TEL 905 479 4411 PIONEER ELECTRONICS DE MEXICO S A de C V Blvd Manuel Avila Camacho 138 10 piso Col Lomas de Chapultepec Mexico D F 11000 TEL 55 9178 4270 tifij 15Hi131H Ii Z 15 ts trli 11I t g f 445m13t i5 02 2521 3588 tif f w5ft 1i lH fi n 5j Q i51ij tJiXt Wffi j G9t 901 6 i5 0852 ...

Page 269: ... While the changes are intended to improve the overall user experience for most users Pioneer and its licensors disclaim any warranty or liability for damages in connection with such changes Indications of the navigation system may be different from the actual value Some of the features of the navigation system do not take in to consideration the type of vehicle it is installed into English ...

Page 270: ...En 2 ...

Page 271: ...En 3 ...

Page 272: ...En 4 ...

Page 273: ...En 5 ...

Page 274: ...En 6 ...

Page 275: ...Upgrade procedures 25 Upgrading the software program and the map database 25 Checking whether the upgrade was done properly 26 Updating the Bluetooth wireless technology software 26 How to use the navigation menu screens Screen switching overview 28 What you can do on each menu 29 Shortcut Menu 29 Selecting the shortcut 29 Removing a shortcut 30 Operating menu screens e g Navigation Menu screen 30...

Page 276: ...nt 51 Sorting waypoints 51 Canceling the route guidance 52 Registering and editing locations Storing favorite locations 53 Registering a location by Favorites 53 Registering a location by scroll mode 53 Editing registered locations 53 Editing the favorite location in the list 53 Editing your home 54 Sorting the favorite locations in the list 54 Deleting a favorite location from the list 55 Registe...

Page 277: ...ring in advance 76 Switching to PC Mode 76 Canceling PC Mode 76 Launching the application 76 Basic operations of the audio source Switching the audio source 79 Turning off the audio source 79 Audio screen switching overview 80 What you can do on each menu 81 Displaying the Function Menu screen 81 Using the radio TUNER Reading the screen 82 Using the touch panel keys 82 Operating by hardware button...

Page 278: ...101 Using Sound Retriever 101 Using the function menu 102 Setting a repeat play range 102 Playing songs in random order shuffle 102 Playback and Pause 103 Setting the audiobook play speed 103 Using the XM tuner Reading the screen 104 Using the touch panel keys 105 Operating by hardware buttons 105 Storing and recalling broadcast stations 105 Switching the XM channel select mode 105 Using the SIRIU...

Page 279: ...ions of leads 122 Adjusting the response positions of the touch panel touch panel calibration 122 Adjusting the screen brightness 123 Recording your travel history 123 Using the demonstration guidance 123 Restoring the default setting 124 Turning off the screen 124 Displaying the Initial Setting screen 124 Setting the illumination color 125 Switching the auxiliary setting 125 Setting the rear outp...

Page 280: ...sary information is not available please contact the companies listed below Please do not ship your product to the compa nies at the addresses listed below for repair without making advance contact U S A Pioneer Electronics USA Inc CUSTOMER SUPPORT DIVISION P O Box 1760 Long Beach CA 90801 1760 800 421 1404 CANADA Pioneer Electronics of Canada Inc CUSTOMER SATISFACTION DEPARTMENT 340 Ferrier Stree...

Page 281: ...e you purchased the hardware For the following descriptions refer to Opera tion Manual of the purchased hardware Hardware description Explanation of other non operation infor mation How to use this manual Finding the operation procedure for what you want to do When you have decided what you want to do you can find the page you need from the Con tents Finding the operation procedure from a menu nam...

Page 282: ...ade for iPod touch 4th generation iOS 4 3 1 iPod touch 3rd generation iOS 4 1 iPod touch 2nd generation iOS 3 1 1 iPod touch 1st generation iOS 3 1 2 iPod classic 120GB Ver 2 0 1 iPod classic 160GB 2009 Ver 2 0 3 iPod classic 80GB Ver 1 1 2 iPod classic 160GB 2007 Ver 1 1 2 iPod with video Ver 1 3 iPod nano 6th generation Ver 1 1 iPod nano 5th generation Ver 1 0 1 iPod nano 4th generation Ver 1 0 ...

Page 283: ...compilation or any other means You shall not use the Software to operate a service bureau or for any other use involving the processing of data for other per sons or entities Pioneer and its licensor s shall retain all copy right trade secret patent and other proprie tary ownership rights in the Software The Software is copyrighted and may not be cop ied even if modified or merged with other pro d...

Page 284: ...ed States except as authorized and as permitted by the laws and regulations of the United States If the Soft ware has been rightfully obtained by you out side of the United States you agree that you will not re export the Software nor any other technical data received from Pioneer nor the direct product thereof except as permitted by the laws and regulations of the United States and the laws and r...

Page 285: ...y decompilation or any other means You shall not use the Software to operate a service bureau or for any other use involving the processing of data for other per sons or entities Pioneer and its licensor s shall retain all copy right trade secret patent and other proprie tary ownership rights in the Software The Software is copyrighted and may not be cop ied even if modified or merged with other p...

Page 286: ...sclaimer or limitation cannot be waived or preempted 4 EXPORT LAW ASSURANCES You agree and certify that neither the Software nor any other technical data received from Pioneer nor the direct product thereof will be exported outside Canada except as authorized and as permitted by the laws and regulations of Canada If the Software has been rightfully obtained by you outside of Canada you agree that ...

Page 287: ...he Data You agree not to alter remove oblit erate or obscure any copyright notice or pro prietary legend contained in or on the Data 3 Limitation of Liability TELE ATLAS PIONEER AND THEIR SUPPLI ERS SHALL NOT BE LIABLE TO ANY END USERS FOR ANY INCIDENTAL CONSEQUEN TIAL SPECIAL INDIRECT OR EXEMPLARY DAMAGES ARISING OUT OF THIS AGREE MENT INCLUDING LOST PROFITS OR COSTS OF COVER LOSS OF USE OR BUSIN...

Page 288: ...is agreed that the Licensed Tele Atlas Products are a trade secret and a proprietary commercial product and not sub ject to disclosure 8 Additional provisions for Tele Atlas Premium Points of Interest the POIs With respect to the POI Licensed Tele Atlas Products End User specifically agrees that End User shall not a except as otherwise specifically set forth herein license or otherwise provide the...

Page 289: ...ns and restrictions to which the use of the Brand Icon Licensed Tele Atlas Product will be subject provided to the End User from time to time in the re lease notes applicable to the Value Added Product 10 Copyright Notices End User shall allow the display of the then current copyright notice for the Licensed Tele Atlas Products on the initial splash screen in the code on the storage medium on the ...

Page 290: ...ay not assign any part of this Agreement without PIONEER s prior written consent You acknowledge and understand that the Data may be subject to re strictions on exportation and agree to comply with any applicable export laws In the event that any provision or part of a provision of this Agreement is determined to be invalid illegal or unenforceable such provision or part there of shall be stricken...

Page 291: ...It is strictly prohibited to reproduce and use any part or the whole of this map in any form without permission from the copyright owner If the local traffic regulations or conditions deviate from this data follow the local traf fic regulations such as signs indications etc and conditions such as construction weather etc The traffic regulation data used in the map database applies only to standard...

Page 292: ...time First check your device number DEVICE NUMBER displayed such as Device or Device Number of your naviga tion system for later procedures To display the device number do the following 1 Touch Menu on the map screen The Navigation Menu screen appears 2 Touch Settings The Settings Menu screen appears 3 Touch Service Info The Service Information Screen screen ap pears 4 Write down your device numbe...

Page 293: ...ationupdate ca For issuing the password follow the instruc tion on the website 2 Record the password that you received You need to input this password accurately Write down your password to avoid mis takes Upgrade procedures NEVER stop the engine of your vehicle or turn off the power supply to the navigation system until the installation is completed Turning the power off during upgrade process ca...

Page 294: ...technology software Access the Pioneer website to check your phone s compatibility If your phone is on the list and you wish to update manually update the Bluetooth firmware after the automatic up grade is finished http www pioneerelectronics com In Canada http www pioneerelectronics ca p Registered phones that are listed on the Connection List screen are cleared by the software update 1 Insert th...

Page 295: ...En 27 Chapter 04 Instructions for upgrading Instructions for upgrading ...

Page 296: ...Screen switching overview 7 1 2 3 2 4 5 6 En 28 Chapter 05 How to use the navigation menu screens ...

Page 297: ...ings on the Bluetooth wireless technology connection 5 Settings Menu screen You can access the screen to customize set tings 6 Applications Menu screen You can launch applications downloaded to an SD memory card via the utility program AVIC FEEDS 7 Audio operation screen This is the screen that normally appears when you play the audio source Shortcut Menu Registering your favorite menu items in sh...

Page 298: ...the selection touch Close Operating menu screens e g Navigation Menu screen 1 2 3 1 Screen title 2 The previous screen returns 3 Shows the next or previous page Operating list screens e g city list 1 5 4 2 3 1 Screen title 2 Touching or on the scroll bar scrolls through the list and allows you to view the re maining items 3 The previous screen returns 4 If all of the characters cannot be displayed...

Page 299: ...such as or numbers Touch to toggle the selection p Even if you use any of A Ä Å Æ the displayed result is the same 5 OK Confirms the entry and allows you to proceed to the next step 6 Deletes the input text one letter at a time be ginning at the end of the text Continuing to touch the key deletes all of the text p You can select the type of keyboard to be used for inputting characters For details ...

Page 300: ...paring the past average fuel mileage and the average fuel mileage since the navigation system was last started Touching this item displays the Eco Graph screen For details refer to Checking the eco friendly driving status on page 37 5 Map control Touching displays touch panel keys for changing the map scale and the map orienta tion 6 Street name or city name that your vehi cle is traveling along F...

Page 301: ... estimated time of arrival is only a reference value and does not guarantee arrival at that time Travel time to your destination or waypoint d Current time Meaning of guidance flags Destination The checkered flag indicates your destination Waypoint The blue flags indicate your way points Guidance point The next guidance point next turn ing point etc is shown by a yel low flag Audio information bar...

Page 302: ...nce for the destination or a waypoint is available Please review and obey all local traffic rules along the highlighted route for your safety No turn by turn directions will be displayed on these roads Non routable roads pink color road Map display is possible but it cannot be used for route calculation Please review and obey all local traffic rules along this route For your safety Operating the m...

Page 303: ... between 2D and 3D 2D map screen 3D map screen 1 Display the map screen 2 Touch on the map screen or appears p When the 2D map screen is selected is displayed p When the 3D map screen is selected is displayed 3 Touch or Each time you touch the key changes the set ting p If you do not operate the function for a few seconds the initial map screen automati cally returns Checking the eco friendly driv...

Page 304: ...ng information about a specified location An icon appears at registered places home lo cation specific places Favorites entries and places where there is a POI icon Place the scroll cursor over the icon to view detailed in formation 1 Scroll the map and move the scroll cur sor to the icon you want to view 2 Touch The Information List screen appears 3 Touch the item that you want to check the detai...

Page 305: ...splay the Eco Graph Reading the screen 5 2 3 4 1 1 Average fuel mileage comparison graph Displays a comparison of the average fuel mileage up to the point the navigation system was last stopped past average fuel mileage and the current average fuel mileage The dis play is updated every 3 seconds The more the value moves in the direction of the better the fuel mileage There are three different grap...

Page 306: ...tes how well you have driven in an environmentally friendly way The points of Eco Drive Level change ac cording to Eco Score when the vehicle reaches the destination When a certain num ber of points is reached the level increases and a message appears 1 1 Tree icon As the level increases a tree icon changes from a young tree to a big tree p This is not displayed when Eco Drive Level is set to Off ...

Page 307: ...increased or de creased Off No message appears and no sound beeps when the vehicle reaches the destination For details refer to Displaying Eco Drive Level guidance on the previous page Rapid Start Warning On A message appears and a sound beeps when the vehicle experiences a sudden start Off default No message appears and no sound beeps when the vehicle experiences a sudden start Clear Record Fuel ...

Page 308: ...basic flow of creating your route 1 Park your vehicle in a safe place and apply the parking brake j 2 Display the Top Menu screen For details of the operations refer to Screen switching overview on page 28 j 3 Select the method of searching for your destination j 4 Enter the information about your destina tion to calculate route j 5 Confirm the location on the map For details refer to Setting a ro...

Page 309: ...itching overview on page 28 2 Touch Address 3 Touch the key next to Country to dis play the country list 4 Touch one of the items on the list to set the country as search area The screen returns to the previous screen p Once the country has been selected you only have to change countries when the lo cation is outside of the country you se lected 5 Touch the key next to State 6 Touch one of the ite...

Page 310: ... Touch the desired house number range The searched location appears on the map screen For the subsequent operations refer to Set ting a route to your destination on page 48 Setting up a route to your home If your home location is stored the route to your home can be calculated by touching a single key 1 Touch Home on the map screen and then touch Navigation For details of the operations refer to S...

Page 311: ...elected 5 Touch one of the items on the list to set the country as search area The POI Name Input Menu screen returns 6 Touch Name The POI Name screen appears 7 Enter the POI name and then touch OK The POI Name Input Menu screen returns 8 Touch Search The POI List screen appears 9 Touch the POI you want The searched location appears on the map screen Touch Sort Each time you touch Sort changes the...

Page 312: ... on the map screen For the subsequent operations refer to Set ting a route to your destination on page 48 Searching for POIs around the city You can search for POIs around a specified city 1 Touch Home on the map screen and then touch Navigation For details of the operations refer to Screen switching overview on page 28 2 Touch POI The POI Search screen appears 3 Touch Around City The Around City ...

Page 313: ...ions refer to Set ting a route to your destination on page 48 Searching for POIs by using the data on the SD memory card Creating a customized POI is possible by using the utility program AVIC FEEDS which is available separately on your PC AVIC FEEDS will be available on our website Storing the customized POI properly and inserting the SD memory card enables the system to use the data for searches...

Page 314: ...n on page 48 Searching for a location by coordinates Entering a latitude and longitude pinpoints the location 1 Touch Home on the map screen and then touch Navigation For details of the operations refer to Screen switching overview on page 28 2 Touch Coordinate The Coordinate Input Menu screen ap pears 3 Touch Longitude The Enter Longitude screen appears 4 Enter the longitude and then touch OK The...

Page 315: ...t the position as destination waypoint 1 Display the map screen 2 Touch and drag the screen to scroll the map to the position you want 3 Touch For details refer to Setting a route to your destination on the next page En 47 Chapter 08 Searching for and selecting a location Searching for and selecting a location ...

Page 316: ...ed to the Waypoints List screen p If a destination is not set Waypoint is not available 3 Touch OK Route confirmation screen 1 2 3 4 The displayed route is set as your route and the route guidance starts 1 Distance to the destination 2 Travel time to your destination 3 Estimated fuel cost to your destination For details refer to Inputting the fuel consumption information for calculating the fuel c...

Page 317: ...e Route info screen on this page 2 Touch Options The Route Options screen appears 3 Touch the desired items to change the route calculation conditions and then touch OK The route is recalculated and the Route con firmation screen appears Items that users can operate Settings marked with an asterisk show that these are default or factory settings Route Condition This setting controls how the route ...

Page 318: ...en into account p If you want to set your route to avoid raised draw bridges select On On Calculates a route while avoiding streets or bridges with traffic restrictions during a cer tain time Off Calculates a route while ignoring traffic re strictions p The system may calculate a route that in cludes streets or bridges that are subject to traffic restrictions during a certain time even if On is se...

Page 319: ...an delete successive waypoints 1 Display the Route info screen For details refer to Displaying the Route info screen on page 49 2 Touch Waypoints The Waypoints List screen appears 3 Touch Delete next to the waypoint that you want to delete The touched waypoint will be deleted from the list 4 Touch OK on the Waypoints List screen The route is recalculated and the Route con firmation screen appears ...

Page 320: ...ation screen appears 7 Touch OK The map of the current position appears Canceling the route guidance If you no longer need to travel to your destina tion follow the steps below to cancel the route guidance 1 Touch Home on the map screen and then touch Navigation For details of the operations refer to Screen switching overview on page 28 2 Touch Cancel A message confirming the cancellation of the c...

Page 321: ...en the map of the location you want to register is displayed touch OK The location is registered and then the Edit Favorite screen appears For details refer to Editing the favorite loca tion in the list on this page 6 Touch OK The registration is complete Registering a location by scroll mode 1 Touch and drag the screen to scroll the map to the position that you want to regis ter Cursor 2 Touch Th...

Page 322: ...the operations refer to Screen switching overview on page 28 2 Touch Favorites The Select Favorite screen appears p Home location is displayed on the top of the list 3 Touch next to the home location The Edit Favorite screen appears 4 Touch the item that you want to change the setting Touch Phone You can edit the registered phone number To dial the number touch p Touching enables you to call the p...

Page 323: ...ites screen appears 4 Select the location you want to delete A check mark appears next to the selected lo cation Touch All or None Selects or deselects all entries 5 Touch Delete A message will appear asking you to confirm the deletion 6 Touch Yes The data you selected is deleted Touch No Cancels the deletion Registering and editing your home Registering your home position saves time and effort Al...

Page 324: ...he setting Touch Phone You can edit the registered phone number To dial the number touch p Touching enables you to call the position if a telephone number is available Pairing with cellular phone featuring Bluetooth wireless technology is required For details refer to Dialing from the map on page 66 Touch Modify Location You can change the registered location by scrol ling the map p For home infor...

Page 325: ...e data is overwritten with new data 1 Insert an SD memory card into the SD card slot 2 Touch Home on the map screen and then touch Navigation For details of the operations refer to Screen switching overview on page 28 3 Touch Data In Out The Export Import Menu screen appears 4 Touch Export next to Favorites Data export starts After the data is exported the completion mes sage appears 5 Touch OK Th...

Page 326: ...ouch Navigation For details of the operations refer to Screen switching overview on page 28 4 Touch Data In Out The Export Import Menu screen appears 5 Touch Import next to Favorites The following message appears 6 Touch Yes Data import starts After the data is imported the Navigation Menu screen appears En 58 Chapter 11 Registering and editing locations ...

Page 327: ...n system is turned off the Bluetooth connection is also discon nected When the system restarts the sys tem automatically attempts to reconnect the previously connected cellular phone Even when the connection is severed for some reason the system automatically re connects the specified cellular phone ex cept when the connection is severed due to cellular phone operation Displaying the phone menu Us...

Page 328: ...uch Setting on the Phone Menu screen The Bluetooth Settings screen appears 4 Touch Connections The Connection List screen appears 5 Touch Add The Add Device screen appears 6 Touch Search devices The Nearby Devices screen appears The system searches for cellular phones fea turing Bluetooth technology that are ready for the connection and displays them in the list if the device has been found p Up t...

Page 329: ...ry to activate Bluetooth wireless tech nology For details refer to the instruction manual of your cellular phone 2 Display the Phone Menu screen For details of the operations refer to Dis playing the phone menu on page 59 3 Touch Setting on the Phone Menu screen The Bluetooth Settings screen appears 4 Touch Connections The Connection List screen appears 5 Touch Add The Add Device screen appears 6 ...

Page 330: ...ch Select specific devices The Select specific devices screen appears 7 Touch the model name of the cellular phone to be connected The system searches for cellular phones fea turing Bluetooth technology that are ready for the connection and displays them in the list if the device has been found p If you cannot find the desired model name on the list touch Other phones to search the cellular phones...

Page 331: ...lar phone selected as the target of connection However connect the cellular phone manually in the following cases Two or more cellular phones are registered and you want to manually select the cellu lar phone to be used You want to reconnect a disconnected cel lular phone Connection cannot be established automa tically for some reason If you start connection manually carry out the following proced...

Page 332: ...Touch Drop next to the cellular phone name Making a phone call You can make a phone call in many different ways Direct dialing 1 Display the Phone Menu screen For details of the operations refer to Dis playing the phone menu on page 59 2 Touch Dial Pad The Enter Phone Number screen appears 3 Touch the number keys to enter the phone number The phone number that was input is dis played And is activa...

Page 333: ...abs Makes the screen jump to the beginning of the page including the entry whose names start with any of selected letters or numbers Each touch of the alphabet tab cycles through the list by the first letter of the list item Touching ABCDE displays all entries that start with symbols or numbers Touching Others displays the page including entries that are not assigned to any of the other tabs 4 Tou...

Page 334: ...POI The POI Search screen appears 3 Search for the POI The POI List screen appears For details of the operation refer to Search ing for Points of Interest POI on page 43 4 Touch next to the POI that you want to call The Detailed POI Information screen ap pears 5 Touch to make a call To cancel the call after the system starts dial ing touch 6 Touch to end the call Dialing from the map You can make ...

Page 335: ...g the phone vo lume on page 69 p You may hear a noise when you hang up the phone Rejecting an incoming call You can reject an incoming call For details refer to Setting the automatic re jection function on page 70 When a call comes in touch The call is rejected p The rejected call is recorded in the missed call history list For details refer to Dialing from the history on page 65 Transferring the ...

Page 336: ... phone book entries p You can send the phone book entries re peatedly before touching OK If your cellu lar phone supports one by one transfer only send all the entries that you want to transfer and then touch OK p If your phone has a capability for automatic transfer of phone book this screen is skipped and transfer will start p The transferred data cannot be edited on the navigation system 6 Touc...

Page 337: ... 3 Touch or to set their volume Phone Ringtone This setting controls the incoming ring tone volume Phone Voice This setting controls the incoming voice vo lume p Phone volume varies depending on the in coming caller s phone volume setting and other conditions For details concerning operations refer to Answering an incoming call on page 66 Stopping Bluetooth wave transmission You can stop transmiss...

Page 338: ...s priority and all incoming calls are automatically rejected p If Refuse All Calls is set to On rejected incoming calls will be stored in the missed call list Echo canceling and noise reduction When you are operating hands free phoning in the vehicle you may hear an undesirable echo This function reduces the echo and noise while you are using hands free phoning and maintains a certain sound qualit...

Page 339: ...he name is changed p Up to 16 characters can be entered for a de vice name Updating the Bluetooth wireless technology software Update files will be available for download in the future You will be able to download the lat est update from an appropriate website to your PC p Before you download the files and install the update read through the instructions on the website Follow the instructions on t...

Page 340: ...be performed The registered name appears if the phone number of the received call is already regis tered in the phone book When one phone number is registered under different names the name that comes first in the phone book is displayed If the phone number of the received call is not registered in the phone book the phone number of the received call appears During incoming and outgoing calls or t...

Page 341: ... fuel you need to tra vel 60 miles 100 kilometers Gas Price Unit Enter the fuel unit price Gas Price For details refer to Calculating the fuel consumption on this page Gas Unit Set the fuel unit Currency Set the unit of currency When all the items are entered inputting the fuel consumption information is complete Calculating the fuel consumption When you enter the fueling information to the naviga...

Page 342: ... memory card p If there is previous data in the SD memory card the data is overwritten with new data 1 Insert an SD memory card into the SD card slot 2 Touch Home on the map screen and then touch Navigation For details of the operations refer to Screen switching overview on page 28 3 Touch Gas Mileage The Gas Mileage screen appears 4 Touch Export After a message confirming whether to export the da...

Page 343: ...Export next to Gas Mileage Data export starts After the data is exported the completion mes sage appears 5 Touch OK The Navigation Menu screen appears En 75 Chapter 13 Fuel cost management Fuel cost management ...

Page 344: ... USB port Mini B 4 Connect the USB cable to your PC Connect the detachable device and your PC using the USB cable 5 Insert an SD memory card into the SD card slot 6 Turn on the power switch of detach able device 7 Touch Home on the map screen and then touch Navigation For details of the operations refer to Screen switching overview on page 28 8 Touch Connect PC A message confirming whether to rest...

Page 345: ...application to an SD memory card 2 Insert an SD memory card into the SD card slot 3 Touch Home on the map screen to dis play the Top Menu screen For details of the operations refer to Screen switching overview on page 28 4 Touch Applications The Applications Menu screen appears 5 Touch the application that you want to launch A message confirming whether to restart the navigation system appears 6 T...

Page 346: ...En 78 Chapter 14 Using Applications ...

Page 347: ...tuner CD built in CD player USB USB storage de vice iPod iPod connected using USB input EXT1 external unit 1 EXT2 external unit 2 AUX auxiliary device p In the following cases the sound source cannot to be used When a unit corresponding to each source is not connected to the naviga tion system When no disc is set in the navigation system When AUX in the Initial Setting screen is set to Off For det...

Page 348: ...reen switching overview Press the button Press and hold the button for a few seconds Press the center of MULTI CONTROL Turn MULTI CONTROL to select the item En 80 Chapter 15 Basic operations of the audio source ...

Page 349: ...n make various settings for the hard ware control 7 Map screen Press the MODE button to display the naviga tion map screen Displaying the Function Menu screen Advanced functions for each audio source are put on the Function Menu screen To use those functions display the Function Menu screen p Depending on the audio source Function Menu may not exist 1 Press the center of MULTI CONTROL when the aud...

Page 350: ...or details refer to Tuning in strong sig nals on the next page 7 STEREO indicator Shows when the selected frequency is being broadcast in stereo Using the touch panel keys 1 1 to Recalls radio stations For details refer to Storing and recalling broadcast frequencies on the next page Operating by hardware buttons Pressing the BAND ESC button Band can be selected from among FM1 FM2 FM3 or AM Pressin...

Page 351: ...uch of a key 1 Display the Function Menu screen For details of the operation refer to Display ing the Function Menu screen on page 81 2 Turn MULTI CONTROL to display BSM 3 Press the center of MULTI CONTROL to begin a search Searching begins to flash While Search ing is flashing the six strongest broadcast frequencies will be stored under the preset tuning keys to in order of their signal strength ...

Page 352: ...Shows what preset item has been se lected Frequency Multicasting indicator Shows the number of multicast chan nels in the current frequency Channel name Shows the channel name of broadcast channel Artist name Shows the artist name for the current song Song title Shows the title of the song currently playing Program type Shows the type of current program 3 Signal level indicator 4 Blending mode ind...

Page 353: ...cies are recalled from memory Using the function menu 1 Display the Function Menu screen For details of the operation refer to Display ing the Function Menu screen on page 81 2 Turn MULTI CONTROL to select a func tion Turning MULTI CONTROL switches between the functions in the following order BSM best stations memory Local local seek tuning Seek Mode seek mode Blending reception mode Storing the s...

Page 354: ... of MULTI CONTROL to switch between Seek All and Seek HD Seek All Seeks stations from both analog and digital broadcasting Seek HD Seeks from digital broadcasting only p If you select Seek HD on this setting while Blending is set to Off the setting on Blending turns to On auto matically Switching the reception mode If a digital broadcast reception condition gets poor the tuner automatically switch...

Page 355: ...ently playing when available Artist name of the track Shows the artist name of the track cur rently playing when available Disc title Shows the title of the disc currently play ing when available Track title Shows the title of the track currently playing when available 3 Playback condition indicator Indicates the current playback condition Playing tracks in random order Indicator Meaning No indica...

Page 356: ...continuously will skip to the previous track Pressing and holding MULTI CONTROL left Performs fast reverse p Fast reverse stops when it reaches the be ginning of the first track on the disc Pressing the center of MULTI CONTROL The function select screen appears Pressing the LIST button Shows the list to select a track p This function is available only when the CD TEXT disc is played For details re...

Page 357: ...n again p To turn scan play off touch again p If you touch while the repeat play range is set to the repeat play range changes to disc repeat automatically and scanning tracks will begin p If you skip a track forward or backward dur ing scan play the scan play is automatically canceled p If you touch during scan play the scan play is automatically canceled and playback of the current track will be...

Page 358: ...icated next to TRK Shows the track number currently play ing Play time Shows the elapsed playing time within the current track Comment Shows the comment of the file currently playing when available Folder name Shows the folder name currently play ing File name Shows the file name currently playing Track title Shows the title of the track currently playing when available Artist name Shows the artis...

Page 359: ...perating by hardware buttons Pressing the BAND ESC button Switches between CD audio data CD DA and ROM compressed audio file p This operation is available only when play ing a disc containing both CD DA and compressed audio files p If you have switched between CD DA and compressed audio playback starts at the first track on the disc Pressing and holding the BAND ESC button Playback returns to the ...

Page 360: ...ng MULTI CONTROL right enables you to perform the equivalent operation p When a folder is selected the first track of the selected folder is played by pressing and holding the center of MULTI CONTROL p When the lower folder is listed the list re turns to the upper folder by pressing MULTI CONTROL left If the root folder is listed this operation is not available p The content of the root folder is ...

Page 361: ...he root folder during scan play the scan play is automatically canceled p If you touch during scan play the scan play is automatically canceled and playback of the current track will be repeated p If you touch during scan play the scan play is automatically canceled and tracks will be played in random order Playback and Pause Touch Playback of the current track pauses and Pause is displayed p To t...

Page 362: ...y playing Track title Shows the title of the track currently playing when available Artist name Shows the artist name currently playing when available Album title Shows the title of the album of the cur rent track when available p The item is blank if there is no corre sponding information 3 File type indicator Shows the type of audio file currently playing 4 Playback condition indicator Indicates...

Page 363: ...ng MULTI CONTROL right Skips to the start of the next file Pressing and holding MULTI CONTROL right Performs fast forward Pressing MULTI CONTROL left Skips to the start of the current file Pressing it twice in a row will skip to the start of the previous file Pressing and holding MULTI CONTROL left Performs fast reverse p There is no sound on fast reverse or for ward Pressing the center of MULTI C...

Page 364: ...rm returning to the root folder while the repeat play range is set to or the repeat play range changes to all re peat automatically Playing files in random order Files in a selected repeat range are played in random order Touch Random play begins When you turn random play on appears p To turn random play off touch again p If you touch while the repeat play range is set to the repeat play range cha...

Page 365: ... automatically en hances compressed audio and restores rich sound Touch S Rtrv repeatedly to select the desired setting Each touch of S Rtrv changes the settings as follows Sound Retriever function level 1 is acti vated Sound Retriever function level 2 is acti vated No indicator Sets to off p S Rtrv2 has a stronger effect than S Rtrv1 and is more effective when playing back highly compressed audio...

Page 366: ...song When a podcast is played the episode is displayed Artist name Shows the artist name for the current song Album title podcast title Shows the title of the album of the cur rent song When a podcast is played the podcast title is displayed 3 Playback condition indicator Indicates the current playback condition Setting a repeat play range Indicator Meaning Repeats all songs or videos in the selec...

Page 367: ...ng Pressing and holding MULTI CONTROL right Performs fast forward Pressing MULTI CONTROL left Skips to the start of the current song Pressing it twice continuously will skip to the previous song Pressing and holding MULTI CONTROL left Performs fast reverse Pressing the center of MULTI CONTROL The function select screen appears Pressing the LIST button Shows the list to select a song For details re...

Page 368: ...the center of MULTI CONTROL to play the se lected song or episode Searching for applicable items alphabetically Using the search control displays the page which includes the first applicable option p This function is available for the alphabeti cal list only 1 Press the LIST button to display the top category menu p To return to the previous screen press the BAND ESC button 2 Turn MULTI CONTROL to...

Page 369: ...rd from the car s speakers and operation can be conducted from your iPod While the control mode is set to iPod you can operate iPod function from the connected iPod This function can be operated with the follow ing iPod models iPod nano second generation iPod nano third generation iPod nano fourth generation iPod classic iPod touch first generation iPod touch second generation iPhone iPhone 3G iPh...

Page 370: ...nu screen For details of the operation refer to Display ing the Function Menu screen on page 81 2 Turn MULTI CONTROL to select Play Mode 3 Press the center of MULTI CONTROL to set Each press of MULTI CONTROL changes the settings as follows Repeat All Repeats all songs in the selected list Repeat One Repeats just the current song p Icons below are displayed as the repeat play indicator When the set...

Page 371: ...iPod play back speed can be changed 1 Display the Function Menu screen For details of the operation refer to Display ing the Function Menu screen on page 81 2 Turn MULTI CONTROL to display Audiobooks 3 Press the center of MULTI CONTROL re peatedly until the desired setting appears in the display Each press of MULTI CONTROL changes the settings as follows Normal Plays back audiobooks in normal spee...

Page 372: ...e lected Channel number indicated next to CH Shows the XM channel number the tuner is currently tuned to Preset number indicated next to P CH Shows what preset item has been se lected Detail information Shows the detailed information of the broadcast channel currently being re ceived Artist name Shows the artist name for the current song Song title Shows the title of the current song and program C...

Page 373: ...the broadcasting channels During Category mode You can skip the broadcasting channels within a selected category Pressing the center of MULTI CONTROL The function select screen appears Storing and recalling broadcast stations With a touch of any of the preset tuning keys to you can easily store up to six broad cast channels for later recall also with the touch of a key 1 Select the channel that yo...

Page 374: ...e The setting is changed as follows Channel mode You can select a channel from all channels when you operate this function Category mode You can select a channel within a selected category that you operate this function En 106 Chapter 22 Using the XM tuner ...

Page 375: ... Replay mode 1 Source icon Shows which source has been selected 2 Text display area Band Shows the SIRIUS band that has been selected Channel number indicated next to CH Shows the SIRIUS channel number that the tuner is tuned to Preset number indicated next to P CH Shows what preset item has been se lected Play time Shows the elapsed playing time within the stored broadcast p Play time is displaye...

Page 376: ...s useful for switching the preset item Pressing MULTI CONTROL up or down During Channel mode You can recall radio stations assigned to pre set tuning keys to During Category mode The categories move up or down one at a time Pressing MULTI CONTROL left or right During Channel mode The channels move up or down one at a time During Category mode The channels move up or down one at a time within a sel...

Page 377: ...ERFACE capable for this function As soon as you tune to a channel Pioneer SIRIUS BUS INTERFACE automatically begins storing the broadcast It can store approximately up to 44 minutes previous depending on the selected channel and the memory capacity of Pioneer SIRIUS BUS INTERFACE 1 Touch and hold on the SIRIUS screen to activate the Instant Replay mode p It begins replaying the stored broadcast on...

Page 378: ...OL to store the selected league in memory The game alert function will start on that lea gue p To turn the Game Alert off of the selected league press the center of MULTI CONTROL again 5 Press MULTI CONTROL up or down to select a desired team Teams in the selected category are switched in the display 6 Press the center of MULTI CONTROL to store the selected team in memory The game alert function w...

Page 379: ...stered while the Game Alert setting is On 1 Display the Function Menu screen For details of the operation refer to Display ing the Function Menu screen on page 81 2 Turn MULTI CONTROL to display Game Info The game information of your selected team is displayed 3 Press MULTI CONTROL up or down to select a game p The game score will be updated automati cally 4 Press the center of MULTI CONTROL to sw...

Page 380: ... 1 Source icon Shows which source has been selected 2 External unit indicator Displays the information that is sent by con nected external units 3 Auto Manual mode indicator Shows the current mode Using the touch panel keys 1 1 The external unit can be operated by transmit ting the operating commands set to 1 key through 6 key p Operation varies depending on the ex ternal unit connected In some ca...

Page 381: ...isplay ing the Function Menu screen on page 81 2 Turn MULTI CONTROL until the desired setting appears in the display 3 Press the center of MULTI CONTROL to set p The operating commands set to Function1 through Function4 vary de pending on the external unit p Some functions may not be used until you touch and hold the key Switches between automatic and manual function 1 Display the Function Menu sc...

Page 382: ...s manual Reading the screen 1 1 Source icon Shows which source has been selected Selecting AUX as the source 1 Turn on the AUX source For details refer to Switching the auxiliary setting on page 125 2 Press the SRC OFF button to display the AUX screen For details refer to Switching the audio source on page 79 En 114 Chapter 25 Using the AUX source ...

Page 383: ...ce and beep When set to guidance is output When set to no guidance is output Touch Beep Each time you touch the key changes the setting On default A beep sounds Off The beep sound is muted Customizing the regional settings Selecting the language You can set the languages used on the pro gram and voice guidance Each language can be set separately 1 Display the Settings Menu screen For details of th...

Page 384: ...mer time Summer time setting is off by default Touch Summer Time to change the setting if you are in the summer time period 6 Touch Time format Each time you touch the key changes the set ting 12 hour default Changes the display to 12 hour format with am pm 24 hours Changes the display to 24 hour format Changing the unit between km and miles This setting controls the unit of distance and speed dis...

Page 385: ...of keyboard to be used for inputting characters 1 Display the Settings Menu screen For details of the operations refer to Dis playing the Settings Menu screen on page 115 2 Touch Region The Region screen appears 3 Touch Keyboard Each time you touch the key changes the set ting QWERTY default QWERTZ AZERTY ABC Customizing the map screen settings The general settings related with a map screen can be...

Page 386: ...ained 5 Touch POI The Overlay POI Main Category screen appears p Categories that are already set will have a blue check mark 6 Touch the main category you want A list of subcategories under the selected main category appears p Categories that are already selected will have a blue check mark 7 Touch the subcategory to display A red check mark appears next to the selected category To cancel the sele...

Page 387: ... map screen on page 32 1 Display the Settings Menu screen For details of the operations refer to Dis playing the Settings Menu screen on page 115 2 Touch Map The map setting screen appears 3 Touch Show Maneuver Each time you touch the key changes the set ting View default Displays maneuvers on the map Hide Hides maneuvers on the map Changing the setting of navigation interruption screen You can se...

Page 388: ...anges to blue based road colors Red Changes to red based road colors Setting the auto zoom display This setting enables switching to an enlarged map around the point where your vehicle is approaching an intersection entrance exit of freeway or a junction 1 Display the Settings Menu screen For details of the operations refer to Dis playing the Settings Menu screen on page 115 2 Touch Map The map se...

Page 389: ...lays Eco Meter on the map Off Hides Eco Meter on the map Setting the power saving function You can select the setting of the screen back light to save the battery power p This setting can only be changed when the detachable device is removed from the head unit 1 Display the Settings Menu screen For details of the operations refer to Dis playing the Settings Menu screen on page 115 2 Touch Backligh...

Page 390: ...ination When the headlights or small lamps of a ve hicle are on On is displayed When the small lamps of a vehicle are off Off is dis played If the orange white lead is not con nected Off appears Adjusting the response positions of the touch panel touch panel calibration If you feel that the touch panel keys on the screen deviate from the actual positions that respond to your touch adjust the respo...

Page 391: ...en the detachable device is removed from the head unit this function is not available 1 Insert an SD memory card into the SD card slot 2 Display the Settings Menu screen For details of the operations refer to Dis playing the Settings Menu screen on page 115 3 Touch Drive Log The Drive Log screen appears 4 Touch Drive Log Each time you touch the key changes the set ting On You can store your track ...

Page 392: ...1 Display the Settings Menu screen For details of the operations refer to Dis playing the Settings Menu screen on page 115 2 Touch Screen Off The screen is turned off p Touch anywhere on the screen to turn it back on Displaying the Initial Setting screen To customize the initial settings display the Initial Setting screen 1 Press the MODE button when the map of the current location is displayed Th...

Page 393: ...fer controller The navigation system s rear output can be used for a full range speaker or subwoofer connection If you switch S W Control to Rear SP S W you can connect a rear speak er lead directly to a subwoofer without using an auxiliary amp Initially the navigation system is set for a rear full range speaker connection Rear SP F Range p Both rear speaker leads output and RCA rear output are sw...

Page 394: ...L to display the function select screen For details refer to Audio screen switching overview on page 80 3 Turn MULTI CONTROL to select Audio Menu 4 Press the center of MULTI CONTROL The Audio Menu screen appears 1 2 3 4 1 Source icon Shows which source has been selected 2 Screen title 3 Function currently selected 4 Setting value 5 Turn MULTI CONTROL to select one of the initial settings Turning M...

Page 395: ... that you can easily recall at any time Here is a list of the equalizer curves Equalizer curve SuperBass is a curve in which only low pitched sound is boosted Powerful is a curve in which low pitched and high pitched sounds are boosted Equalizer curve Natural is a curve in which low pitched and high pitched sounds are slightly boosted Vocal is a curve in which the midrange which is the human vocal...

Page 396: ... and high sound ranges at low volume 1 Display the Audio Menu screen For details refer to Displaying the Audio Menu screen on page 126 2 Turn MULTI CONTROL to select Loud ness 3 Press the center of MULTI CONTROL to turn loudness on Loudness level e g Mid appears in the dis play p To turn loudness off press MULTI CONTROL again 4 Press MULTI CONTROL left or right to select a desired level Each time ...

Page 397: ...ear speakers 1 Display the Audio Menu screen For details refer to Displaying the Audio Menu screen on page 126 2 Turn MULTI CONTROL to select HPF 3 Press the center of MULTI CONTROL to turn high pass filter on p To turn high pass filter off press MULTI CONTROL again 4 Press MULTI CONTROL left or right to select cut off frequency Each time MULTI CONTROL is pressed left or right frequencies are sele...

Page 398: ...ncreases or decreases 4 to 4 is displayed as the source volume is increased or decreased The following AV sources are set to the same source level adjustment volume automatically USB and iPod XM and SIRIUS EXT1 and EXT2 p The source volume level for AM can be set separately from FM En 130 Chapter 26 Customizing preferences ...

Page 399: ... the battery it returns to the last system status A message appears when the remaining bat tery life is getting low When the battery nearly runs out a message appears and the navigation system automati cally turns off p When the battery of the detachable device is completely run down the splash screen is displayed the next time the system is booted up Replicating the settings You can import settin...

Page 400: ...ach method For the contents that are cleared in each method see the list presented later For detailed information about the items which would be erased refer to Setting items to be deleted on the next page Method 1 Press the RESET button Pressing the RESET button clears almost all settings of the audio function Method 2 Touch F Reset For details refer to Restoring the default setting on page 124 M...

Page 401: ...d 2 Method 3 Method 4 Map function View mode and scale setting on the map 1 1 Direction of the map 1 1 Last cursor position on the map screen 1 1 1 Route setting Current route 1 Guidance state of the current route 1 1 Vehicle position information 1 1 1 Route info 1 1 1 Navigation Menu Point registered in Favorites 1 Sorting order selected in Favor ites 1 1 History 1 Gas Mileage 1 1 1 Driving data ...

Page 402: ...ure to read Setting items to be deleted before you perform this operation For details refer to Setting items to be deleted on the previous page 1 Display the Settings Menu screen For details of the operations refer to Dis playing the Settings Menu screen on page 115 2 Touch and hold F Reset The Clear Data Setting screen appears 3 Touch Clear user information or Reset The message confirming whether...

Page 403: ...ed service sta tion Upgrade SD memory card was pulled out during upgrade process Consult the nearest authorized service sta tion The screen that cannot begin the upgrade process is displayed Eject the upgrade SD memory card and dis play the map of your current position and then reinsert the card Problems with the navigation screen Symptom Cause Action Reference The power doesn t turn on The naviga...

Page 404: ...he GPS antenna GPS reception may be lost temporarily The quality of signals from the GPS satellites is poor causing reduced positioning accu racy When using a cellular phone keep the antenna of the cellular phone away from the GPS antenna Something covers the GPS antenna Do not cover the GPS antenna with spray paint or vehicle wax because this may block the reception of GPS signals Snow buildup ca...

Page 405: ...Cause Action Reference CD playback is not possible The disc is inserted upside down Insert the disc with the label upward The disc is dirty Clean the disc The disc is cracked or otherwise da maged Insert a normal round disc The files on the disc are an irregular file format Check the file format The disc format cannot be played back Replace the disc The loaded disc is a type this system cannot pla...

Page 406: ...ut of range for ser vice Retry after re entering the range for service The connection between the cellular phone and the navigation system cannot be established now Perform the connection process If the screen becomes frozen Park your vehicle in a safe place and apply the parking brake Press RESET button on the navi gation system En 138 Appendix Appendix ...

Page 407: ...is played the navigation system restarts Consult the nearest authorized Pioneer ser vice station if this message persists Dataloading failed You may have transferred the data from your cellular phone in a format cannot be received by the naviga tion system Select a suitable item and format then retry Page 72 Connect your cellular phone with another method again and retry Page 59 Application startu...

Page 408: ... Go Home 42 POI 43 Spell Name 43 Near Me 43 Near Dest 44 Around City 44 AVIC FEEDS 45 Favorites 45 53 History 45 56 Cancel 52 Page Coordinate 46 Gas Mileage 73 Eco Graph 37 Route info 49 Cpy Setting 131 Data In Out 57 74 Connect PC 76 En 140 Appendix Appendix ...

Page 409: ...Mode 119 Show Maneuver 119 AV Guide Mode 119 Day Night Display 120 Road Color 120 Close Up View 120 Favorites Icon 120 Current Street 121 Eco Meter 121 Backlight Timeout 121 Service Info 121 Set Home 55 Location 122 Page Connection 122 Calibrate 122 Brightness 123 Drive Log 123 Demo Mode 123 F Reset 124 Screen Off 124 En 141 Appendix Appendix Appendix ...

Page 410: ...Dialed 65 Missed 65 Transfer 67 Volume 69 Phone Ringtone Phone Voice Setting 69 Connections 63 Bluetooth On Off 69 Auto Answer Preference 69 Refuse All Calls 70 Echo Cancel 70 Auto Connect 70 Edit Name 71 Clear Memory 68 Bluetooth Software Update 71 En 142 Appendix Appendix ...

Page 411: ...En 143 ...

Page 412: ...EL 65 6472 7555 PIONEER ELECTRONICS AUSTRALIA PTY LTD 5 Arco Lane Heatherton Victoria 3202 Australia TEL 03 9586 6300 PIONEER ELECTRONICS OF CANADA INC 340 Ferrier Street Unit 2 Markham Ontario L3R 2Z5 Canada TEL 1 877 283 5901 TEL 905 479 4411 PIONEER ELECTRONICS DE MEXICO S A de C V Blvd Manuel Avila Camacho 138 10 piso Col Lomas de Chapultepec Mexico D F 11000 TEL 55 9178 4270 先鋒股份有限公司 總公司 台北市中...

Page 413: ...rtent des informations importantes que vous devez comprendre pour pouvoir utiliser ce systeme de navigation Notice to all users I Notice atous les utilisateurs This software requires that the navigation system is properly connected to your vehicle s parking brake and depending on your vehicle additional installation may be required For more information please contact your Authorized Pioneer Electr...

Page 414: ... contrast the GNU General Public Licenses are intended to guarantee your freedom to share and change free software to make sure the software is free for all its users This license the Lesser General Public License applies to some specially designated software packages typically libraries of the Free Software Foundation and other authors who decide to use it You can use it too but we suggest you fi...

Page 415: ...m which contains a notice placed by the copyright holder or other authorized party saying it may be distributed under the terms of this Lesser General Public License also called this License Each licensee is addressed as you A library means a collection of software functions and or data prepared so as to be conveniently linked with applica tion programs which use some of those functions and data t...

Page 416: ...be ing compiled or linked with it is called a work that uses the Library Such a work in isolation is not a derivative En work of the Library and therefore falls outside the scope of this License However linking a work that uses the Library with the Library creates an executable that is a derivative of the Library because it contains portions of the Library rather than a work that uses the library ...

Page 417: ...n it 10 Each time you redistribute the Library or any work based on the Library the recipient automatically receives a license from the original licensor to copy distribute link with or modify the Library subject to these terms and condi tions You may not impose any further restrictions on the recipients exercise of the rights granted herein You are not responsible for enforcing compliance by thir...

Page 418: ...ordinary Gen eral Public License To apply these terms attach the following notices to the library It is safest to attach them to the start of each source file to most effectively convey the exclusion of warranty and each file should have at least the copyright line and a pointer to where the full notice is found one line to give the library s name and a brief idea of what it does Copyright C year ...

Page 419: ...out the data for the map database 18 Terms used in this manual Front display and Rear display 19 Video image 19 SO memory card 19 G Important safety information Cautions for the front panel 21 Eco friendly driving functions 21 Fuel cost management 22 Traffic information 22 em Additional safety information Parking brake interlock 23 When using a display connected to VOUT 23 To avoid battery exhaust...

Page 420: ...2 this device must accept any inter ference received including interference that may cause undesired operation of the device MADE IN THAILAND m En For Canadian model This Category II radiocommunication device complies with Industry Canada Standard RSS 310 CAUTION USE OF CONTROL OR ADJUSTMENT OR PER FORMANCE OF PROCEDURES OTHER THAN THOSE SPECIFIED HEREIN MAY RESULT IN HAZARDOUS RADIATION EXPOSURE ...

Page 421: ... and leave it there BE SURE TO OBSERVE THE FOLLOWING GUIDELINES Do not turn up the volume so high that you can t hear what s around you Use caution or temporarily discontinue use in potentially hazardous situations Do not use headphones while operating a motorized vehicle the use of headphones may create a traffic hazard and is illegal in many areas 0 ilfil iiiJi Wi q m J Q J r En m ...

Page 422: ...on of the Software by reverse eng i En neering disassembly decompilation or any other means You shall not use the Software to operate a service bureau or for any other use involving the processing of data for other per sons or entities Pioneer and its licensor s shall retain all copy right trade secret patent and other proprie tary ownership rights in the Software The Software is copyrighted and m...

Page 423: ...e exported outside the United States except as authorized and as permitted by the laws and regulations of the United States If the Soft ware has been rightfully obtained by you out side of the United States you agree that you wi II not re export the Software nor any other technical data received from Pioneer nor the direct product thereof except as permitted by the laws and regulations of the Unit...

Page 424: ...f the Software by reverse engi CID En neering disassembly decompilation or any other means You shall not use the Software to operate a service bureau or for any other use involving the processing of data for other per sons or entities Pioneer and its licensor s shall retain all copy right trade secret patent and other proprie tary ownership rights in the Software The Software is copyrighted and ma...

Page 425: ...l law which provides that such a disclaimer or limitation cannot be waived or preempted 4 EXPORT LAW ASSURANCES You agree and certify that neither the Software nor any other technical data received from Pioneer northe direct product thereof will be exported outside Canada except as authorized and as permitted by the laws and regulations of Canada If the Software has been rightfully obtained by you...

Page 426: ...ors and they retain all ownership rights in the Data You agree not to alter remove oblit erate or obscure any copyright notice or pro prietary legend contained in or on the Data ill En 3 limitation of liability TELE ATLAS PIONEER AND THEIR SUPPLI ERS SHALL NOT BE LIABLE TO ANY END USERS FOR ANY INCIDENTAL CONSEQUEN TIAL SPECIAL INDIRECT OR EXEMPLARY DAMAGES ARISING OUT OF THIS AGREE MENT INCLUDING...

Page 427: ...r any federal state or local law it is agreed that the Licensed Tele Atlas Products are a trade secret and a proprietary commercial product and not sub ject to disclosure 8 Additional provisions for Tele Atlas Premium Points of Interest the POls With respect to the POI licensed Tele Atlas Products End User specifically agrees that End User shall not a except as otherwise specifically set forth her...

Page 428: ...plicable to the Value Added Product ill En 10 Copyright Notices End User shall allow the display of the then current copyright notice for the Licensed Tele Atlas Products on the initial splash screen in the code on the storage medium on the packaging in the Help About section in the operator s manual and in any displayed or printed map image for each Value Added Pro duct that is based upon 1 Te e ...

Page 429: ...d or modi fied only by PIONEER You may not assign any part of this Agreement without PIONEER s prior written consent You acknowledge and understand that the Data may be subject to re strictions on exportation and agree to comply with any applicable export laws In the event that any provision or part of a provision of this Agreement is determined to be invalid illegal or unenforceable such provisio...

Page 430: ...efer to the information on our website It is strictly prohibited to reproduce and use any part or the whole of this map in any form without permission from the copyright owner If the local traffic regulations or conditions deviate from this data follow the local traf fic regulations such as signs indications etc and conditions such as construction weather etc The traffic regulation data used in th...

Page 431: ...ercially available and can be con nected to this navigation unit will be referred to as the Rear display 0 Video image Video image in this manual indicates mov ing images of DVD Video DivX iPod and any equipment that is connected to this system with an RCA cable such as general purpose AVequipment 0 SD memory card The SD memory card SDHC memory card microSD card and microSDHC card are col lectivel...

Page 432: ...y streets and street closures may not be taken into consideration For example if a street is open during the morning only but you arrive later it would be against the traffic regula En tions so you cannot drive along the set route When driving please follow the actual traffiC signs Also the system may not know some traf fic regulations Before using your navigation system be sure to read and fully ...

Page 433: ...C OFF Never grip the buttons tightly or use force when removing or attaching Do not leave the front panel in places where it may become subject to high temperatures or humidity such as Places close to a heater vent or air condi tioner Places exposed to direct sunlight such as on top of the dashboard or the rear shelf Places that may be exposed to rain such as close to the door or on the vehicle s ...

Page 434: ...e The fuel mileage displayed is only a reference value and does not guarantee the fuel mi leage displayed can be obtained 0 Traffic information Pioneer does not bear responsibility for the accuracy of the information transmitted Pioneer does not bear responsibility for changes to information services provided by broadcasting stations or by related com panies such as cancellation of services or cha...

Page 435: ...e in order to view video image or to enable other functions offered by the navigation system park your ve hicle in a safe place and keep the brake pedal pushed down before releasing the parking brake if the vehicle is parked on a hill or other wise might move when releasing the parking brake 4 CAUTION Accuracy performance of interlock may be im pacted by such factors as speed signal detection GPS ...

Page 436: ... swallowing it To prevent data loss and damage to the sto rage device never remove it from this naviga tion system while data is being transferred If data loss or corruption occurs on the sto rage device for any reason it is usually not possible to recover the data Pioneer accepts no liability for damages costs or expenses arising from data loss or corruption Never insert or eject an SD memory car...

Page 437: ...7 283 5901 905 479 4411 For warranty information please see the lim ited Warranty sheet incl uded with you r pro duct Visit our website Visit us at the following site http www pioneerelectronics com In Canada http www pioneerelectronics ca Register your product We will keep the details of your purchase on file to help you refer to this information in the event of an insurance claim such as loss or...

Page 438: ...General disclaimer Pioneer Corporation does not guarantee the operation of the CD ROM with respect to per sonal computers using any applicable OS In addition Pioneer Corporation is not liable for any damages incurred as a result of use of the CD ROM and is not responsible for any com pensation Note When you run the supplied CD ROM on a Mac OS insert the CD ROM Into a CD drive and then double click...

Page 439: ...936 TEL 65 6472 7555 PIONEER ELECTRONICS AUSTRALIA PTY LTD 5 Arco Lane Heatherton Victoria 3202 Australia TEL 03 9586 6300 PIONEER ELECTRONICS OF CANADA INC 300 Allstate Parkway Markham Ontario L3R OP2 Canada TEL 1 877 283 5901 TEL 905 479 4411 PIONEER ELECTRONICS DE MEXICO S A de C V Blvd Manuel Avila Camacho 138 10 piso Col Lomas de Chapultepec Mexico D F 11000 TEL 55 9178 4270 t ij fS N0 01 i g...

Page 440: ......

Page 441: ...opment Your feedback is important in our continual effort to design and build the most advanced consumer focused product in the industry pour profiter des avantages ci apres exposes Beneficier gratuitement des informations des mises a jour et des services lies a votre nou veau produit Proteger votre recente acquisition Les informa tions detaillees relatives avotre achat sont conservees sur fichier...

Page 442: ... Fig 4 ______ AVERTISSEMENT _ Veuillez touiours suivre les instructions indiquees ci dessous lors du branchement ou de I in stallation des pieces Ne pas suivre les instructions indiquees ci dessous peut entrainer un mauvais fonctionnement de I unite En outre si les pieces de cette unite fonctionnent mal de la fumee pourra sortir de I unite au cette derniere pourra prendre feu Assurcz vous de toujo...

Page 443: ...cation satisfaisante NOTE Ths equfpment has been tested and found to comply with the limits for a CICtsS B digital device pursuant to part 15 of the FCC RUles These nmits are designed to pm iide reasonable protectjon against harmful interference in a residential installatioll This equipment Jene atf s uses and can radiate radio frequency energy and if not installed and used in accordance with the ...

Page 444: ...ABLIES CI DESSUS PEUVENT DONC NE PAS S APPLIQUER A VOUS LA PRESENTE GARANTIE VOUS DONNE DES DROITS LEGAUX SPECIFIQUES VOUS POUVEZ JOUIR D AUTRES DROITS QUI PEUVENT VARIER D UN ETAT A L AUTRE AU CANADA SOUS RESERVE DE CE QUI EST EXPRESSEMENT STIPULE DANS LES PRESENTES AUCUNE REPRESENTATION GARANTIE OBLIGATION OU CONDITION QU ELLE SOIT IMPLICITE OBLIGATOIRE OU AUTRE NE S APPLIQUE A CE PRODUIT SERVIC...

Page 445: ... YOU THIS WARRANTY GIVES YOU SPECIFIC LEGAL RIGHTS AND YOU MAY HAVE OTHER RIGHTS WHICH MAY VARY FROM STATE TO STATE IN CANADA EXCEPT AS EXPRESSLY PROVIDED HEREIN THERE ARE NO REPRESENTATIONS WARRANTIES OBLIGATIONS OR CONDITIONS IMPLlED STATUTORY OR OTHERWISE APPLICABLE TO THIS PRODUCT TO OBTAIN SERVICE In the U S A or Canada to receive warranty service you need to present your sales receipt or you...

Reviews: