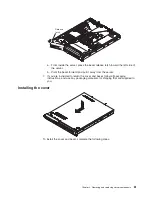
1
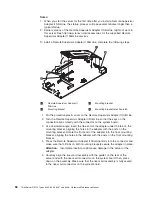
Adapter bracket
3
Tab
2
Expansion-slot bracket
4
Adapter
4. Carefully grasp the adapter by its top edge or upper corners and align it with
the expansion slot in the riser-card assembly; then, press the adapter
firmly
into the expansion slot.
Important:
Make sure that the U-shaped opening in the metal adapter bracket
engages the tab on the expansion-slot bracket.
5. Follow the cabling instructions, if any, that come with the adapter.
6. Carefully align the riser-card assembly with the guides on the rear of the
server and with the riser-card connectors on the system board; then, press
down on the assembly. Make sure that the riser-card assembly is fully seated
in the riser-card connector on the system board.
7. If the riser-card assembly is an optional PCI-X riser-card assembly, reconnect
the riser-card power cable to the riser-card assembly.
8. If you are installing a ServeRAID-MR10i controller (2.5-inch drive models only),
complete the following steps:
Chapter 4. Removing and replacing server components
65
Summary of Contents for ThinkServer RS110
Page 1: ...ThinkServer RS110 Types 6435 6436 6437 and 6438 Hardware Maintenance Manual ...
Page 2: ......
Page 3: ...ThinkServer RS110 Types 6435 6436 6437 and 6438 Hardware Maintenance Manual ...
Page 8: ...vi ThinkServer RS110 Types 6435 6436 6437 and 6438 Hardware Maintenance Manual ...
Page 18: ...xvi ThinkServer RS110 Types 6435 6436 6437 and 6438 Hardware Maintenance Manual ...
Page 74: ...56 ThinkServer RS110 Types 6435 6436 6437 and 6438 Hardware Maintenance Manual ...
Page 238: ...220 ThinkServer RS110 Types 6435 6436 6437 and 6438 Hardware Maintenance Manual ...
Page 251: ......
Page 252: ...Part Number 46U0856 Printed in USA 1P P N 46U0856 ...


