Scanner Maintenance and Calibration
5
Keysight 5500 SPM User’s Guide
5-8
Calibrating the Multi-Purpose Scanner
Regular calibration ensures that Keysight multi-purpose scanners will
provide high performance imaging for many years of service. The
following calibration procedure is recommended once or twice per year,
if the system is moved, and before critical measurements.
1
Make sure the correct scanner file is selected under the PicoView
Scanner
menu.
2
Place a calibration target on a sample plate and mount the plate on
the microscope.
3
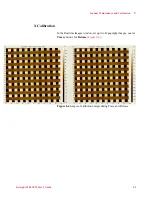
Follow the procedures for Contact Mode measurements to obtain an
image of the calibration target. Use the following settings:
a
Deflection =
-0.8 to -1.0 V
.
b
Setpoint voltage =
0 V
.
c
Scan
Size =
90 microns
.
d
Resolution
=
256
.
e
Scan
Speed
to
1 ln/s
.
4
Make sure that the target is positioned such that its features are
aligned in both the X and Y directions. Use a
Cross
Section
tool
(Horizontal, Vertical or Real Time) in the Realtime Images window,
from either the Tools Menu or Toolbar,
as an aid. If the target is not
aligned, withdraw the tip, adjust the target, and approach again.
5
In the Realtime Images
window, choose
File > Autosave
. During
calibration this provides a useful way to review the effects of applied
changes to the calibration file.
NOTE
The procedures and descriptions in this User Guide are for PicoView
1.12x and higher.


