


Additional Imaging Modes
5
Keysight 5500 SPM User’s Guide
5-43
11
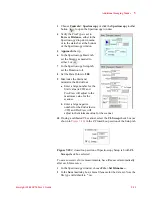
If using a calibrated CL scanner, select the
CL Sweep
check box (as
) in the Z Closed Loop section of the Setup tab.
Figure 7-25
Z closed loop section of Spectroscopy Setup tab with
CL
Sweep
check box selected
12
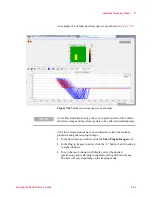
Click the
Volume
tab in the Spectroscopy window to display the
topographic image. The transparency of the image can be adjusted
by clicking on it and rolling the mouse wheel.
13
Specify the resolution by selecting a volume from the pull down
menu.
14
Using your mouse, click in the topographic image and drag a
rectangle to specify which force curves will be displayed in the
spectroscopy window.
To save successive force measurements, have files saved automatically
after each force curve:
1
In the Spectroscopy window, choose
File > Set filename ...
.
2
In the
Save As
dialog box, enter a filename for the data set. Note the
file type will default to *.mi.
3
Click the
Save
button. Turn on Auto Save by choosing
File > Auto
Save
. The title bar at the top of the window will indicate Auto Save
is on. It will also be indicated by a check mark next to Auto Save in
the Spectroscopy File menu.
Begin to take force measurements. For the initial acquisition, it is
recommended that Toggle Auto Full Scale be turned
On
.
1
Start the sweep of the selected area by clicking the
Scan Up or Scan
Down
buttons.
2
Stop measurements at any time by clicking the
Stop
button.
3
After the initial sweep has completed, adjust the sweep range as
needed using the Start/End parameters in the Spectroscopy Setup
tab.