Replacing Hardware Components
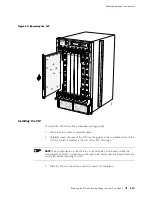
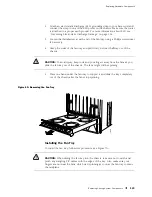
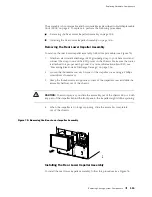
Figure 64: Removing the CIP
1260
R
Installing the CIP
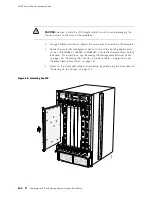
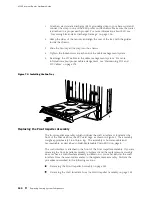
To install the CIP, follow this procedure (see Figure 65):
1.
Verify that the router is powered down.
2.
Carefully insert the rear of the CIP into the guides at the top and bottom of the
CIP slot, which is located to the left of the FPC card cage.
NOTE:
The components on the CIP are on the left side of the board, unlike the
components of an FPC, which are on the right side. Verify that the components are
on the left before inserting the CIP.
3.
Slide the CIP into the chassis until it contacts the midplane.
Replacing the CIP and Routing Engine Interface Port Cables
143
Summary of Contents for Internet Router M160
Page 12: ...M160 Internet Router Hardware Guide xii Table of Contents ...
Page 16: ...M160 Internet Router Hardware Guide xvi List of Figures ...
Page 18: ...M160 Internet Router Hardware Guide xviii List of Tables ...
Page 24: ...M160 Internet Router Hardware Guide xxiv Requesting Support ...
Page 26: ...2 Product Overview ...
Page 30: ...M160 Internet Router Hardware Guide 6 Safety Requirements Warnings and Guidelines ...
Page 66: ...M160 Internet Router Hardware Guide 42 Cable Management System ...
Page 80: ...M160 Internet Router Hardware Guide 56 Routing Engine Architecture ...
Page 82: ...58 Initial Installation ...
Page 104: ...M160 Internet Router Hardware Guide 80 Unpacking the Router ...
Page 148: ...M160 Internet Router Hardware Guide 124 Configuring the JUNOS Internet Software ...
Page 150: ...126 Hardware Maintenance Replacement and Troubleshooting Procedures ...
Page 242: ...M160 Internet Router Hardware Guide 218 Troubleshooting the Power System ...
Page 244: ...220 Appendixes ...
Page 292: ...M160 Internet Router Hardware Guide 268 Packing Components for Shipment ...
Page 301: ...Part 5 Index Index 277 ...
Page 302: ...278 Index ...


