


M160 Internet Router Hardware Guide
First, perform the following prerequisite procedures:
Verify that the router site meets the requirements described in “Preparing
for Router Installation” on page 59.
Place the rack in its permanent location, allowing adequate clearance for
airflow and maintenance, and secure it to the building structure. For details,
see Rack Requirements on page 59.
Read the information in “Installation Safety Guidelines and Warnings” on page
239, with particular attention to “Chassis Lifting Guidelines” on page 239.
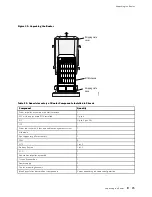
Remove the router from the shipping carton, as described in “Unpacking the
Router” on page 77.
Then, perform the following procedures to install the router:
1.
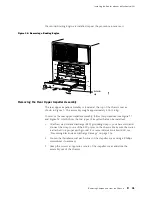
If you are front-mounting the router, remove the center-mounting ear from
each side of the chassis. (Also, we recommend installing a shelf or other
support for the rear of the chassis.)
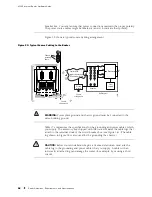
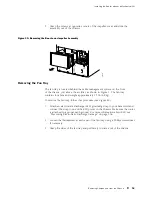
2.
Load the router onto the lift, making sure it rests securely on the lift platform.
3.
Use the lift to position the router at the correct height in the rack.
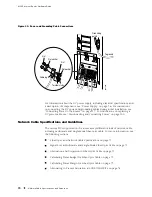
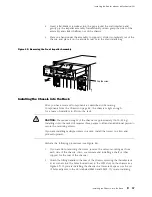
4.
Align the bottom hole in both front support posts or center-mounting brackets
with a hole in each rack rail, making sure the chassis is level.
5.
Install one of the mounting screws provided into each of the two aligned holes.
Use a 5/32-in. Allen wrench to tighten the screws.
6.
Moving up each post or ear, install a screw in every mounting hole.
7.
Verify that all the mounting screws on one side of the rack are aligned with the
mounting screws on the opposite side and that the router is level.
8.
Move the lift away from the rack.
9.
To continue the installation, proceed to “Connecting the Router and Performing
Initial Configuration” on page 111.
82
Installing the Chassis Using a Mechanical Lift
Summary of Contents for Internet Router M160
Page 12: ...M160 Internet Router Hardware Guide xii Table of Contents ...
Page 16: ...M160 Internet Router Hardware Guide xvi List of Figures ...
Page 18: ...M160 Internet Router Hardware Guide xviii List of Tables ...
Page 24: ...M160 Internet Router Hardware Guide xxiv Requesting Support ...
Page 26: ...2 Product Overview ...
Page 30: ...M160 Internet Router Hardware Guide 6 Safety Requirements Warnings and Guidelines ...
Page 66: ...M160 Internet Router Hardware Guide 42 Cable Management System ...
Page 80: ...M160 Internet Router Hardware Guide 56 Routing Engine Architecture ...
Page 82: ...58 Initial Installation ...
Page 104: ...M160 Internet Router Hardware Guide 80 Unpacking the Router ...
Page 148: ...M160 Internet Router Hardware Guide 124 Configuring the JUNOS Internet Software ...
Page 150: ...126 Hardware Maintenance Replacement and Troubleshooting Procedures ...
Page 242: ...M160 Internet Router Hardware Guide 218 Troubleshooting the Power System ...
Page 244: ...220 Appendixes ...
Page 292: ...M160 Internet Router Hardware Guide 268 Packing Components for Shipment ...
Page 301: ...Part 5 Index Index 277 ...
Page 302: ...278 Index ...