Scanner Maintenance
Drive belt system
WARNING
:
To perform any maintenance, troubleshooting, or
replacement of components, ensure that power is
disabled at the breaker.
2.
Use the procedure in Subsection 9.1.7 to remove the beam covers at
the cable and distant ends of the scanner.
3.
Use the procedure in Subsection 9.6.3 to loosen the head drive belts.
The heads will need to be realigned after the pulleys are changed.
4.
Remove the 5/8"-11 central bolts that support the pulleys, and
remove the old pulley.
5.
Replace the pulley with a new one and re-assemble using the 5/8"-
11 central bolt.
6.
Alignment of the pulleys to each other and to the belt tensioners on
the carriages is set at the factory. Assembling the pulleys back
together as they were should maintain this alignment.
7.
Follow the procedure in Subsection 9.6.3 for tensioning the belts
and realigning the heads.
8.
Reinstall the beam covers as described in Subsection 9.1.7.
9.
Run a profile correction for the sensors that need it. Refer to the Da
Vinci System Installation and Setup Manual (Honeywell p/n
46018200).
10.
Record the maintenance in the scanner logbook.
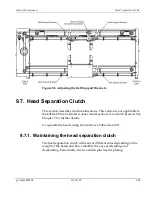
9.6.7. Adjusting the belt support brackets
The upper and lower beams have brackets attached to the side of the
beams to support the drive belts as shown in Figure 9-6. To adjust them:
1.
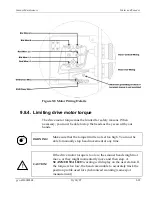
Scan the heads offsheet on the cable end of the scanner and turn off
the Motor Power keyswitch (see Figure 9-9).
p/n 6510020208
10/18/07
9-27
Summary of Contents for 4022
Page 1: ...Precision Platform 4022 Scanner System Manual 6510020208 ...
Page 2: ......
Page 3: ...Precision Platform 4022 Scanner October 2007 ...
Page 22: ......
Page 72: ......
Page 94: ......
Page 126: ......
Page 162: ......
Page 170: ......
Page 234: ......
Page 239: ...Glossary p n 6510020208 10 18 07 11 5 VIO Virtual Input Output ...

