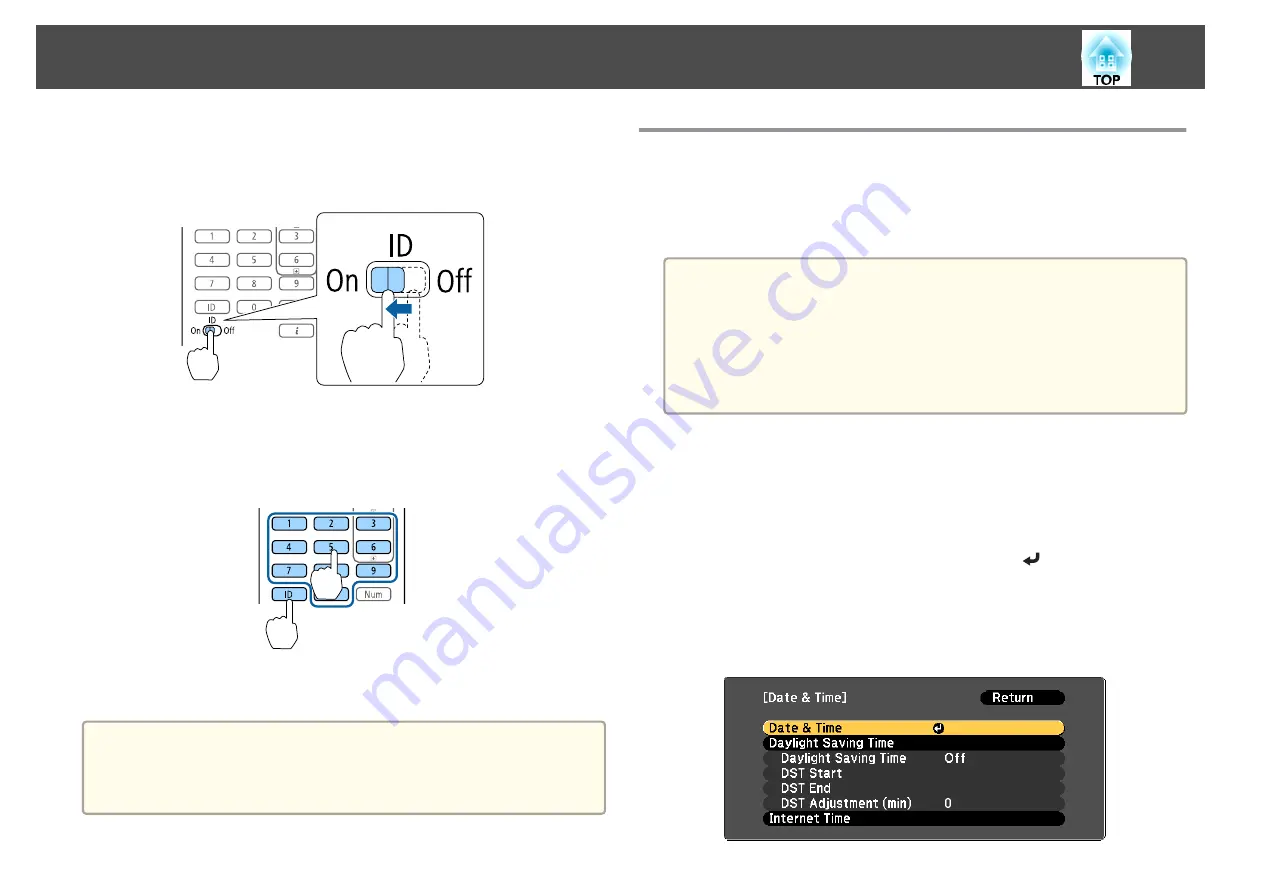
Setting the remote control ID
a
Set the remote control [ID] switch to On.
b
While holding the [ID] button, press a number button to select a
number to match the ID of the projector you want to operate.
s
Enter a two digit number (Example: 01 when the ID is 1).
Once this setting has been made, the projector that can be operated by the
remote control is limited.
a
The remote control ID setting is saved in the remote control. Even if
the remote control batteries are removed to replace them and so on,
the stored ID setting is retained. However, if the batteries are left out
for a long time, it is reset to the default value (ID0).
Setting the Time
You can set the time for the projector. The set time is used for the schedule
function.
s
a
•
When you turn on the projector for the first time, the message "Do
you want to set the time?" is displayed. When you select
Yes
, the
screen from step 4 is displayed.
•
When
Schedule Protection
is set to
On
in
Password Protection
,
settings related to the date and time cannot be changed. You can
make changes after setting
Schedule Protection
to
Off
.
s
"Managing Users (Password Protection)"
a
Press the [Menu] button while projecting.
s
"Using the Configuration Menu"
b
Select
Operation
from
Extended
.
c
Select
Date & Time
, and then press the [
] button.
d
Make settings for the date and time.
Use the soft keyboard to enter the date and time.
s
Installing the Projector
38
Summary of Contents for EB-L25000U
Page 1: ...User s Guide ...
Page 13: ...Introduction This chapter explains the names for each part ...
Page 49: ...Basic Usage This chapter explains how to project and adjust images ...
Page 114: ...Security Functions 114 ...
Page 115: ...Configuration Menu This chapter explains how to use the Configuration menu and its functions ...
Page 186: ...m To complete the adjustment press the Menu button Image Maintenance 186 ...
Page 187: ...Appendix ...


