


11.
Use both hands to turn the weak media roll and slide the media under the metal paper guide until
the media is transported automatically. You will hear a beeping sound when the media is
correctly fed and loaded.
IMPORTANT
Make sure media is always rolled up evenly on the core. Do not load media that is not
rolled up evenly (telescoping) as it can damage the machine.
12.
Close the media drawer carefully. The operator panel displays the message that new media is
detected and an icon in the top left corner indicates that a roll is loaded for inside printing. This
can take 5 seconds.
IMPORTANT
Do not open the media drawer when the indicator light is off, you can damage the
machine.
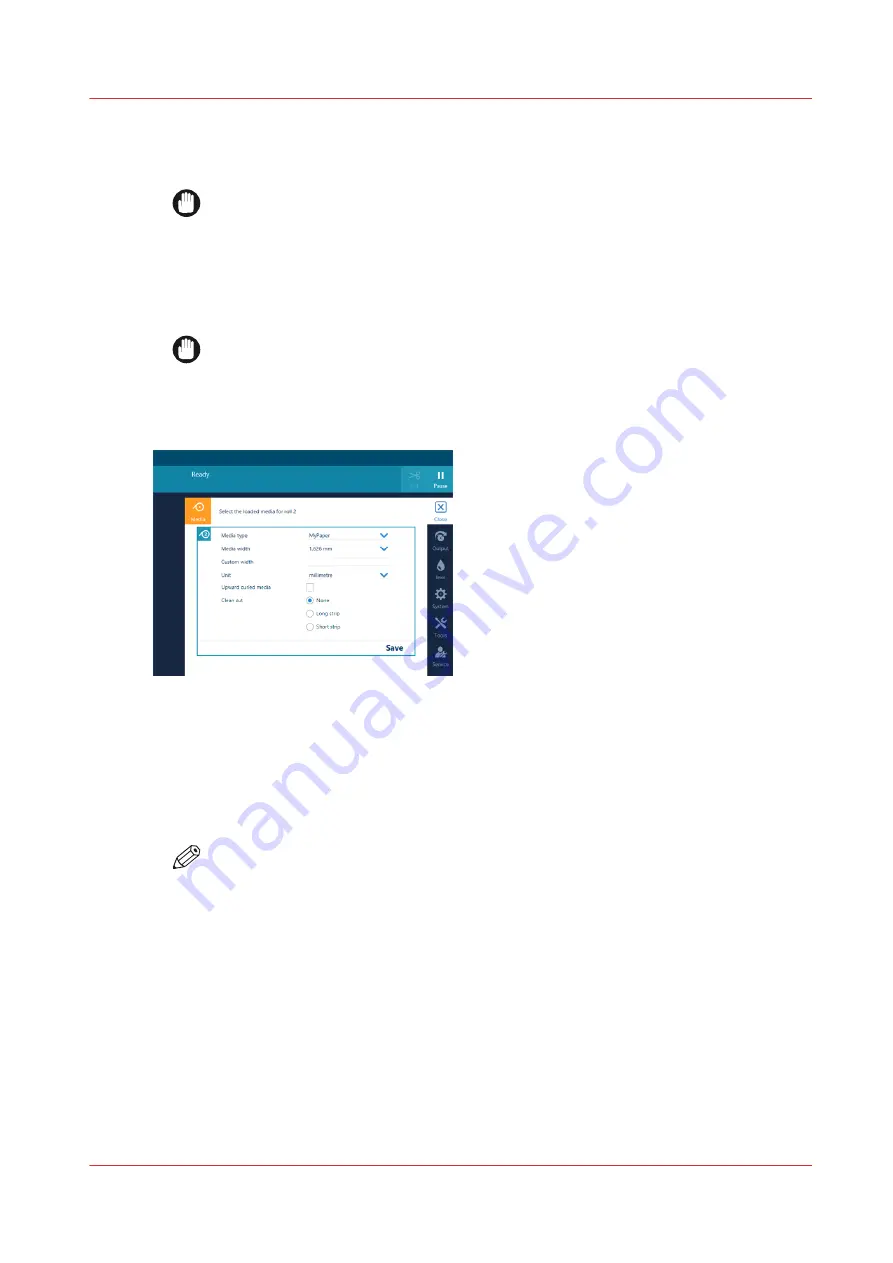
13.
On the operator panel, select the correct media type and fill in the media width.
14.
When the media you use has an upward curl select [ Upward curled media].
This setting persists as long as the media is assigned. When enabled, the system feeds the media
to the output position. You can then open the top cover and guide the media. After you close the
top cover, the media is transported to the clamp. Open the top cover and guide the media again.
Printing starts after these actions have been completed.
15.
Tap on [Save].
NOTE
For the highest output quality, it is advised to always perform a media calibration when
you load a new media type or a new media width. For more information, see
.
After you finish
After the weak media is loaded, a print job does not start automatically. First you have to:
1. Feed the media. For more information see
Feed and retract media manually on page 133
.
2. Transport the media on the platen to the desired position. For more information see
Transport media by manual control on page 135
.
Load weak media for outside printing
Chapter 4 - Handle the media
107
Summary of Contents for Colorado 1630
Page 1: ...Colorado 1630 Extended operation guide 2021 2022 Canon Production Printing ...
Page 9: ...Chapter 1 Introduction ...
Page 18: ...Optional features 18 Chapter 1 Introduction ...
Page 19: ...Chapter 2 Safety information ...
Page 30: ...Safety System 30 Chapter 2 Safety information ...
Page 31: ...Chapter 3 Explore the system ...
Page 38: ...The components of the printer top cover open 38 Chapter 3 Explore the system ...
Page 39: ...Chapter 4 Handle the media ...
Page 81: ...FLXfinish in the RIP Chapter 4 Handle the media 81 ...
Page 157: ...Chapter 5 Print a job ...
Page 166: ...Use the PRISMAsync Remote Control app 166 Chapter 5 Print a job ...
Page 167: ...Chapter 6 Maintain the system ...
Page 257: ...Chapter 7 Improve quality ...
Page 267: ...Chapter 8 Configure the network and security settings ...
Page 298: ...Enable system installation from USB 298 Chapter 8 Configure the network and security settings ...
Page 299: ...Chapter 9 Troubleshooting and support ...
Page 318: ...Install a license via ORS 318 Chapter 9 Troubleshooting and support ...
Page 372: ...Error codes overview 372 Chapter 9 Troubleshooting and support ...
Page 373: ...Appendix A Regulation Notices ...
Page 387: ......


