background image


2-6 

Time Guardian Series

 – 

Installation


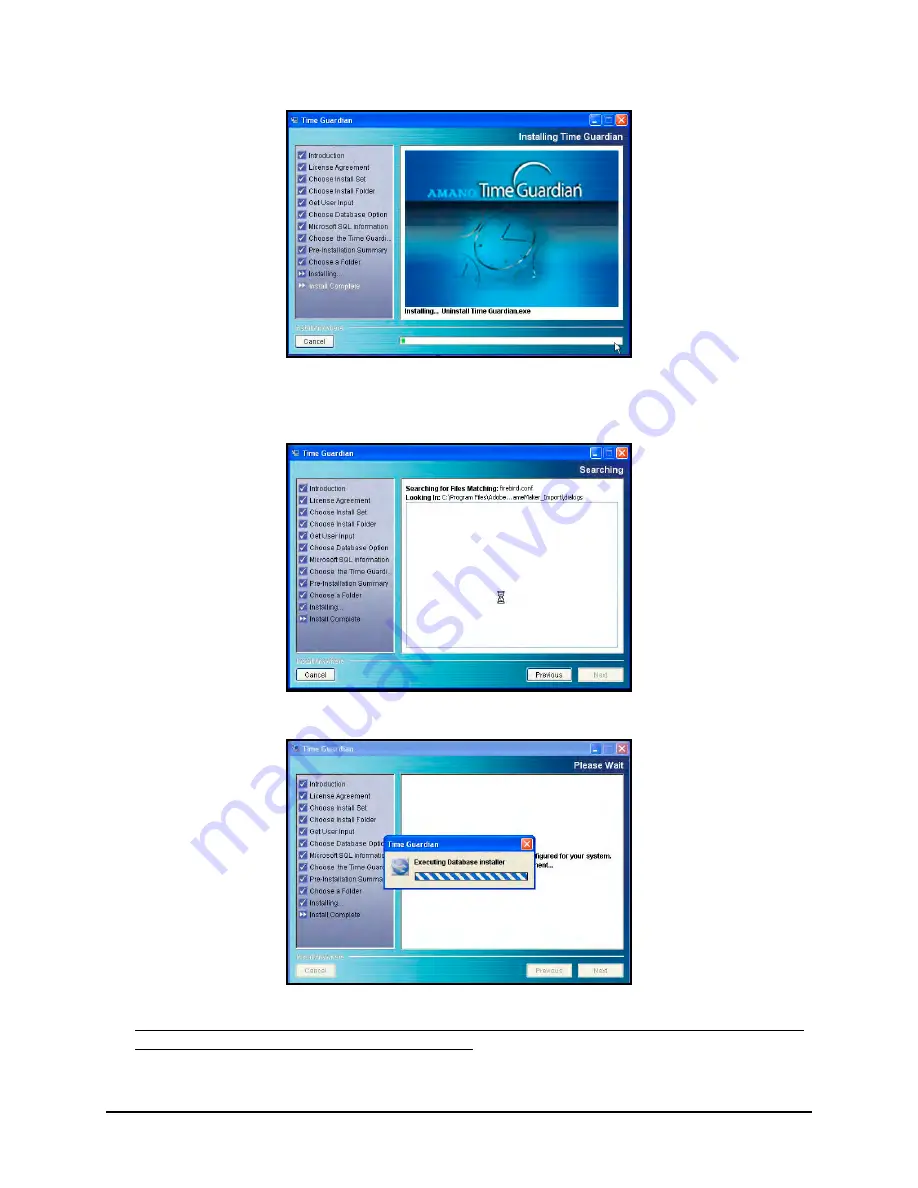
13. At this point, the general install is complete and the installation utility will scan your PC for 

Adobe Acrobat Reader

®

. If it is not installed, the installation utility will install it. 


14. The Firebird Database Server will be installed. 


15. If QuickBooks Integration was selected the QuickBooks drivers will be installed to exchange 

data between Time Guardian and QuickBooks


. Next QuickBooks utility will execute and the 

QuickBooks InstallShield Wizard for QBFC will appear. 

Summary of Contents for Time Guardian Series

Page 1: ...Time Guardian Series Installation and User Guide...

Page 2: ...efore any attempt is made to operate the equipment For more information about Amano s complete line of products visit our web site at www amano com time Licenses and Trademarks Amano and Time Guardian...

Page 3: ......

Page 4: ......

Page 5: ...Formulas 4 7 Chapter 5 Employee Administration 5 1 Adding Employees 5 1 Chapter 6 Timecard Administration 6 1 Timecard Module 6 1 Hot Keys 6 10 Adding Editing and Deleting Employee Punches 6 10 Adding...

Page 6: ...eal Module Introduction 13 1 Using the Advanced Meal Module 13 2 Chapter 14 Advanced Rounding Module 14 1 Advanced Rounding Module Introduction 14 1 Using the Advanced Rounding Module 14 2 Chapter 15...

Page 7: ...fit Time Module 21 1 Benefit Time Module Introduction 21 1 Using the Benefit Time Module 21 1 Chapter 22 User Group Module 22 1 User Group Module Introduction 22 1 Using the User Group Module 22 2 Cha...

Page 8: ...iv Time Guardian Series Table of Contents Table of Contents This page intentionally left blank...

Page 9: ...n Time Guardian Plus or Time Guardian Pro Feature Module and welcome you to the Amano Cincinnati family of Time Solution and Access Control products The following table lists the standard and optional...

Page 10: ...s Time Rounding Capability Based on Company Defined Pay Class Customizable Rounding Optional Advanced Rounding Module activation can supply additional advanced Pay Class and or Daily Rules rounding sc...

Page 11: ...000 2005 and 2008 Firebird 2 0 Setup Wizard The Time Attendance software Setup Wizard provides a seamless setup when used with the appropriate Wizard on line help The Setup Wizard is designed as a 9 s...

Page 12: ...e completion of Step 9 Login Setup click on the Wizard Complete button to end the Setup Wizard Once the initial setup is complete the Setup Wizard can be accessed and used at any time to make setup mo...

Page 13: ...y via the Toll Free support number to Purchase and conveniently activate any combination of available Expand the employee capacity from the standard 100 employees incrementally from 125 employees and...

Page 14: ...1 6 Time Guardian Series Introduction This page intentionally left blank...

Page 15: ...Install button to launch InstallShield Wizard If the installation stalls browse on CD to Disk1 InstData Windows VM install exe Full integration with QuickBooks Pro can require QuickBooks to be install...

Page 16: ...re program should automatically launch the Time Guardian Series CD Menu see figure 2 Click the Install button and the software program should automatically launch the InstallAnywhere Wizard see figure...

Page 17: ...click on the Next button 6 If Server was selected as an installation option you will be prompted to enter the IP Address of the Time Attendance Software Server Enter the IP Address and click on the Ne...

Page 18: ...installed installing the Time Attendance software inside the Program Files folder Note You must purchase Microsoft SQL separately have it already installed and properly configured 9 If Microsoft SQL...

Page 19: ...ion on the screen and click on the Next button to proceed 11 The QuickBooks Direct Integration screen will appear Please review the displayed information on the screen and click on the Next button to...

Page 20: ...ader If it is not installed the installation utility will install it 14 The Firebird Database Server will be installed 15 If QuickBooks Integration was selected the QuickBooks drivers will be installe...

Page 21: ...r Cancel if you are not using QuickBooks payroll software 17 Click on the Finish button to complete installing the QuickBooks InstallShield Wizard for QBFC 18 Next click on the Install button to begin...

Page 22: ...ation ASA screen will appear after the initial software installation see Figure Enter the Activation Code Serial Number 9 digit number supplied on the Amano software CD and click on the Activate butto...

Page 23: ...is point contact Amano customer support at 1 800 896 7035 22 Upon successful activation the registration screen will appear see figure Perform on line registration by entering the appropriate informat...

Page 24: ...and registered the Setup Wizard Welcome screen will appear see figure for example See Setup Wizard for detailed setup instructions Click on the Next button to begin the Setup Wizard to configure the...

Page 25: ...ation i e add terminals and employees Buttons The following buttons are common to all the modules in the Time Attendance software Button Description Button Description Button Description Close Add Sav...

Page 26: ...on Perform Save Selects or de selects Check and Uncheck all Pay codes in the Weekly and Consecutive windows in the Pay class module and the various Overtime modules Save As Allows you to copy the prop...

Page 27: ...Last item i e User in the list which appears on the top right of the open screen To delete an item i e Bell User navigate to the desired item i e User and click on the Delete button Click on the Yes...

Page 28: ...ete button will then be displayed Should you have any questions or require additional information please email TGSupport Amano com The following information will sequentially guide the user through th...

Page 29: ...00th s 8 hours 30 minutes 8 50 4 Access Control Auto Sync and Repunch Protection 5 Select the Time Format for Timecard and Reports This selection determines the time display format in Time Guardian Se...

Page 30: ...Requires Authentication if desired and enter Username and Password to be required For added security click the box to select Requires SSL 14 Enter the Default E mail Contact which is the E mail addre...

Page 31: ...sked to synchronize with the Access Control Nexus 220 or AmanoNet 7 6 at login 6 After completing the entry selection of company information click on the Apply button to save the company information a...

Page 32: ...dule for a list of Payroll Interfaces After saving the information for Step 1 General Setup click on the Next button to advance to Step 2 Department Setup If no General Setup is desired skip all of St...

Page 33: ...on the Main View This information will also be displayed in the Department Report If no departments are created this report will be disabled After completing the Department information entry for Step...

Page 34: ...ow the hours awarded to a specific Pay Code Hours corresponds to work hours REG OT and non worked hours SCK VAC Dollars corresponds to monetary amounts given to an employee Bonus Tip 5 See the pre def...

Page 35: ...ultiplier parameter is marked as defineable that means the default value in the field can be changed by entering a new value and saving it If the Split Hours Counts Towards Attendance and Counts Towar...

Page 36: ...t exceed the set hour value are normally paid at a higher wage or rate If the Counts Towards Overtime box is not selected then hours assigned to that Pay Code will not be counted towards the Overtime...

Page 37: ...field The Name and Hours fields are highlighted in yellow must be filled 1 Enter a name for the Holiday in the Name field yellow required field 2 Enter a description of the Holiday in the Description...

Page 38: ...table below gives an example of a holiday that occurs on the same date but assigns different hours based on the Pay Class An unlimited number of holidays can be added and the custom holiday rule based...

Page 39: ...ay 1 day after 2 days after or 3 days after The Start and End Days define when a schedule will run start to end 3 Enter a Start Time and End Time in the appropriate fields of the Week for the Start an...

Page 40: ...ou will be required to enter a Name 2 Enter a brief description of the Pay Class in the Description field 3 Select Apply On Call Pay for Weighted Average Overtime if On Call Pay is desired see Advance...

Page 41: ...lated for a schedule that crosses day change time 12 13 hours is a recommended number for this field This allows all lunch or break punches to be applied to the correct schedule In the examples below...

Page 42: ...tab is used to define the basic daily and weekly overtime rules for this Pay Class The Time Attendance software was designed to accommodate a wide variety of overtime rules activation of the Advanced...

Page 43: ...yees hours in the timecard that occur during non scheduled time before they can be calculated see example table For example employee Bill Jackson is an engineer who is assigned to a schedule to work M...

Page 44: ...working more hours than a set hour value for that particular week or pay period The hours that exceed the set hour value are normally paid at a higher wage than regular REG Pay Code hours Weekly Over...

Page 45: ...work before applying and assign to a Pay Code of OT or DT If DT is selected for Overtime Level 1 OT Level 2 will be disabled 10 From the Pay Class Advanced Overtime Rules click on the Weekly Overtime...

Page 46: ...ted for Overtime Level 1 OT Level 2 will be disabled 14 From the Pay Class Advanced Overtime Rules click on the Consecutive Day Overtime tab to define the Consecutive Day Weekend Overtime see figure C...

Page 47: ...or OT2 pay code 15 Select Yes to Apply Consecutive Overtime rules to enable rules Then select when to reset Weekly Overtime 16 Enter the Saturday Sunday hour amount to work before applying and assign...

Page 48: ...ing his time being calculated with Daily Rounding which rounds by total time versus Punch Rounding which rounds by each punch punch pairs The following example table is provided to give you a visual e...

Page 49: ...00 29 00 30 Next Unit Start 00 30 Next Unit Start 00 30 Next Unit Start 00 30 Next Unit Start This pattern will repeat itself throughout the entire day Meal Rules Note If the Advanced modules are acti...

Page 50: ...the Length of Meal window This is the length of time between an employee s meal punches that will be applied toward the meal rule Enter in the Meal Grace This is the number of minutes that an employe...

Page 51: ...le of 08 15 to 17 00 with 45 minutes for lunch So employee Bill Jackson has met the window requirements for punching Out and In for lunch of 11 15 to 13 15 This will prevent meal punches from being de...

Page 52: ...cted No in Step 3 Pay Code Setup for Does your company have paid Holidays The Holidays assigned to a Pay Class can be displayed in calendar format by clicking on the Calendar button This button is act...

Page 53: ...e actual time worked The Time Attendance software has nine 9 standard Exceptions which are located in the Selected list that can be moved to the Available list see figure The default is all exceptions...

Page 54: ...PM schedule These Exceptions are based on the recorded IN and OUT punches In the example above an employee has a schedule for Monday through Friday and worked on Saturday so the UNSCH exception would...

Page 55: ...he Access Control database as Access and Time 2 Press the Find button see figure to search for the Access Control database you will need to know the name and location of the import file Employees who...

Page 56: ...le You will be required to enter a Name 2 In the Name field enter a name for the Import profile 3 Enter a brief description of the Import profile in the Description field 4 Enter the name and path of...

Page 57: ...Month Jan Month January Year 90 Year 1990 Day 1 Day 01 and Day Mon Hour Format Select the hour format The choices are Hour 8 00 Hour 08 00 Hour 08 00 or Minutes 480 Full Name Format Select the Full N...

Page 58: ...n the Import Field Map Settings tab This tab allows you to manually define the elements of the import file you are using Note The data elements in the selected list should match the data fields of the...

Page 59: ...r both of which are entered in the Employee module on the General tab see figure The standard Employees module for Time Guardian consists of seven 7 tabs General Personal Contact Assignments Schedule...

Page 60: ...the dropdown choices of Import from QuickBooks Export to QuickBooks or Both ways bi directional The synchronization will be performed depending on what was selected for the method of synchronization i...

Page 61: ...number entered is 8 and the employee is scheduled to work from Monday through Friday then they will be awarded 8 hours for each of those days The total amount will be 40 hours for the week By Schedul...

Page 62: ...yee is deleted in the Time Attendance software that employee will be marked Access only in the Access Control database This type of person will not have their transactions transferred to the Time Atte...

Page 63: ...ed in the Setup Wizard Time Zone Assigns the time zone of the location that the employee works in Daily Rule Assigns a daily rule to the employee if the Advanced Overtime module is active Supervised b...

Page 64: ...kly template Employees Labor Level Use this tab as to assign Labor Levels Home Department to employees see figure This tab allows you to assign default Home Labor Level Assignments for Departments to...

Page 65: ...New button Enter in a name and description for the Certification in the Name and Description fields Click on the button when finished To add a Certification when first entering the Add Edit Certificat...

Page 66: ...ist and click on the button To remove all the listed Certifications click on the button Note This function can also be done with Global Assign from the main employee list Employees Benefit This tab al...

Page 67: ...supervisor can assign the employee a password to use for initial login to the web module Retype this password in the confirm password Next select the modules below from the web client that you wish th...

Page 68: ...the existing rate for the employee by the percentage as defined in Rate Setup Rates can be increased using the Operation field or by clicking on the Percent Increase button and the following window wi...

Page 69: ...erminal using the appropriate terminal installation guide The terminal is installed to communicate with the host PC The installation guide will provide the necessary steps to install the terminal You...

Page 70: ...When validation is used only employees assigned to a particular terminal with the selected Labor Levels can use the terminal Labor transfers at the terminal can only occur within the Labor Levels sele...

Page 71: ...the Terminal Validation from the Labor Level screen see figure The Labor Level category has precedent over the Employees filter For example if employee numbers 1 20 where assigned to the 1 Engineering...

Page 72: ...o you can use the Employee tab to sort the employee list using Number Badge Payroll Last Name First Name and Comment and then apply the criteria To add an employee to the Terminal Validation highlight...

Page 73: ...In the Description field enter in a brief description of the Bell Schedule 3 Click on the Add button A blank row will appear in the Bells grid 4 Enter a time in 24 hour format of the day in the Time c...

Page 74: ...yellow required field that will be used to describe the area or site where a terminal or group of terminals is located 2 In the Description field enter in a brief description of the Location 3 In the...

Page 75: ...ingerprint Installation Guide Nexus Lite documents Hand Punch 50e Manual etc to perform terminal diagnostics hardware configuration and identify the IP address Modem A modem is used at the Com Port of...

Page 76: ...ing a new FPT 40 or MTX Terminal you must first search for the Terminal 13 In the Name field enter in a unique name required field that will be used to describe the terminal This field will be automat...

Page 77: ...ox select the time format 12 hour or 24 hour for the terminal FPT 40 MTX 15 and Hand Punches 20 In the Misc boxes select whether to enable the RR Keypad Repunch Protection and or view hours for the MT...

Page 78: ...e Group passwords for the selected terminal Each password may be up to 10 digits long a Security Disable the hand reading checks in the terminal required field b Enrollment Enroll and remove users req...

Page 79: ...file must be created in this step Each profile consists of a Name Password and Language selection Selecting Default User will cause this Login to be displayed each time the Time Guardian is opened Pre...

Page 80: ...odules Write Rates When checked the user will have write access to the Rates modules Advanced Labor Filter When checked the user will have the ability to filter employee with another labor filter adva...

Page 81: ...t Labor Level will appear in the Available list Also you can use the Employee tab to sort the employee list using Number Badge Payroll Last Name First Name and Comment and then apply the criteria To a...

Page 82: ...dditionally labor categories can be filtered in the Available or Selected lists by entering additional case sensitive characters in dedicated Criteria fields see illustration The Criteria field locate...

Page 83: ...Pro from the Time Guardian Series as examples Enter the Username and Password you defined in Step 9 Login Setup and click on the button and the Auto Find dialog will appear to select the type of term...

Page 84: ...nd Shift Rules will not be visible unless the Advanced Pay Class and Advanced Meal modules are activated Note Time Guardian Pro contains all modules Layout Appearance The following is an overview of t...

Page 85: ...e Access Control button and configuring Access Control When the Synchronize Access Control submenu is selected all new transactions are transferred to the Time Attendance software The Access Control m...

Page 86: ...es the ability to change the password for the current user administrator if it has expired or is set to change password on Login When this submenu is selected the Change Password screen will appear se...

Page 87: ...ions on active terminals from the Host PC such as poll locations set locations time download validation and settings and view communicate with specific terminals location Recalculate Click on this mod...

Page 88: ...gure Timecard Colors The following figure shows the colors displayed in the timecard to indicate various employee exceptions that have occurred if they have been configured to be tracked Note The amou...

Page 89: ...cting the Setup Wizard from the Edit menu clicking on the Pay Code tab and pressing the Holiday button A formula is used in the Date Definition and Condition tables to generate the holiday Note If the...

Page 90: ...4 8 Time Guardian Series How To Use This page intentionally left blank...

Page 91: ...oyee Number must be unique since it is the primary sorting key Badge Numbers can be changed or reused should an employee lose the badge or become inactive Each tab also has an Employee List double cli...

Page 92: ...field Note If you are using Access Control Nexus 220 or AmanoNet 7 6 use the Registration Reader RR Badge Reader icon to the right of the Badge field to enter the Badge number from the Registration Re...

Page 93: ...e There are two options to identify your employees Select either Salary or Hourly Pay Type Select either Hours or Schedule Note A salaried employee can be paid by hours or by schedule An employee does...

Page 94: ...rital status Single Married Divorce or Widowed Default is Not Specified Educational Level The employee s education level Elementary High School Some College No Degree Associate Bachelor Masters or Doc...

Page 95: ...mecard processing Validation Assigns employee to a validation template which defines specific location terminal Apply On Call Pay for Weighted Average Overtime Check this function to calculate overtim...

Page 96: ...click on the Add All button To remove an employee from the Selected list highlight the desired employee in the Selected list and click on the Remove button To remove all the listed employees click on...

Page 97: ...defined dropdown lists Only predefined Departments will appear under Home Labor Level Assignments Note See Advanced Labor Rate Module Example of Multiple Labor Levels for details about Labor Level Ass...

Page 98: ...k on the button when finished and a new row will be created in the Rates box To delete a rate or rate operation select the desired row and click on the Delete button Note Creating Cost rates can also...

Page 99: ...izard essentially corresponds to the tabs found on the Employees screen see Adding Employees However Certification Benefit and Web Access will only appear if the appropriate module is activated 3 Afte...

Page 100: ...n the list Assignments Global Apply If selected the Assignments window for the Global Apply Wizard see the following figure will be the 2nd to appear This corresponds to the Assignments tab found on t...

Page 101: ...e to change the employee s selected schedule by clicking on the box next to Schedule Settings If no checkmark is placed in this box then the Schedule selections will not be applied to the employee s W...

Page 102: ...e the following figure will be the 5th to appear This corresponds to the Certification tab found on the Employees screen Note This global apply function will only be available when Advanced Schedule m...

Page 103: ...Table Additionally if assigning a Rate Table the user can choose to Override the employee s existing Rate Table with the new settings by clicking on the Override checkbox In this example all selected...

Page 104: ...e added to it When the Global Apply Wizard is completed all these settings will be applied to all the employee s selected on the list Benefit Global Apply If selected the Benefit window for the Global...

Page 105: ...en only the employees that do not have passwords are affected When the Global Apply Wizard is completed all these settings will be applied to all the employee s selected on the list Make the desired e...

Page 106: ...k on the desired employee record or highlight the employee in the list and click on the button The Employees window will appear with the fields populated with the information of the selected employee...

Page 107: ...roll Last Name First Name Middle Name Exception Pay Class Schedule Department Number Department Labor Level name or labor level number Additional filtering in ascending order can be accomplished by en...

Page 108: ...onth Previous Month Last 2 Weeks Date Range Current Pay period and Previous Pay period Note When Current Pay period and Previous Pay period are selected the first Pay Class in the Selected List on the...

Page 109: ...om the Timecard module double click on an employee or highlight an employee on the list and click on the Timecard icon to view the Timecard grid screen with the Punches tab as shown The Punches Tab in...

Page 110: ...o a schedule For all other Timecard modifications see Punches and Adjustments tabs To perform an employee Timecard override click on the Overrides tab then click on the Hours cell in the grid for the...

Page 111: ...mn is provided to make notes i e reason for the adjustment For all other Timecard modifications see Punches and Overrides tabs 1 To perform an employee Timecard adjustment click on the Adjustments tab...

Page 112: ...on Monday His Pay Class awards Daily Overtime after he has worked 8 hours and his boss scheduled him to work 10 hours on Monday to finish a rush project He used the adjustments feature to add 2 REG ho...

Page 113: ...Tab in the Timecard grid consists of the following displayed columns Totals The Daily and Pay period Totals for the employee are shown in the Timecard grid at the bottom of the screen to provide a qui...

Page 114: ...s of the following Activation of the following modules will add these associated icons User Module will add Preferences icon on the timecard toolbar Benefit Time Module will add Benefit icon on the ti...

Page 115: ...Administration 6 9 Grid Navigation Timecard grid navigation can be accomplished through the following keys and mouse clicks Note Holding down any of the above keys will cause the cursor to move rapidl...

Page 116: ...e desired IN or OUT punch field and or by clicking the Add Punch button in the toolbar and entering the time in the field Punches can be entered in either military or AM PM format For example 5 o cloc...

Page 117: ...ve your changes Editing Tips To edit an employee tip double click on the desired Tip field and enter the desired dollar amount When you have finished click on the Save button in the toolbar to save yo...

Page 118: ...nches tab see figure This is required if Hours for payroll require authorization was checked in the Overtime Rules tab from the Pay Class step in the Setup Wizard Global Timecard Edit To globally edit...

Page 119: ...nch Type the choices are Standard or Transfer If Standard for Punch Type selected no other choices available If Transfer for Punch Type selected check Home Labor box to bypass departments or select de...

Page 120: ...ed departments If desired enter text in the Comments reason field When Add Dollars is selected the following is an example of the General Global Edit window Enter Adjustment Settings for Dollars enter...

Page 121: ...ck on the Next button and the following is an example of the Date Range Global Edit window that will appear Date Selection select from the dropdown list The choices are Today Yesterday Last Open Perio...

Page 122: ...ck on the Next button and the following is an example of the Global Edit Department window that will appear To add a department highlight the department in the Available list and click on the Add butt...

Page 123: ...the Selected list and click on the Remove button To remove all selected employees click on the Remove All button Use the Sort field dropdown list to sort employees The choices are Number Badge Payroll...

Page 124: ...6 18 Time Guardian Series Timecard Administration This page intentionally left blank...

Page 125: ...rolled by the communication download with the Time Attendance software Communications Module From the tree view click on the Communications module within the Daily Activities group and the following t...

Page 126: ...ocation double click on the desired location row and the following Communications dialog will appear for FPT 40 terminals The Send Maps Receive Maps and Clear Maps commands are only used for FPT 40 te...

Page 127: ...r the employee s hours you are going to recalculate and select the Pay period that the hours belong to from the Pay period list or In the Pay Class tab select All for Pay Class and select the Pay peri...

Page 128: ...es 6 Click on the Employee tab Employees can be filtered in both the Available and Selected lists by selecting a sort category in the dropdown list in the sort field Then enter secondary filter data i...

Page 129: ...ceptions Report Lists all employees exceptions by day with IN OUT punches Used to make corrections and show comments Historical Hours Report Landscape calendar like view of selected exceptions generat...

Page 130: ...ost for the employees to see when they are scheduled to work Schedule vs Actual Report From Advanced Schedule A landscape format analysis report of scheduled time with wages versus actual hours with v...

Page 131: ...Report Schedule vs Actual Report DeAccrual Balance Report and DeAccrual History Report 6 For Hours Summary Report Check the following options to include them on the report Employee signature line Supe...

Page 132: ...14 For Schedule vs Actual Report Check the following options to include them on the report Report type of Summary or Detail Punch time of Actual Punches and Rounded Punches 15 In the Output Format sec...

Page 133: ...Footer Text field enter the text that you want to appear on the footer of the report 22 Click on the Sort tab See the following illustration for an example 2 The Available column lists the sorting cr...

Page 134: ...red position 23 Click on the Exception tab See the following illustration for an example To add an Exception to the report highlight the desired Exception in the Available list and click on the Add bu...

Page 135: ...e priority 25 Click on the Audit Class tab See the following illustration for an example To add an Audit Class activity type to the report highlight the desired Audit Class in the Available list and c...

Page 136: ...n enter data in the Criteria field s above either or both lists Only departments labor levels matching the data entered will appear in both lists Note Filtering by department labor level does not excl...

Page 137: ...associated with the user that was logged into the Time Guardian Series software when the report profiles where created However a user with Admin privileges can click on the button to transfer the rep...

Page 138: ...including all of the information contained in the General tab of the Employee Setup Wizard Schedule Posting Report As seen in the following example the Schedule Posting Report provides a list of emplo...

Page 139: ...n they can be modified at any time by opening the Setup Wizard from the Edit menu and selecting the Exceptions tab Select the exceptions you wish to track see below for additional method As seen in th...

Page 140: ...ion selected to be included in the report To include a tabulated summary of Exceptions for each day of the week select to Exceptions Per Day Hours Summary Report This report provides a one line total...

Page 141: ...and hors that are not authorized to go to payroll export file Labor Analysis Report As seen in the following example the Labor Analysis Report provides a complete and detailed account of employees lab...

Page 142: ...seen in the following examples the Time Card Detail Report and Time Card Summary Report provide a complete and detailed account of employees punch times totals wages and exceptions for a specified pe...

Page 143: ...s Setup Wizard selections DeAccrual Balance Report As seen in the following example the DeAccrual Balance Report provides a list of employees showing balance of remaining yearly benefits Requires Bene...

Page 144: ...ports module and click on the Copy Report Settings button The report profile settings will be copied to the selected Users Since report profiles when created are directly linked to the logged in User...

Page 145: ...n payroll selection payroll number and output path will be created automatically during the initial Setup Wizard when QuickBooks Pro is selected to auto sync 6 In the Payroll ID field select Payroll N...

Page 146: ...ian Series Output See the following matrix tables for additional information on Specific Payroll Settings QuickBooks Pro Examples of export iif file fields for QuickBooks Pro are shown in the followin...

Page 147: ...Time Guardian Series Output 9 19 ADP For DOS Examples of export file fields for ADP for DOS are shown in the following matrix table...

Page 148: ...9 20 Time Guardian Series Output ADP PC Payroll For Windows Examples of export file fields for ADP PC Payroll for Windows are shown in the following matrix table...

Page 149: ...Time Guardian Series Output 9 21 CBS Payroll Examples of export file fields for CBS Payroll are shown in the following matrix table...

Page 150: ...9 22 Time Guardian Series Output Ceridian Power Pay Examples of export file fields for Ceridian Power Pay are shown in the following matrix table...

Page 151: ...Time Guardian Series Output 9 23 EasyPay Examples of export file fields for EasyPay are shown in the following matrix table...

Page 152: ...9 24 Time Guardian Series Output Excel Examples of export file fields for Excel are shown in the following matrix table...

Page 153: ...Time Guardian Series Output 9 25 Gevity HR Examples of export file fields for Gevity HR are shown in the following matrix table...

Page 154: ...9 26 Time Guardian Series Output Paychex Paylink Examples of export file fields for Paychex Paylink are shown in the following matrix table...

Page 155: ...Time Guardian Series Output 9 27 Paychex Preview Examples of export file fields for Paychex Preview are shown in the following matrix table...

Page 156: ...9 28 Time Guardian Series Output PayDay Examples of export file fields for PayDay are shown in the following matrix table...

Page 157: ...Time Guardian Series Output 9 29 PayWeb Examples of export file fields for PayWeb are shown in the following matrix table...

Page 158: ...9 30 Time Guardian Series Output Peachtree Win Examples of export file fields for Peachtree Win are shown in the following matrix table...

Page 159: ...Range was chosen as the Date Selection you must enter the From Date and Until Date using the Calendar icon You also have the option of going forward or backward as many days weeks months or years from...

Page 160: ...e Range and Breaks tab to sort out employees by selecting the Pay Class Department Labor Levels and Employee tabs Employees that are assigned to the selected Pay Class and or Department Labor Level wi...

Page 161: ...eate a QuickBooks export iif file manually is as follows Part A Configuration Step 1 During installation of the Amano Time Attendance software the Setup Wizard in Step 1 General Setup will ask Do you...

Page 162: ...Series Output Step 2 Select Utilities Export Timer Lists and the following screen will appear Step 3 Enter the name for the payroll file in the File name field see figure It is recommended to use an...

Page 163: ...necessary browse to define the Output Path for the iif file Step 2 In the Payroll ID field select Payroll Number Employee Number Social Security Number or Badge Number Step 3 In the Output Path field...

Page 164: ...g This information can be obtained from QuickBooks iif file opened with Notepad see figure The Time Attendance software will enter a default value in the Export To field Choose the location and file n...

Page 165: ...oyees by selecting the Pay Class Department Labor Levels and Employee tabs Employees that are assigned to the selected Pay Class and or Department Labor Level will appear in the Available list Also yo...

Page 166: ...Amano Time Attendance software it can now be imported by QuickBooks From QuickBooks select File from the main menu see figure Step 13 From QuickBooks Pro select Utilities Import Timer Activities and t...

Page 167: ...ickBooks Pro auto integration synchronization Part A Configuration Step 1 During installation of the Amano Time Attendance software the Setup Wizard in Step 1 General Setup will ask Do you want to sen...

Page 168: ...ropdown choices of Import from QuickBooks Export to QuickBooks or Both ways bi directional Step 2 The selection of Direct Integration for QuickBooks will auto create the QuickBooks Pro payroll templat...

Page 169: ...ke sure that QuickBooks is running before proceeding to synchronize message will appear click OK to proceed Step 5 When the NO CERTIFICATE message appears select Yes always allow access even if QuickB...

Page 170: ...ars click Done Step 8 In QuickBooks click Edit and select the Preferences Option When the Preferences screen appears click on the Company Preferences tab to verify access to QuickBooks click OK Step 9...

Page 171: ...ckBooks Step 2 Click on the Pay codes tab to perform Pay codes mapping with QuickBooks from the QuickBooks Pay Code s screen Select the Mapping browse button alongside the Time Attendance Pay Code lis...

Page 172: ...he Payroll highlight the desired employee in the Available list and click on the Add button To select all the listed employees click on the Add All button To remove an employee from the Payroll highli...

Page 173: ...change must be updated in QuickBooks to maintain good synchronization The Time Attendance software can accept the QuickBooks payperiod settings of Weekly Bi Weekly Semi Monthly and Monthly Any differe...

Page 174: ...from Employee Individual Schedule requires Advanced Schedule module Advanced Schedule requires Advanced Schedule module and Override Existing 7 Click on the Import File Format Settings tab This tab d...

Page 175: ...Parent Child relationship a Employee Number Select how the Employee Number will be defined The choices are As it is Same as Badge or Manual Increment From If Manual Increment From is selected you mus...

Page 176: ...element in the Available list and click on the Add button To select all the fields click on the Add All button The field s will then be displayed in the Selected list Add additional fields until all...

Page 177: ...le name in the File Name field and press the browse button to establish a path of where the file will be placed 6 Select the Export Options by selecting the desired Export Type select from the dropdow...

Page 178: ...ections and the Recurrence settings that you have defined Note For client server setup the Auto Process will be executed on the server side Creating an Auto Process Profile 1 Click on the Auto Process...

Page 179: ...urrence settings 7 When Report is selected for the Process Type select Report profile from the dropdown list in the Report field Check Keep file if desired and enter the Output Path use the browse but...

Page 180: ...etup Wizard Terminals Setup Terminal selection is as follows a To select a terminal highlight the desired terminal in the Available list and click on the Add button b To select all terminals from the...

Page 181: ...at you want the process to repeat Weekly The service for the auto process can be run every set number of weeks on specific days of the week See the following example Enter the following a Recur Every...

Page 182: ...click on the button The Select Date dialog box will appear d Start Time Enter the time of day HH MM that you want the process to run Yearly The process can be set to run once every year on the date s...

Page 183: ...r un scheduled hours Pay period Option in Daily Activities Provides the ability to Lock Pay Periods Provides the ability to Close Pay Periods Holiday Group Holiday Eligibility Provides the ability to...

Page 184: ...be created prior to adding your holidays If it has not been selected you will be unable to assign holiday hours to a Pay Code until one has been created How to Create a Holiday 1 Click on the Holiday...

Page 185: ...d in the Date Definition and Condition tables to generate the holiday The Date Definition table consists of the following Creating a Holiday Group The Holiday Group is used to setup the requirements t...

Page 186: ...ed amount of days from the date set Hire or Selected Date to be awarded holiday hours Meet Hours Requirement The employee must work a required amount of hours from the date set Hire or selected date t...

Page 187: ...e Available list and click on the Add button To select all Pay Codes click on the Add All button To remove a Pay Code highlight the desired Pay Code in the Selected list and click on the Remove button...

Page 188: ...er of hours to be worked you must specify the Pay Code for the hours worked The choices are Worked Hours Non Worked Hours All Hours Selected Pay Codes or Within Schedule For Selected Pay Codes click o...

Page 189: ...and click on the Remove button To remove all selected Holidays click on the Remove All button 12 Click on the Move Up or Move Down buttons to move a holiday up or down in the Selected column to change...

Page 190: ...d For Scenario 2 if Last In Punch is selected for an employee that has a schedule 8 00am 5 00pm If the Last In Punch was 08 20am and minutes from was set for 60 minutes 1 hour then the employee would...

Page 191: ...ge Time 11 If you are using both Maximum shift length and number of punches to override the Day Change Time you must select how punches will be applied to the schedule in the Shift Requirement field T...

Page 192: ...from the Pay Class highlight the desired Holiday in the Selected list and click on the Remove button To remove all selected Holidays click on the Remove All button Click on the Calendar icon to displ...

Page 193: ...oup is assigned to the Pay Class The Year field is used to view the current previous or following year s scheduled holidays Click on the icon too print the displayed Holiday calendar and to close the...

Page 194: ...ed REG OT 11 In the Cost Multiplier field enter in the cost multiplier for the Pay Code For example TT 3 0 in the example shown above 12 In the Billable Multiplier field enter in the billable multipli...

Page 195: ...ation of this module include Advanced Pay Class Overtime Definition Custom overtime level and pay codes selection for specific day of week or holiday Weekly Overtime Template Consecutive and Non Conse...

Page 196: ...overtime and outside shift overtime nodes will be grayed out but the exception template will stay selectable and theses nodes will not be accessible from the tree view Software Setup Feature Software...

Page 197: ...us pay On call bonus For example if overtime is awarded after 40 hours Day Pay Code Split Hours Monday REG Y 8 0 Tuesday REG Y 8 0 Wednesday REG Y 8 0 Thursday REG Y 8 0 Friday REG Y 10 0 The overtime...

Page 198: ...e setup for the Consecutive Overtime requires overtime reset date which determines if the hours and days worked to qualify must occur in a Weekly Start Pay Period Day of Week Start or by Pay Period If...

Page 199: ...Hours worked on an unassigned schedule When checked the employee will only be awarded overtime for each of the above if a check is placed in the corresponding column of the Timecard grid Shifts All s...

Page 200: ...a set hour value in one shift Schedule The hours that exceed the set hour value are normally paid at a high wage or rate Up to 4 levels of Shift Overtime can be used Each level can be assigned its own...

Page 201: ...hift Overtime template will appear in the Shift Overtime window 5 Click on the Level tab 6 In the Level table enter the threshold limits from and To times and assign a reasonable Pay Code to each leve...

Page 202: ...cking on the column heading Also you can select unselect all pay codes by clicking on the Check Uncheck All icon Outside Shift Overtime Outside Shift overtime allows you to create a finite set of over...

Page 203: ...y are checked Note If you wish to duplicate the properties of an existing Outside Shift Overtime template for another Shift Overtime template select the desired Outside Shift Overtime template from th...

Page 204: ...ill be combined to reach Level 1 s threshold value Note You can select all the Pay Codes in a given column by clicking on the column heading You can also deselect any checked Pay Codes in a column by...

Page 205: ...o set the rules which govern daily punches such as Rounding Break Lunch Rounding and Daily Overtime Daily Overtime Overtime is the time an employee works that extends beyond a certain level of time se...

Page 206: ...Rules module in the Tree View see figure 2 Click on the button and the following Daily Overtime window will appear 3 Enter a name for the Daily Overtime template in the name field required field 4 En...

Page 207: ...reshold value Note The 4 buttons at the top right of the Level tab allow you to Select or De select all copy cut and paste the Overtime Pay Codes into different days or holidays The Period Overtime Pe...

Page 208: ...Module To create a Period Overtime template 1 Click on the Period Overtime node within the Shifts Module in the Tree View and the following type of screen will appear 2 Click on the button and the Pe...

Page 209: ...employee can receive overtime for each period 9 Click on the Settings tab and the following type of screen will appear 10 In the Level tab select the day of the week that this overtime rule will apply...

Page 210: ...ekly Overtime is set in the Weekly Overtime window which is accessed by selecting the Weekly Overtime node within the Pay Class module in the Tree View Up to 4 levels of Weekly Overtime can be used Ea...

Page 211: ...unt table check the Pay Codes in each column that you want to be combined to achieve each level s threshold For example if you checked REG and HOL in the Level 1 column then the hours for REG and HOL...

Page 212: ...ays are days that are worked one right after another with no days off in between Up to 4 levels of Consecutive Overtime days can be created with each level assigned its own threshold limit to move the...

Page 213: ...e in the name field required field 3 Enter a description of the overtime template in the Description field 4 Click on the Consecutive 1 tab 5 Enter the threshold limits and assign a Pay Code to each l...

Page 214: ...in the grid if all were selected Note If you wish to duplicate the Consecutive Overtime properties from the General Consecutive and or Count tabs select the desired Consecutive Overtime template open...

Page 215: ...b 6 Click on the Add button to create a date range or period A row will appear with the Start and End Date fields enabled 7 In the Start Date field enter a start date manually in MMDDYYYY format or cl...

Page 216: ...ists select the Month and Year Click on the desired day in the calendar When you have finished click on the button in the Select Date screen to save your setting and close the dialog box and return to...

Page 217: ...s from one Pay Code to another See the following table for a settings example Range Overtime From To Pay Code Base 00 00 08 00 REG Level 1 08 00 10 00 OT Level 2 10 00 12 00 DT Level 3 12 00 TT Level...

Page 218: ...Codes in a column by clicking on the column heading To select all Pay Codes in the grid click on the button This button will also deselect all the Pay Codes in the grid if all were selected Note The 4...

Page 219: ...ule with Auto Schedule Individual Advanced Schedules Schedules Rotation Employee Schedule Override Employee Configuration Advanced Pay Class Template Schedule assignment based on schedule start time s...

Page 220: ...Auto Schedules Schedule Coverage and Schedule Rotation utilizing the Web See the Web Interface Module for procedural steps Note See Timecard Administration for procedural steps for Schedule Overrides...

Page 221: ...to the employee Template Schedules A template schedule is a schedule that an employee has for a particular day Sun Mon Tues Wed Thurs Fri or Sat For example Employee 1 will have a schedule setup as fo...

Page 222: ...re 1 days before Current Day or 1 days after 8 In the End box select the Day that the schedule will end and the time of the day that the schedule is to end The choices are Current Day 1 days after 2 d...

Page 223: ...Schedule End Before and After times need to be entered IN and OUT Punch If selected both the Schedule Start End Before and After times need to be entered 5 Assign a template schedule using the dropdow...

Page 224: ...nd check the desired day of the week The assigned Template or Auto Schedule will appear in the schedule list with a under the chosen day To remove a Template or Auto Schedule from a particular day hig...

Page 225: ...d To close this view click on the button Schedule Coverage The Schedule Coverage feature illustrated below allows you to view a report or image of the schedule hours and verify that you have adequate...

Page 226: ...rage window will appear 3 Enter a name for the Coverage Schedule report in the Name field and a brief description of the report in the Description field 4 Select the Maximum of employee s to be includ...

Page 227: ...n select the desired day in the From field Weekly Range Select Day of the Week and select the desired Day in the Start Day field 9 Click on the Pay Class tab To include schedule coverage for a given P...

Page 228: ...on the Employee tab To add an employee to the report highlight the desired employee in the Available list and click on the Add button To select all employees to the report click on the Add All button...

Page 229: ...riteria fields see above illustration The Criteria field located above the Available list filters only that list while the Criteria field above the Selected list filters that list Each list is filtere...

Page 230: ...00 am to 05 00 pm on 06 25 06 This employee may have a different schedule on another date The schedule might be from 09 00 am to 6 00 pm on 6 26 03 The individual schedule is applied to employee when...

Page 231: ...one of the following choices Today Yesterday Last Open Period Previous Open Period Current Week Previous Week Current Month Previous Month Last 2 Weeks Date Range Current Pay period or Previous Pay pe...

Page 232: ...months or years from the From Date 6 Click on the Pay Class tab This tab allows you to select those employees that belong to particular Pay Classes By default all Pay Classes are selected To select a...

Page 233: ...ab allows you to select employees By default all employees are selected Employees can be sorted by Employee Number Badge Number Payroll ID Last Name First Name or Comment using the Sort field Employee...

Page 234: ...edule Profile in the Main View and click on the button The Individual Scheduler consists of the following components Grid One row for each selected employee s and a column for each day in the profile...

Page 235: ...nter the End Time in the Time field To copy an already existing schedule select the desired Template Schedule using the Template Schedule list or the and buttons Enter a new schedule name and click on...

Page 236: ...ividual Scheduler Assign Schedule Assigns the currently displayed template schedule in the Template Schedule list to the employee for the particular day Assign Additional Schedule Assigns an additiona...

Page 237: ...n indicator will appear alongside the scheduled hours in the cell Below is a list of the indicators that may appear in the cell Icon Meaning Advance Schedule Advance Schedule with Pay in Advance Sched...

Page 238: ...that the schedule will be in Hours Enter the amount of hours for the day Allocation Select Normal Pay in advance or Remainder If Pay in Advance is selected you must enter the date that the employee w...

Page 239: ...d The Edit User Defined command from the submenu enables you to create a custom Advanced Schedule There are 15 User Defined Advanced Schedules to choose from User Defined Advanced Schedules must be en...

Page 240: ...u The selected schedule will appear in the grid When you have finished click on the click on the button to save your settings and exit the Individual Scheduler window Schedule Rotation Schedule Rotati...

Page 241: ...ick on the button The Select Date dialog box will appear Using the dropdown lists select the Month and Year Click on the desired day in the calendar When you have finished click on the button to save...

Page 242: ...or list or click on the button The Labor References window will appear d To add a labor category select a subcategory from each of the dropdown lists and click on the Add button The selected labor cat...

Page 243: ...In the Labor box check the Home Labor box to default all labor levels to Home Labor or select the sub categories of each Labor Level you wish to include in the schedule Note See Advanced Labor Rate Mo...

Page 244: ...Paste buttons once there is at least one schedule assigned to a day in the rotation pattern 8 To add an additional Schedule and Labor Reference to particular day a Select the desired day in the rotati...

Page 245: ...m The choices are Employee Individual Schedule or Advanced Schedule 7 Check Benefit if you want to import employee benefits from another database Note Benefit will only appear when Tracking Type in Co...

Page 246: ...owing Employee Number Select how the Employee Number will be defined The choices are As it is Same as Badge or Manual Increment From If Manual Increment From is selected you must enter the starting nu...

Page 247: ...s will then be displayed in the Selected list Add additional fields until all data elements have been properly defined Use the Remove Fields button to un assign fields To skip a data element click on...

Page 248: ...ut section Shifts All setup rules will fall into 3 categories shift rules daily rules or multiple day rules Shift rules apply to a given shift or schedule They include punch rounding shift rounding pu...

Page 249: ...rom assigned schedules Exceptions in Time Guardian Pro are defined by a group or set and then assigned to a Shift To create a group or set of Exceptions template 1 Click on the Exception module within...

Page 250: ...ption highlight the desired Exception note Meal Penalty MPNT can now be selected in the Available list and click on the button To select all the listed Exceptions click on the button To remove an Exce...

Page 251: ...s deducted In the automatic method different time windows are setup to see if employees punch for the meal If the employee punches then amount setup for the automatic deduction taken away from the emp...

Page 252: ...nother Meal Overtime template select the desired Meal template open it enter in a new name and click on the button The new Meal template will appear in the Main View A fixed meal or break has to be ta...

Page 253: ...and moving forward For End the time will be deducted starting from the end time of the break or meal and moving forward 6 Select Fixed as the Type 7 Place a check in the Auto Meal check box if you wi...

Page 254: ...a 14 Enter From and To times for the break in 24 hour format and Break Length in HH MM format 15 Click on the button to add more breaks or click on the button to remove a break 16 Click on the Meals t...

Page 255: ...ble Interval or Terminal Meal Template 1 Click on the Meal Templates node within the Shifts module in the Tree View 2 Click on the button and the Meal Templates window will appear 3 Enter a name for t...

Page 256: ...Break Size For breaks based on default size enter the number of breaks and the default break size in the fields provided For breaks based on Shift break size the following selection will appear For br...

Page 257: ...Than Threshold fields set the conditions if the time taken for the break is either less or more than the threshold in the fields provided They choices are Allowed break Which is the amount of time the...

Page 258: ...12 for the Coffee Breaks d Click on the Meals tab Repeat steps 10 through 12 for the Meals An example of how this would be used is to look at an employee who is assigned a 1 00 hour meal size to be t...

Page 259: ...Default Punch Position Start or End that the break or meal will be based on 6 Select Flex as the Type and Sequence as the Flex Type 7 Place a check in the Auto Meal check box if you wish to have an a...

Page 260: ...the Break size based on shift length click on the Add button A row will appear Enter the From and To times of the shift and the size of each break for that shift When you have finished entering the n...

Page 261: ...yee when an employee takes a longer period of time than they were allocated for in the break a Enter in the amount of time HH MM that the action is to be taken b Set the conditions if the time taken f...

Page 262: ...k deduction Enter in the required number of hours to work before the deduction is applied and select the Meal Position of the shift to deduct from The Meal Position is used to determine where in the e...

Page 263: ...sed on shift length click on the Add button A row will appear Enter the From and To times of the shift and the size of each breaks for that shift Click on the Combine multiple employee breaks to one c...

Page 264: ...a Enter in the amount of Threshold time HH MM before the action is to be taken b Set the conditions if the time taken for the break is both less and more than the threshold in the fields provided The...

Page 265: ...over or remaining time that an employee has from a meal or break to other meals or breaks where the employee exceeded the time allowed For example the Break Credit is setup to allow break time to be c...

Page 266: ...used Break time will be credited to using the dropdown list The choices are None Meals Breaks Coffee Breaks All Breaks Breaks and Meals Coffee Breaks and Meals or All Breaks and Meals 6 In the Maximum...

Page 267: ...at the punches make up Note Hours rounding cannot be done in conjunction with punching rounding The user has a choice of either using punch rounding or hour rounding parts The sections of the Time Att...

Page 268: ...ding rules for the Pay Class Hours Enter the following to set the Hours rounding rules for the Pay Class Type Select the period in which the hours will be rounded The choices are None Weekly or Pay pe...

Page 269: ...was selected set the Unit and Point for IN and OUT punches for both the Break and Meal Rounding moves an employee s punches or hours to an even amount to make it easier for calculations There are 2 me...

Page 270: ...g upon the type s of Punch Rounding selected Note If you wish to duplicate the properties of an existing Rounding Template for another Rounding Template select the desired Rounding Template open it en...

Page 271: ...peat for the scheduled end time For example the schedule for the employee is 8 00 AM to 4 00 PM The grace window for the start of schedule is set for 15 minutes before 7 45 AM and 15 minutes after 8 1...

Page 272: ...t punch of the day after the start of the schedule and not inside the grace window Early OUT The last punch of the day before the end of the schedule and not inside the grace window Late OUT The last...

Page 273: ...ted this rounding will be used for all punches including the first IN and last OUT punches A Unit and Point must be assigned to both the IN and OUT punches Open Schedule Open Schedule rounding is used...

Page 274: ...a transfer punch it will use transfer rounding if it is activated If it is not activated then IN OUT rounding will be used Hour Rounding Hour Rounding is enabled in the General Rounding tab You must s...

Page 275: ...loyee a daily total of 7 hours and 30 minutes Example Schedule Rounding The first schedule is from 8 00 AM to 12 00 PM The four punches within the schedule calculate to 3 hours and 21 minutes of time...

Page 276: ...ule You must select either Hour or Punch Rounding for the break or meal Hour Rounding will round the total time taken and Punch Rounding will round the punches to the unit If Hour Rounding is selected...

Page 277: ...11 37 AM 11 52 AM 12 07 PM 08 00 AM 02 45 PM 03 00 PM 03 15 PM 03 30 PM 03 45 PM 04 00 PM 04 15 PM 03 09 PM 04 10 PM 02 55 PM 03 10 PM 03 25 PM 03 40 PM 03 55 PM 04 10 PM Indicates what Unit the punc...

Page 278: ...14 12 Time Guardian Series Advanced Rounding Module This page intentionally left blank...

Page 279: ...both the employee standard rate setup and the labor rate setup This screen will be seen the same way in the labor levels module The sections of the Time Attendance Software affected and or features a...

Page 280: ...duction Welding Work Order 100200 11 00 5 00 6 00 Regular Building A Production Assembly Work Order 100300 5 00 6 00 1 00 Overtime Building A Production Assembly Work Order 100300 How many labor level...

Page 281: ...ck on the button to save your settings and return to the Labor Names window Note When the labor expires the labor name will be flagged in Red see User Accounts and the EXPIRED LABOR WILL NOT BE DOWNLO...

Page 282: ...labor name TS 3000i PIX 55 TG user defined labor names Marketing user defined labor name Show all labor no association In Scenario 1 using the table if Labor Level 1 Department and Labor Level 2 Cost...

Page 283: ...labor level will be in effect Enter a rate for the labor level in the Rate field In the Operation field select Rate Add to Percentage Rate is the labor level s actual rate Add to will add to the exis...

Page 284: ...applies the rate based on the order set and Combined applies the rate based on the combination of items Employee and Labor Levels selected For multiple employees a Rate Setup template must be configur...

Page 285: ...d 6 To add a selection highlight the desired item in the Available list and click on the Add button To select all the listed items click on the Add All button To remove an item highlight the desired i...

Page 286: ...Combined tab of the Rate Setup window and at least one employee has been added in the Employees module The rate templates created here are assigned to employees in the Wage tab of the Employees module...

Page 287: ...dd a rate based on a Rate Template check the Use Rate Template option and select a Rate Template using the dropdown list in the Rate field as illustrated in the following example If you do not wish to...

Page 288: ...e 6 Enter a rate in the Rate field 7 Repeat Steps 3 thru 6 to add additional Rates to this template 8 To delete a rate select the desired row and click on the Delete button 9 To automatically increase...

Page 289: ...ssigned to the Billable Rate Order in the Combined tab of the Rate Setup window and at least one employee has been added in the Employees module The rate templates created here are assigned to employe...

Page 290: ...ple Labor Levels for details on setting up Labor Levels names and association links Parent Child relationship 4 To add a rate based on a Rate Template check the Use Rate Template option and select a R...

Page 291: ...in the Date field to enter the date that the rate increase will be in effect and enter the percentage increase of the rate in the Increase field When you have finished click on the button to save you...

Page 292: ...Name field required field 5 In the Description field enter a brief description of the Rate Template 6 To add a rate click on the Add button and a row will appear on the Rates box 7 Click on the butto...

Page 293: ...gs Pay Class weighted average all employee settings On call bonus for weighted average defined in Pay Code This function can be used to calculate overtime rate of pay for daily weekly period and range...

Page 294: ...15 16 Time Guardian Series Advanced Labor Rate Module Example Showing...

Page 295: ...Time Guardian Series Advanced Labor Rate Module 15 17 Example Showing...

Page 296: ...15 18 Time Guardian Series Advanced Labor Rate Module Example Showing...

Page 297: ...Time Guardian Series Advanced Labor Rate Module 15 19 Example Showing...

Page 298: ...15 20 Time Guardian Series Advanced Labor Rate Module Example Showing...

Page 299: ...tored in the Nexus220 and AmanoNet 7 6 database for time and attendance This can be accomplished automatically when polling is performed or manually when the Synchronize Access Control command is sele...

Page 300: ...l tab of the Setup Wizard When Nexus 220 Access Control software is connected to an AC or EC controller 4 tags are available see the following figure for an example with 4 Tags Tag1 can be used to ass...

Page 301: ...or demonstration Access Group for Access groups that will be assigned to the tag Start Date The date when the tag will be activated YYYYMMDD End Date Displays the date when the tag will expire YYYYMM...

Page 302: ...nsactions during synchronization leave the default value 0 for the Reason Code Otherwise set the Reason Code to a value that is specific to filter for those transactions that you want to process 4 Cli...

Page 303: ...Attendance Employee The following criteria must be met to import a Nexus 220 Tag holder into Time Attendance The Nexus 220 Tag holder s Master Type should be Access and Time The Nexus 220 Tag holder m...

Page 304: ...220 database to prevent re processing the same transaction again Note This process only imports NEW Departments Employees Tag holders and Nexus 220 Transactions It does NOT update any existing Departm...

Page 305: ...assign access levels sites and tag options to the badge or tag number entered in the General tab Tag2 thru Tag8 can be used to add and configure additional tag s or badge s for the employee to use Cl...

Page 306: ...ptions Assigns one of the following functions to the badge or tag a Normal Normal employee b Suspend All access for a particular tag is suspended c Blacklist The tag holder will be denied access to th...

Page 307: ...Synchronize Access Control menu will appear under the Time Attendance software File menu Use this menu selection to synchronize both the Time Attendance software and the AmanoNet 7 6 system The proce...

Page 308: ...n transactions from AmanoNet 7 6 into the Time Attendance software as punches There following criteria must be met for the transactions to come in 1 The transactions have not been processed 2 Under th...

Page 309: ...Time Guardian Series Access Control Module 16 11 Requirements Relationship Matrix for Amano Time Attendance software and AmanoNet 7 6...

Page 310: ...16 12 Time Guardian Series Access Control Module This page intentionally left blank...

Page 311: ...t 6 service to be started and configured to automatically start when the Time Attendance software is opened This service was installed during the initial installation but not started for Time Guardian...

Page 312: ...illustrative purposes The activation of the Web Interface Module provides a punch web view that allows the employee to punch IN or OUT This operates with same functionality as the Amano MTX 15 and or...

Page 313: ...b Interface there are two paths 1 Open any Web browser 2 For non secure login type http localhost 8080 tg Replace localhost with the IP address of the Time Attendance software server The standard port...

Page 314: ...concurrent user Therefore to simultaneously login on a PC would require anther concurrent user Supervisor Web Access The Setup Daily Activities Output and Preferences menus from the Time Attendance so...

Page 315: ...00 AM 2 00 PM Sat The template schedule consists of start and end times Fixed type only which may span across multiple days this is limited by maximum shift length Pay Code shift rules and the days to...

Page 316: ...hat the schedule is to end The choices for End Day are Current Day 1 days after 2 days after or 3 days after 9 When you have finished configuring the template schedule click on the button to save your...

Page 317: ...have to be assigned 5 Assign a template schedule using the dropdown list in the Template Schedule field 6 When you have finished configuring the template schedule click on the button to save your set...

Page 318: ...dule will appear in the schedule list with a under the chosen day 5 When you have finished configuring the schedule click on the button to save your settings and return back to the main Schedules view...

Page 319: ...s module To create a Rotating Schedule Template 1 Click on the Schedule Rotation menu selection from the Setup menu see figure 2 Click on the button and the following Schedule Rotation window will app...

Page 320: ...ed by cells see the following figure 7 Click on the button to exit without saving your settings and return to the main Schedule Rotation screen showing a list of already created schedule rotations Not...

Page 321: ...The defined labor category will appear in the Labor References window e When you have finished click on the button to finish and return to the Schedule Rotation window 9 Click on the button to apply...

Page 322: ...To edit a Schedule Rotation template select the desired Schedule Rotation from the main list and click on the icon To edit a specific schedule for a day click on the icon within that cell Timecard Gr...

Page 323: ...n be displayed Column Name Field Description Day Dates within Pay period that have no punches or schedule Indicator Indicator symbol displayed to show timecard modified TZ Time Zone used for punch Day...

Page 324: ...vel 4 user defined LEVEL5 Labor Level 5 user defined LEVEL6 Labor Level 6 user defined Tip Tips in dollars separate from bonus dollars Comments Reason Comments Reason Information Indicators Web The In...

Page 325: ...s tab then select the desired column in the date row you wish to edit Click to enter the value for Hours Dollars Bonus Pay Code only and Comments Reason Use the dropdown lists for Labor Levels Zone Co...

Page 326: ...Schedule Assigned Schedule user defined LEVEL1 Labor Level 1 user defined LEVEL2 Labor Level 2 user defined LEVEL3 Labor Level 3 user defined LEVEL4 Labor Level 4 user defined LEVEL5 Labor Level 5 us...

Page 327: ...e Zone Code assigned user defined for zone differentials Pay Code Pay Code user defined assigned to hours Hours Total Hours for assigned Pay Code And the following additional user selectable columns t...

Page 328: ...tiple Labor Levels for details about Labor Level Association links Parent Child relationship Totals Web The Daily and Pay period Totals for the employee are shown in the Timecard grid at the bottom of...

Page 329: ...Save Saves the currently displayed employee record Pay periods This dropdown list allows you to view different Pay periods in the Punch Overrides or Adjustments Timecard grids Previous Pay periods can...

Page 330: ...are set by clicking on the appropriate Preferences submenu selections from the Preferences menu Punches Columns Menu Selection Web The Punches Columns selection is used to set the properties of each...

Page 331: ...nu and the following User Preferences Adjustment Columns or Overrides Columns windows will appear The Adjustment Overrides Columns selections are used to set the user preferences properties of each of...

Page 332: ...ollowing User Preferences Exception Colors window will appear To define colors for exception colors click on the button on the desired color column and select a color from the Pick A Color palette To...

Page 333: ...e from the employee while red indicates the punches have been performed by a supervisor Miscellaneous Colors Menu Selection Web The Miscellaneous Colors submenu is used to change the colors for items...

Page 334: ...AM is the default When 8 is entered it will be taken as 8 00 AM If 8 o clock PM is intended the 8 must be followed by a P or 8P When you have finished click on the Save button in the toolbar to save...

Page 335: ...e finished click on the Save button in the toolbar to save your changes Schedule Override Overriding a schedule consists of changing an employee s schedule for a given day within another existing sche...

Page 336: ...ab of the Pay Class module you must place a check in the corresponding overtime column B Sch A Sch or U Sch for the employee to be awarded overtime hours see the figure Authorizing Payroll Export To a...

Page 337: ...inition Main Application Tree view Zone Qualification definition Main Application Tree view Zone Award definition Main Application Tree view Note Due to the complexity of the Zone Differential rules A...

Page 338: ...e in a day that an employee can work to receive premium pay Zone Codes are assigned to Zone Differentials To create a Zone Code perform the following To create Zone Codes 1 Click on the Zone Different...

Page 339: ...e in the name field required field 5 Enter a description of the rule in the Description field 6 Click on the Settings tab and the following settings view will appear 7 Click on the Add button to add a...

Page 340: ...n Schedule start before Schedule start before Schedule start after Schedule start after Schedule end before Schedule end before Schedule end after Schedule end after First In punch after zone start La...

Page 341: ...eated To delete a Qualification Rule click on the Remove button To move a Qualification Rule up in the sequence select the desired line and click on the Move Up button To move a Qualification Rule dow...

Page 342: ...chedule Hours worked before scheduled Within Schedule Hours worked in schedule After Schedule Hours worked after schedule Schedule Use this to setup award for schedule Zone Use zone window to award ho...

Page 343: ...n in the Pay Code Selection column to select the Pay Code hours to count towards the Zone Award Assign Pay Code Select either Single Pay Code or Pay Code Mapping Labor Level Filter Select either All o...

Page 344: ...rential in the Description field 5 The Assigned Day field is read only and set in the Day s of the Week Holiday field of the Settings tab To do so click on the Settings tab and the following type of s...

Page 345: ...ppear a Select a Qualification from the Qualification list and click on the Add button The choices are Work Hour Before Schedule Within Schedule After Schedule Schedule and Zone A row will appear in t...

Page 346: ...Rule select the desired rule from the list and click on the Remove button d Click on the button to save your settings and return to the Zone Qualifications window To exit without saving click on the b...

Page 347: ...OS 2 ADP PC Payroll for Windows 3 CBS 4 Excel 5 GevityHR 6 Paycheck Paylink 7 Paycheck Preview 8 Payday 9 Peachtree 10 Ceridian Power Pay 11 EasyPay 12 PayWeb 13 QuickBooks file export Integration 1 A...

Page 348: ...Paymate Platinum 44 Creative Solutions 45 MAS 90 v4 1 0 46 Paragon Note Due to the complexity of the Payroll Interface Profile creation Amano recommends using Support to assist in defining your Payro...

Page 349: ...ommunicate regardless of location and system Standards based The IM system uses an open standards based protocol to communicate allowing easy integration into existing environment and systems This mod...

Page 350: ...n double click on it to display properties Step 4 On the Properties screen under Startup type select Automatic from the dropdown menu and click on the Apply button Step 5 With Escalation Services TG o...

Page 351: ...sence notification by Threshold Company Escalation frequency in minutes is set on the Company Global Settings Tab screen for event notification see figure Employee IM password is set on the Employees...

Page 352: ...3 In the Name field enter a name for the IM Profile required field 4 Enter a brief description of the IM Profile in the Description field 5 In the Notification type field select either Both Jive Mess...

Page 353: ...ected Exceptions are generated To select an Exception highlight the desired Exception in the Available list and click on the Add button To select all Exceptions from the Available list click on the Ad...

Page 354: ...from the IM Profile highlight the desired employee in the Selected list and click on the Remove button To remove all the listed employees click on the Remove All button Employees can be sorted by Emp...

Page 355: ...Auto Process Module and Company Module Global and Notification Settings 13 From the IM profile screen click on the To button to use the Address Book and select recipients from the dropdown choices of...

Page 356: ...Events Notification Module 2 Select English then click continue 3 Change the Domain to the server s IP Address as seen below then click Continue 4 In the Data source Settings screen select Embedded Da...

Page 357: ...he Admin or computer that the Jive Messenger Server is installed on New Password Enter a new password for admin account If you do not want to change the password for the admin user click Skip This Ste...

Page 358: ...rom the Start Menu or your Desktop from the Time Guardian folder and the following screen will appear 2 Enter in the Username and Password you wish to login as Click Save Password if you want to save...

Page 359: ...tton in the lower left hand corner and select Profile Edit Account from the menu 3 The Profile Editor screen will appear 4 Enter the changes to the Profile and click Save 5 Restart the IM Client and l...

Page 360: ...20 12 Time Guardian Series Events Notification Module 7 In the Data source Settings screen select Embedded Database and click Continue...

Page 361: ...es added from the activation of this module include Company Benefit tracking Type De Accrual or Import Balances Employee configuration Employee Manual Balance Adjustment Employee Balance display Emplo...

Page 362: ...ct a Pay Code from the dropdown list The choices are all non work hours type Pay Codes SCK VAC PER HOL JURY and BRV To adjust the benefit time for an employee click on the Add button Setup Company Set...

Page 363: ...ll Supervisor Group could be the only group allowed to see Wages The Time Attendance software sections affected and or features added from the activation of this module include Software Feature Softwa...

Page 364: ...ime Schedule Rotation Zone Differential Daily Overtime Individual Schedule Qualification Rules Shift Overtime Daily Rules Labor Levels Range Overtime Shifts Using the User Group Module The User Group...

Page 365: ...can be accomplished by entering characters in a case sensitive field located to the right of the dropdown list see above illustration Click in the column headings anywhere to further sort both columns...

Page 366: ...s for the Group the corresponding buttons and will be disabled when a user assigned to the Group is using the software Modules can be removed from the Group by selecting them in the Selected list and...

Page 367: ...access to the Wages tab in Employees Module Write Rates When checked the user will have write access to the Rates modules THIS MUST BE CHECKED to have access to the Wages tab in Employees Module Adva...

Page 368: ...oup click on the Employee tab select the employee and click on the button The Employee Filter window will appear The Employee filter is deeper as it acts upon the other filter from the Department Labo...

Page 369: ...while the Criteria field above the Selected list filters that list Each list is filtered independently in ascending order Also employees can be filtered by checking the Show Active Employees Only box...

Page 370: ...nsitive characters in dedicated Criteria fields see illustration The Criteria field located above the Available list filters only that list while the Criteria field above the Selected list filters tha...

Page 371: ...ep 1 Insert the Nexus Lite Management CD into your CD ROM drive and the CD Menu will automatically launch If the installation stalls browse on CD to Disk1 InstData Windows VM install exe Step 2 After...

Page 372: ...OM drive The software program should automatically launch the Nexus Lite Management CD Menu see figure 2 Click the Install button and the software program should automatically launch the InstallAnywhe...

Page 373: ...If Server was selected as an installation option you will be prompted to enter the IP Address of the Nexus Lite Management Software Server Enter the IP Address and click on the Next button If you did...

Page 374: ...stalled Note You must purchase Microsoft SQL separately have it already installed and properly configured 9 If Microsoft SQL was selected as a database option you will be prompted to enter the SQL Ser...

Page 375: ...is complete and the installation utility will scan your PC for Adobe Acrobat Reader If it is not installed the installation utility will install it 13 The Firebird Database Server will be installed 1...

Page 376: ...ASA procedure the following error message will appear At this point you have a trial period of up to 14 days to use the software Click the OK button to launch the software and continue using the Nexus...

Page 377: ...user through a seamless step by step initial configuration of the Nexus Lite Management NLM software As data is entered in each step the Setup Wizard can be sequentially advanced to complete the next...

Page 378: ...e you must review your setup verifying that all mandatory fields in red have been completed When all required fields are complete the Wizard Complete button will then be displayed Should you have any...

Page 379: ...e Zip Code Country and Telephone Number of the company 2 After completing the entry of company information click on the Apply button to save the company information and return to the Step 1 General Se...

Page 380: ...Lite backup bak file to be imported Click on the Employee Import button and the Import window see figure will appear on the General tab Note This feature is capable of importing Access Groups created...

Page 381: ...save the Import information and return to the Step 2 Employee Setup Click on the Close button close the Import window without saving Do you want to configure Access Group s Answer Yes to this question...

Page 382: ...k Yes for this question and press the Employee button if you want to enter employees The Employees module see figure of the Nexus Lite Management NLM software allows you to have up to one hundred 100...

Page 383: ...e i e may be a seasonal employee Employees Personal Use Personal tab as Human Resources function to record the following employee personal information Gender Male or Female Birth Date use calendar to...

Page 384: ...xample Employees Assignments Use Assignments tab to Assign each employee to Time Zone Assigns the time zone of the location that the employee works in Pay Class Grayed out and not used Daily Rule Gray...

Page 385: ...ample all visitors could have an Expiry Date of only one day Enter a unique description if desired for the Custom Field Each employee could have up to 3 tags assigned to them Click on Tag 1 through Ta...

Page 386: ...exus Lite controller s and reader s You may need to obtain the IP address for each Ethernet Nexus Lite connected to the system Step 3 Terminal Setup is optional use this step only if The company wants...

Page 387: ...ng yellow required field 2 In the Description field enter in a brief description for the Terminal Validation 3 The Department tab is not used and grayed out 4 Click on the Employees tab to filter empl...

Page 388: ...ll appear see figure Answer Yes to this question if you are using Nexus Lite terminals Ethernet connection Before a Location can be created a Terminal Validation must be set You must create a Location...

Page 389: ...er the IP Address and Port default port 10 005 Obtain the correct IP address from your network administrator or alternatively please consult the appropriate terminal manual to perform terminal diagnos...

Page 390: ...access See the Web Interface Quick Start Guide for more details 12 Click on the Terminals tab to add edit or delete terminals 13 Click on the Add button to add the Nexus Lite Terminal to the Location...

Page 391: ...try selection of information for Step 3 Terminal Setup click on the Next button to advance to Step 4 Login Setup Step 4 Login Setup NLM Required Please create your personal login The Login Setup allow...

Page 392: ...On When checked the password will expire on a given date When the date arrives a check will automatically be placed in the disabled option Read Rates Not used in NLM Write Rates Not used in NLM Advan...

Page 393: ...r this date the user will be prompted to enter a new password Cannot change password The users will not be able to change their password 7 Click on the Employees tab to filter employees 8 To filter ad...

Page 394: ...the Nexus Lite Management NLM login screen The Time settings and other configuration data will now be populated in the software Note Employees can be entered during the initial setup process or any ti...

Page 395: ...on Report Communications Module NLM From the NLM Tree View click on Communications module within the Daily Activities group and the following type of screen will appear Locations are selected by click...

Page 396: ...such as IP Address and Port Note The command is not used and will be grayed out To select a specific Nexus Lite terminal within a location double click on the desired location row and the following Co...

Page 397: ...hidden Reports will be resized to fit large data fields such as Badge Number Employee Number Employee Name and Labor Names Reports are generated from Report Profiles which are created in the Reports m...

Page 398: ...e the report in an Excel worksheet 7 Click on the Date Range tab See the following illustration for an example 8 In the Date Selection field select the date range for the report The choices are Today...

Page 399: ...on for an example 14 The Available column lists the sorting criteria reports They are Date Device IP Name and Tag Code Employees are selected by using the dropdown list in each of the corresponding so...

Page 400: ...Type in the Available list and click on the Add button To add all Event Types to the report click on the Add All button To remove an Event Type from the report highlight the desired Event Type in the...

Page 401: ...and click on the Run Report button The report will be generated and displayed on screen if Adobe Acrobat PDF Output format was selected see Figure below If Excel Output was selected the report will be...

Page 402: ...rator privilege 1 Login into Nexus Lite Management NLM using your username password 2 Click on Users in Tree View Setup Users 3 Click on the New button to create a new user A new dialog will open 4 Ty...

Page 403: ...ftware Advanced Settings Allows the user to set a specific Day Change Time and Override After Midnight The Day Change Time set in the software occurs on or after midnight Example a Day Change Time of...

Page 404: ...employee a monetary award for a given day By Actual Time Displays actual punch times in the editing screen By Rounded Time Displays Rounded punches configured by the pay policy in the editing screen C...

Page 405: ...only DOB Abbreviation used for Date of Birth Dollar Pay Codes Used to assign Tips and Bonuses in the system Door One of two types of relay schedules Door is used to assign the duration of time when ac...

Page 406: ...e first date that an employee begins working for an employer Historical Report This report displays all historical data for an employee for a given length of time including absence exception and pay c...

Page 407: ...lish communication Late In LI An exception used to identify late IN punches for an employee Long Meal LM An exception used to identify a long meal by an employee Late Out LO An exception used to ident...

Page 408: ...dicating that the punch occurred after midnight and is applied to the Next day No Schedule Indicates that no specific schedule has been assigned to an employee Not Scheduled NS An exception used to id...

Page 409: ...ry standards are weekly bi weekly semi monthly and monthly Payroll Interface Payroll software packages that the Time and Attendance software can automatically interact with Personal Part of the employ...

Page 410: ...one schedule can be assigned per terminal Report A format for presenting employee and system information to the user in a predefined format Rounding A formula used to adjust employees punched time bas...

Page 411: ...inal Number List A listing of all terminals currently available in the Time and Attendance software Used to assign Relay Schedules Time Display The format used to display time either AM PM or Military...

Page 412: ...ll automatically process undefined data Unit Identifies how an hour will be divided into smaller pieces for rounding purposes Vacation The Pay Code used for scheduled time off Wages An assigned dollar...

Page 413: ......

Page 414: ...AMX 406700 Rev6 Copyright 2011 Amano Cincinnati Inc 6 11 www amano com time...

Reviews: