USO
RESTRITO
Procedure for Basic Transition Operation
97
c
ti
o
n
and
T
ra
n
s
itio
n
s
To change the keys and background presets in
Setup menus simultaneously:
Press the [ALL]
button.
To allocate a particular next transition button to the
[ALL] button function, see “Setting the Operation
Mode of the [ALL] Button in the Transition Control
Block” in Chapter 19 (Volume 2).
3
For the transition to change the key priority, set the
priority for after the transition.
When using keys 1 to 8, see “Priority Setting for Keys
1 to 8” (page 101). For details of the key priority
setting operation, see “Key Priority Setting” (page
98).
4
Select the new video used for the transition.
•
In the background B row of cross-point buttons,
select the new background video.
•
When inserting a key, select the key signal, and
make any required settings.
For details of key settings, see Chapter 4 “Keys”
(page 123).
To carry out a cut transition, skip to step
7
; otherwise
continue to step
5
.
5
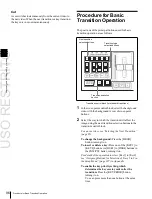
Select one of the transition type selection buttons in
the transition control block.
To carry out a dissolve to the new video:
Press one
of the [MIX], [NAM], [SUPER MIX], and [PST
COLOR MIX] buttons, turning it on.
To carry out a wipe:
Press the [WIPE] or [DME]
button, turning it on.
To carry out a transition while playing back a
frame memory clip:
Press one of the buttons
corresponding to the clip to be used
(FM1&2CLIP, FM3&4CLIP, FM5&6CLIP, and
FM7&8CLIP).
You can also use the Misc >Transition menu to select
a desired transition type for the M/E or PGM/PST
bank.
See “Selecting the Transition Type by a Menu
For an overview, see “Transition Types” (page 95).
Notes
The transition type selection buttons in the transition
control block can be interchanged in the setup menu.
For details, see “Overall Control Panel Settings
(Config Menu)” in Chapter 19 (Volume 2).
6
Make the required settings, according to the selected
transition type.
For details of the settings, see the relevant section.
Super mix:
“Super Mix Settings” (page 102)
Preset color mix:
“Color Matte Settings” (page 103)
Wipe:
“Basic Procedure for Wipe Settings” (page
DME wipe:
Clip transition:
“Clip Transition Operations” (page
Using the transition preview function
you can check the transition on the preview monitor.
7
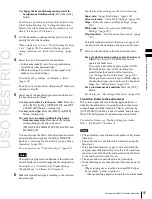
Carry out the transition in the transition execution
section.
For a gradual transition such as a mix (dissolve) or
wipe:
Press the [AUTO TRANS] button, or
operate the fader lever.
To execute a transition by pressing the [AUTO
TRANS] button, first set the transition rate
(specified as the duration of the transition).
See “Setting the Transition Rate” (page 105).
When you have selected a wipe or DME wipe as
the transition type, you can also set the transition
range.
See “Pattern Limit” (page 107).
For an instantaneous transition:
Press the [CUT]
button.
For details, see “Executing a Transition” (page 105).
Transition linked to the audio mixer
If the video signal selected in the background B row is
linked to the audio mixer in setup, then the audio mixer
sound changes with the transition. That is, pressing the
[AUTO TRANS] button gives a cross fade, and pressing
the [CUT] button gives an instantaneous sound switch.
For details of setup, see “Making Settings for Audio
Mixer” in Chapter 19 (Volume 2).
Notes
•
The audio mixer is not linked to a snapshot or key frame
transition.
•
The audio mixer is not linked to a transition using the
fader lever.
•
If the bus-fixed mode
is selected in the
setup menu, and the fader lever is in the lowest position,
there is a cross fade from the audio selected on the B row
to the audio selected on the A row.
•
The audio mixer is not linked to a key transition.
•
In the following cases, the audio and video may be out of
sync.
-
When carrying out a cross fade in some DME wipes
(for example, “picture in picture”)
-
When executing a preset color mix in two-stroke mode
Содержание MVS-8000X SystemMVS-7000X System
Страница 358: ...USO RESTRITO 358 Wipe Pattern List Appendix Volume 1 Enhanced Wipes Rotary Wipes ...
Страница 360: ...USO RESTRITO Random Diamond DustWipes 360 1 w pe PaternLO ...
Страница 362: ...USO RESTRITO 362 DME Wipe Pattern List Appendix Volume 1 Door 2D trans 3D trans ...
Страница 363: ...USO RESTRITO DME Wipe Pattern List 363 Appendix Volume 1 Flip tumble Frame in out Picture in picture ...
Страница 364: ...USO RESTRITO 364 DME Wipe Pattern List Appendix Volume 1 Page turn Page roll ...
Страница 365: ...USO RESTRITO DME Wipe Pattern List 365 Appendix Volume 1 Mirror Sphere Character trail Wave Ripple Split slide ...
Страница 367: ...USO RESTRITO DME Wipe Pattern List 367 Appendix Volume 1 Squeeze 3D trans Picture in picture Page turn ...
Страница 376: ...USO RESTRITO 376 Menu Tree Appendix Volume 1 Frame Memory Menu FRAME MEM button Color Bkgd Menu COLOR BKGD button ...
Страница 377: ...USO RESTRITO Menu Tree 377 Appendix Volume 1 AUX Menu AUX button CCR Menu CCR button ...
Страница 379: ...USO RESTRITO Menu Tree 379 Appendix Volume 1 DME Menu DME button ...
Страница 380: ...USO RESTRITO 380 Menu Tree Appendix Volume 1 Global Effect Menu GLB EFF button Router Menu Device Menu DEV button ...
Страница 381: ...USO RESTRITO Menu Tree 381 Appendix Volume 1 Macro Menu MCRO button ...
Страница 382: ...USO RESTRITO 382 Menu Tree Appendix Volume 1 Key Frame Menu KEY FRAME button ...
Страница 383: ...USO RESTRITO Menu Tree 383 Appendix Volume 1 Effect Menu EFF button ...
Страница 384: ...USO RESTRITO 384 Menu Tree Appendix Volume 1 Snapshot Menu SNAPSHOT button ...
Страница 385: ...USO RESTRITO Menu Tree 385 Appendix Volume 1 Shotbox Menu SHOTBOX button ...
Страница 386: ...USO RESTRITO 386 Menu Tree Appendix Volume 1 File Menu FILE button ...
Страница 388: ...USO RESTRITO 388 Menu Tree Appendix Volume 1 ENG SETUP button to previous page topages after 390 to next page ...
Страница 389: ...USO RESTRITO Menu Tree 389 Appendix Volume 1 ENG SETUP button to page 387 to previous pages to following pages ...
Страница 390: ...USO RESTRITO 390 Menu Tree Appendix Volume 1 ENG SETUP button to previous pages to next page a MVS 7000X only ...
Страница 391: ...USO RESTRITO Menu Tree 391 Appendix Volume 1 ENG SETUP button to previous pages ...
Страница 392: ...USO RESTRITO 392 Menu Tree Appendix Volume 1 User Setup Menu USER SETUP button Diagnostic Menu DIAG button ...
Страница 413: ...USO RESTRITO MVS 8000X System MVS 7000X System SY 4 470 637 01 1 Sony Corporation 2013 ...
Страница 706: ...USO RESTRITO MVS 8000X System MVS 7000X System SY 4 470 637 01 1 Sony Corporation 2013 ...


