USO
RESTRITO
168
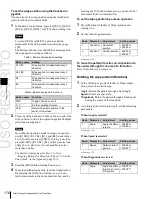
Basic Procedure for Wipe Settings
Knob
Parameter
Adjustment
Setting values
1
Width
Border width
0.00 to 100.00
Knob
Parameter
Adjustment
Setting values
1
Soft
Edge softness
0.00 to 100.00
Knob
Parameter
Adjustment
Setting values
1
Width
Border width
0.00 to 100.00
2
Inner Soft
Border inner
softness
0.00 to 100.00
3
Outer Soft
Border outer
softness
0.00 to 100.00
Knob
Parameter
Adjustment
Setting values
1
Size
Pattern size
0.00 to 100.00
Ch
a
p
te
r 5
W
ip
e
s
Border:
border
Soft:
soft edge
Soft Border:
soft border
3
Set the parameters according to the selection in step
2
.
When border is selected
When soft edge is selected
When soft border is selected
4
When you selected border or soft border, select the
edge fill signal in the <Edge Fill> group.
Utility 2 Bus:
signal selected on the utility 2 bus
Matte:
signal from the dedicated color matte
generator
5
Depending on the operation in step
4
, carry out the
following operation.
When ‘Utility 2 Bus’ is selected:
Hold down the
[UTIL] button in the cross-point control block,
and select the signal on the background B bus.
While the [UTIL] button is held down, the
background B bus changes to the utility 2 bus.
Notes
To enable the [UTIL] button, its operation mode
must be set to [Hold] beforehand.
For details, see “Setting the Button Operation
Mode” in Chapter 19 (Volume 2).
When ‘Matte’ is selected:
In the same Edge/
Direction menu, press [Matte Adjust] to display
the Matte Adjust menu, then adjust the single-
color or two-color combination color matte. Select
whether to use a single-color matte or a two-color
combination in the <Edge Matte> group.
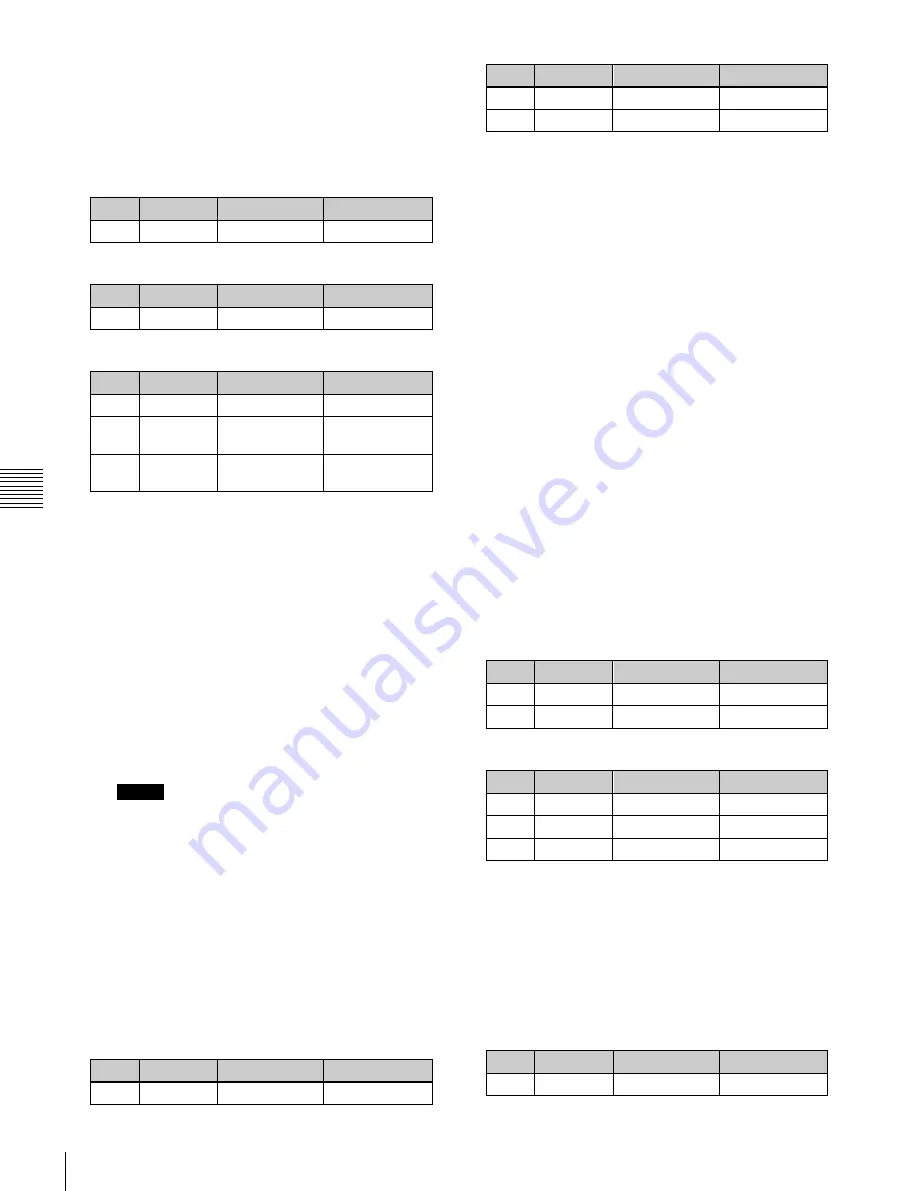
Flat Color:
Adjust color 1 with the following
parameters.
Knob
Parameter
Adjustment
Setting values
2
Saturation
Saturation
0.00 to 100.00
3
Hue
Hue
359.99 to 0.00
When you select [Mix Color] for a two-color
combination, see the next paragraph.
Carrying out a color mix for the edge fill
matte
When you selected [Matte] for the border or soft border
edge fill, you can combine color 1 and color 2.
For the combination, you can use not only a normal wipe
generator pattern, but also the dedicated color mix pattern.
1
In the <Edge Fill> group of the Edge/Direction menu,
select [Matte], and press [Matte Adjust].
The Matte Adjust menu appears.
2
In the <Edge Matte> group, select [Mix Color],
turning it on.
3
In the <Mix Pattern> group, make one of the following
selections.
Wipe:
Use the wipe pattern selected for the transition.
Pattern:
Use the dedicated pattern.
4
Depending on the selection in step
3
, set the following
parameters.
When Wipe is selected
Knob
Parameter
Adjustment
Setting values
1
Size
Pattern size
0.00 to 100.00
2
Soft
Edge softness
0.00 to 100.00
When Pattern is selected
Knob
Parameter
Adjustment
Setting values
1
Size
Pattern size
0.00 to 100.00
2
Soft
Edge softness
0.00 to 100.00
3
Pattern
Pattern number 1 to 24
a)
a)
The patterns are the same as for a standard wipe.
List” (page 357) in Appendix
.
If you selected Pattern, you can also carry out the
pattern selection by pressing [Mix Pattern Select] in
the Matte Adjust menu, to display the Mix Ptn Select
menu. Select any pattern appearing in the Mix Ptn
Select menu (wipe patterns 1 to 24) by pressing the
appropriate button, and you can then adjust the
following parameters.
Knob
Parameter
Adjustment
Setting values
1
Luminance Luminance
0.00 to 100.00
Содержание MVS-8000X SystemMVS-7000X System
Страница 358: ...USO RESTRITO 358 Wipe Pattern List Appendix Volume 1 Enhanced Wipes Rotary Wipes ...
Страница 360: ...USO RESTRITO Random Diamond DustWipes 360 1 w pe PaternLO ...
Страница 362: ...USO RESTRITO 362 DME Wipe Pattern List Appendix Volume 1 Door 2D trans 3D trans ...
Страница 363: ...USO RESTRITO DME Wipe Pattern List 363 Appendix Volume 1 Flip tumble Frame in out Picture in picture ...
Страница 364: ...USO RESTRITO 364 DME Wipe Pattern List Appendix Volume 1 Page turn Page roll ...
Страница 365: ...USO RESTRITO DME Wipe Pattern List 365 Appendix Volume 1 Mirror Sphere Character trail Wave Ripple Split slide ...
Страница 367: ...USO RESTRITO DME Wipe Pattern List 367 Appendix Volume 1 Squeeze 3D trans Picture in picture Page turn ...
Страница 376: ...USO RESTRITO 376 Menu Tree Appendix Volume 1 Frame Memory Menu FRAME MEM button Color Bkgd Menu COLOR BKGD button ...
Страница 377: ...USO RESTRITO Menu Tree 377 Appendix Volume 1 AUX Menu AUX button CCR Menu CCR button ...
Страница 379: ...USO RESTRITO Menu Tree 379 Appendix Volume 1 DME Menu DME button ...
Страница 380: ...USO RESTRITO 380 Menu Tree Appendix Volume 1 Global Effect Menu GLB EFF button Router Menu Device Menu DEV button ...
Страница 381: ...USO RESTRITO Menu Tree 381 Appendix Volume 1 Macro Menu MCRO button ...
Страница 382: ...USO RESTRITO 382 Menu Tree Appendix Volume 1 Key Frame Menu KEY FRAME button ...
Страница 383: ...USO RESTRITO Menu Tree 383 Appendix Volume 1 Effect Menu EFF button ...
Страница 384: ...USO RESTRITO 384 Menu Tree Appendix Volume 1 Snapshot Menu SNAPSHOT button ...
Страница 385: ...USO RESTRITO Menu Tree 385 Appendix Volume 1 Shotbox Menu SHOTBOX button ...
Страница 386: ...USO RESTRITO 386 Menu Tree Appendix Volume 1 File Menu FILE button ...
Страница 388: ...USO RESTRITO 388 Menu Tree Appendix Volume 1 ENG SETUP button to previous page topages after 390 to next page ...
Страница 389: ...USO RESTRITO Menu Tree 389 Appendix Volume 1 ENG SETUP button to page 387 to previous pages to following pages ...
Страница 390: ...USO RESTRITO 390 Menu Tree Appendix Volume 1 ENG SETUP button to previous pages to next page a MVS 7000X only ...
Страница 391: ...USO RESTRITO Menu Tree 391 Appendix Volume 1 ENG SETUP button to previous pages ...
Страница 392: ...USO RESTRITO 392 Menu Tree Appendix Volume 1 User Setup Menu USER SETUP button Diagnostic Menu DIAG button ...
Страница 413: ...USO RESTRITO MVS 8000X System MVS 7000X System SY 4 470 637 01 1 Sony Corporation 2013 ...
Страница 706: ...USO RESTRITO MVS 8000X System MVS 7000X System SY 4 470 637 01 1 Sony Corporation 2013 ...


