USO
RESTRITO
Control of VTRs, Extended VTRs, and Disk Recorders
431
Ch
a
p
te
r 12
E
x
te
rn
a
l De
v
ic
e
s
7
Press [Enter].
The new start point setting is reflected in the status
area.
8
To set the stop point, in the <Stop TC> group press
[Set].
A timecode window appears.
If you do not want to set the stop point, skip to step
11
.
9
Set the stop point as a timecode value.
10
Press [Enter].
The new stop point setting is reflected in the status
area.
11
To set the variable speed, in the <Variable Speed>
group, carry out either of the following.
•
Press [Fit].
Without setting a speed value, this automatically
carries out playback according to automatically
calculated values for the duration and keyframe
duration to fit the set start point and stop point.
•
Press [Set], and adjust the parameter with the knob.
Knob
Parameter
Setting
Setting values
2
Variable
Variable speed –100 to +200
a)
a) The setting range of the variable speed depends on the type of
connected device.
The new variable speed setting is reflected in the status
area.
Repeat steps
2
to
11
as required for other devices.
To carry out start point and stop point settings
and cueing up operations in the device control
block
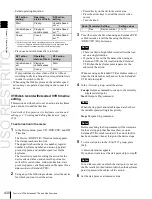
With the following buttons in the device control block, you
can set the start point or stop point of a keyframe point on
the timeline, or carry out a cueing up operation.
Notes
•
When using the device control block (trackball or
joystick), check that the [MENU] button in the block is
lit amber. If it is not lit, press it, turning it on.
•
When using the device control block (search dial), check
that [TIMELINE] is lit amber.
[START TC] button:
Set the start point of the keyframe
point to the current time.
[STOP TC] button:
Set the stop point of the keyframe
point to the current time.
[SET START TC] button (of the device control block
(search dial)):
Enable to input the timecode of the
start point of the keyframe point with the numeric
keypad control block.
[SET STOP TC] button (of the device control block
(search dial)):
Enable to input the timecode of the
stop point of the keyframe point with the numeric
keypad control block.
[SET DUR] button (of the device control block (search
dial)):
Enable to input the duration between the start
point and stop point of a keyframe point with the
numeric keypad control block.
[CUE] button:
Cue up to the start point set for the
keyframe point.
To display or check the settings, use the Device >DDR/
VTR >Timeline menu.
To test an action command output
To test an action command output, select the desired
device from the upper list in the status area, and press [Test
Fire].
An action command is output from the DCU 9-pin serial
port, according to the settings in the list.
To clear the start point, stop point, and variable
speed settings
1
In the upper list in the status area, select the device for
which you want to clear the settings.
2
Carry out any of the following operations as required.
•
To clear the start point setting, press [Clear] in the
<Start TC> group.
•
To clear the stop point setting, press [Clear] in the
<Stop TC> group.
•
To clear the variable speed setting, press [Clear] in
the <Variable Speed> group.
To set the action for a rewind operation
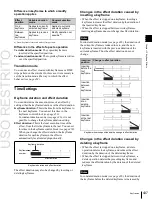
On the VTR/disk recorder/Extended VTR timeline, when
the [REWIND] button in the keyframe control block is
pressed the action set for the first keyframe is not executed;
when the [RUN] button is pressed, then the first keyframe
action is executed.
To execute an action when the [REWIND] button is
pressed, it is necessary to set this action (Rewind Action).
To carry out this setting, in the Device >DDR/VTR
>Timeline menu, press [Rewind Action] to recall the
Rewind Action menu. In this setting screen, use the same
setting method as in the screen for setting an action on the
VTR/disk recorder timeline.
Alternatively, you can select the reverse arrangement,
whereby when the [REWIND] button is pressed, this
executes the action set for the first keyframe, and when the
[RUN] button is pressed the first keyframe action is not
executed. In this case, the Rewind Action setting is still
valid.
For details of the setting, see “Setting the First Keyframe
When a Rewind is Executed” (page 603).
Содержание MVS-8000X SystemMVS-7000X System
Страница 358: ...USO RESTRITO 358 Wipe Pattern List Appendix Volume 1 Enhanced Wipes Rotary Wipes ...
Страница 360: ...USO RESTRITO Random Diamond DustWipes 360 1 w pe PaternLO ...
Страница 362: ...USO RESTRITO 362 DME Wipe Pattern List Appendix Volume 1 Door 2D trans 3D trans ...
Страница 363: ...USO RESTRITO DME Wipe Pattern List 363 Appendix Volume 1 Flip tumble Frame in out Picture in picture ...
Страница 364: ...USO RESTRITO 364 DME Wipe Pattern List Appendix Volume 1 Page turn Page roll ...
Страница 365: ...USO RESTRITO DME Wipe Pattern List 365 Appendix Volume 1 Mirror Sphere Character trail Wave Ripple Split slide ...
Страница 367: ...USO RESTRITO DME Wipe Pattern List 367 Appendix Volume 1 Squeeze 3D trans Picture in picture Page turn ...
Страница 376: ...USO RESTRITO 376 Menu Tree Appendix Volume 1 Frame Memory Menu FRAME MEM button Color Bkgd Menu COLOR BKGD button ...
Страница 377: ...USO RESTRITO Menu Tree 377 Appendix Volume 1 AUX Menu AUX button CCR Menu CCR button ...
Страница 379: ...USO RESTRITO Menu Tree 379 Appendix Volume 1 DME Menu DME button ...
Страница 380: ...USO RESTRITO 380 Menu Tree Appendix Volume 1 Global Effect Menu GLB EFF button Router Menu Device Menu DEV button ...
Страница 381: ...USO RESTRITO Menu Tree 381 Appendix Volume 1 Macro Menu MCRO button ...
Страница 382: ...USO RESTRITO 382 Menu Tree Appendix Volume 1 Key Frame Menu KEY FRAME button ...
Страница 383: ...USO RESTRITO Menu Tree 383 Appendix Volume 1 Effect Menu EFF button ...
Страница 384: ...USO RESTRITO 384 Menu Tree Appendix Volume 1 Snapshot Menu SNAPSHOT button ...
Страница 385: ...USO RESTRITO Menu Tree 385 Appendix Volume 1 Shotbox Menu SHOTBOX button ...
Страница 386: ...USO RESTRITO 386 Menu Tree Appendix Volume 1 File Menu FILE button ...
Страница 388: ...USO RESTRITO 388 Menu Tree Appendix Volume 1 ENG SETUP button to previous page topages after 390 to next page ...
Страница 389: ...USO RESTRITO Menu Tree 389 Appendix Volume 1 ENG SETUP button to page 387 to previous pages to following pages ...
Страница 390: ...USO RESTRITO 390 Menu Tree Appendix Volume 1 ENG SETUP button to previous pages to next page a MVS 7000X only ...
Страница 391: ...USO RESTRITO Menu Tree 391 Appendix Volume 1 ENG SETUP button to previous pages ...
Страница 392: ...USO RESTRITO 392 Menu Tree Appendix Volume 1 User Setup Menu USER SETUP button Diagnostic Menu DIAG button ...
Страница 413: ...USO RESTRITO MVS 8000X System MVS 7000X System SY 4 470 637 01 1 Sony Corporation 2013 ...
Страница 706: ...USO RESTRITO MVS 8000X System MVS 7000X System SY 4 470 637 01 1 Sony Corporation 2013 ...


