191
Macro Attachment Assigning
Chap
te
r 1
4
Ma
cr
os
macro mode and post-macro mode, assign the function to
the 1st row, and make the selection by pressing the button.
For macro-only mode, press the pre-macro and post-macro
selection buttons simultaneously to make a selection.
You can assign any one of the 250 macro registers to a
button.
For a button whose function is switched by delegation, you
can make a separate macro attachment for each function.
For each control panel, you can make up to 1000 macro
attachment settings.
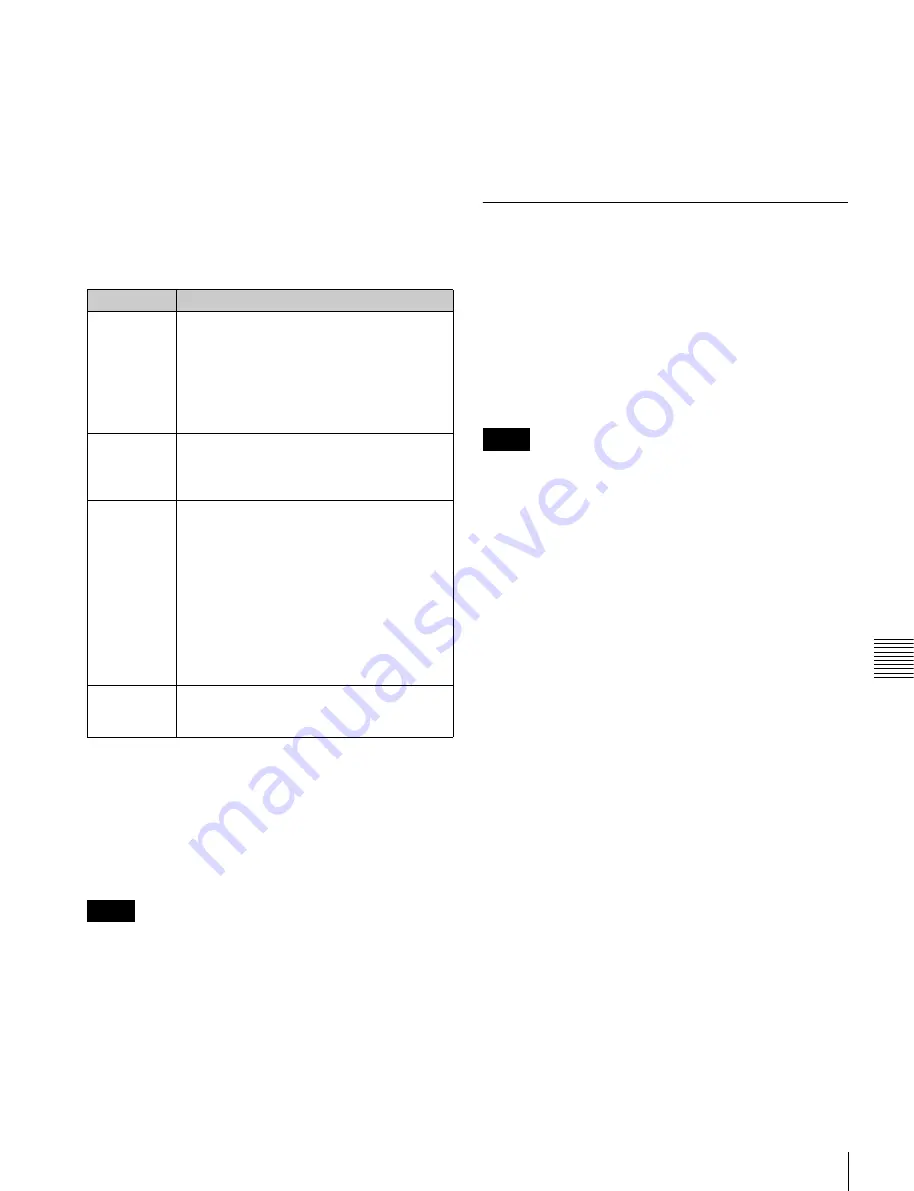
The macro attachment setting is possible for the following
bus buttons.
a) Shotbox recall, macro recall, some utility commands (Inhibit Set, Inhibit
All Clear, K-SS Store, and macro operating commands) cannot be set to
assigned buttons.
b) In the case of an event that inserts or deletes a key with an independent key
transition, the state (inserted or not inserted) prior to event registration is
also saved in the macro. When the macro is executed, the event is only
replayed if the key state matches the saved state. (Example: For a macro
with an event that inserts/deletes a key, when the macro is executed, if the
key was inserted it is deleted, but otherwise nothing occurs as concerns
keying.)
• After setting a macro attachment to a button for which
you can perform function replacement or function
assignment, if you change the function assignment to the
button, the macro attachment setting may disappear.
• After setting a macro attachment to a cross-point button
in the cross-point control block, if you change the
function assignment to the button, the macro attachment
setting disappears.
Enabling and disabling macro attachment
You can temporarily disable the macro attachment
settings. When a macro attachment is disabled, pressing
the button does not cause execution of the assigned macro.
You can enable and disable macro attachments for the
PGM/PST bank and M/E banks individually.
Setting and Canceling a Macro
Attachment
Setting a macro attachment to a button
This section describes an example of setting a macro
attachment to a background A row cross-point button.
For details about buttons that can have a macro
attachment,
“Setting a macro attachment to a button”
.
The [PRE MCRO] and [POST MCRO] functions must be
assigned to buttons in the 1st row of the cross-point control
block. The assignment is carried out in the Engineering
Setup >Panel >Operation >Key/AUX/Function Assign
menu (7326.13)
1
Recall the macro register (1 to 250) that you want to
assign to the button
2
To set in pre macro mode, hold down the [PRE
MCRO] button assigned to the 1st row in the cross-
point control block, and to set in post macro mode,
hold down the [POST MCRO] button, and then press
the desired button in the background A row.
The cross-point button you pressed flashes amber, and
the register you recalled in step
1
is assigned to the
button.
If you make both pre macro and post macro
settings for the same button
The later setting is valid.
To set a macro attachment without changing
cross-points
When you set a macro attachment to a cross-point button,
you can make the setting without changing the bus cross-
points. Carry out this selection in the Engineering Setup
>Panel >Operation >Macro menu (7326.6)
To make a macro attachment setting in macro
only mode
To make a macro attachment in macro only mode, use the
following procedure.
Block
Button
Cross-point
control block
• Background A row cross-point buttons
• Background B row cross-point buttons
• Cross-point buttons of the bus assigned to
the 2nd row.
• 2nd row buttons assigned by the utility/
shotbox function
a)
• Buttons set to “Inhibit”
Device
control block
Buttons assigned the function of the VTR/
disk recorder/frame memory operating mode
[PLAY], [CUE], [STOP], and [START TC]
buttons
Transition
control block
Fader and buttons assigned the following
functions
• Next transition selection
• Transition type selection
• Wipe direction selection
• Auto transition, cuts
• Device control (CUE, PLAY, STOP)
• Pattern limit On/Off
• Independent key transition type selection
• Independent key transition auto transition,
cuts
b)
Flexi Pad
[AUTO TRNS]
b)
, [KEY ON]
b)
, [RUN],
[REWIND], [NORM], [REV], and [NORM/
REV] buttons
Notes
Notes


