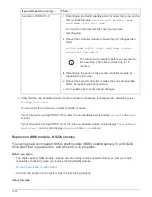
3. Remove the NSM module from the shelf:
a. Loop your index fingers through the finger holes of the latching mechanisms on either side of the NSM
module.
If you are removing the bottom NSM module, and if the bottom rail is obstructing access
to the latching mechanisms, place your index fingers through the finger holes from the
inside (by crossing your arms).
b. With your thumbs, press down and hold the orange tabs on top of the latching mechanisms.
The latching mechanisms raise, clearing the latching pins on the shelf.
c. Gently pull until the NSM module is about one third of the way out of the shelf, grasp the NSM module
sides with both hands to support its weight, and then place it on a flat stable surface.
When you begin pulling, the latching mechanism arms extend from the NSM module and lock in their
fully extended position.
4. Loosen the NSM module cover thumb screw and open the cover.
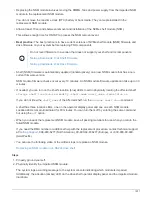
5. Physically locate the failed boot media.
The boot media is located along the shelf chassis wall opposite from the power supply. The boot media
attention (amber) LED, located on the board next to the boot media slot, is illuminated.
The LED remains illuminated for 10 minutes after you remove the NSM module from the
shelf.
6. Replace the boot media:
a. Using the Phillips #1 screwdriver, carefully remove the screw securing the bottom (notched) end of the
boot media to the board.
b. Remove the boot media by rotating the notched end up slightly and then gently pulling it towards you
until it releases from the socket.
You can hold the boot media by placing your thumb and forefinger on the side edges, at the notched
end.
c. Unpack the boot media from the antistatic bag.
d. Insert the replacement boot media by pushing it gently into the socket until it is seated squarely and
completely in the socket.
You can hold the boot media by placing your thumb and forefinger on the side edges, at the notched
end. Make sure that the side with the heat sink is facing up.
When correctly seated, and when you let go of the boot media, the notched end of the boot media is
angled up, away from the board, because it is not yet secured with the screw.
e. Gently hold down the notched end of the boot media as you insert and tighten the screw with the
screwdriver to secure the boot media in place.
Tighten the screw just enough to hold the boot media securely in place, but do not
overtighten.
1516
Содержание AFF A700
Страница 4: ...AFF and FAS System Documentation 1...
Страница 208: ...3 Close the controller module cover and tighten the thumbscrew 205...
Страница 248: ...2 Close the controller module cover and tighten the thumbscrew 245...
Страница 308: ...Power supply Cam handle release latch Power and Fault LEDs Cam handle 305...
Страница 381: ...Power supply Cam handle release latch Power and Fault LEDs Cam handle 378...
Страница 437: ...1 Locate the DIMMs on your controller module 434...
Страница 601: ...Cabling SAS shelves in FAS9000 AFF A700 and ASA AFF A700 ONTAP 9 8 and later Cabling SAS storage ONTAP 9 8 and later 598...
Страница 605: ...602...
Страница 1117: ...3 Close the controller module cover and tighten the thumbscrew 1114...
Страница 1157: ...2 Close the controller module cover and tighten the thumbscrew 1154...
Страница 1228: ...Power supply Cam handle release latch Power and Fault LEDs Cam handle 1225...
Страница 1300: ...Power supply Cam handle release latch Power and Fault LEDs Cam handle 1297...
Страница 1462: ...Installing SuperRail to round hole four post rack 1459...
Страница 1602: ...1599...
Страница 1630: ...1627...
Страница 1634: ...Orange ring on horizontal bracket Cable chain 1631...
Страница 1637: ...b Raise the drive handle to vertical c Use the handle to lift the drive from the drive drawer 1634...
Страница 1643: ...Callout Cable chain Connector Connects to Left Vertical Midplane Left Horizontal Drive drawer 1640...
Страница 1645: ...Guide rail 1642...
Страница 1648: ...Tab that you press to release the fan module handle 5 Use the fan module handle to pull the fan module out of the shelf 1645...
Страница 1669: ...Attention LED light on 1666...


