


Steps
1. If you are not already grounded, properly ground yourself.
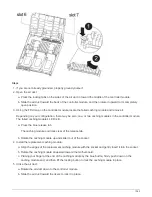
2. Open the air duct:
a. Press the locking tabs on the sides of the air duct in toward the middle of the controller module.
b. Slide the air duct toward the back of the controller module, and then rotate it upward to its completely
open position.
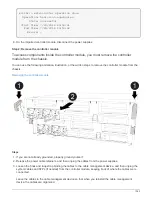
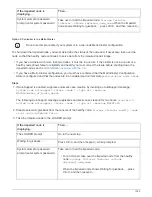
3. Using the FRU map on the controller module, locate the failed caching module and remove it:
Depending on your configuration, there may be zero, one, or two caching modules in the controller module.
The failed caching module’s LED is lit.
a. Press the blue release tab.
The caching module end rises clear of the release tab.
b. Rotate the caching module up and slide it out of the socket.
4. Install the replacement caching module:
a. Align the edges of the replacement caching module with the socket and gently insert it into the socket.
b. Rotate the caching module downward toward the motherboard.
c. Placing your finger at the end of the caching module by the blue button, firmly push down on the
caching module end, and then lift the locking button to lock the caching module in place.
5. Close the air duct:
a. Rotate the air duct down to the controller module.
b. Slide the air duct toward the risers to lock it in place.
1345
Содержание AFF A700
Страница 4: ...AFF and FAS System Documentation 1...
Страница 208: ...3 Close the controller module cover and tighten the thumbscrew 205...
Страница 248: ...2 Close the controller module cover and tighten the thumbscrew 245...
Страница 308: ...Power supply Cam handle release latch Power and Fault LEDs Cam handle 305...
Страница 381: ...Power supply Cam handle release latch Power and Fault LEDs Cam handle 378...
Страница 437: ...1 Locate the DIMMs on your controller module 434...
Страница 601: ...Cabling SAS shelves in FAS9000 AFF A700 and ASA AFF A700 ONTAP 9 8 and later Cabling SAS storage ONTAP 9 8 and later 598...
Страница 605: ...602...
Страница 1117: ...3 Close the controller module cover and tighten the thumbscrew 1114...
Страница 1157: ...2 Close the controller module cover and tighten the thumbscrew 1154...
Страница 1228: ...Power supply Cam handle release latch Power and Fault LEDs Cam handle 1225...
Страница 1300: ...Power supply Cam handle release latch Power and Fault LEDs Cam handle 1297...
Страница 1462: ...Installing SuperRail to round hole four post rack 1459...
Страница 1602: ...1599...
Страница 1630: ...1627...
Страница 1634: ...Orange ring on horizontal bracket Cable chain 1631...
Страница 1637: ...b Raise the drive handle to vertical c Use the handle to lift the drive from the drive drawer 1634...
Страница 1643: ...Callout Cable chain Connector Connects to Left Vertical Midplane Left Horizontal Drive drawer 1640...
Страница 1645: ...Guide rail 1642...
Страница 1648: ...Tab that you press to release the fan module handle 5 Use the fan module handle to pull the fan module out of the shelf 1645...
Страница 1669: ...Attention LED light on 1666...


