


5
F
C
10.
11.
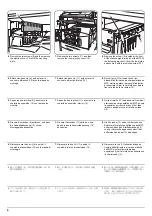
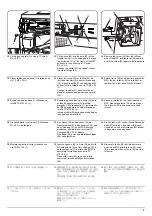
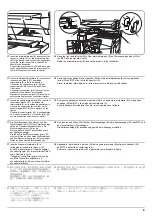
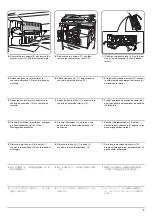
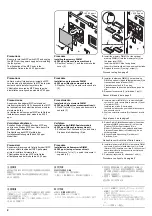
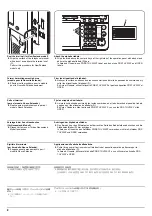
Attach the job separator tray (C) to the rail (17) of the job separator (A) by sliding it from the front
side.
Insert the fitting section (18) on the right side of the job separator tray (C) into the recessed
portion (19) of the MFP.
Put the hook (20) on the right side onto the pin (21) located inside the MFP.
10.
11.
Fixer le plateau du séparateur de travaux (C) au rail (17) du séparateur de travaux (A) en le
faisant glisser depuis l’avant.
Insérer la section de la garniture (18) sur le côté droit du séparateur de travaux (C) dans la partie
en retrait (19) du MFP.
Mettre le crochet (20) sur le côté droit sur la goupille (21) située dans le MFP.
10.
11.
Instale la bandeja del separador de trabajos (C) en el carril (17) del separador de trabajos (A)
deslizándolo por el lado delantero.
Inserte la sección de fijación (18) en el lado derecho de la bandeja del separador de trabajos (C)
en la parte entrada (19) del MFP.
Ponga el gancho (20) en el lado derecho del pasador (21) ubicado dentro del MFP.
10.
11.
Die Jobtrennerablage (C) von der Vorderseite auf die Schiene (17) des Jobtrenners (A)
schieben.
Die Passkante (18) auf der rechten Seite der Jobtrennerablage (C) in die Aussparung (19) des
MFP einführen.
Den Haken (20) auf der rechten Seite auf den Stift (21) im Inneren des MFP setzen.
10.
11.
Montate il vassoio del separatore (C) sulla rotaia (17) del separatore stesso, facendolo scorrere
dal lato frontale.
Inserite la sezione di montaggio (18) situata sul lato destro del vassoio del separatore (C) nella
posizione rientrante (19) dell’MFP.
Mettete il gancio (20) situato sul lato destro sul perno (21) che si trova all’interno dell’MFP.
10.
11.
ジョブセパレータ (A) のレール (17) にジョブセパレータ排出トレイ (C) を前側よりスライ
ドさせて取り付ける。
ジョブセパレータ排出トレイ (C) 右側の取付部 (18) を本体の凹部 (19) に挿入する。
右側面のフック (20) を MFP 本体内側のピン (21) の上に乗せる。
11.
将作业分离器托盘(C)从前侧滑动装入作业分离器(A)的导板(17)上。
将作业分离器出纸托盘(C)的右侧安装部(18)插入本体的凹部(19)。
将右侧的挂钩(20)放在 MFP 主机内侧的卡销(21)上。
A
17
C
21
20
19
18
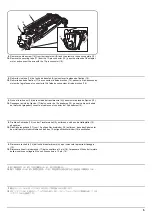
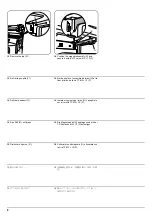
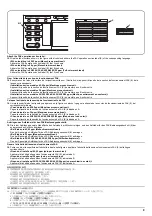
[Metric specifications only]
After using alcohol to clean the portion of the job
separator tray (C) shown in the figure, adhere
the eject stopper A3 (F) along the reference
lines.
[Pour spécifications métriques seulement]
Après avoir utilisé de l’alcool pour nettoyer le
plateau du séparateur de travaux (C) montré
dans la figure, faire adhérer la butée d’éjection
A3 (F) le long des lignes de référence.
[Sólo para las especificaciones métricas]
Después de utilizar alcohol para limpiar la parte
de la bandeja del separador de trabajos (C) que
aparece en la figura, pegue el tope de expulsión
de A3 (F) por las líneas de referencia.
[Nur metrische Spezifikationen]
Den in der Abbildung gezeigten Abschnitt der
Jobtrennerablage (C) mit Alkohol reinigen, dann
den Auswerfanschlag A3 (F) innerhalb der
Bezugslinien ankleben.
[Solo per le specifiche metriche]
Dopo avere usato l’alcol per pulire la parte del
vassoio del separatore (C) illustrata in figura,
fare aderire il fermo di espulsione A3 (F) lungo
le linee di riferimento.
[
センチ仕様のみ ]
ジョブセパレータ排出トレイ (C) の図の位置を
アルコール清掃後、排出ストッパ A3(F) を基準
に沿って貼り付ける
10.
[
仅限英寸规格产品
]
用酒精擦净作业分离器出纸托盘(C)
(图示位
置)后,沿着基准线贴上出纸挡块 A3(F)。
Содержание TASKalfa 420i
Страница 1: ...SERVICE MANUAL Published in May 2010 842KS113 2KSSM063 Rev 3 TASKalfa 420i TASKalfa 520i ...
Страница 4: ...This page is intentionally left blank ...
Страница 10: ...This page is intentionally left blank ...
Страница 14: ...2KR 2KS This page is intentionally left blank ...
Страница 224: ...2KR 2KS 1 4 66 This page is intentionally left blank ...
Страница 328: ...2KR 2KS 2 3 30 This page is intentionally left blank ...
Страница 371: ...INSTALLATION GUIDE FOR PAPER FEEDER ...
Страница 381: ...INSTALLATION GUIDE FOR 3000 SHEETS PAPER FEEDER ...
Страница 436: ...INSTALLATION GUIDE FOR CENTER FOLDING UNIT ...
Страница 450: ...INSTALLATION GUIDE FOR MAILBOX ...
Страница 458: ...INSTALLATION GUIDE FOR HOLE PUNCH UNIT ...
Страница 470: ...INSTALLATION GUIDE FOR BUILT IN FINISHER ...
Страница 483: ...INSTALLATION GUIDE FOR JOB SEPARATOR ...
Страница 491: ...INSTALLATION GUIDE FOR FAX System ...
Страница 507: ......
Страница 508: ......