6
E
7
6
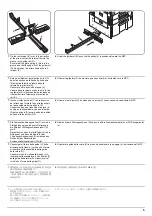
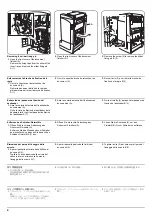
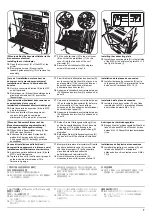
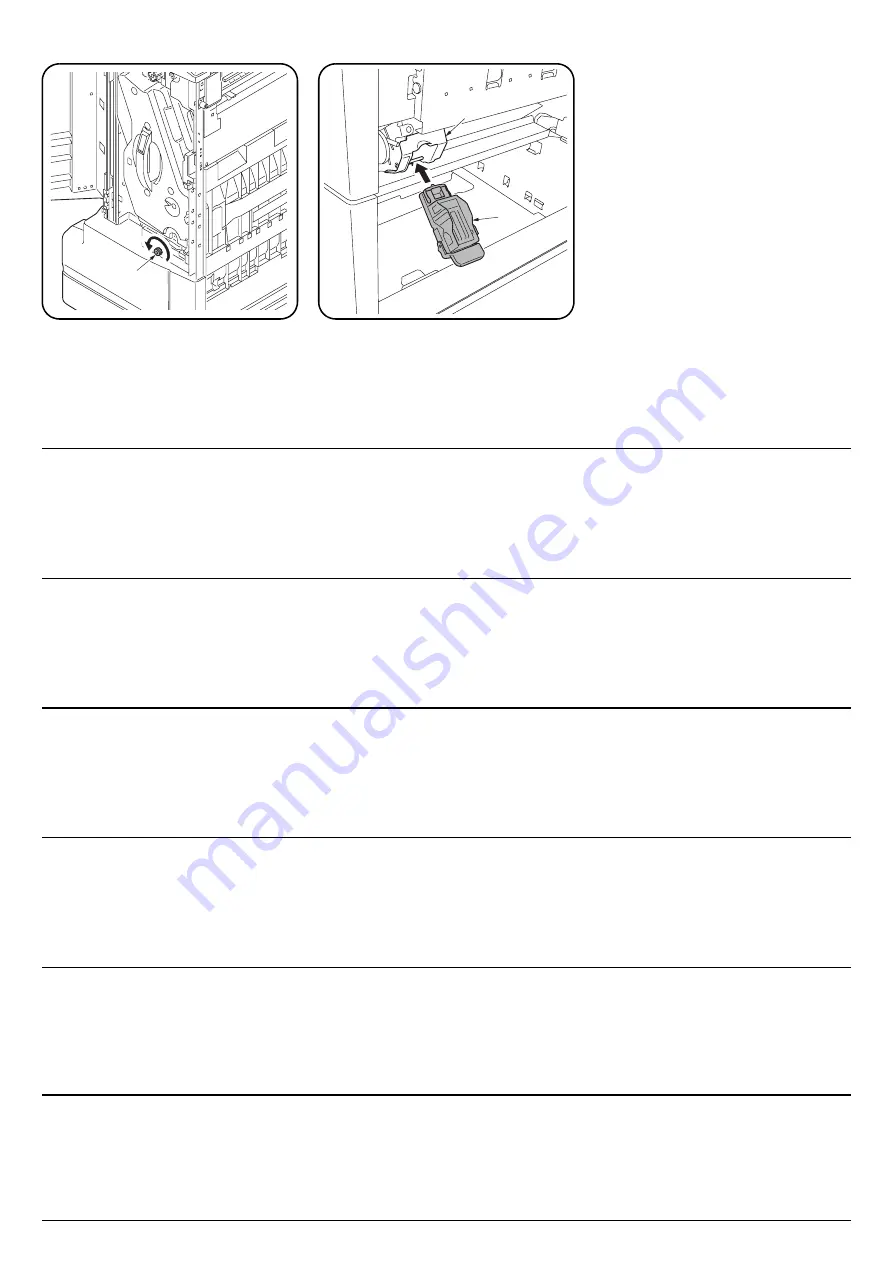
Removing the fixing pin
9.
Turn the fixing pin (6) counterclockwise to
remove it.
10.
Close the front cover of the document
finisher (A).
Installing the staple cartridge
11.
Remove the fixing tape from the staple
cartridge holder (7).
12.
Insert the staple cartridge (E) into the staple
cartridge holder (7).
13.
Close the right cover of the document
finisher (A).
14.
When using a full-color machine, move to
step 48 on page 14.
Enlèvement de la broche de fixation
9.
Faire tourner la broche de fixation (6) dans le
sens inverse des aiguilles d’une montre pour
la retirer.
10.
Refermer le capot avant du retoucheur de
document (A).
Installation de la cartouche d’agrafes
11.
Retirer la bande de fixation du porte-
cartouche d’agrafes (7).
12.
Insérer la cartouche d’agrafes (E) dans le
porte-cartouche d’agrafes (7).
13.
Refermer le capot de droite du retoucheur de
document (A).
14.
Lors de l'utilisation de la machine
entièrement en couleurs, passer à l'étape 48
de la page 14.
Extracción del pasador de fijación
9.
Gire el pasador de fijación (6) hacia la
izquierda para quitarlo.
10.
Cierre la cubierta delantera del finalizador de
documentos (A).
Instalación del cartucho de grapas
11.
Quite la cinta de fijación del portacartucho
de grapas (7).
12.
Inserte el cartucho de grapas (E) en el
portacartucho de grapas (7).
13.
Cierre la cubierta derecha del finalizador de
documentos (A).
14.
Cuando utilice una máquina a todo color,
vaya al paso 48 de la página 14.
Entfernen des Fixierstifts
9.
Drehen Sie den Fixierstift (6) gegen den
Uhrzeigersinn, um ihn zu entfernen.
10.
Schließen sie die vordere Abdeckung des
Dokument-Finishers (A).
Anbringen der Heftklammerkassette
11.
Ziehen Sie das Klebeband von der
Heftklammer-Kassettenhalterung (7) ab.
12.
Setzen Sie die Heftklammerkassette (E) in
die Kassettenhalterung (7) ein.
13.
Schließen Sie die rechte Abdeckung des
Dokument-Finishers (A).
14.
Bei Verwendung einer Vollfarbenmaschine
gehen Sie zu Schritt 48 auf Seite 14 weiter.
Rimozione del perno di fissaggio
9.
Per rimuovere il perno di fissaggio (6)
ruotarlo in senso antiorario.
10.
Chiudere il pannello anteriore della finitrice di
documenti (A).
Installazione della cartuccia pinzatrice
11.
Staccare il nastro adesivo dal contenitore
della cartuccia pinzatrice (7).
12.
Inserire la cartuccia pinzatrice (E) nel
contenitore (7).
13.
Chiudere il pannello destro della finitrice di
documenti (A).
14.
In caso si utilizzi un macchinario a colori,
procedere con il punto 48 a pagina 14.
拆下固定销
9.
逆时针旋转固定销(6),将其拆下。
10.
关闭装订器(A)的前盖板。
安装订书针盒
11.
从订书针盒支架(7)上拆下固定胶带。
12.
将订书针盒(E)插入订书针盒支架(7)。
13.
关闭装订器(A)的右盖板。
14.
全彩色机器时,请进入第 14 页的步骤 48.
固定ピンの取り外し
9.
固定ピン (6) を左に回して取り外す。
10.
ドキュメントフィニッシャ(A) の前カバーを
閉じる。
ステープルカートリッジの取り付け
11.
ステープルカートリッジホルダ (7) の固定
テープを剥がす。
12.
ステープルカートリッジホルダ (7) にス
テープルカートリッジ (E) を挿入する。
13.
ドキュメントフィニッシャ(A) の右カバーを
閉じる。
14.
フルカラー機の場合、14 ページ手順 48 へ進
む。
Содержание TASKalfa 420i
Страница 1: ...SERVICE MANUAL Published in May 2010 842KS113 2KSSM063 Rev 3 TASKalfa 420i TASKalfa 520i ...
Страница 4: ...This page is intentionally left blank ...
Страница 10: ...This page is intentionally left blank ...
Страница 14: ...2KR 2KS This page is intentionally left blank ...
Страница 224: ...2KR 2KS 1 4 66 This page is intentionally left blank ...
Страница 328: ...2KR 2KS 2 3 30 This page is intentionally left blank ...
Страница 371: ...INSTALLATION GUIDE FOR PAPER FEEDER ...
Страница 381: ...INSTALLATION GUIDE FOR 3000 SHEETS PAPER FEEDER ...
Страница 436: ...INSTALLATION GUIDE FOR CENTER FOLDING UNIT ...
Страница 450: ...INSTALLATION GUIDE FOR MAILBOX ...
Страница 458: ...INSTALLATION GUIDE FOR HOLE PUNCH UNIT ...
Страница 470: ...INSTALLATION GUIDE FOR BUILT IN FINISHER ...
Страница 483: ...INSTALLATION GUIDE FOR JOB SEPARATOR ...
Страница 491: ...INSTALLATION GUIDE FOR FAX System ...
Страница 507: ......
Страница 508: ......


