4
11
A
10
5
5
5
5
9
9
8
8
8
8
7
5
6
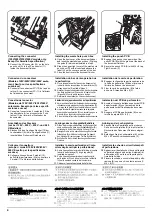
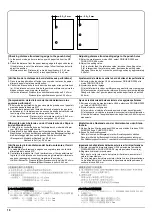
4.
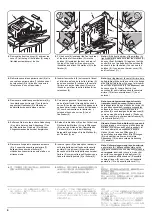
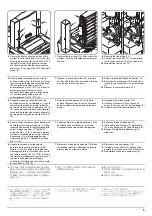
Remove the front top cover (6) and rear top
cover (7) at the top of the finisher (5) using a
flat-blade screwdriver or the like.
5.
Fit the hooks (8) located at the front and rear
of the bottom of the mailbox (A) into the
notches (9) located at the front and rear of
the top of the finisher (5) as shown in the
illustration and attach the mailbox (A) to the
finisher (5).
Note:
Lift the front and rear of the mailbox (A)
lightly upward to make sure that the mailbox (A)
does not float. If it floats, fit it again so that the
hooks (8) do not protrude from the notches (9)
as shown in the illustration. (You can see the
notches (9) if you remove the rear cover (10)
and front cover (11).)
4.
Retirer le couvercle supérieur avant (6) et le
couvercle supérieur arrière (7) situés en haut
du retoucheur (5) à l’aide d’un tournevis à
tête plate ou d’un outil équivalent.
5.
Insérer les crochets (8) se trouvant à l'avant
et à l'arrière au fond de la boîte à lettres (A)
dans les encoches (9) situées à l'avant et à
l'arrière en haut du retoucheur (5) comme
illustré ici, puis fixer la boîte à lettres (A) au
retoucheur (5).
Note:
Lever légèrement l'avant et l'arrière de la
boîte à lettres (A) de sorte que celle-ci ne bouge
plus.Si la boîte à lettres (A) bouge, la réinsérer
de sorte que les crochets (8) ne dépassent pas
des encoches (9) comme illustré. (Les
encoches (9) sont visibles quand le couvercle
arrière (10) et le couvercle avant (11) sont
enlevés.)
4.
Remueva la cubierta superior delantera (6) y
la cubierta superior trasera (7) en la parte
superior del finalizador (5) utilizando un
destornillador de punta plana o similar.
5.
Coloque los ganchos (8) ubicados en la
parte inferior frontal y trasera del buzón de
correo (A) en las muescas (9) ubicadas en la
parte superior frontal y trasera del finalizador
(5), como se muestra en la ilustración, y
coloque el buzón de correo (A) en el
finalizador (5).
Nota:
Levante ligeramente la parte frontal y
trasera del buzón de correo (A) hacia arriba
para asegurarse de que el buzón de correo (A)
no queda suspendido.Si quedara suspendido,
colóquelo de nuevo de forma tal que los
ganchos (8) no sobresalgan de las muescas (9),
como se muestra en la ilustración. (Puede ver
las muescas (9) si quita la cubierta trasera (10)
y la cubierta frontal (11).)
4.
Entfernen Sie die vordere obere Abdeckung
(6) und die hintere obere Abdeckung (7) an
der Oberseite des Finishers (5) mit einem
Klingenschraubendreher oder dergleichen.
5.
Setzen Sie die Haken (8) an der Vorder- und
Rückseite der Mailbox (A) in die Öffnungen
(9) vorne und hinten an der Oberseite des
Finishers (5) ein, wie in der Abbildung
dargestellt, und bringen Sie die Mailbox (A)
am Finisher (5) an.
Hinweis:
Heben Sie die Mailbox (A) vorne und
hinten etwas an, um sicher zu stellen, dass die
Mailbox (A) nicht pendelt.Falls Sie pendelt, ist
sie noch einmal so einzupassen, dass die
Haken (8) nicht aus den Öffnungen (9)
hervorstehen, wie abgebildet. (Die Öffnungen
(9) sind sichtbar, wenn man die hintere
Abdeckung (10) und die vordere Abdeckung
(11) abnimmt.
4.
Rimuovere il coperchio superiore anteriore
(6) e il coperchio superiore posteriore (7)
dalla parte superiore del finitore (5)
utilizzando un cacciavite a punta piatta, o un
attrezzo simile.
5.
Inserire i ganci (8) posizionati sul davanti e
sul dietro della parte di fondo della casella
postale (A), negli incavi (9) posizionati sul
davanti e sul dietro della parte superiore del
finitore (5) come mostrato nell’illustrazione, e
fissare la casella postale (A) al finitore (5).
Nota:
Sollevare leggermente la parte anteriore
e posteriore (A) della casella postale verso
l’alto per accertarsi che non si sposti.Nel caso in
cui si sposta, inserirla di nuovo in modo che i
ganci (8) non sporgano fuori dagli incavi (9),
come mostrato nell’illustrazione. (È possibile
vedere gli incavi (9) se si rimuove il pannello
posteriore (10) e il pannello anteriore (11).)
4. フィニッシャ (5) 上部の天カバー前フタ
(6) 、天カバー後フタ (7) をマイナスドライ
バなどで取り外す。
5. メールボックス (A) 下部の前後にあるフッ
ク (8) をフィニッシャ(5) 上部の前後にあ
る切り欠き部 (9) にイラストのように挿入
し、メールボックス (A) をフィニッシャ(5)
に取り付ける。
注意
メールボックス (A) の前後をそれぞれ上方向に
軽く持ち上げ、メールボックス (A) が浮かない
ことを確認する。
浮く場合は、イラストのようにフック (8) が切
り欠き部 (9) に乗り上げないように、再度取り
付けること。
(後カバー(10)、前カバー(11) を外
すと、切り欠き部 (9) が見えます)
4.
用一字形螺丝刀拆下装订器
(5)
上部的顶罩前
盖板
(6)
和顶罩后盖板
(7)
。
5.
如图所示,将位于邮箱
(A)
底部前后侧的卡扣
(8)
嵌入位于装订器
(5)
顶部前后侧的凹口
(9)
,并将邮箱
(A)
安装至装订器
(5)
。
注:
轻轻向上提升邮箱
(A)
的前后侧,确保邮箱
(A)
未
处于悬浮状态。
如果处于悬浮状态,请重新安装,勿使卡扣
(8)
从
凹口
(9)
中凸出,如图所示。
(
拆下后盖板
(10)
和
前盖板
(11)
之后可以看到凹口
(9)
。
)
Содержание TASKalfa 420i
Страница 1: ...SERVICE MANUAL Published in May 2010 842KS113 2KSSM063 Rev 3 TASKalfa 420i TASKalfa 520i ...
Страница 4: ...This page is intentionally left blank ...
Страница 10: ...This page is intentionally left blank ...
Страница 14: ...2KR 2KS This page is intentionally left blank ...
Страница 224: ...2KR 2KS 1 4 66 This page is intentionally left blank ...
Страница 328: ...2KR 2KS 2 3 30 This page is intentionally left blank ...
Страница 371: ...INSTALLATION GUIDE FOR PAPER FEEDER ...
Страница 381: ...INSTALLATION GUIDE FOR 3000 SHEETS PAPER FEEDER ...
Страница 436: ...INSTALLATION GUIDE FOR CENTER FOLDING UNIT ...
Страница 450: ...INSTALLATION GUIDE FOR MAILBOX ...
Страница 458: ...INSTALLATION GUIDE FOR HOLE PUNCH UNIT ...
Страница 470: ...INSTALLATION GUIDE FOR BUILT IN FINISHER ...
Страница 483: ...INSTALLATION GUIDE FOR JOB SEPARATOR ...
Страница 491: ...INSTALLATION GUIDE FOR FAX System ...
Страница 507: ......
Страница 508: ......


