1
2
3
4
5
6
7
8
9
10
11
12
9-24
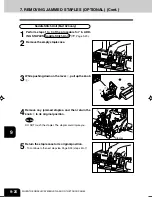
WHEN THE GRAPHIC SYMBOLS FLASH ON THE TOUCH PANEL
3
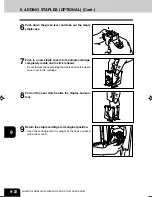
Pull out the grip of the saddle stitch holder ( ) to-
ward you and turn it ( ) 90
o
clockwise in the direc-
tion of the arrow.
4
Remove the empty staple case and set a new one.
- Replace both staple cases with new ones.
- Do not remove the seal holding the staples before the staple
case is set in the cartridge.
5
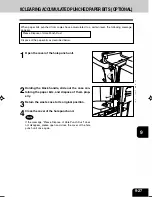
Return the saddle stitch holder and the saddle
stitching unit to their respective original positions.
6
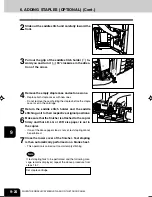
Make sure that the finisher is attached to the copier
firmly and that LD, LG or LT-R size paper is set in
the copier.
- If one of the above paper sizes is not set, test stapling cannot
be performed.
If test stapling fails to be performed and the following mes-
sage remains displayed, repeat the above procedure from
steps 1 to 7.
Set staple cartridge
2
Slide out the saddle stitch unit carefully toward the
front.
7
Close the lower cover of the finisher. Test stapling
is then automatically performed on a blank sheet.
- This operation is carried out to avoid empty stitching.
6. ADDING STAPLES (OPTIONAL) (Cont.)
Summary of Contents for e-studio 211c
Page 1: ......
Page 2: ......
Page 61: ...1 2 3 4 5 6 7 8 9 10 11 12 3 18 SETTING OF BASIC COPY MODES ...
Page 71: ...1 2 3 4 5 6 7 8 9 10 11 12 4 10 COLOR EDITING AND ADJUSTMENT ...
Page 93: ...1 2 3 4 5 6 7 8 9 10 11 12 USING THE EDITING FUNCTIONS 5 22 ...
Page 129: ...1 2 3 4 5 6 7 8 9 10 11 12 6 36 USING THE SPECIAL FUNCTIONS ...
Page 199: ...1 2 3 4 5 6 7 8 9 10 11 12 9 30 WHENTHE GRAPHIC SYMBOLS FLASH ONTHETOUCH PANEL ...
Page 222: ...1 2 3 4 5 6 7 8 9 10 11 12 11 17 MEMO ...
Page 223: ...1 2 3 4 5 6 7 8 9 10 11 12 11 18 SPECIFICATIONS OPTIONS MEMO ...
Page 224: ......
Page 225: ......


