53
Cha
p
ter 5
Procedure for Settin
g
In
sp
ection Conditions
5.4 Adjusting White Balance
An object in white is sometimes recognized as the one in yellowish or reddish white depending on the
light. Adjusting a white balance corrects color dispersion that occurs due to the using light, so that the
white object looks white. But, if a red LED is used for capturing a white paper, you cannot adjust the white
balance.
1. Take something white such as white paper with the camera and capture
the image.
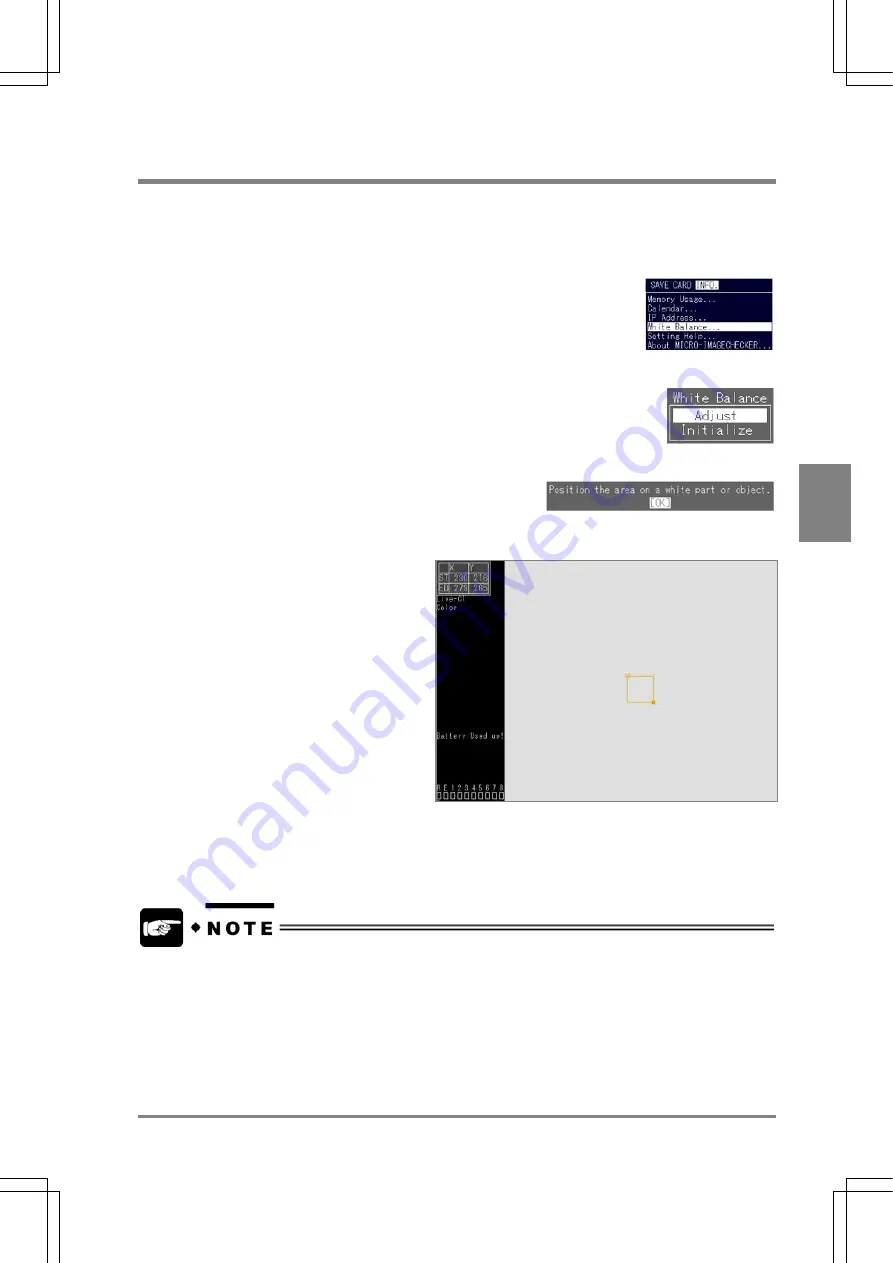
2. Choose "INFO." > "White Balance" from the menu bar.
3. Select "Adjust" from the White Balance menu.
4. When the message shown below appears, press the ENTER key.
5. Set a rectangular area to “White” in the Image Display area.
Set the area in the following order:
"Move" > "Start Point" > "End Point".
6. Slowly open/close the aperture of the
lens until "OK" appears in the status
display area. When "OK" is displayed
in the area, take your hands off the
aperture.
7. Press the ENTER key while OK is
displayed.
Now adjustment of white balance is
completed.
8. Select "SAVE" > "Save" from the
menu bar to save the modified
settings.
Be sure to save the settings in the AX40 before power is removed from the devise, because the data that
have not been saved are erased.
•
If you connect one camera to the AX40 (Camera = Camera 1), adjust white balance while
displaying an image saved as Memory 1. (If you displayed an image saved as Memory 2,
white balance cannot be adjusted.)
•
If you use two cameras, adjust white balance for each image saved as Memory 2 and
Memory 1. Also, if you changed to another camera, re-adjust white balance.
Summary of Contents for Micro-Imagechecker AX40
Page 9: ...1 Names and Functions of Parts Chapter 1 Chapter 1 Names and Functions of Parts ...
Page 15: ...7 Installation and Wiring Chapter 2 Chapter 2 Installation and Wiring ...
Page 25: ...17 Input and Output Interface Ports Chapter 3 Chapter 3 Input and Output Interface Ports ...
Page 42: ......
Page 70: ......
Page 94: ...86 Setting Checkers Chapter 6 6 7 Gray Edge 6 7 1 Menu Options ...
Page 108: ...100 Setting Checkers Chapter 6 6 9 Smart Matching 6 9 1 Menu Options ...
Page 184: ......
Page 185: ...177 TOOL Chapter 8 Chapter 8 TOOL ...
Page 192: ......
Page 193: ...185 Environment Settings Chapter 9 Chapter 9 Environment Settings ...
Page 215: ...207 Chapter 10 Parallel Communication Chapter 10 Parallel Communication ...
Page 225: ...217 Chapter 11 RS232C Communication Chapter 11 RS232C Communication ...
Page 255: ...247 Chapter 12 Ethernet Communication Chapter 12 Ethernet Communication ...
Page 261: ...253 Chapter 13 Using a CF Card Chapter 13 Using a CF Card ...
Page 279: ...271 Chapter 15 Troubleshooting Chapter 15 Troubleshooting ...
Page 292: ...284 Specifications and Product Numbers Chapter 16 Camera Cable Keypad ...
Page 294: ...286 Specifications and Product Numbers Chapter 16 ANM88161 ANM88251 ANB842NL Unit mm ...


